
Blog, Dressmaking
Mastering Tucks in Fabric for Dressmakers
You pull a bodice from the cutting table, hold it up to the light, and realise the shape is almost right, but not quite. The fabric has room to move, the neckline needs quiet control, and the front needs something more precise than a loose gather or a blunt dart. That is where tucks in fabric earn their place, because they can shape, flatter, and finish a garment without taking the cloth apart.
Understanding Tucks and How They Differ From Pleats
A lot of sewing trouble starts with a naming problem. A dressmaker reads a pattern, sees a tuck, and treats it like a pleat or a dart, then wonders why the garment sits differently on the body.
The basic difference in the sewing room
A tuck is folded fabric secured by crosswise stitching or a later seam, whereas a pleat is folded and typically stitched or pressed into position, and a dart removes fabric to create body contouring. That distinction matters because tucks keep the cloth, they don't carve it away. The result is a fold that can add surface texture, change width, and still leave the cloth structurally intact.
Practical rule: use a tuck when you want texture and some shaping without cutting out fullness, use a dart when you want to remove fabric to fit the body, and use a pleat when you want controlled fullness that opens back out.
In dressmaking terms, tucks sit neatly on yokes, cuffs, children's clothing, blouses, and decorative panels. They also suit garments that need a small fit adjustment while still looking finished. That makes them especially useful when you want the fabric itself to do more than just cover the body.
Why the distinction matters for fit
Pleats and tucks can look similar from a distance, but they behave differently. A tuck stays secured by stitching, so it usually keeps the fold line more definite and more permanent. A pleat, by contrast, is designed to open or fall away in a particular direction.
That difference becomes obvious on a sleeve head, a bodice front, or a cuff. If you need the panel to look neater and slightly narrower, tucks can do the job. If you need volume that still moves, pleats make more sense.
UK sewing resources and museum collections treat these details as part of a long textile tradition, not just decorative fuss. The stitch line, the fold depth, and the way the cloth holds shape all change the result, which is why the technique deserves more respect than a passing mention in a pattern envelope.
Popular Tuck Styles for Garments and Homewares
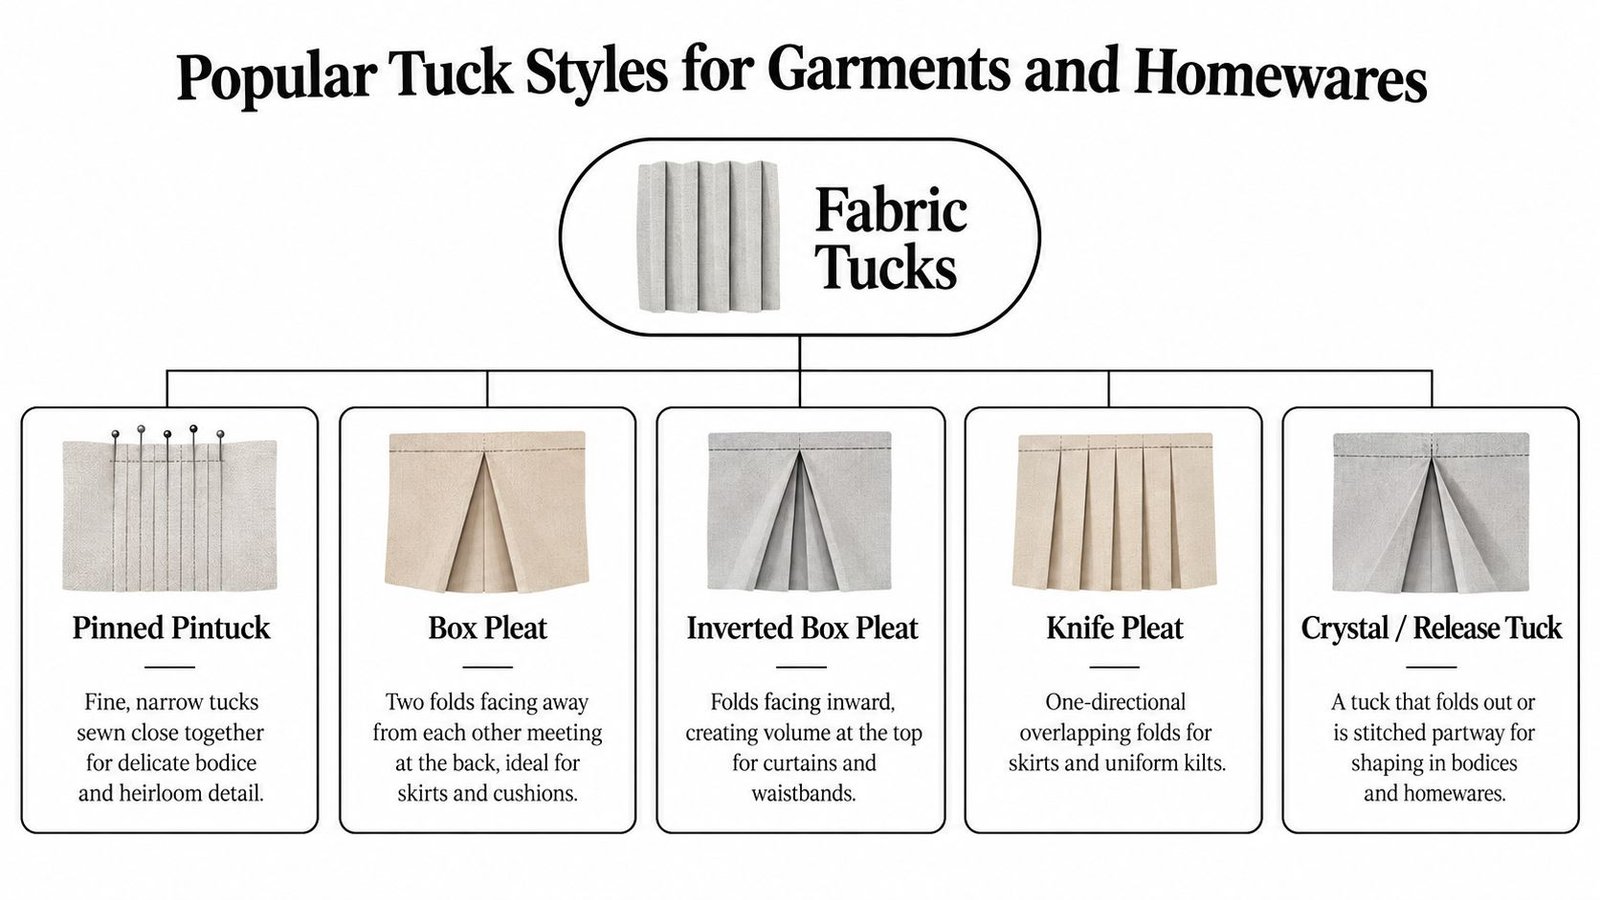
A row of tucks can look crisp, soft, vintage, architectural, or subtly decorative depending on the fold and the stitch. The same pattern piece can give a completely different mood once the tuck style changes.
The styles you'll actually use
Standard tucks are parallel folds held by stitching, and the common versions include pin tucks, centred tucks, tapered tucks, curved tucks, and shell tucks. Pin tucks are the most delicate of the group. They work well when you want a close, fine ridge on a blouse front, a child's dress, or a heirloom-style panel.
Centred tucks sit a little bolder on the surface, so they're useful when a garment needs visible texture without becoming fussy. Tapered tucks help shape the fabric subtly as the fold changes length. Curved tucks are more sculptural because the fold changes direction, while shell tucks create a scalloped edge that suits vintage touches and homewares.
Curved and shell tucks do more than decorate. They change the eye line of the garment, which can make a plain panel look intentional instead of flat.
Where each style earns its place
For soft furnishings, straight rows of tucks can give a cushion cover a neat, finished look. On garments, the same idea can narrow a bodice front or give a yoke more interest without adding bulk at the seam. Pin tucks are especially useful when you want rhythm and fine texture, while shell tucks work better as a finish or edge feature.
The video below is worth a look if you want to see those ideas handled visually before you cut into your own cloth.
A good mental shortcut is this. If the fabric needs gentle texture, think pin tuck. If it needs decorative shaping, think centred or tapered tuck. If you want something more expressive, curved or shell tucks give you that extra movement.
Calculating Fabric Allowance and Marking Your Folds
Tucks catch people out because they consume more cloth than they seem to at first glance. If you mark them after cutting, you can end up with a panel that's too narrow, especially across the bust or upper arm.
The calculation that saves fabric
Each tuck needs an allowance equal to twice its finished width, because the fabric is folded back on itself before the stitching is made. So a finished 5 mm tuck needs about 10 mm of extra fabric per tuck. If you plan ten of them, that is about 100 mm of extra width before seam allowances are even considered. The maths is simple, but the consequence is big if you skip it.
| Fabric Suitability for Tucks | Tucking Behaviour | Best Use Case |
|---|---|---|
| Cotton lawn | Holds a sharp fold and a clear stitch line | Pintucks, blouse fronts, yokes |
| Linen | Takes a defined tuck but may look slightly softer than cotton | Summer tops, cuffs, vintage styling |
| Viscose | Can shift and flatten unless handled carefully | Temporary tucks, soft shaping |
| Jersey | Stretches and can distort under stitching | Limited use, test first on scraps |
| Deadstock blends | Behaviour varies, so test for body and recovery | Alterations, sample-led garment design |
Mark first, stitch second
A simple, repeatable approach saves a lot of seam ripping. Mark the fold lines first, then snip the neckline and hem points so you can match them accurately later. Stay-stitch the neckline if it might stretch, then complete the tucks before sewing any dart that crosses the same area.
A practical sequence is to press the centre crease first, fold the fabric wrong sides together, and stitch a few millimetres from each fold. If the tuck stops part-way down the garment, secure the end with reverse stitching so it doesn't open during wear or laundering.
Make the sample before you cut the final piece. A row of evenly spaced test tucks tells you more about the cloth than any pattern note can.
That sample matters even more if you're working with marked stripes or checks. Tucks shift pattern repeat, so the layout needs checking before the scissors come out. If you need a visual reference for stretch display textiles while planning samples and samples cards, Stretch Fabric Displays, Stretch Banner is a useful materials page to compare behaviour and presentation ideas.
Choosing the Right Fabric for Tucking
Some fabrics fold beautifully, others fight you. That's not a flaw in the technique, it's just the cloth telling the truth about its own structure.
What the fibres do
Experiments involving cotton, silk, and synthetic fibres found that fibre characteristics directly affect the quality and stability of formed fabric structures, meaning identical tuck measurements can produce different results in crisp cotton, slippery silk, or stretchy jersey. In plain sewing-room terms, that means one tuck rule doesn't fit every cloth.
Crisp cotton lawn usually gives the cleanest line because it holds its fold and resists collapse. Lightweight linen is also dependable, though it can look a little softer after washing. Viscose can be elegant, but it needs more care because it slips under the presser foot and doesn't always keep a razor-sharp ridge.
What works and what doesn't
Stretchy jersey is rarely the first choice for formal tucks because the fabric can distort as soon as the needle goes in. If you do use it, test the needle, stitch length, and stabilising method on scraps first. Deadstock and mixed fibres can be excellent, but they need checking for recovery, thickness, and drape before you commit to the full garment.
| Fabric Type | Tucking Behaviour | Best Use Case |
|---|---|---|
| Cotton lawn | Crisp, stable, easy to press | Pintucks, heirloom-style detail |
| Linen | Structured but slightly softer after pressing | Shirts, cuffs, summer garments |
| Viscose | Slippery, needs basting and careful handling | Soft shaping, light decorative rows |
| Jersey | Unstable for narrow tucks unless stabilised | Occasional experimental detail |
| Blended deadstock | Variable, sample first | Alterations, one-off garments |
A useful habit is to test shrinkage, needle marks, and pressing response on a scrap before cutting the main piece. That tells you whether the fabric will support a row of neat folds or turn them into a wavy line. For home dressmakers, that small test prevents a lot of disappointment later.
Using Tucks for Shaping and Low-Waste Alterations
Tucks are often treated like decoration first and construction second. That misses one of their best uses, which is adjusting shape while keeping fabric on the table instead of in the bin.
Shaping without overcutting
The UK government's Level 3 Garment Maker apprenticeship standard explicitly lists darts, gathers, and tucks as garment-shaping techniques, which confirms what experienced dressmakers already know, tucks belong in the shaping toolkit. A row of tucks can reduce the effective width of a panel, control fullness over the bust, or make a bodice sit more neatly at the waist.
That same idea is useful in alterations. A loose sleeve can be brought in with a tuck instead of a cut-down seam. A long bodice can be shortened visually without removing the original hem. In both cases, the garment keeps more of its original cloth, which helps preserve resale and reuse value.
Repair-minded sewing
Tucks also work as a low-waste intervention when a strip of cloth has faded or lost shape. A carefully placed tuck can hide a damaged line, take in an oversized section, or rescue a garment that would otherwise be written off. Temporary hand tacking is useful here because it lets you test the fit before making the change permanent.
More Sewing carries fabrics and sewing supplies that suit this kind of decision-led making, including cottons, viscose and Tencel blends, jerseys, denims, and ex-designer deadstock. It also offers sewing guidance for tucks and pintucks on blouse fronts and yokes, which makes it a practical place to look when you want a cloth that can hold the fold.
The real advantage of a tuck is flexibility. It can decorate a garment, but it can also rescue one.
A tuck is not the answer for every alteration. It's a poor choice on highly elastic jersey, bulky coated cloth, or anything so thick that the folded section becomes hard and clumsy. But on the right fabric, it gives you shaping, texture, and a cleaner waste profile than a heavy cut-down alteration.
Pressing and Stitching Tips for a Professional Finish
Even a perfectly measured tuck will look amateur if the pressing is sloppy. The fold has to be set, the line has to stay straight, and the stitching has to respect the cloth.
Pressing that keeps the fold honest
Press the centre crease first, then fold the fabric wrong sides together and press again before stitching. Use a pressing cloth on delicate surfaces so you don't leave shine, especially on darker cottons and smooth synthetics. Steam helps, but only if you hold the fold long enough for the crease to settle before you move the iron away.
The recommended sequence is to stay-stitch the neckline, complete the tucks before sewing a dart, press the centre crease first, fold the fabric wrong sides together, and stitch a few millimetres from each fold. That order stops the fold from wandering when later seams cross the area.
Stitching consistency
Sew the outermost tuck first, then work in the same direction for every remaining tuck. That habit reduces shifting and helps the rows look parallel rather than slightly canted. When using a twin needle for pintucks, a little extra upper-thread tension helps the ridge stand more proudly on the surface.
Pin at intervals perpendicular to the fold if the fabric wants to slide. Keep your stitching distance from the fold edge consistent, because even a small drift is obvious once you've sewn several rows together. If one tuck ends part-way down the garment, secure it with reverse stitches so the end doesn't fray open.
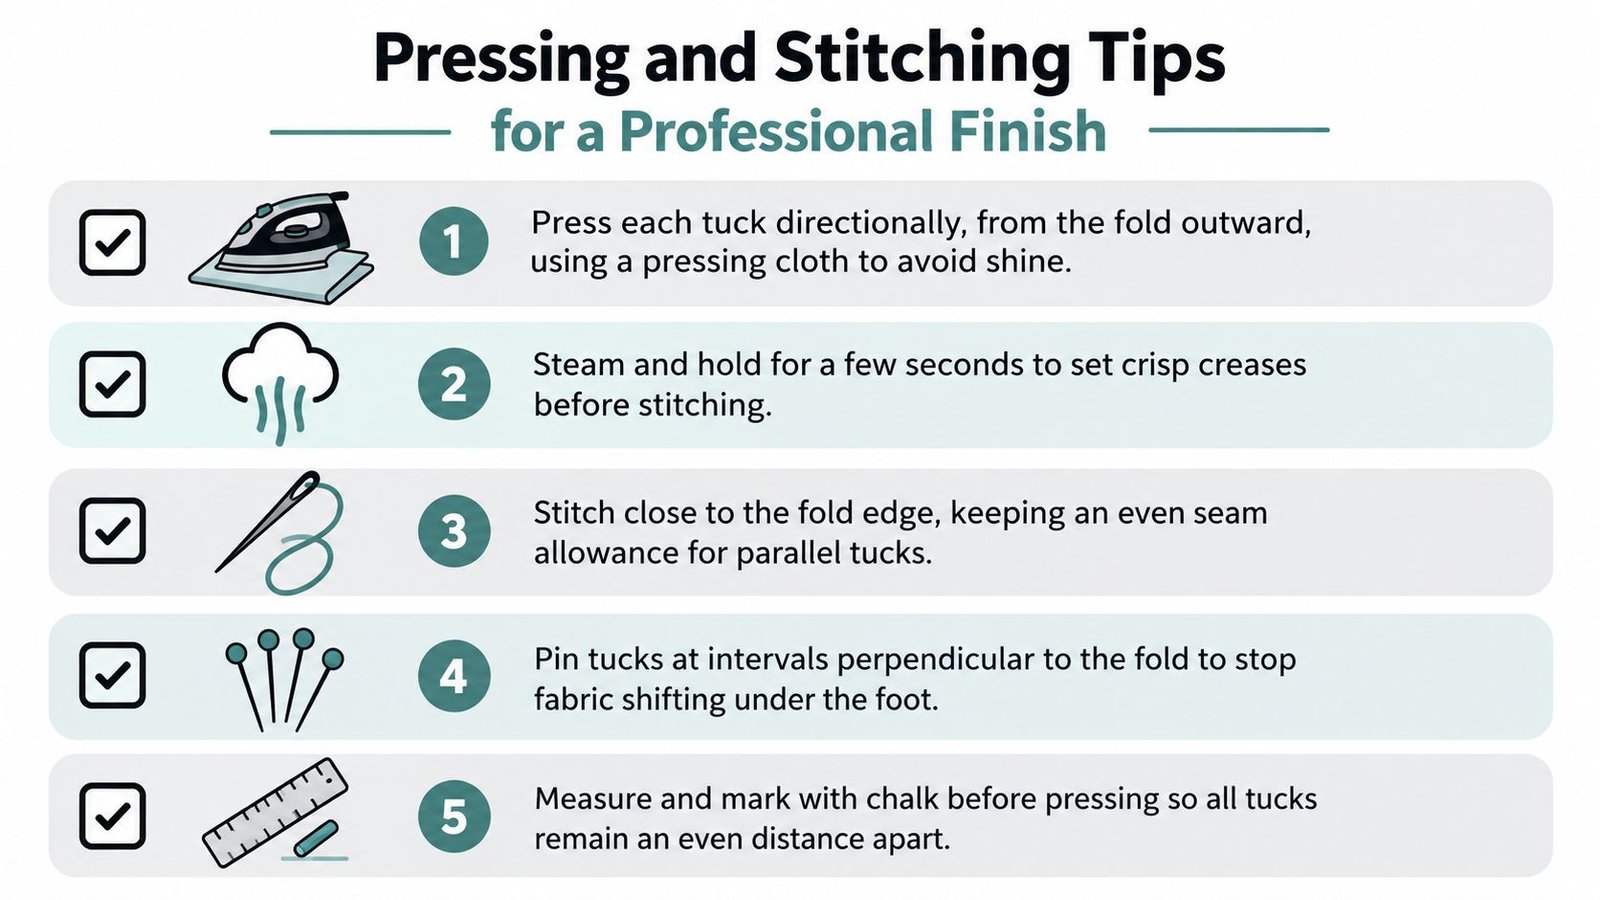
A neat tuck line is never an accident. It comes from clear marking, controlled pressing, and stitching the same way every time.
More Sewing is a useful place to look when you want fabrics, tools, and practical sewing guidance that support careful garment making. If you're planning tucks in fabric for a blouse, yoke, or alteration, visit More Sewing to find materials and supplies that fit the job and keep your next project moving cleanly from sample to finished piece.
