
Blog, Dressmaking
How to Sew a Seam by Hand Without a Machine
A trouser seam has split after a wash, your favourite jacket lining is opening at the shoulder, or the last seam of a cushion cover is coming undone. You don't need to wait for a sewing machine to fix it. With a needle, suitable thread and a little control, you can make a neat, durable seam by hand.
The important choice isn't whether you can sew. It's which stitch suits the fabric and the stress placed on that seam. A running stitch is useful for temporary work and lightly stressed seams, while a backstitch gives much more support where the garment pulls as you move. Good preparation matters just as much as the stitch itself, from marking the seam allowance to finishing the thread so it can't unravel.
Why Hand Sewing Still Matters
Hand sewing is a practical repair skill, not a second-best version of machine sewing. It lets you work inside a garment, reach a small opening, preserve delicate fabric and make a controlled repair without setting up equipment. A hand-sewn seam can also be the sensible choice for a quiet evening repair, a small alteration or a section that would be awkward to feed beneath a machine foot.
UK repair habits show how useful this remains. Repair Week research reported that residents repaired approximately 14 items per person in the previous year, while clothing and textile repairs accounted for about 413 million repairs nationally. The same research found that 47% of surveyed people were prepared to replace a button, and 31% learned repair skills through online tutorials. These figures are reported by Repair Week research on repairable items.
The essentials are straightforward:
- Even stitches: Regular spacing helps the seam lie flat and prevents weak gaps.
- Suitable thread: The thread should work with the fabric rather than cutting into it or looking conspicuous.
- A suitable needle: A fine needle helps with lightweight cloth, while thicker fabric needs a stronger needle that won't bend.
- Controlled tension: Pull the thread until it rests against the fabric, not until the fabric gathers.
- A secure finish: The final stitches or knot must hold the seam under movement and washing.
Practical rule: A strong seam is built from alignment, regular stitching and calm tension. Speed comes later.
Hand sewing was once a normal household skill. Before mechanisation, garment production in the UK was widely carried out as a cottage industry, with goods made in people's homes. The Museum of English Rural Life describes basic sewing as common, particularly for repairing clothes and making undergarments. Producing a blazer could take approximately 14 hours, while a shirt could take around 10 hours, as recorded in the museum's history of clothing production before and after mechanisation.
Fabric was valuable, so people repaired, altered and reused garments rather than discarding them. The same source notes that almost all surviving eighteenth-century garments show evidence of reuse. Your small repair follows that same practical instinct. You're keeping useful cloth, labour and a favourite item in service.
Tools and Thread You Need to Begin
Put everything within reach before threading the needle. Searching for scissors halfway through a repair encourages you to leave pins in the fabric or pull the thread awkwardly.
You need sharp fabric scissors, hand-sewing needles, thread, pins, tailor's chalk or a removable fabric pen, small thread clippers and a thimble. A ruler helps when you need to mark a precise seam line. Choose a needle that matches the cloth. A fine needle is comfortable for lawn, silk-like viscose and tightly woven lightweight fabric, while denim and coat-weight wool need a sturdier needle with enough strength to pass cleanly through the layers.
Thread colour is easier to judge against the fabric than from the reel. Lay a single strand across the right side and view it in ordinary daylight. If two colours seem close, choose the one that disappears rather than the one that looks brightest on the reel.
Preparing the thread
Use good-quality polyester thread for general garment repairs because it has useful strength and a little flexibility. Cotton thread can suit cotton patchwork and some natural fabrics, particularly where you want a softer, less elastic thread. For a wider discussion of thread choices, including thread intended for piecing and quilting, consult this guide to piecing and longarming thread.
Cut a manageable length rather than filling the thread with knots. A thread that is too long catches on the fabric and tangles behind your work. Cut the end at an angle, which gives you a sharper point for threading and reduces the fuzzy fibres that can form at a blunt cut. If the thread drags across coated or very tightly woven cloth, a little beeswax can help it pass smoothly and lie under control.
A small knot at the tail needs to grip without becoming a visible lump. Thread the needle, leave a short tail, and tie the tail securely with the working thread. On fine fabric, avoid a large knot that can show on the right side. You can bury a starting knot between the layers when the construction allows, or begin inside the seam allowance and secure the thread with a few controlled stitches.
Keep the work surface calm
Place the fabric flat, with enough light to see the weave. Keep pins in a small dish or pincushion, and use the thimble when pushing through several layers. If the thread begins to twist, let the needle hang and allow the thread to unwind before continuing. That small pause prevents the tight loops and knots that make beginners blame the needle.
Preparing the Fabric Before You Stitch
A neat seam begins before the needle enters the cloth. Turn the pieces so the right sides face each other, then match the edges, notches and important points. Work with the wrong side facing up when possible, because that keeps the marked stitching line visible.
Measure the seam allowance with a ruler and mark it using tailor's chalk or a removable pen. Don't rely on the raw edge unless the pattern specifically makes that safe. A typical home-sewing seam allowance in the UK is about 1.5 cm, while industrial construction often uses approximately 1.0 cm to reduce fabric waste. Seam allowances should be trimmed on curved seams or bulky areas so the finished seam lies flat, as explained in BBC Bitesize's guidance on seam allowances.
Follow the pattern's stated allowance before choosing your own. Curves at a neckline or armhole often need a narrower allowance to reduce bulk, while a straight side seam can usually accommodate a broader one. Mark the line at several points, then join the marks rather than trying to judge the distance by eye.
Hold the layers together
Insert pins vertically across the seam, with the heads extending beyond the edge so they can be removed easily as you sew. Match the endpoints first, then secure the centre and any notches. On a long side seam, slippery lining or soft viscose can shift even when it looks aligned. Use temporary tacking with long, loose stitches when pins aren't enough.
A running stitch is the natural starting point for a stable woven fabric such as cotton or lightweight linen. It works well for a cushion cover or a lightly stressed side panel. Pass the needle through both layers, keeping each stitch on the marked line. For a trouser crotch, an underarm or a bag handle, choose backstitch instead because those areas receive repeated pulling.
Mark a useful guide
If your fabric has a visible weave, count the threads crossed by the needle to keep each stitch consistent. Otherwise, let the chalk line do the work. The line is more reliable than the raw edge, especially when the edge has stretched or been cut slightly unevenly.
Once the seam is sewn, press it gently before trimming anything. Pressing reveals whether the pieces have shifted and helps you spot a section that needs unpicking while the repair is still easy to correct.
Running Stitch and Backstitch Step by Step
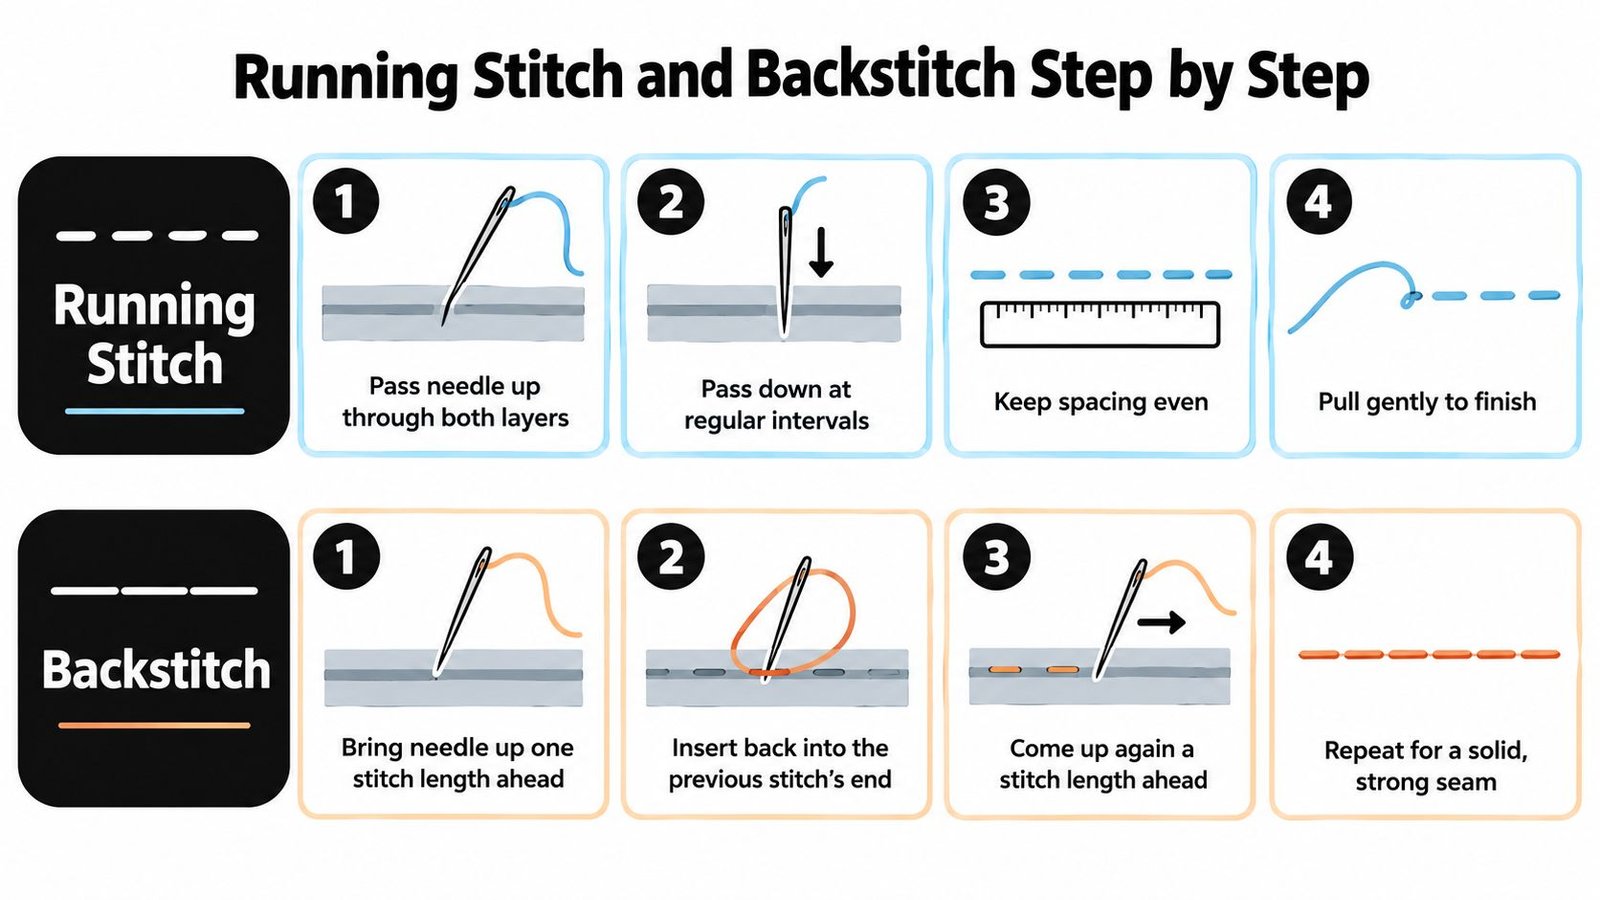
Running stitch and backstitch look similar from a distance, but they behave differently under strain. Running stitch moves in a simple up-and-down rhythm, leaving small gaps between the individual stitches on the underside. Backstitch overlaps the previous stitch, creating a more continuous line that better resists pulling.
Running stitch for stable, low-stress seams
Place the fabric right sides together and align the marked lines. Start roughly 1.3 cm, or 1/2 in, inside the seam, then make two or three running stitches towards the marked beginning. Reverse direction over those stitches to anchor the seam without adding a bulky knot at the very end.
Continue along the line, passing the needle up through both layers and down again at regular intervals. For general construction, stitches of about 6 to 12 mm, or 1/4 to 1/2 in, are a useful range. Use shorter stitches on fine or lightweight fabric, where a long stitch can gape and look uneven.
Keep the thread relaxed. If you pull hard after each stitch, the seam may pucker. At the finish, make several small backstitches, then pass the needle through a nearby stitch to form a concealed knot. Trim the thread close to the knot, taking care not to cut the fabric.
For a cotton cushion cover, running stitch is a sensible choice for a straight side seam that won't receive much strain. It is also useful for temporary construction because it can be removed without leaving a dense line of thread.
Backstitch for areas that pull
Backstitch follows a different rhythm. Bring the needle up one stitch length ahead, then insert it back at the end of the previous stitch. Bring it up again one stitch length forward, and repeat. Each new stitch reaches back to meet the last one.
The result is a firm, nearly continuous seam. Use it for a trouser crotch, underarm, fitted waist seam, repaired split or bag handle. It takes longer than running stitch, but the extra thread coverage gives the seam more resistance when the fabric moves.
| Stitch | Strength | Visibility | Best use |
|---|---|---|---|
| Running stitch | Light to moderate | Can be visible on the seam line | Stable woven seams, temporary work and cushion covers |
| Backstitch | Strong | More visible if the thread contrasts | Crotches, underarms, bag handles and repairs |
| Tacking | Temporary | Easy to remove | Holding slippery or matched layers before final sewing |
Before committing to the garment, test the stitch on a scrap cut from the same fabric. Tug the sample gently and look for gaps, puckering or thread breakage. The strongest-looking stitch isn't automatically the right answer if it makes a delicate fabric distort.
For a visual reminder of the two movements, use this short demonstration:
Matching the Stitch to the Seam
Stop thinking of stitches as a list to memorise. Think about what the seam has to do. A temporary seam needs to release easily, a side seam needs steady support, and a turned opening needs a finish that doesn't announce itself on the outside.
| Stitch | Best for | Strength | Visibility |
|---|---|---|---|
| Running stitch | Basic seams and temporary construction | Light to moderate | Usually visible along the seam line |
| Backstitch | Crotches, underarms, repairs and other stressed seams | Strong | Visible if the thread contrasts |
| Whipstitch | Neatening a raw edge or joining folded edges | Moderate | Can show at the edge |
| Slip stitch | Closing a hem or turned opening | Light to moderate | Nearly invisible from the outside |
| Ladder stitch | Closing a turned opening with folded edges | Moderate | Becomes largely concealed when drawn gently |
The decision becomes clearer with a garment example. On a linen top, use backstitch for a side seam if the seam will take movement and strain. At the hem, use slip stitch so the thread catches only a small amount of the garment and doesn't create a visible row on the right side. If a seam needs temporary support while you match stripes or a lining, use tacking first and remove it after the permanent stitch is secure.
Choose for the stress point: The neatest stitch isn't always the strongest stitch, and the strongest stitch isn't always the kindest to the fabric.
Seam allowance still matters here. Mark the line before stitching, pin the matching points and keep the layers aligned. If the fabric has a curve, don't force a straight edge to behave like one. Trim or notch the allowance after sewing where appropriate, without cutting into the stitches, so the fabric can spread or turn without puckering.
Press the seam according to the construction. A straight seam often benefits from being pressed open, while a narrow seam or a particular garment design may call for both allowances to be pressed to one side. Use the pattern and the fabric's behaviour as your guide, not a habit applied to every project.
Scotland's textile-technology specification treats tacking, running stitch, backstitch, ladder stitch, slip hemming, blanket stitch, herringbone and buttonhole stitch as distinct skills. That range is useful because no single hand stitch solves every problem. The right question is always, “What does this section need to withstand, hide or hold?”
Pressing and Finishing the Seam
Pressing is not the same as ironing. Ironing moves back and forth to remove creases, while pressing places the iron down briefly to set the shape without stretching the fabric. A hand-sewn seam can be technically secure and still look homemade if you skip this stage.
Start on the wrong side with a warm iron suitable for the fabric. Use a pressing cloth on delicate viscose, fine cotton or any surface that may shine. Press the seam flat first. This settles the stitches and shows whether the seam is straight. Then press the allowances open, or to the side if the garment's construction calls for that finish.
Check the outside before trimming
Turn the piece right side out and inspect the seam in ordinary light. Look for a ridge caused by a bulky knot, a line pulled tight enough to gather the fabric, or a section where the needle caught only one layer. These faults are easier to correct now than after the raw edge has been trimmed.
Raw edges on fraying fabric need attention. A machine zigzag can neaten them quickly, but a hand-sewn whipstitch is useful when no machine is available. Take small diagonal bites over the edge without pulling them so tightly that the fabric rolls. On a lightly fraying cloth, the stitch holds the fibres in place. On a very loose weave, consider a wider finish or a construction that encloses the raw edge.
A French seam is a useful example for sheer cotton or viscose. First join the fabrics with the wrong sides together using a narrow seam, then trim the allowance carefully, press it and fold the fabrics so the raw edge is enclosed. Stitch the second seam with the right sides together, then press it to one side. The finished seam contains the fraying edges and gives the inside of a lightweight top a clean appearance.
If the garment needs more than a local repair, accurate hand sewing works best alongside careful fitting. A guide to alterations for the perfect fit can help you think about where a seam should sit before you alter it.
Quick correction: If the fabric puckers, unpick the last few stitches, relax the thread and sew again. Pressing won't repair tension that was too tight.
Common Mistakes and How to Fix Them
Most hand-sewing problems come from a small mismatch between stitch, fabric and tension. Check the sample first, then inspect the work from both sides as you go.
- Puckered seam: The thread has been pulled too tightly, or the stitches are too long for the cloth. Remove the affected section, let the layers relax and use a shorter, more even stitch.
- Visible knot: The knot is too large or sits on the outside. Start inside the seam allowance, bury the knot between layers where possible or secure the thread with small stitches instead.
- Skipped layer: The needle has passed through only one fabric piece. Lift the work after every few stitches and check that the needle has entered both layers.
- Wavy seam: The fabric shifted during sewing. Add pins, use temporary tacking on slippery cloth and follow the marked line rather than the raw edge.
- Broken or heavy-looking thread: The thread weight doesn't suit the fabric. Replace it with a finer thread for delicate cloth or a stronger option for dense, stressed seams.
- Fraying edge: The raw edge needs a finish. Use a whipstitch by hand or trim and neaten it in a way that keeps the seam flat.
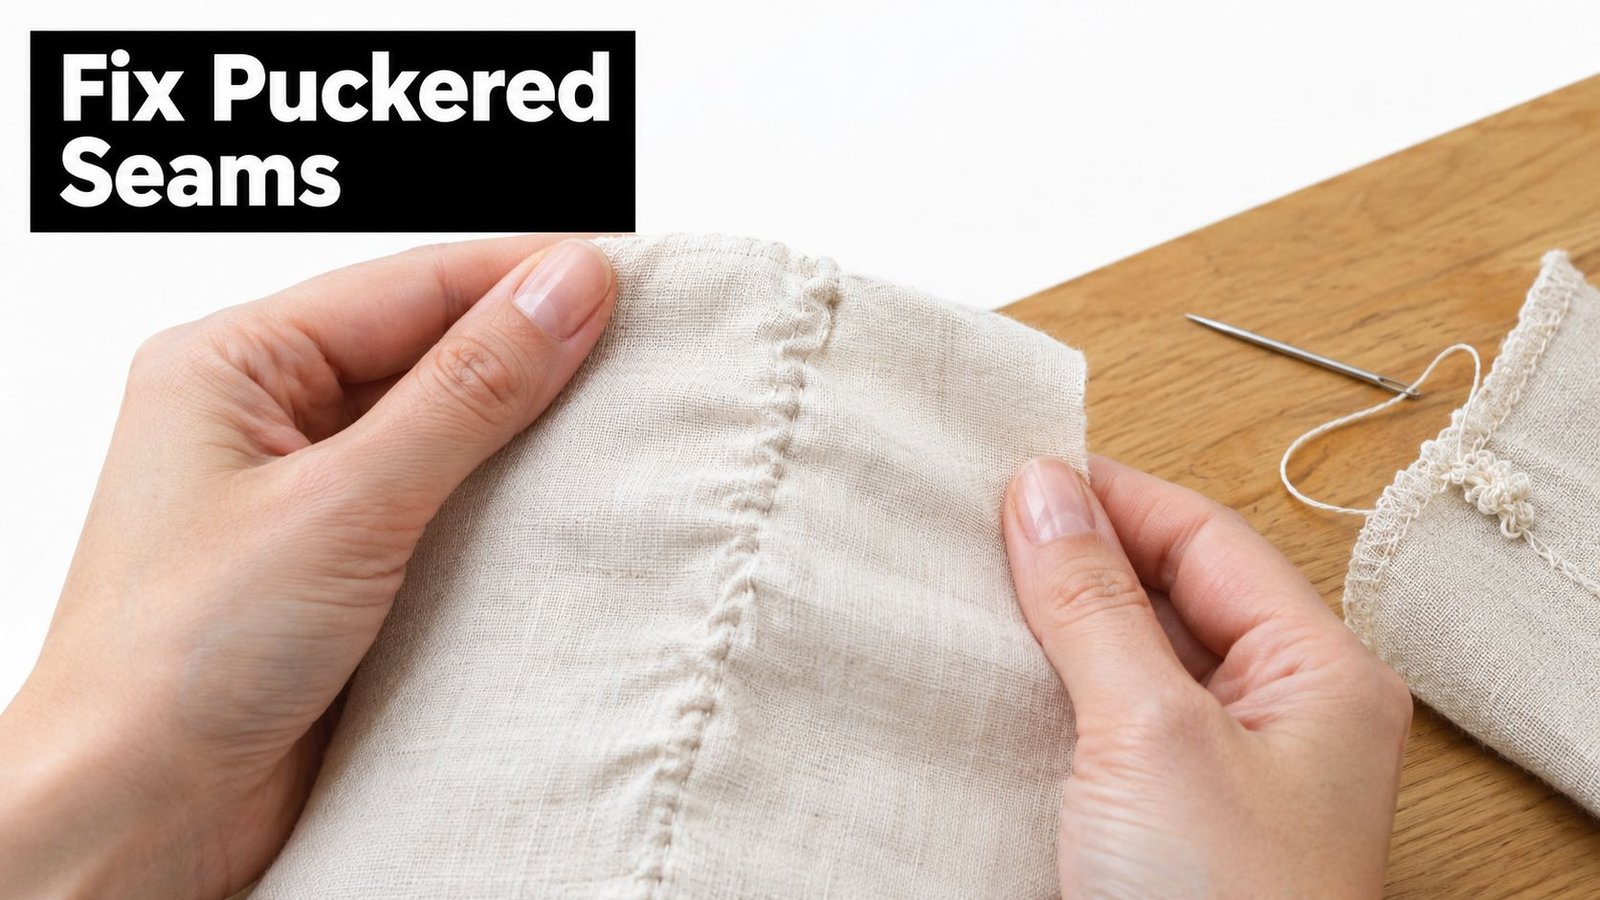
Use the pattern's stated seam allowance rather than assuming one size suits every project. 15 mm is common in UK and European dressmaking, while curved areas such as necklines and armholes commonly use approximately 6 to 10 mm to reduce bulk. Pulling the thread tightly after every stitch distorts the seam, and uneven tension produces puckering, as explained in this UK hand-sewing guide.
For a hem, choose slip stitch when the outside needs to stay discreet. For a straight cushion-cover seam, running stitch may be enough. For a side seam or repair that will be pulled, use backstitch. For a turned opening, ladder stitch can close the gap neatly. If you're preparing repeated samples or production instructions, this guide to tech pack mistakes is a useful reminder that small construction details need to be recorded clearly.
Before sewing the actual garment, make a sample with the same fabric, thread and number of layers. Tug it gently, press it and inspect both sides. That short test tells you more than choosing a stitch from a list.
More Sewing offers quality fabrics, haberdashery and ready-to-sew kits for practising everything from a simple running stitch to a carefully fitted garment repair. Visit More Sewing to find suitable cloth, needles, thread and sewing supplies for your next hand-sewn project.
