
You've got a length of crisp white cloth on the cutting table, scissors in hand, and a pattern pinned and ready. It looks stable. It feels predictable. Then you wash the finished piece and the hem rides up, the bodice tightens, or the curtain no longer meets the sill. White cotton sheeting is dimensionally active, especially along its length, and how you dry it matters as much as how hot you wash it. I would always test the exact wash and dry routine on a sample first. A twenty minute check like that saves a project you can't recut.
White Cotton Sheeting Weights and Thread Counts at a Glance
White cotton sheeting is plain woven cotton cloth sold in a range of weights for bedding, linings, toiles, and household sewing. The name tells you the fibre and colour, but it doesn't tell you how the cloth will drape, mark, or hold a seam. For that you need two numbers, weight in GSM and, used carefully, thread count. They measure different things and they aren't interchangeable.
| Fabric type | Typical weight (GSM) | Weave | Common use |
|---|---|---|---|
| Lawn | 60-90 | Plain | Blouses, linings, light covers |
| Calico (plain sheeting) | 100-150 | Plain | Toiles, mock-ups, costume |
| Percale bedding | 100-140 | Plain 1:1 | Bed sheets and pillowcases |
| Sateen bedding | 120-180 | Satin | Smooth, drapey bed sheets |
| Heavy sheeting | 180-250 | Plain or twill | Dust covers, curtains, theatre props |
Two Different Thread Counts
Bedding labels usually give threads per square inch. A 300 count sheet adds the warp and weft threads in a square inch together, and sellers can inflate the result by counting plied yarns separately. It is partly a marketing figure, and a higher number doesn't always mean a stronger or softer sheet.
Dressmaking cloth is described differently, as threads per inch in each direction. Say a calico is listed as 68 x 68. That's 68 warp ends and 68 weft picks per inch, a balanced, open plain weave that marks easily and sews without a fight. You can feel that balance between your fingers. It tells you about openness and stability, not luxury.
A high bedding count therefore doesn't make a fabric better for sewing. A dense percale that feels crisp on a bed can resist a needle and pucker at a shaped seam, while a lower count calico will take chalk lines, pins, and unpicking all afternoon.
Use GSM to Compare
Practical rule: GSM tells you how heavy the cloth will feel in your hand and how it will drape over a table edge, so compare sheeting by GSM, not by thread count.
Work from the job backwards. Find the weight band for your project in the table, then check whether you need the flat stability of plain weave or the float and sheen of sateen. Say you're lining a summer jacket. You start at lawn weight so the lining doesn't drag the shell down. Say you're covering furniture in storage. You start at heavy sheeting, because a light cloth will snag and go slack. The weave decision follows the weight, not the other way round.
What White Cotton Sheeting Is and How Its Weave Changes It
Hold plain weave up to the light and you can read its basket-like grid. Each weft thread goes over, then under, each warp thread in turn. That simple interlacing produces the familiar flat, matt surface of most white cotton sheeting.
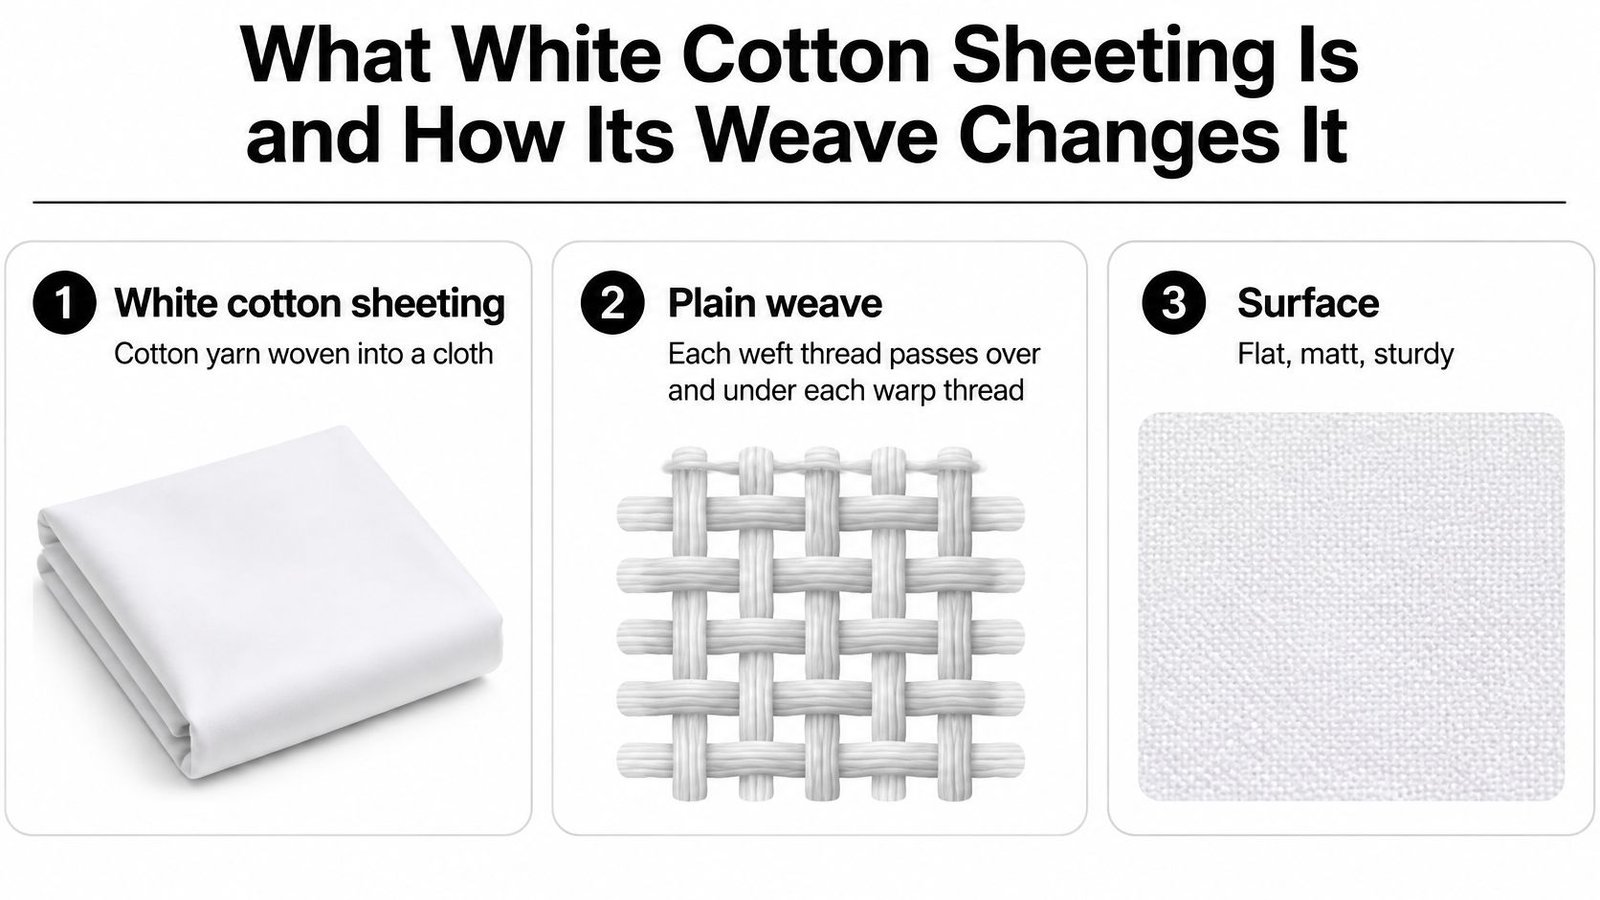
Plain weave cuts cleanly with shears or a rotary cutter, holds a pressed edge, and grips at a seam so stitches don't slip. The trade-off is visible creasing. Fold a percale or calico square, press it, and the line stays obvious, which is useful for hems and pleats but unforgiving if you press in the wrong place.
Sateen works differently. Longer yarn floats sit on the surface, typically passing over several threads before dipping under, so light catches a smooth sheen and the cloth drapes in soft folds. It feels lovely for bedding, but those floats snag more readily and cut edges fray faster. You'll need to finish edges promptly and handle pattern pieces rather than tossing them in a pile.
If you want to see how those interlacings look under magnification before you handle yardage, this clip is worth pausing on.
Twill is the third weave you'll meet. Look for a diagonal rib, the same structure behind denim and cotton drill. It drapes a little more than a comparable plain weave and hides marks well, but the diagonal can creep during cutting if you don't keep the grain square.
Calico at the Cutting Table
Calico isn't a separate weave. It's a plain weave cotton with a stiffer hand that suits toiles and mock-ups because you can draw balance lines on it in pencil, pin through it repeatedly, and see where a garment pulls. It stands away from the body more than lawn does, so don't judge final drape from a calico toile if your fashion fabric is fluid.
One line of history explains why this cloth is so ordinary now. Cotton only began to displace linen in British homes after 1800, and the University of Hertfordshire research on cotton and linen sheets records cotton at 25% of stolen sheets identified by material in the 1820s in West Riding of Yorkshire Quarter Sessions records, with linen still the majority. Low cost, absorbency, washability, and suitability for mechanised weaving drove the shift.
Judge the three weaves by behaviour, not by name or colour. Cut a 10 cm square, fold it, sew a short seam, and wash it. I would choose the cloth that behaves through all four steps, not the one that looks whitest on the roll.
Choosing Weight and Weave for Your Project
Start with the finished object, then work backwards to weight. A sheet, a toile, and a dust cover may all be white cotton, yet they fail in completely different ways.
| Project | Suggested GSM | Weave | Watch for |
|---|---|---|---|
| Bed sheets | 100-180 | Plain or satin | Pre-wash to avoid size change after the first wash |
| Toiles and mock-ups | 100-150 | Plain (calico) | Cut on grain and press flat before marking |
| Garment linings | 60-100 | Plain | Check shrinkage against the outer fabric before cutting |
| Dust covers | 180-250 | Plain | Breathability; allow for shrinkage in size |
| Curtains and blinds | 180-250 | Plain or twill | Measure after washing; consider a lining for light |
| Costume and props | 180-250 | Plain | Test for bleaching or dye risk on a hidden corner |
When Two Options Look Close
Percale and sateen overlap in weight, so use the job to split them. If the item will be hot washed and tumble dried week after week, I would choose the heavier plain cloth, because its tighter interlacing tolerates agitation and pressing better. If drape is the point, choose sateen and accept the extra edge finishing.
Fitted garments need another rule. Make a calico toile first, fit it, transfer your alterations, and if the final garment is also plain cotton, cut it in the same cloth. You remove one unknown. Say a bodice toile fits perfectly in calico but you cut the final version in a much lighter lawn. The lawn will collapse differently over the bust and your fitting work partly goes to waste.
For linings, test the pairing, not the cloth in isolation. Pin lawn to a scrap of your outer fabric, wash both together if that's the planned care, and check whether one has pulled the other out of square. For curtains and dust covers, breathability matters more than a pristine finish. A dense, coated, or tightly packed cloth traps damp air against wood and upholstery, while an ordinary heavy sheeting lets air move.
Three Questions Before You Buy
- How will it be washed: Temperature, machine cycle, detergent, and whether it'll ever see a tumble dryer.
- How will it be handled: Drawn daily as curtains, folded as bedding, worn close to the skin, or left over furniture for months.
- How exact must the size stay: A loose dust cover tolerates change that would ruin a fitted bed sheet or a blind cut to a recess.
Our fabric range includes calico, cotton lawn, plain cotton, and linings among wider categories such as Cotton, Deadstock Fabric, and Viscose & Tencel, so you can compare weights side by side rather than guessing from names alone.
Follow a short decision path. Name the project, pick the GSM band, choose the weave, confirm the washing and drying plan, and keep the care information with your project notes. As a first step, order a swatch of the sheeting you're considering, cut a 40 cm test square, and put it through the pre-wash routine before you commit to metres.
How the Drying Method Changes Shrinkage and Feel
Most sewists obsess over wash temperature and treat drying as an afterthought. That's backwards for cotton. The University of Bolton investigation into laundering and dimensional change found that tumble-dryer agitation accounted for 34% of dimensional change and distortion, while the washing spin cycle contributed 24%. Mechanical action rearranges the structure, so size changes even when the yarn itself hasn't.
| Drying method | Dimensional effect | Feel and creasing | Best use |
|---|---|---|---|
| High-heat tumble drying | Highest risk; agitation drives most of the change | Stiffer, more creasing | Only when the finished item will be tumble dried |
| Low-heat tumble drying | Lower risk, still measurable | Some creasing | Household covers and everyday items |
| Line drying | Lower risk; fabric relaxes | Softer; may crease if hung wet | Toiles and fitted pieces |
| Flat drying | Lowest risk; most control | Smoothest, least stiff | Curtain panels and fitting samples |
Read that with its caveat attached. That investigation examined 100% cotton knitted fabrics, not woven sheeting, so treat the percentages as a direction of travel rather than a precise forecast for calico or percale. Knits move more than wovens, but they reveal the mechanism clearly, which is useful when you're deciding what to test.
What Each Method Does in Practice
High-heat tumble drying combines heat with sustained tumbling, giving you the most distortion and a noticeably stiffer hand. Sheets come out creased in ways a quick shake won't fix. Only build it into your test if the finished item will be dried that way. Testing harsher than real life can send you compensating for shrinkage that'll never happen.
Low-heat tumble drying is a practical middle ground for household covers and everyday bedding. Change is smaller but still measurable on a marked square, so don't assume low heat means no heat effect.
Line drying lets the cloth relax under its own wet weight. Peg sheeting by a hem or selvedge, smooth it with your palms, and you'll reduce creases without forcing it flat. A heavy wet curtain panel can pull at peg points, so spread the weight over several pegs.
Flat drying on a clean towel or mesh rack gives you the most control. You can ease the grain square with your hands, check the corners sit at right angles, and leave it undisturbed, which is exactly what a fitting sample or curtain panel needs.
Test with the drying method you plan to use for the finished item, not the one you prefer or the one that's convenient today.
If an item will be laundered often, run five wash-and-dry cycles on your sample before you trust its dimensions. The fabrics in that Bolton work reached fully relaxed dimensions after five cycles under appropriate conditions, so a single wash may still leave movement in the cloth. If you want the background on the fibre behaviour behind this, the explanation of why cotton shrinks in the wash from SouthShore Fine Linens is a clear companion read.
Press your test sample flat before measuring it. Tumbled cotton can look shorter because it's buckled and stiff. A firm press separates real dimensional change from temporary creasing.
How to Pre-Wash and Measure Sheeting Before Cutting
A curtain drop cut to the finished length can end up short after its first wash. Test the planned wash-and-dry routine on a sample before cutting, and measure lengthwise and crosswise separately. White cotton sheeting can change more along its length, and the drying method affects both dimensions and feel.
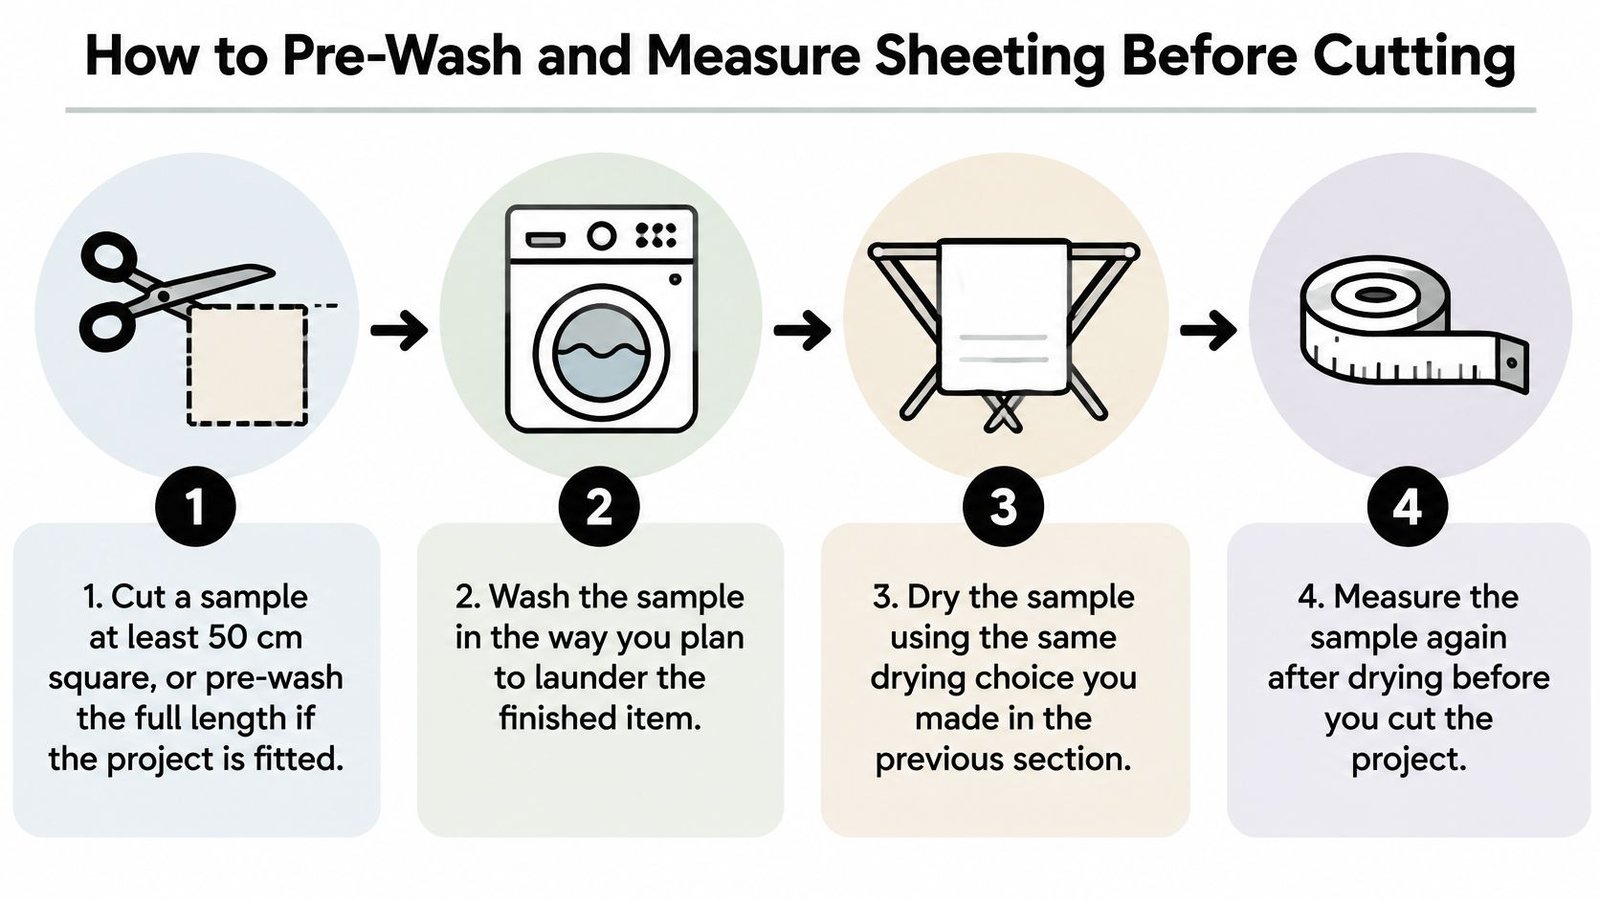
The Eight Step Routine
- Cut your sample: Take at least a 50 cm square, or pre-wash the full length for fitted work. A small offcut may not show uneven finishing across the width.
- Mark a measured square: Draw a 40 cm square with a fabric marker or tacking stitches. Keep one edge parallel to the selvedge (warp) and the other across it (weft).
- Record the starting size: Measure each side twice with a metal ruler. Write the figures on masking tape attached to the sample.
- Wash as planned: Use the detergent, temperature and cycle intended for the finished item. A gentle test wash does not show how cloth will behave in a hotter bedding wash.
- Dry as planned: Use the same method you intend for the finished piece. Switching from tumble drying to line drying can change the result.
- Remeasure and calculate: For each direction, calculate (new measurement minus old measurement) divided by the old measurement, then multiply by 100.
- Press and measure again: Press flat without steam, then remeasure. Creasing can make the cloth appear shorter than it is.
- Allow for any remaining change: A 200 cm curtain drop that shrinks 1.5% lengthwise loses about 3 cm. If you have not pre-washed the full piece, add that amount to the cutting length.
Why the Length Moves Most
Lengthwise grain usually shows more shrinkage than crosswise grain. The University of Manchester record of research on cotton plain fabrics reports warp-direction shrinkage of approximately 1.29-1.71%, compared with 0.002-0.045% in the weft direction after repeated tumble-drying cycles. The same research reports increased bending stiffness and more visible creasing after tumble drying. Press the sample before judging its feel or dimensions.
That difference makes grainline placement important. Keep pattern grainlines parallel to the selvedge, especially for fitted work. Turning a piece crossgrain to save fabric can leave a bodice or blind with uneven shrinkage.
Costume pieces and dust covers can also become a poor fit after laundering. The UK National Archives guidance on managing mixed collections advises washing cotton and calico in advance to remove impurities and prevent later shrinkage from affecting fit. A cover that becomes too short after washing may no longer protect what it was made to cover.
If someone else is laundering the cloth, record the wash and drying conditions so they can be repeated. That is more useful than asking a professional provider of wash and fold services in Singapore to approximate a routine without those details.
Treat 2% or less in both directions as workable for most projects. If either direction exceeds that, wash and dry the full piece before cutting. For fitted bodices, recess blinds and matched curtain pairs, pre-washing the full piece avoids relying on a sample alone.
Cutting, Seams and Pressing White Cotton Sheeting
Once the cloth is washed and measured, your sewing settings decide whether seams sit flat or pucker for the life of the piece. Test every setting on an offcut of the same pre-washed cloth, folded exactly as your seam will be. A single layer test tells you almost nothing.
Needles and Stitch Length
Fit a universal needle size 80/12 for most plain sheeting and calico. It's sturdy enough to pass through two or three layers without deflecting, yet fine enough not to punch visible holes. For lawn, switch to a sharp 70/10. The finer point parts the yarns cleanly and avoids skipped stitches on lightweight cloth.
Set stitch length by weave. Use 2.5 to 3 mm for calico and plain sheeting seams, which gives a strong seam you can still unpick cleanly on a toile. Drop to 2 to 2.5 mm for sateen to reduce pucker along its floaty surface, and loosen your presser foot pressure a touch if your machine allows it so the layers feed evenly.
Seam Finishes That Suit the Cloth
- French seams for lawn linings: Sew wrong sides together at 5 mm, trim to 3 mm, press, then sew right sides together at 7 mm so raw edges sit fully enclosed and won't show through sheer cloth.
- Flat-felled seams for calico toiles and curtain lengths: Press both allowances to one side, trim the under layer, fold the top allowance over it, and edgestitch, giving you a seam that survives repeated fitting and handling.
- Overlocked or narrow zigzag edges for sateen: Finish cut edges before you assemble, because sateen frays quickly and a ragged allowance will creep out of a seam after washing.
Curves need stabilising before you cut them open. Staystitch curved necklines and armholes 5 mm inside the seamline while the piece is still flat, stitching from shoulder to centre on each side so you don't stretch the bias. After sewing the seam, clip concave curves to within 3 mm of the stitching, little snips about 1 cm apart, so the allowance can spread and the curve lies flat instead of pulling into points.
Press each seam as you sew it. Cotton sheeting forgives many things, but a seam that's been sewn over three times unpressed won't sit flat later.
Use a dry iron on the cotton setting and press the seam flat first, then open or to one side, exactly as your finish requires. On sateen, put a pressing cloth between iron and fabric and lift rather than slide the iron, because sliding polishes the floats into shiny patches that catch the light. A tailor's clapper, or even a clean block of wood pressed down firmly, sets a crease on heavy sheeting better than repeated iron passes.
Hems repay the same care. Turn a double 2 cm fold for bed sheets, pressing each fold before you stitch so the edge doesn't roll under the foot. If you're scaling that hem up into bedding projects, the walk-through of duvet cover sewing for farmhouse bedrooms from Farmhouse World shows the same double-fold logic worked at full bed size. For curtains, turn a double 5 cm fold, which adds useful weight at the bottom edge, improves the hang, and gives you fabric to let down if a later wash takes a little more length. Mitre the corners by folding at 45 degrees, press, and slipstitch by hand so no machine stitching crosses the front.
Reading Care Labels and Storing White Cotton
Care labels give useful cleaning instructions, but UK textile law requires fibre-content labelling, not care labels. The Liverpool City Council Trading Standards advice on textile labelling explains that many manufacturers follow BS EN ISO 3758 voluntarily. If a care label is missing, test your intended routine on a sample before washing the whole piece.
| Symbol | Meaning | What to do |
|---|---|---|
| Triangle with a cross | Do not bleach | Avoid chlorine bleach; test any brightener on a hidden seam first |
| Square with a circle | Tumble drying allowed | Choose low or medium heat and remove promptly |
| Square with a cross through the circle | Do not tumble dry | Line dry or dry flat |
| Iron with one dot | Low heat, about 110°C | Iron on the reverse side |
| Iron with two or three dots | Medium (about 150°C) or high (about 200°C) heat | Use a pressing cloth at the higher setting |
| Circle with a cross | Do not dry clean | Follow the washing symbol instead |
| Circle with a W | Professional wet clean only | Take it to a wet-clean specialist |
Read symbols in order: washing, bleaching, drying, ironing, then professional cleaning. A circle with a letter gives a cleaner information about solvents; a W indicates professional wet cleaning. Check the bleach symbol before using whitening products, since a crossed triangle means bleaching is not permitted.
When There Is No Label
- Test a concealed corner: Dab your planned detergent, brightener, or stain treatment on a hidden seam allowance. Check for colour change or yellowing after ten minutes.
- Wash a sample first: Mark a square and measure it, then put the swatch through your planned wash-and-dry routine. Measure again and check for shrinkage, distortion, or surface damage.
- Record the method: Note the temperature, cycle, and drying method with your project notes so you can repeat the routine.
Store sheeting clean and fully dry. Fold it loosely in a breathable, stable enclosure, away from direct light, damp walls, and places where temperature and humidity fluctuate, such as lofts, sheds, and cellars. Damp can cause spotting, while light can fade and weaken the cloth. Handle stored fabric with clean hands, check it periodically for spots or insect activity, and refold it along different lines to avoid permanent creases. Keep the care label or your written washing notes with the fabric.
Order a fabric sample swatch of calico, cotton lawn, or plain cotton from More Sewing, run the marked-square pre-wash test on it, and only then cut with confidence.
