
You've got a raw neckline curling on the table, a packet of 25 mm bias binding open beside the machine, and the tape keeps rolling out of the presser foot before the needle gets anywhere near it. That's usually the moment a home dressmaker starts searching for a bias binder machine.
Here's the short version of what you're about to buy. The attachment saves genuine time when a project needs several metres of binding, and it tests your patience when the edge curves or the fabric stretches. Most of the trouble people blame on the metal comes from the tape, the width match, or the way the fabric is fed. Get those three right and the tool behaves.
What a Bias Binder Machine Does to Your Tape
A bias binder machine is not a machine. It's an attachment that fits the presser-foot shank of the sewing machine you already own, and it folds bias tape around a raw edge while the needle stitches through everything in one pass.
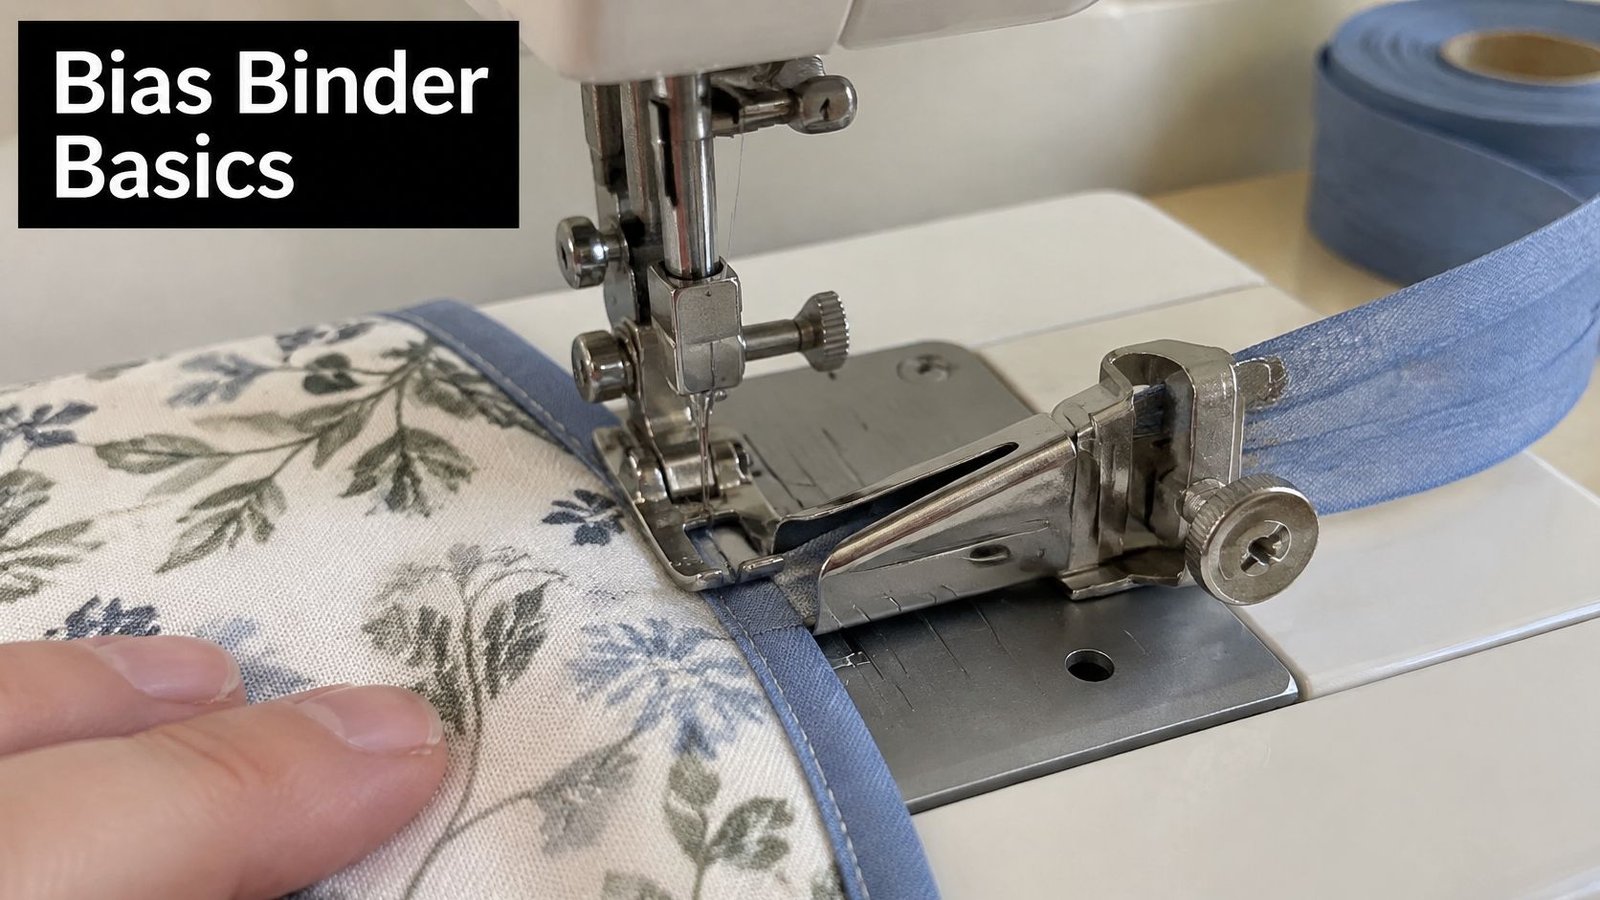
Three parts do the work. The sliding plate, sometimes a shaped channel, holds the tape and turns both long edges inwards. The special presser foot carries that plate and presses the folded tape flat against the fabric. The slot is where the garment edge goes, so the tape wraps around it as it travels.
According to Brother's attachment instructions, a bias binder feeds tape through a shaped channel or sliding plate that folds the binding around the fabric edge while stitching. Trim the tape end to a 45-degree point first: the tapered end enters the guide more easily and reduces bunching. Then feed the tape through the plate, under the foot, and place the fabric in the slot so the tape encloses the edge. Begin slowly, hold the fabric straight in front of the foot, and keep a steady moderate speed rather than pulling.
Say you're binding a scoop neckline in cotton lawn with the raw edge exposed. By hand, that's folding, pinning, stitching one side, wrapping, pressing and stitching the second side, and it's an hour of your evening on a fiddly curve. Through the binder, it's one pass and a topstitch.
The two jobs you'll reach for it most are necklines and armholes on dresses and tops, and the top edge of a bag or tote, where you want a clean, even finish on a heavy seam. The quick test before you commit: if the project needs more than a few metres of binding, the attachment pays you back in time. For a single short hem, hand binding is quicker than setting the thing up.
Choosing the Right Binder Width for Your Tape
The rule that catches many users: the binder and the tape must match exactly. Close enough is still wrong.
A mismatch stops the tape folding symmetrically. One side rides wider than the other, or the tape slips out of the channel altogether, and you can spend an hour adjusting tension on a problem that has nothing to do with tension. Binder attachments are sized by the width of the finished binding they produce, and each size expects tape at the specified width: the standard binder, for example, comes in finished widths of 1/4 inch, 3/8 inch and 1/2 inch, as the guide to Binder Attachments #87 and #88 lays out.
What each width is for
| Binder width | Finished tape width | Best for | Check before stitching |
|---|---|---|---|
| 1/4 inch binder | about 6 mm | Lightweight cotton, lawn, narrow edges | Tape measures 6 mm once folded |
| 3/8 inch binder | about 9.5 mm | Blouse necklines, armholes, general dressmaking | Tape feeds evenly through the plate |
| 1/2 inch binder | about 12.7 mm | Bag straps, heavier fabrics, bound seams | Both folds are captured on scrap |
| Adjustable 5-20 mm | 5-20 mm | One attachment for several widths | Screw is set to the tape width before each use |
The metric figures are approximate conversions, so always measure your tape rather than trusting the packet alone.
The 1/4 inch binder is the one for fine work: a lawn blouse, a chiffon facing, a narrow trim on a camisole where a wider binding would look heavy. The 3/8 inch does most of the work in dressmaking, because a binding near 9.5 mm sits neatly inside a neckline or armhole without fighting the seam allowance. The 1/2 inch handles bag straps, bound seams on a jacket lining and anything with bulk, where a narrow tape would disappear under the fabric.
An adjustable binder folds a range of widths, which sounds like the sensible single purchase. It's a reasonable starting point if you sew several widths, but the trade-off is real: you adjust the screw for every change of tape, and a fixed-width binder is faster and more repeatable once you know your size. For a runner who binds the same neckline finish on every dress, fixed wins. For occasional work across mixed projects, the adjustable earns its place.
Measure the finished tape, not the strip. Bias tape is sold by its folded measurement, so a 1/2 inch tape is 1/2 inch across once folded, not the width of the cut strip.
Setup check before you sew a garment: pull several inches of tape through the attachment, then test-stitch on a scrap to confirm both folded edges are being captured consistently. If one fold is missed on scrap, it will be missed on the neckline.
Cutting Bias Strips That Fold Cleanly
You can't feed a badly cut strip through a binder and expect it to behave. Bias binding is cut at 45 degrees to the lengthwise and crosswise grain, and that diagonal orientation is what gives the strip its flexibility, letting it follow necklines, armholes and rounded hems more smoothly than a straight-grain strip ever will, as Maven Patterns' bias binding tutorial explains.
The working rule is simple arithmetic: cut the strip at four times the finished binding width. A 4 cm strip gives roughly 1 cm of finished binding once folded evenly. That rule is what tells you whether your fabric will stretch far enough for the job.
| Finished width | Strip width to cut | Typical use |
|---|---|---|
| 6 mm (1/4 inch) | 24 mm | Lightweight cotton, lawn, narrow edges |
| 20 mm | 80 mm | Wide decorative binding within the adjustable range |
Finding true bias in five steps
- Square one end of the fabric. A ruler and a rotary cutter save you from a wavy start.
- Fold the cloth diagonally until the crosswise grain runs parallel with the selvedge.
- Press the fold as your guide rather than trusting chalk on a slippery viscose.
- Mark parallel strips from that pressed line at your calculated width.
- Cut and join the strips with diagonal seams, then press the seams open so there's no ridge to jam in the plate.
Two habits improve the result more than any accessory. Press the strip in half lengthwise before it enters the binder, because tape that hasn't been pressed bunches at the entry and folds unevenly. And cut a little more length than you think you need: binding a neckline always eats more strip than the tape measure suggests, especially on a curve.
Press as you cut, not as you sew. A crisp strip with a set fold slides through the channel with light resistance; a soft, curly one catches on the edges of the plate.
How to Set Up and Stitch Binding Step by Step
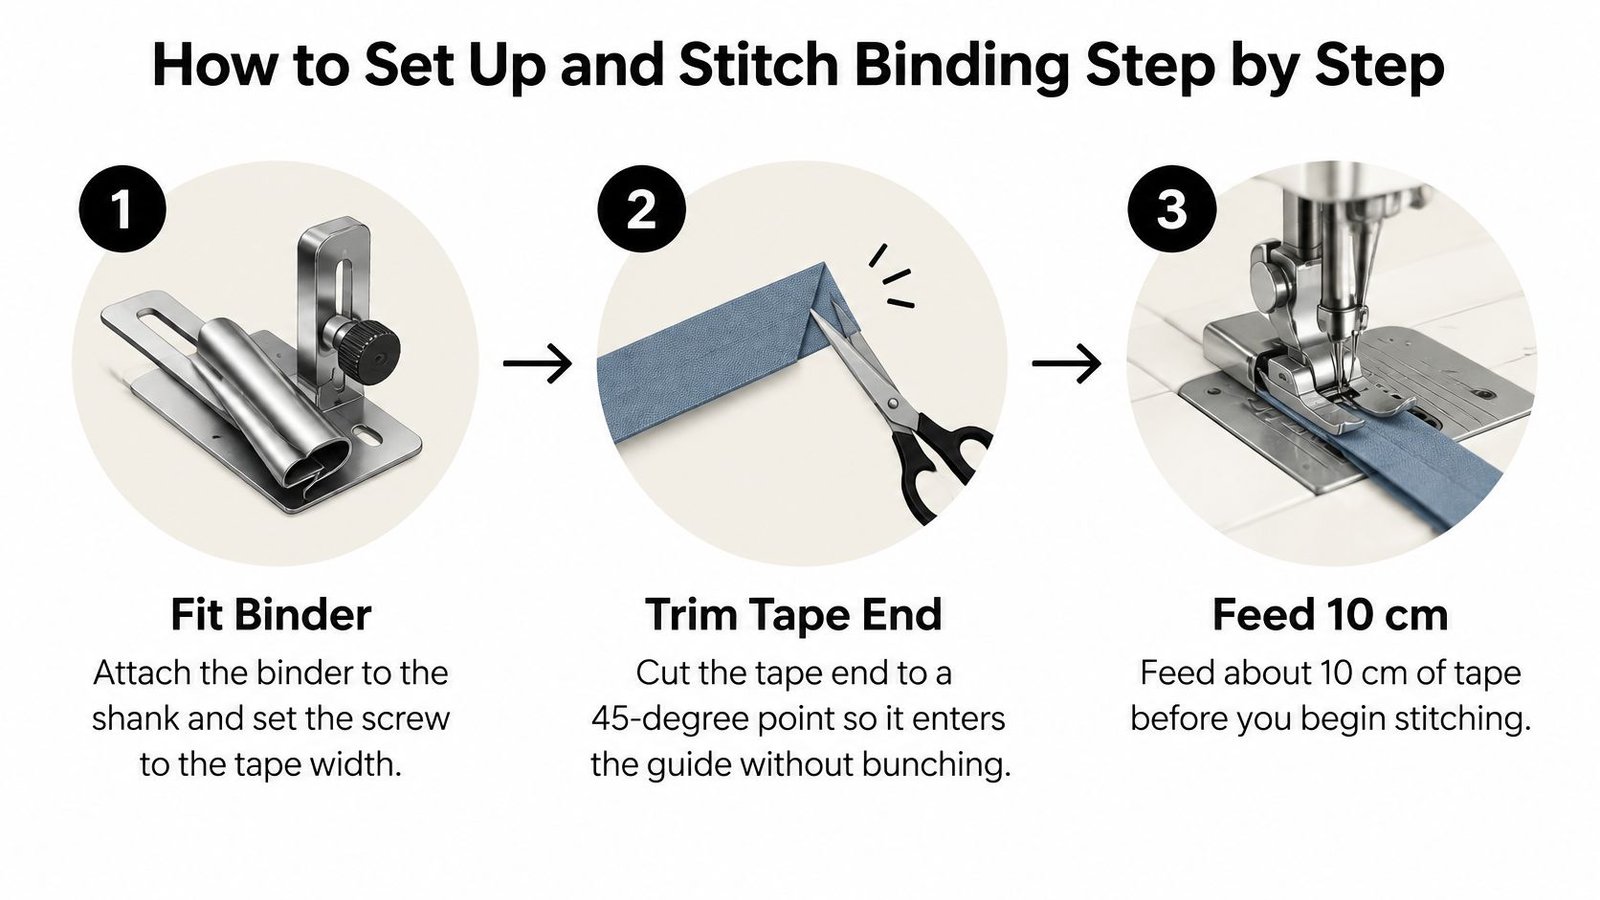
Fit comes before anything else. Check your machine's shank type, low shank, high shank or slant, and confirm the binder is made for that shank, because an attachment that doesn't seat properly will never hold the tape straight no matter how carefully you adjust it.
The stitching routine
- Fit the binder to the shank and set the adjustment screw to the tape width. Test the fit by pulling tape through by hand.
- Trim the tape end to a 45-degree point so it enters the guide without bunching.
- Feed about 10 cm of tape through the sliding plate and under the special presser foot, so there's a tail to hold.
- Slide the fabric edge into the slot until the tape wraps it, keeping the edge flat and fully seated.
- Start slowly. Hold the fabric straight in front of the foot and keep a steady moderate speed instead of tugging the work through.
- Stitch a scrap first and check that both folds are captured before you commit a garment.
- Press the binding towards the garment and topstitch close to its edge for a finish that stays put through washing.
Which stitch to use
An adjustable binder works with a straight stitch, a narrow zigzag or a decorative stitch, so the choice is yours as long as you test it. Husqvarna Viking's notes on its adjustable bias binder describe setting the opening with its screw so it fits the tape width while the fabric edge sits snugly in the groove, inserting the tape from the outside of the bracket and starting slowly. A narrow zigzag earns its place on jersey, where it stretches with the fabric instead of snapping.
Curves need help. When binding a curved edge, snip small V-shaped clips into the seam allowance so the fabric can spread around the curve without puckering, then press, pin and stitch close to the edge.
Guiding, not pulling, is the whole skill. Your hands position the fabric; the feed dogs move it.
What a good result looks like
Even tape on both sides of the edge. No tunnelling, where the fabric escapes the fold and the stitching runs over a bare patch. A stitch line sitting just inside the fold on both faces, so the binding looks deliberate rather than fought with. If you get all three on a 300 mm scrap, the setup is right and you can start on the actual neckline.
Fixing Puckers, Slipping Tape and Uneven Edges
Tape slipping out of the channel is the most common complaint with a binder, and the cause is usually a width mismatch rather than a fault in the machine. Before you touch anything else, hold the tape against the plate and check it is the size the binder is built for. Brother Sewing Shop's UK guidance on binder feet lists the same four suspects, incorrect tape width, insufficiently pressed tape, bias strips cut off-grain and excessive presser-foot pressure, and puts all of them ahead of thread tension as the things to correct first.
| Symptom | Likely cause | Fix |
|---|---|---|
| Tape slips out of the channel | Tape width does not match the binder | Match binder to tape width and pull a short length through first |
| Puckers along a curve | Fabric stretched or strip cut off-grain | Recut the strip on true bias and clip the seam allowance |
| One fold wider than the other | Tape feeds off-centre or presser pressure is too high | Reduce pressure and recentre the tape feed |
| Tape bunches at the entry | Blunt tape end | Trim the tape end to a diagonal point |
| Edges tunnel or stretch | Fabric pulled through the foot | Start slowly and guide the fabric instead of pulling |
Work down that list in order. Puckering on a curve usually means the fabric stretched as it went in, or the strip was cut off-grain and has no give left; recutting on true bias solves it faster than any dial adjustment. One fold consistently wider than the other points to feed alignment or too much presser pressure, and dropping the pressure is a thirty-second change.
Change the tape before you change the tension. Almost every binding fault starts with width, pressing or pressure, and adjusting tension to compensate just moves the problem sideways.
Run an acceptance test before production
Before the garment goes anywhere near the machine, sew a generous length of scrap built from the same fabric layers as the project, then check that both tape edges stay captured, the seam allowance stays covered along the whole run, and nothing tunnels or stretches. A binder's rated tape range is a component specification: it describes the channel, not how your particular fabric will feed through it. That gap is exactly what the scrap test is for.
Keep the test honest. Binding ponte jersey means the scrap is ponte jersey, cut on the same grain and run over a curve as well as a straight edge if the garment has both. If the scrap passes on the stretchiest, curviest part of the job, the setup will hold everywhere else. A moment of checking beats unpicking a finished neckline.
Keeping the Binder Accurate Over Time
A binder is a small piece of metal with tight tolerances, and it rewards five minutes of care after each project. Tape leaves lint and sizing in the channel, and a single fibre build-up is enough to make the fold drag on one side only.
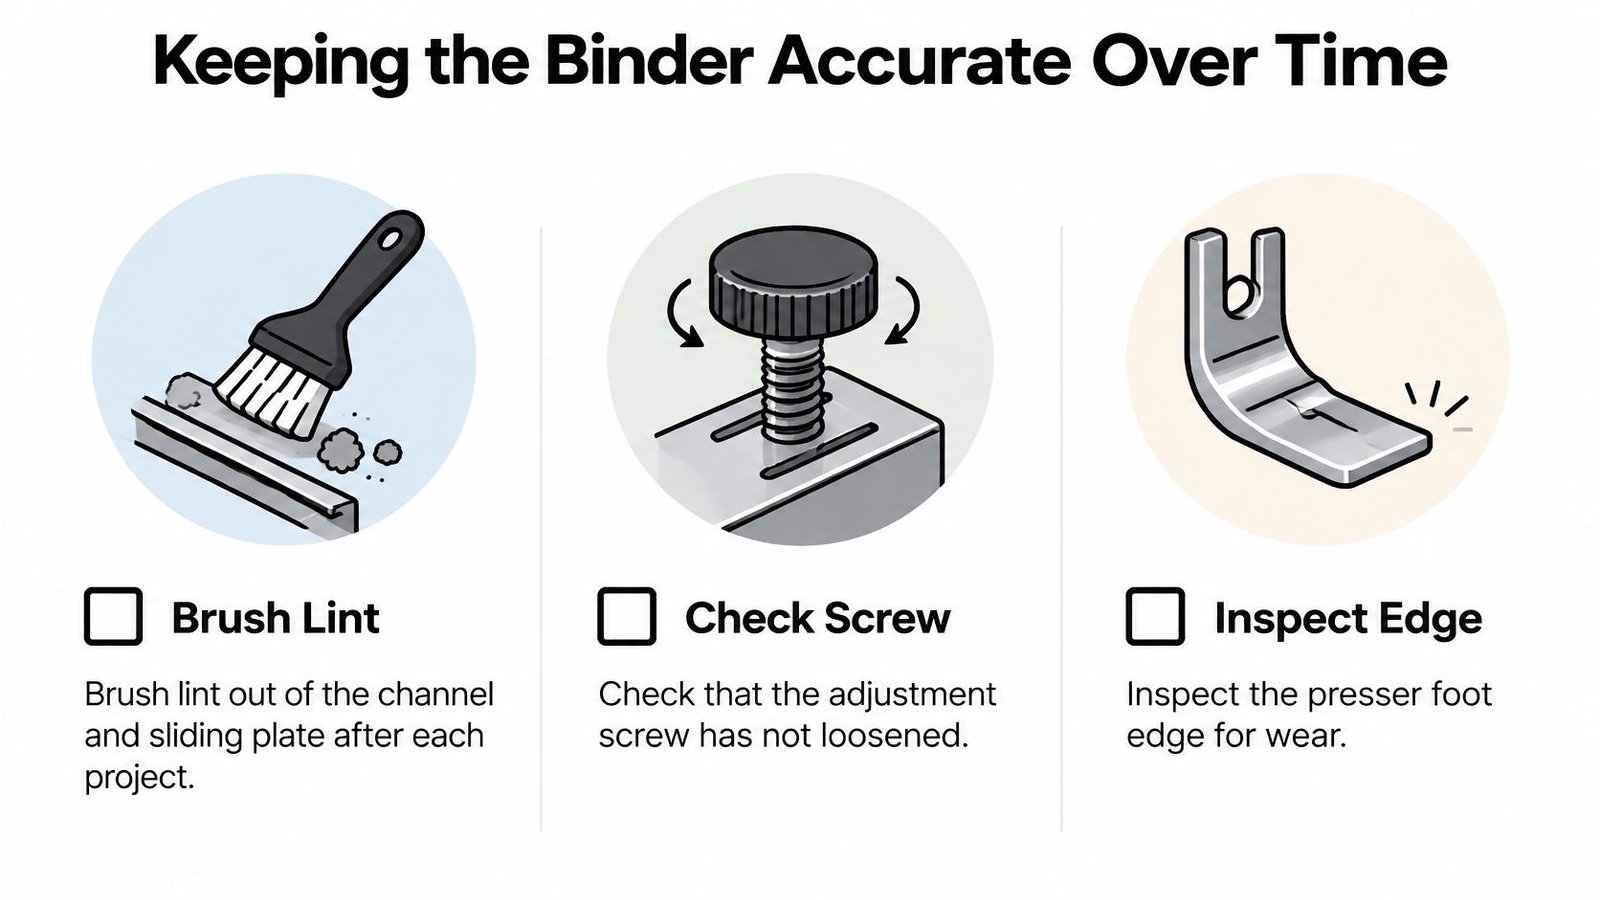
- Brush lint out of the channel and sliding plate with a small brush after every project. Sheer and fine fabrics need this more often than denim.
- Check the adjustment screw hasn't worked loose. Vibration loosens it slowly, and a screw that's half a turn out is the difference between a crisp fold and a wavy one.
- Inspect the presser foot edge for nicks or burrs, which snag tape and pull threads on fine fabric.
Your machine's instruction manual is the first reference for lubrication and any part-specific care, since binders differ in how much they need. Store tape flat and dry so it doesn't take a curl before it ever reaches the plate, and keep each binder with the foot and shank it belongs to. A mixed drawer of attachments costs more time than it saves.
One habit I'd recommend to anyone binding regularly: a page in a notebook for each width you use, recording the tape brand, the screw position, the stitch length and the fabric. Setup then becomes a lookup rather than a re-test every time.
The warning sign that the binder needs attention isn't dramatic. Tape that folded evenly last month starts puckering on the same fabric at the same settings. Clean the channel, check the screw and look at the edge before you assume your technique has gone backwards.
Where Each Wins
The honest answer on machine versus hand binding: the attachment wins on length and repetition, and your hands win on curvature and stretch.
Machine binding is the clear choice for long, consistent edges. A 2 m run of binding around a tote bag, or twelve identical napkins for a table, rewards the even feed and steady speed. Hand binding is the better call for tight curves and fabrics that stretch or distort, such as a steep armhole on a fitted bodice or a jersey neckline where the fabric wants to ripple under the foot. On those edges, slower hand-finishing gives you the control that a fixed channel can't.
Rather than taking anyone's word for it, run the comparison on your own fabric.
- Cut two scraps of the same fabric, same size, same grain.
- Bind one by machine at the matching width, and one by hand with a pressed strip.
- Time both, then note stretch, tunnelling and how flat each binding lies after pressing.
- Repeat with a second fabric, ideally denim, viscose or a Tencel blend, because the behaviour changes more than you'd expect.
Record the results. Published detail on how jersey, denim and viscose behave through a binder is thin, so your own notebook becomes the most useful reference you own. A test that takes fifteen minutes answers a question that otherwise costs you a ruined bodice.
Practical rule: if the edge curves more than a gentle sweep, test both methods before committing the garment.
On a stretchy neckline, stay-stitch the curve first and use a narrow zigzag so the binding moves with the fabric rather than locking it. On crisp cotton and linen, the machine wins almost every time.
Choose Your Binder and Test It on Scrap
A bias binder pays back only if you bind often. That's the whole decision, and everything else is detail.
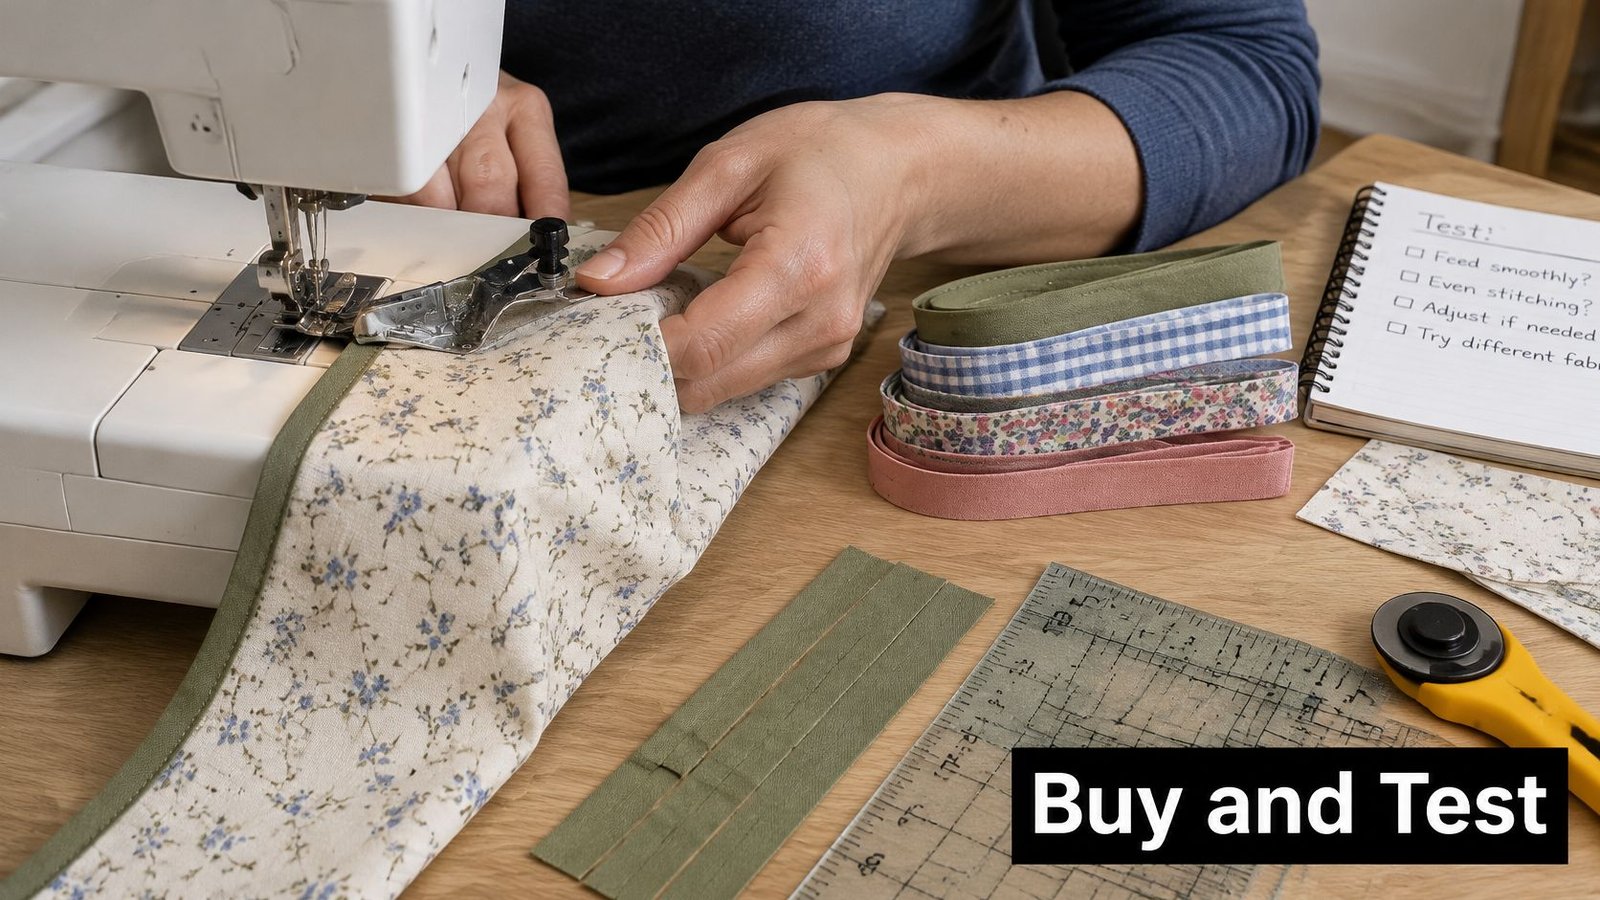
Start with a count, not a shopping basket: how many metres of binding do you sew in a year? If the answer is a couple of necklines, the attachment may never earn its place. If you make bags, run up repeat garments, or bind quilts, it will.
What the prices look like
| Product | Size or width | Price | Listing year |
|---|---|---|---|
| PFAFF Bias Binder (Singer UK) | Not stated | GBP 39.00 MSRP incl. VAT | 2024 |
| baby lock Double Fold Bias Binder (Hobkirk) | 36 mm | GBP 69.00 incl. VAT | 2024 |
| Suisei A2SX24 (College Sewing) | 24 mm start, 6 mm finished | GBP 43.20 incl. tax | 2026 |
For reference, Singer UK listed the PFAFF Bias Binder, SKU 820245096, at an MSRP of £39.00 including VAT in 2024, Hobkirk Sewing Machines listed a baby lock Double Fold Bias Binder 36 mm at £69.00 including VAT in 2024, and College Sewing listed the Suisei A2SX24, a 24 mm starting size with a 6 mm finished size, at £43.20 including tax in a 2026 listing. Those listings span different years and retailers, so check the current price before you buy rather than budgeting from an old figure.
The break-even is easy to work out yourself. Divide the price by what the saved time is worth to you per project. If a £39 binder saves 25 minutes on each garment and you value your sewing time at £15 an hour, that's roughly £6.25 a project, so about six projects before it pays for itself, plus whatever a replacement foot or servicing adds over the years.
Here's a short walkthrough of the attachment in use before you spend anything.
Three steps to a decision you won't regret
- Confirm your machine's shank and that the binder fits it. This is the step people skip and then blame the tool.
- Choose the width that matches the tape you use most, not the widest one available.
- Buy one width and run the 300 to 500 mm scrap test before you cut a garment.
If your binding is occasional, a standard presser foot or hand binding gives better control on curves, and the attachment may never pay back. If you do buy, our team is happy to advise by email or phone after purchase, and the instruction manual should always be your first point of call for part-specific care. We also service and repair sewing machines in-house, which matters if a binder is only as good as the machine it sits on.
If you're kitting yourself out for a season of binding, More Sewing stocks binding and tapes alongside threads, zips, needles, machine accessories and Pfaff sewing machine parts, so the setup comes from one place. Our haberdashery sits next to a fabric range that includes the cottons, lawns, jerseys, denims and viscose blends you'll want for the scrap tests above. Come and see the range at More Sewing and pick your tape width before you pick your binder.
