
Blog, Dressmaking
How to Match Stripes When Sewing: A Practical Guide
You've sewn the side seam, held the top up to the light and felt rather pleased with those stripes. Then you put it on, and the band across your hip takes a noticeable step at the join.
That's the frustration with striped fabric: a small mismatch can draw more attention than a much bigger sewing fault on a plain cloth. Learning how to match stripes when sewing is mostly about making decisions early, then checking them before the stitching becomes difficult to undo.
Matching Stripes Begins at the Cutting Table
A side seam can look convincing with the raw edges pinned together and still disappoint once it's sewn. Those edges disappear inside the garment, so they aren't the place where the stripes need to meet.
The golden rule: Match the seamline, never the cut edge, and decide where the important stripes will meet before the scissors come out.
Start by choosing the joins that matter most. Measure the repeat, mark the pattern pieces and cut in a single layer, using the first cut piece to guide its neighbour. Pin, slip-baste, machine a short test section, then press before judging the result.
Matching also uses cloth that an economical layout might save. The V&A's striped dress record describes that longstanding trade-off between matching stripes and reducing fabric wastage.
The method applies to dresses, skirts, shirts and jersey tops. You don't need every stripe to meet everywhere. You need a sensible plan for the visible joins, and permission to forgive the awkward ones.
Choose Which Seams to Match First
Choose your priorities before marking anything. A curved princess seam, an eased sleeve cap and a straight centre-back seam don't offer the same matching opportunities. Trying to treat them equally wastes fabric and patience.
Start with the visual centre of the garment. On a shirt, check the finished centre front with the button bands overlapping, not just the edges of the separate fronts. Then consider the dominant horizontal bands across the chest and hips, followed by side seams and the front armhole.
The Sewing & Craft Alliance's working-with-stripes guide prioritises centre-front and centre-back openings, side seams and the front armhole of set-in sleeves, while recognising that styling can prevent complete matching.
Which seams to match first
| Seam or area | Priority | Why it matters | If a perfect match is impossible |
|---|---|---|---|
| Centre front and centre back | Must match | The eye reads this vertical line first | Hide the join in a button band, placket or seam detail |
| Side seams | Must match | Horizontal stripes step visibly at bust and hip | Align the pieces at the cutting stage; if still off, keep any offset small and identical on both sides |
| Front armhole of set-in sleeves | High | Sits in the sightline whenever the arm moves | Ease carefully, pin widely and baste before stitching |
| Chest and hip stripe bands | High | These horizontal lines anchor the whole garment | Match the boldest stripe and let the minor ones drift |
| Sleeve caps | Forgive | Curved ease makes a continuous line unlikely | Aim to meet the stripe at the underarm and smooth the cap |
| Princess seams and gathers | Forgive | Curves and fullness break the stripe geometry | Keep the stripe symmetrical on both sides of the body |
Let the fabric and fit influence the decision
A broad cream band against navy needs stricter matching than a busy pattern of narrow, similar-coloured stripes. You can see the edges of that broad band immediately. A close-fitting dress also makes changes across the bust and hips more apparent than a loose overshirt does.
On an A-line or bias-cut skirt, the angled side seams may prevent continuous matching along their full length. Choose a prominent band near the finished hem and keep the centre lines balanced instead. At darts, favour a balanced appearance across the garment rather than forcing the interrupted stripe to behave like an uninterrupted one.
A deliberate offset can work if it's consistent on both sides of the body. An accidental offset on just one side rarely looks intentional.
Spend fabric and patience on the high-priority areas. Let the forgiving areas remain forgiving. That decision determines which stripe becomes your reference on every pattern piece.
Measure the Repeat and Cut Stripes in a Single Layer
Prepare the fabric as carefully as the pattern. Prewash it using the treatment you intend for the finished garment, then press without pulling it out of shape. Let jersey settle flat before positioning anything, and support the whole length of slippery viscose rather than leaving it hanging off the table.
Single-layer cutting takes more space, but you can see every stripe. You're not relying on a hidden lower layer staying aligned while you cut.
Prepare the cloth and mark the pattern
Check the grain and stripe direction. Lay the fabric flat, right side up, with the selvedges relaxed. Check that the crosswise stripes sit square to the lengthwise grain. Don't pull a skewed cloth into a temporary rectangle, because it may return to its original shape after cutting.
Measure the complete repeat. Measure from a recognisable feature, such as the left edge of a broad navy band, to the identical feature in the next complete sequence. Don't stop at a similar-looking stripe if the colours between them differ. For context, Pound A Metre's tartan guide gives 8–20 cm as a common repeat range for UK tartan fabrics.
Mark the grainline, horizontal balance line and stitching lines on your pattern. Add short reference marks wherever the dominant stripe must cross a seam. Transparent tracing paper helps because you can check the fabric underneath without repeatedly lifting the pattern.
Allow extra fabric before cutting. As a starting estimate, reserve an additional complete repeat for each direction in which pieces must move to match. For a hypothetical 15 cm repeat, that means initially allowing 15 cm extra in that direction, not assuming it guarantees the whole layout. Wide pieces, narrow cloth and large repeats can require more, so check the complete layout before buying or cutting.
Examine the stripe sequence from both directions. A broad-dark, narrow-light, narrow-dark arrangement isn't necessarily interchangeable when reversed. Label left and right pieces, and check whether you want mirrored placement or the same sequence travelling around the body.
The industrial marker-making guidance supports marking stripe references on pattern pieces, allowing additional piece goods and accounting for asymmetrical repeats. Remember to keep the grainline parallel to the fabric warp. Don't rotate a piece off grain just to achieve a prettier match.
Cut the adjoining pieces as a pair
Cut the front bodice first, choosing the position of its strongest stripe deliberately. If the pattern is intended for cutting on the fold, trace a complete pattern piece so you can cut it flat. Label the right side of each cut piece with removable tape if the fabric faces look similar.
Lay the cut front back over an identical section of the stripe pattern. Transfer the important stripe positions to the adjoining back pattern at the seamline, especially around the underarm and hem. Keep the pattern's notches as construction references rather than assuming they automatically identify matching stripes.
This first-piece-as-reference approach is demonstrated in Seamwork's stripe and check cutting tutorial. Move the back pattern until its reference marks agree with the fabric underneath, then check its balance line and grainline before cutting.
For example, suppose the selected navy stripe crosses the front side-seam stitching line 4 cm below the underarm notch. Position the back so that the corresponding stripe crosses its stitching line at the same measured position, provided the adjoining seam lengths and shaping allow it. This is a hypothetical placement example, not a universal measurement.
You can pivot a loose paper pattern while checking its orientation, but its final position must still respect the grainline. If the balance line and grain won't agree with the stripes, investigate the cloth rather than cutting off grain.
Work through adjoining pieces in pairs:
- Sleeves: Cut separately, checking the front armhole reference and the relationship between left and right.
- Cuffs and yokes: Check the finished joining line, including any fold or overlap.
- Patch pockets: Trace the underlying stripes onto a transparent pocket pattern, then locate that same arrangement on the remaining cloth.
Keep all pieces labelled until they're assembled. A beautifully matched sleeve is little use if it ends up on the wrong arm.
Pin, Baste and Stitch the Seam
The machine shouldn't be your first test of the match. Temporary stitching lets you open the work, inspect it properly and make a correction without disturbing a permanent seam.
The sequence is straightforward: secure the stripes, check them, then commit.
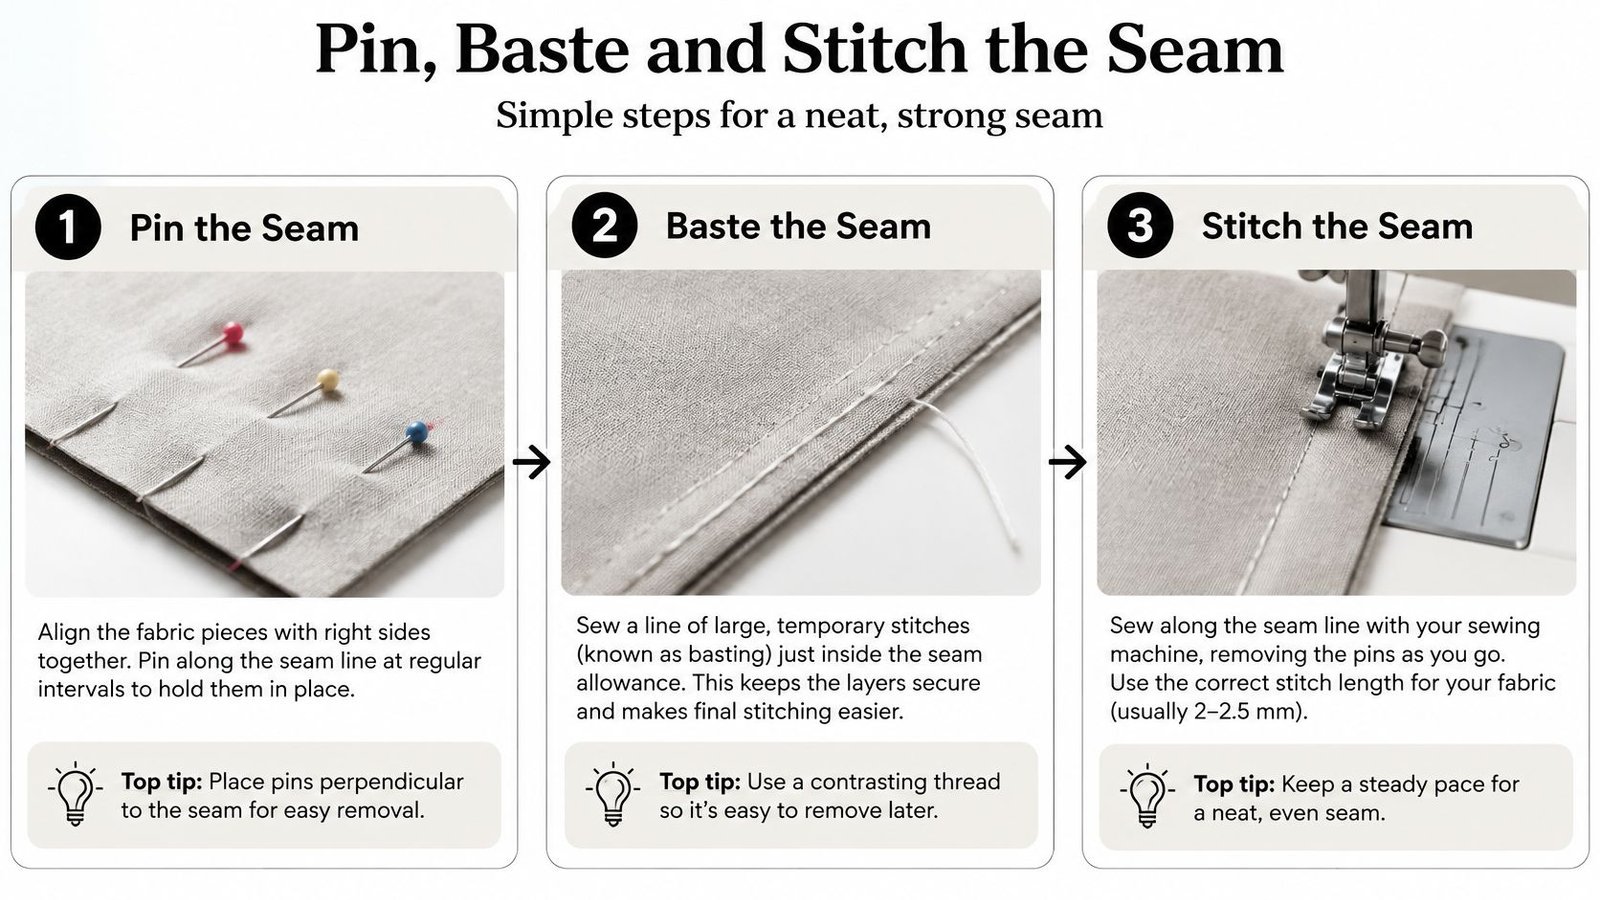
Secure the match before machining
Place the pieces right sides together. Put a pin through a stripe reference at the stitching line, then check that it emerges through the corresponding point underneath. Pin perpendicular to the seam and add support at the stripe crossings. Clips can be useful on jersey or viscose if pins make the cloth ripple, but check that the clips themselves aren't dragging it.
Baste close to the intended seam. Seamwork's stripe-matching tutorial recommends temporary tacking about 12 mm, or half an inch, from the raw edge, within the seam allowance. Treat that as a practical position for a suitable allowance, not a reason to tack outside a narrower one. For slip-basting, fold one allowance back along its seamline, align the visible stripes and take removable hand stitches through the matching points; ordinary long machine basting is another option.
Machine a short test section through a prominent stripe crossing. Open the work and inspect it from the right side before sewing the full length. If the stripe steps, remove the test stitches and adjust the basting rather than stretching one layer to disguise the problem.
Check, sew and press
Use the fold-back check where visibility helps. Fold one seam allowance along the marked stitching line and place that folded edge against the adjoining piece. You can see immediately whether the bands continue. This is particularly helpful at a conspicuous centre join or a pocket edge.
Sew the full seam without pulling from behind or pushing from the front. Remove pins before the needle reaches them. A dual-feed or suitable walking foot can help control layers that creep; the Goldsmiths textile-facilities sewing guide recommends dual feed to keep upper and lower layers synchronised when layers move during sewing.
Press before passing judgement. Set the stitching, then press the allowances open or to one side as the garment requires. Lift and lower the iron rather than sliding it along the seam.
Approve the basting, then check that the machine preserves the match.
Basting won't make movement impossible, so a final inspection still matters. It does mean you can correct the placement before there's a full permanent seam to unpick.
Diagnose and Fix Mismatched Stripes on Tricky Fabrics
Check the seam flat, then check it on the body. Those tests answer different questions. A stripe that steps while the garment lies relaxed suggests placement or feeding trouble; one that only distorts when worn needs a closer look at fit and tension.
With the garment basted, let it hang naturally on a dress form or try it on without tugging the hem into position. Move gently, lower your arms and look again. The Simplicity guide to working with stripes provides practical guidance for handling and matching striped fabrics; the useful distinction when troubleshooting is between an incorrectly positioned stripe and cloth that's being stretched out of position.
Stripe mismatches diagnosed and fixed
| Symptom | Likely cause | Fix |
|---|---|---|
| Stripes step at the seamline | Pieces were matched at the cut edge, not the seamline | Re-mark the seamline, re-baste and align the chalk marks where the stitch line will run |
| Stripes match flat but drag when worn | Seam stitched under tension or matched while the fabric was stretched | Let the fabric relax, re-baste with no tension and accept a small even offset if needed |
| Upper layer creeps ahead of the lower one | Differential feeding or presser-foot pressure shifting one layer | Fit a compatible dual-feed or walking foot and reduce adjustable presser-foot pressure |
| Stripes align at one end but drift along the seam | Inaccurate cutting or a slipped pattern piece | Re-cut if spare cloth allows; otherwise distribute a minor mismatch away from the priority band |
| Stripes wander on jersey or viscose | Fabric stretched while cutting or sewing | Use single-layer cutting, minimal handling, clips where helpful and removable tacking within the allowance |
| Seam looks fine unpressed but wrong after pressing | Distortion hidden while the fabric was manipulated | Let the cloth settle and judge the match after pressing |
Separate stretch recovery from a cutting error
Jersey can lengthen while you handle it, then recover after stitching. Viscose can shift across the table or distort when part of the piece hangs unsupported. Neither problem improves if you keep lifting, pulling and repinning the same area.
Let the fabric settle before deciding it needs re-cutting. Check the paper pattern against the relaxed piece, and compare the marked seamlines rather than the edges.
A small, even offset can be a better compromise than drag lines caused by forcing the stripes together. That doesn't justify sewing badly fitting pieces under tension. If the garment pulls across the bust or hips, correct the fit before chasing the stripe.
If the seam only looks wrong when the garment is on, tension rather than stripe placement is usually the first thing to investigate.
Start Your First Matched-Stripe Make
Measure, mark, cut in a single layer, baste, test, sew and press. Keep that sequence beside the machine for your first attempt rather than trying to remember every detail while handling the cloth.
Choose a simple A-line skirt and concentrate on a dominant band at the side seam. A clear, evenly spaced stripe gives you an obvious reference, although it will also make errors easier to spot. Prewash the fabric and check your layout with the extra repeat allowance before cutting.
For a later jersey project, our Fine Printed Stripe Browns & Teal On Cream Cotton Jersey Fabric 150cm Wide costs £6.50 per half metre. Fabric is sold by the half metre, and multiple orders are sent as one continuous length, so include your matching allowance when calculating the order.
Practise the whole process on your chosen join, from chalk marks to the pressed seam. The habit to keep is simple: don't let the machine permanently stitch a match you haven't approved in the basting.
At More Sewing, we offer dressmaking fabrics, patterns and haberdashery for planning and making your next garment. Visit us to choose your striped fabric and pick up the marking tools, pins and thread you'll need to work carefully from cutting table to finished seam.
