
You've found a brown gingham fabric that looks right for a shirt, but the photograph doesn't tell you whether it'll feel crisp, hang softly or turn see-through against the light. Then there's the check itself. Will the pocket disappear neatly into the pattern, or sit slightly out of line every time you wear it?
Choose the cloth for the job, not just the colour. Brown gingham can work with denim and knitwear as comfortably as summer linen, but its regular grid makes washing, cutting and repair decisions unusually visible.
Weave, Fibre and Colour Before You Buy Brown Gingham
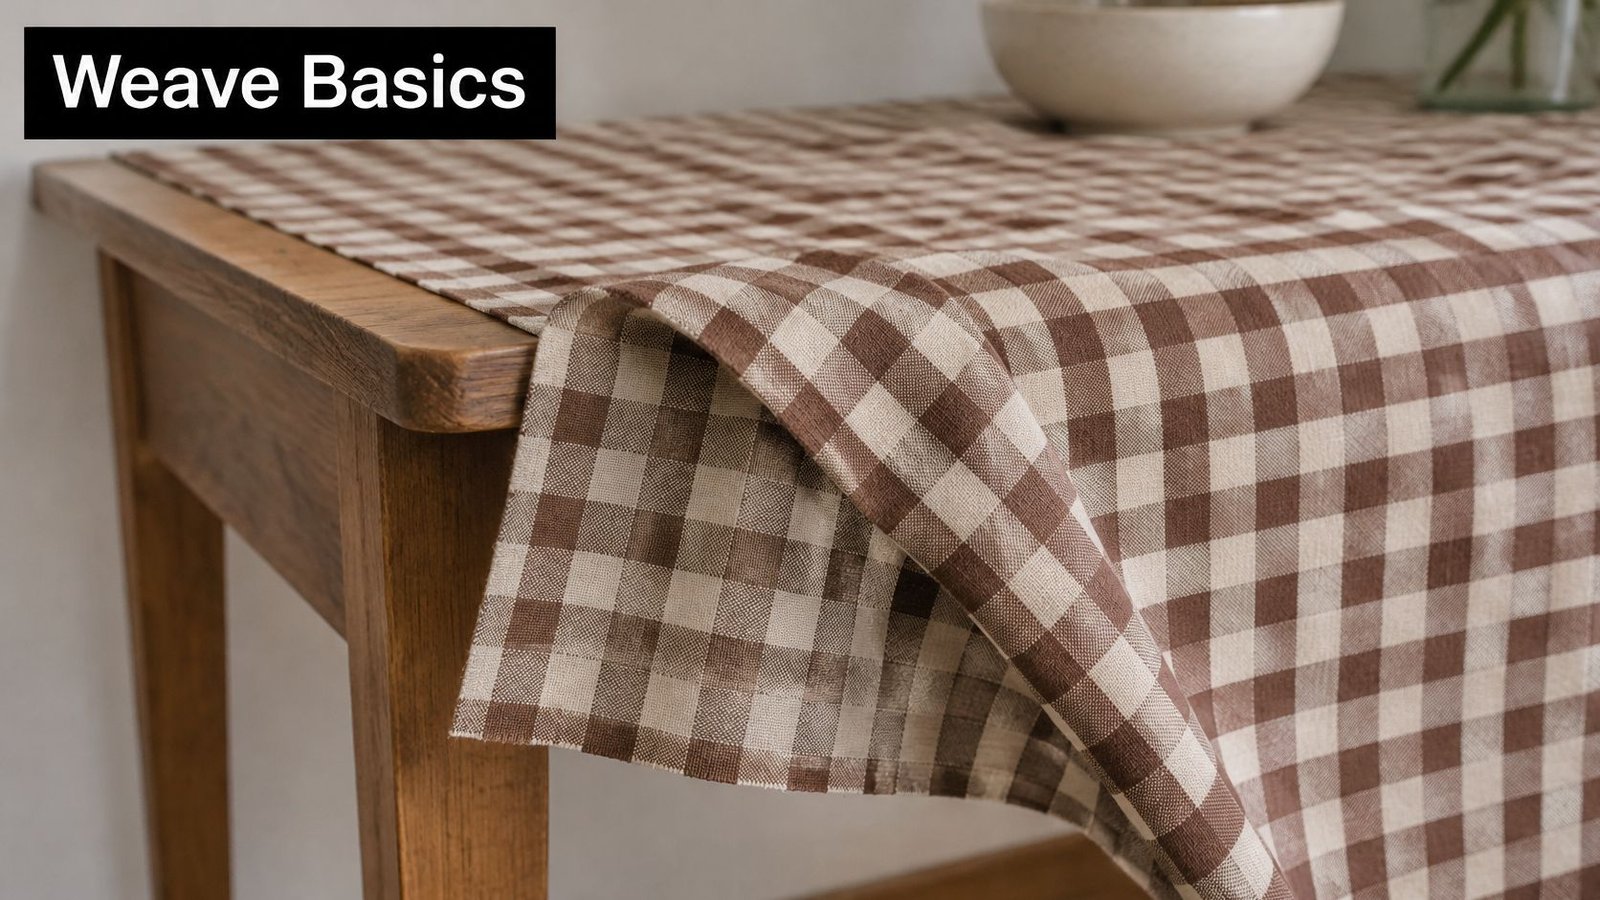
Think of traditional gingham as a grid built into the cloth. Brown yarns cross lighter yarns, producing pale squares, mixed-colour squares and darker intersections rather than a pattern sitting only on the surface.
Bexhill Museum describes gingham as light, usually checked cotton woven from pre-dyed yarns. The Victoria and Albert Museum's gingham record documents cotton lengths made around 1855 in India, within textile collections containing more than 75,000 objects or sets spanning over 5,000 years.
The close-up below shows why it's worth examining individual threads, not the overall colour.
Gingham also has a substantial British manufacturing history. A historical industrial survey reproduced by Random Scottish History records its introduction in 1786, with production concentrated around Airdrie, Lanark and Glasgow, and 18,420 looms recorded in that first manufacturing category.
Check the specification before the shade
Say you're choosing brown-and-cream gingham for a gathered blouse. A photograph may show precisely the colour you want, but a stiff furnishing cotton won't behave like soft shirting at the neckline.
The pattern name isn't a fibre guarantee. Under UK textile-labelling guidance, fibre content must be stated using recognised fibre names, with constituent fibres identified for blends. Look for composition percentages in descending order, then assess the fabric's other specifications separately.
Use this buying checklist:
- Confirm the fibre content. Cotton, cotton blends and synthetic cloth need different pressing and care decisions.
- Check usable width and weight. Mass per unit area helps distinguish airy dressmaking cloth from something intended for cushions.
- Establish how the check was made. Ask whether it's yarn-dyed or printed. “Piece-dyed” isn't a useful substitute for explaining how a contrasting check was produced.
- Handle a swatch. Fold it into a small pleat, gather an edge and hold it against the light.
- Test your intended care routine. Keep an unwashed sample for comparison.
- Compare the actual brown. Assess it beside the clothes, lining or buttons you'll use.
Make a buy-or-skip decision
A yarn-dyed check usually remains visible on both faces, but that alone doesn't guarantee colourfastness. Reject cloth that loses the contrast you liked, distorts badly or feels unsuitable after your test wash.
Buying rule: Buy enough for the planned layout only after the swatch passes your handling and washing tests.
Our website colours may look slightly different from the actual fabric because monitor settings vary. If you have questions about a fabric's colour, contact More Sewing before purchasing rather than trying to judge a subtle chocolate, tobacco or reddish brown from your screen.
Matching Brown Gingham Weight to Each Project
Brown gingham weight, fibre and check scale by project
These are suggested starting points for comparing swatches, not fixed specifications. Choose the handle and care performance first, then use check scale to refine the appearance.
| Project | Likely fibre | Check scale | Care note |
|---|---|---|---|
| Shirts and blouses | Cotton or cotton blend | Suggested 3-6 mm | Prewash; press from the reverse |
| Summer dresses and skirts | Cotton | Suggested 6-10 mm | Check the repeat at the hem before cutting |
| Aprons and pinafores | Cotton or cotton twill | Suggested 6-10 mm | Test colour bleed before cutting |
| Children's garments | Cotton | Suggested 3-6 mm | Choose a fabric labelled suitable for washing at 30°C |
| Cushions and tote bags | Cotton or cotton canvas | Suggested 10-18 mm | Check light fastness for sunny spots |
| Curtains and headboard covers | Cotton or cotton-polyester blend | Suggested 12-18 mm | Plan a lining for weight |
Choose handle before measuring weight
For a shirt, fold the swatch over your finger to imitate a collar. Lightweight shirting should bend without forming a bulky ridge, while still having enough body to support a button band. A very soft cloth may need interfacing even if it feels lovely against the skin.
For a gathered dress, scrunch the fabric loosely in your hand. If the folds spring out firmly, expect a fuller silhouette; if they collapse, expect a softer skirt. Hold pale checks over your hand to assess whether a lining or slip will be necessary.
Aprons and pinafores benefit from more substance, particularly around straps and pocket openings. A cotton twill can provide that, but gingham describes the check rather than promising a particular weave or strength. Don't assume a darker pattern makes lightweight fabric resistant to wear.
Children's clothes need a comfortable surface and a care routine the household can maintain. A small check can work neatly around collars and cuffs, but washability comes from the actual fabric specification, not the size of its squares.
Separate dressmaking from furnishing needs
A cushion cover needs enough body to sit smoothly over its pad. A tote needs resistance to strain at the handles, so soft dress cotton may require a separate supporting layer instead of heavier interfacing everywhere.
Curtains and headboard covers need a different assessment again. Hold the swatch vertically, examine it with daylight behind it and consider whether a lining will improve opacity, drape and protection from light. A decorative cotton isn't automatically suitable for every upholstery application.
Small checks give you frequent alignment references, which can make tiny cutting errors obvious. Large checks need more space to establish their pattern and can create conspicuous broken bands at seams.
Hold the swatch at arm's length. If the brown and cream merge into a muddy tone, decide whether you want that subtle texture or a clearly readable check.
Use this test against your intended background too. A cushion that looks distinct on a worktable may disappear against a dark sofa.
How to Prewash Brown Gingham Without Fading It
Wash settings for brown gingham by fabric type
| Fabric or finish | Starting wash | Drying | Notes |
|---|---|---|---|
| Yarn-dyed cotton, dark brown | Gentle cool wash with colour detergent | Air dry | Test a corner first |
| Coloured cotton, care label allows warmer washing | Use the labelled setting with colour detergent | Air dry, avoid high heat | Never exceed the label limit |
| Cotton blend with synthetic fibre | Cool wash unless the label says otherwise | Air dry, or low heat if permitted | Check for pilling and distortion |
| Heavy furnishing or apron cotton | Cool wash only if washable | Air dry; press while slightly damp if permitted | Weight alone doesn't predict shrinkage |
| Unknown fibre or missing label | Test-wash a swatch before committing | Air dry | Keep the full length untreated until assessed |
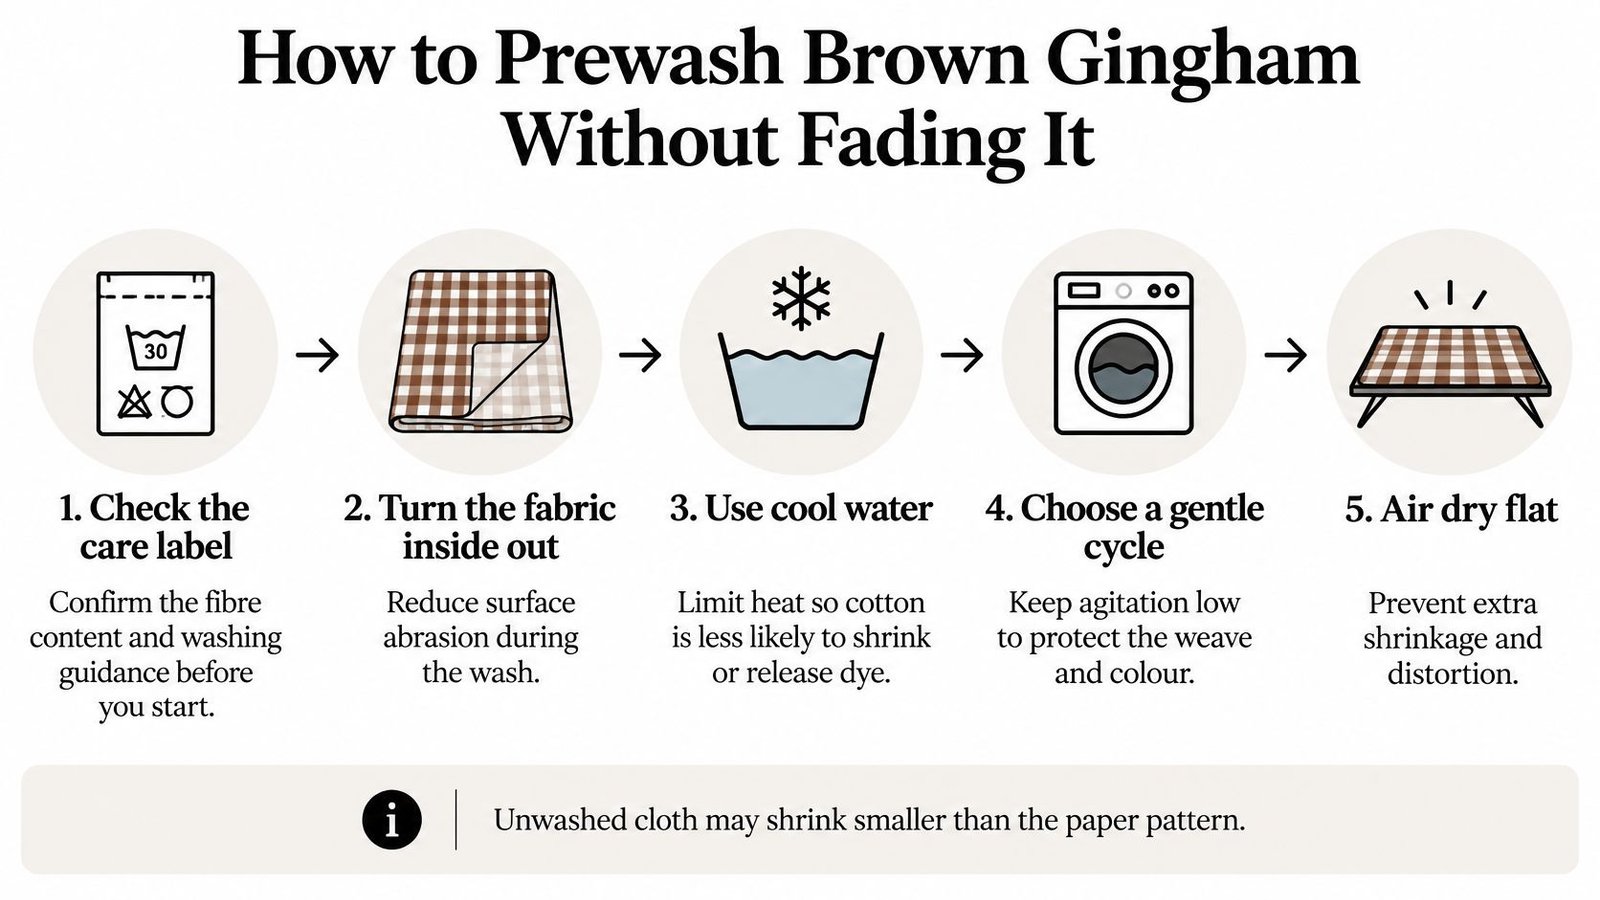
For washable dark brown cotton, a gentle 30°C wash is a sensible starting test; Miele's textile-care guidance allows coloured cotton washing up to 60°C where appropriate, while warning about fading and the need to follow drying instructions. The care label takes priority, especially for blends and furnishing finishes.
Heat and agitation can affect both dimensions and dye. Use a care routine you'll maintain for the finished garment, rather than testing gently and later washing much more aggressively.
Test before cutting
- Prepare a representative swatch. Cut a square large enough to measure accurately, finish its raw edges and mark an internal measuring square with tacking thread. Keep a small unwashed piece beside it.
- Wash on the planned cycle. Use colour detergent and avoid adding pale garments. You're testing the cloth, not risking the rest of your laundry.
- Air dry without stretching. Lay it flat or support it evenly, away from radiators. Pulling wet cloth into shape can conceal dimensional change.
- Press from the reverse. Use a temperature suitable for the fibre and lift the iron rather than pushing it sideways. Smooth the cloth without forcing the checks square.
- Compare dimensions and colour. Measure between the tacked marks, then compare the washed and unwashed samples in daylight. Press a damp white cloth or tissue against an inconspicuous area to look for transfer.
- Prepare the full length before cutting. Once the result is acceptable, wash the garment fabric using the tested routine. A successful swatch doesn't remove the need to prewash the rest.
The visual guide summarises the main care decisions. For an unsewn length, loosely fold the cloth rather than trying to turn it inside out as you would a garment.
Treat colour transfer as a warning
A tissue that picks up brown dye after the test means the cloth needs further assessment. Try a colder wash on another sample, but don't assume cold water has permanently fixed loose dye.
Don't use persistently bleeding fabric as lining against pale clothing or as trim beside cream cloth. Those positions can make transfer particularly troublesome. If repeated testing still produces staining, choose another fabric for a washable project.
How to Match and Cut Gingham Checks Accurately
A gingham garment can look twisted even when its seams meet correctly. The eye follows the horizontal and vertical bands, so uneven cutting becomes part of the finished appearance.
Start by checking whether the woven grain and the visible check agree. Identify a strong vertical brown stripe, then compare it with the pattern's grainline and the fabric's selvedge direction. Don't force a distorted check into alignment by stretching it across the cutting table.
Use the grid without trusting it blindly
- Align the folded cloth. Match checks through both layers and pin at intersections. If the layers won't stay aligned, cut single-layer instead.
- Establish vertical and horizontal references. Use a clear quilting ruler to examine the grid. Check that crosswise bands sit square to the intended waistline or hem reference.
- Position the grainline. Keep the pattern grainline parallel to a selected dark stripe, checking along its length rather than at a single point.
- Move pieces to matching positions. Shift a pocket or adjoining panel along the repeat until its stitching line meets the correct bands. Matching raw edges isn't enough when seam allowances differ.
- Baste important joins. Hand-tack the centre front, pocket or side seam before permanent stitching. Pins alone may allow the layers to creep under the presser foot.
- Inspect from across the room. Hang or hold the garment upright and step back. A mismatched dark band can be easier to notice at a distance than under the machine light.
Apply the method to the garment
For a shirt, keep a dark stripe parallel to the centre-front line. Lay the pocket pattern over the corresponding area of the shirt front, transfer the check position, then cut the pocket so its visible stitching lines meet the same squares.
For a skirt, choose a symmetrical arrangement at centre back. Account for the seam allowance before deciding where the dark bar will finish, particularly around a zip.
For an apron, centre the bib deliberately and compare its upper edge with any neckband attachment. Cut paired ties from equivalent positions if you want them to look balanced, rather than expecting their checks to continue through every knot and fold.
For a child's dress, match the placket to the bodice at the finished overlap. Checking the raw edges can give a false result because part of the placket will be hidden.
Construction choice: Match the dominant brown bands where you want continuity. Offset them only where you want the contrast to be noticed.
Bias-cut pieces turn squares into diamonds, but their edges stretch more readily. A bias pocket or hem facing can give contrast without committing an entire skirt to that behaviour. Staystitch vulnerable edges, handle them gently and let a bias skirt hang before levelling its hem.
Planning Metreage and Matching Margins
Start with your pattern's fabric requirement for the correct size, view and usable width. Then make room for the checks you intend to match, rather than adding an arbitrary allowance to every project.
Use this working formula:
Purchase length = tested cutting layout + matching allowance + washing allowance.
A paper layout is more dependable than a generic shopping rule. Mark the usable fabric width on a table or floor, place the pattern pieces inside it and shift them into their intended repeat positions.
Worked layout decisions
- Shirt with a matched pocket and yoke. In a hypothetical layout needing 1.5 m before matching, you might test whether 20 cm extra lets those pieces move into position. That's an example to check with your pattern pieces, not a size-based buying recommendation.
- Panelled skirt. Move each adjoining panel until the dominant horizontal bands meet at the stitching lines. Add the resulting layout length, not a separate full allowance for every seam.
- Bias-cut skirt. Lay out the actual pieces at their required angle. Wider pieces and mirrored diamonds can prevent efficient nesting, so a straight-grain estimate won't give a reliable order quantity.
Allow for washing using your own test
Calculate dimensional change from the marked swatch: subtract its washed measurement from its original measurement, then divide by the original measurement. Use the lengthwise result when assessing whether your purchase will remain long enough after washing.
Leave practical room for straightening the ends too. Fabric that measures enough along a sloping cut edge may still be short once you square it for a long skirt panel.
Curtains need planning as complete drops. Decide which horizontal band will sit at the top of each panel, then include headings, hems and the movement needed to start adjoining drops at equivalent points in the repeat.
Keep the resulting offcuts together with the washed test sample. Label which pieces have been washed so a later patch doesn't shrink differently from the garment.
Pairing Brown Gingham With Colours and Prints
Pairing brown gingham with colours and prints
| Brown gingham check | Partner | Effect | Best use |
|---|---|---|---|
| Brown and cream check | Cream cotton lawn | Soft, low contrast | Summer dress with a plain yoke |
| Brown and cream check | Navy denim | Relaxed, workwear feel | Shirt worn with jeans |
| Brown and cream check | Olive linen | Earthy, autumn tone | Skirt and top set |
| Brown and cream check | Burgundy or rust | Warm autumn palette | Scarf or cushion trim |
| Brown and cream check | Small-scale stripe | Busy unless the stripe is restrained | Gingham facing or collar only |
Brown needn't be treated as a seasonal novelty. British Vogue's brown-and-cream coverage places the pairing within the move towards brown in autumn/winter 2025 and brown-and-cream combinations in spring/summer 2026.
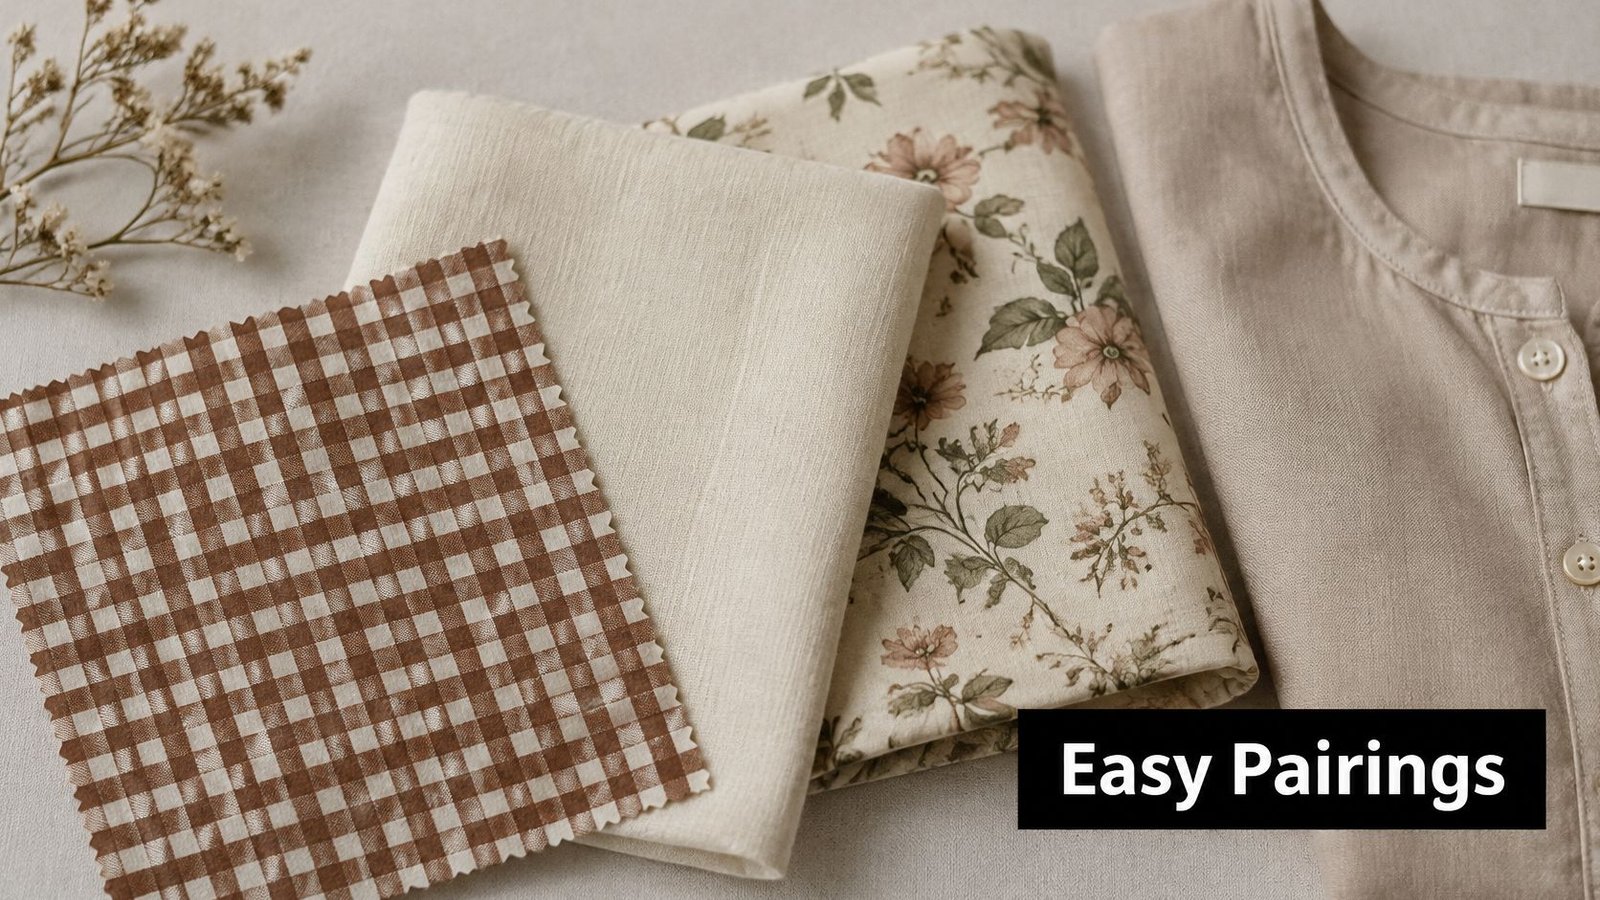
Compare actual fabric partners rather than trying to match colour names.
Let one fabric lead
Cream lawn softens the contrast of a checked dress. Use it for a yoke or sleeve detail, but check opacity before making it an unlined bodice panel.
Navy denim gives brown gingham a practical everyday setting. A loosely tucked shirt with jeans needs little extra pattern, while olive linen works well when you want an earthy skirt-and-top combination without matching everything exactly.
Burgundy and rust are useful accents rather than compulsory main colours. Try a cushion flange, scarf edge or narrow binding before committing to a large contrasting panel.
Two patterns of similar scale usually compete. If you're combining gingham with striped jersey, keep the stripe fine and limit the gingham to a collar or facing. Stabilise the join appropriately because woven gingham won't stretch with the jersey.
For another visual reference, consider which combinations leave enough plain space around the check.
Build a year-round outfit rather than a theme
A dark-brown-dominant check looks visually denser than a cream-dominant one. That can suit a structured pinafore or overshirt, while a paler check may feel quieter across a gathered dress.
Smaller checks are often easier to place around shirt details. Larger checks give skirts and dresses a more obvious graphic effect, especially where broad panels leave the repeat uninterrupted.
For a useful season-spanning project, make a brown gingham shirt with enough ease for a thin layer underneath. Wear it with denim and a wool cardigan in colder weather, then cream linen trousers with the sleeves rolled back when it's warm.
Repairing and Reusing Brown Gingham Offcuts
The useful test of brown gingham fabric isn't whether it looks pristine on the cutting table. It's whether you can keep wearing it when a pocket corner loosens, an elbow thins or a small tear interrupts the check.
Ealing Council's clothing and household-textile guidance reports that UK households discard approximately 35 clothing items per person each year. Saving a repair-sized scrap gives you a practical alternative when the damage is small.
Repair against the existing grid
For a small tear, place a washed matching patch behind the damage. Align its checks with the garment, baste it flat and use matching thread to secure the weakened area without pulling the edges together into a ridge.
For a strained apron pocket corner, unpick enough of the pocket to reach the back cleanly. Support the weakened cloth with a compatible fusible interfacing, test the pressing temperature on scrap, then restitch the pocket and reinforce the opening. Interfacing supports fabric; it doesn't replace missing cloth.
For visible mending, make the contrast deliberate. A cream patch, brown running stitches or a diamond-shaped gingham patch can look intentional when an almost-matching repair would otherwise look misplaced.
The check gives you a positioning grid that an irregular print doesn't. Use it to keep a patch level, but don't pull a worn garment out of shape merely to achieve perfect alignment.
Keep offcuts that have a job
Cotton deserves careful use beyond the main garment. Written evidence submitted to Parliament's Environmental Audit Committee estimates that producing 1 kg of cotton fibre requires around 10,000 litres of water, making thoughtful cutting and continued use worthwhile.
Sort useful remnants by shape:
- Long diagonal pieces can become bias binding.
- Narrow strips suit fabric hair ties.
- Small rectangles make tote pockets.
- Repeated triangles work for bunting.
- Sound matching squares belong in a labelled repair envelope.
Keep only pieces you can realistically use, with the fibre and care information attached. A small, organised repair supply is more useful than a bag of unidentified scraps.
More Sewing offers fabrics, haberdashery and fabric sample swatches to help you choose cloth for a project you'll use. Visit More Sewing to explore the range, and contact us before purchasing if you need help judging a fabric's colour.
