
Blog, Dressmaking, Guides
Palazzo Pant Sewing Pattern: A UK Sewing Guide
You've found a wide-leg pattern, laid out a length of lovely cloth and started wondering whether the trousers will flow or look too big. Perhaps your waist and hip sit in different sizes, or your last pair looked fine standing up but pulled as soon as you sat down.
A good palazzo pant sewing pattern needs a comfortable waist, seat and crotch before it needs a dramatic hem. Separate the room you need to move from the width you want for style, and you can make trousers that hang well, feel right and leave you enough cloth to alter or repair them later.
Measurements, Ease and Toile Fitting
Start with waist, full hip, crotch depth, fullest thigh and inside leg. Measure over the underwear you'll wear with the trousers, with a narrow tape or elastic tied at the intended waistband position. Don't pull the measuring tape tight enough to indent your skin.
For crotch depth, sit upright on a firm, flat chair and measure vertically from the marked waist at your side to the seat. This isn't the same as the crotch seam length, which follows the body from front waist, between the legs, to back waist. Confusing these measurements can leave you changing the wrong part of the pattern.
What to measure and where the ease belongs
| Point | How to measure | Ease to keep | Do not |
|---|---|---|---|
| Waist | Where the band will sit, over usual underwear | A fixed band should fasten comfortably without digging in when seated | Copy the body waist onto elastic |
| Full hip | Fullest seat and hip | For a trial toile, test about 4 to 6 cm for sitting and walking, then adjust | Put all the palazzo width here |
| Crotch depth | Waist to crotch, checked seated | Enough that the curve does not pull when seated | Fix a short rise with hip ease |
| Thigh | Fullest thigh | Room to walk, not skin-tight | Assume a wide hem hides tightness |
| Inside leg | Crotch to the hem you want | Keep cut length and finished length separate | Hem before the cloth has hung |
| Elastic waist | Relaxed band and fully stretched band | Stretches over the hips, then recovers | Use the body waist as the cut length |
Treat the hip allowance in this trial as a starting example, not a universal specification. A pleated design, a pull-on waist and a fitted zip-front pattern won't distribute fullness in the same way. Use the pattern's finished measurements, then let the toile settle the question.
Choose the hip size before shaping the waist
Never choose your size from waist alone. A UK clothing-fit study used ±3 cm between body and corresponding size-chart measurements as its benchmark for objectively suitable fit, and found that 44.44% of 63 athletic women fell between commercial sizes on at least one measurement. That benchmark is a chart-comparison tool, not an instruction to add that amount of wearing ease.
Check both waist and hip against the body-size chart, then compare your measurements with the finished garment measurements. These are different things: the size chart describes the intended wearer, while finished measurements describe the trousers after sewing.
If your hip needs a larger size than your waist, trace the hip size and blend towards the waist size. Where the difference is substantial, distribute the shaping through darts, pleats and side seams rather than carving a sharp inward bend at the side. Keep pleats facing as the design intends.
A University of Manchester study of trouser-drafting methods found inconsistent body-to-pattern relationships between drafting methods and differently shaped bodies. Substituting standard measurements for individual ones, differing ease allowances and the way pattern lines were connected all contributed. Your own measurements deserve more attention than the size label.
Make a toile you can read
Use stable woven cloth for the toile, such as calico, but avoid something so stiff that it disguises how the intended fabric will behave. Mark the grainline, hip line, centre front and centre back on the cloth. Baste the seams and fit a temporary waistband so the trousers hang from their actual wearing position.
Stand naturally rather than pulling yourself upright for the mirror. Sit, walk, bend and lift a knee; if you'll spend much of the day seated, give that position particular attention. Check whether pockets gape or the waistband presses into your stomach.
Toile pass rule: The waistband stays level, the crotch doesn't cut in and the side seams hang vertically, without restricting ordinary movement.
Leave accessible seam allowances during fitting. Change a single area, baste it again and compare the result before trimming anything away. Otherwise, a helpful alteration and an unhelpful one can cancel each other out.
Match the fault to the pattern line
Wrinkles are clues, not a diagnosis on their own. Check that the waistband is sitting correctly before changing the crotch curve.
- Back waist dips: Add back-rise length if the seat is pulling the waistband down. Don't lift the waistband and accept a tighter crotch.
- Crotch cuts in when seated: Test more rise depth. Release the affected area on the toile to see where the cloth needs room.
- Diagonal drag from the crotch: Check crotch extension and seat shape. Test the extension before scooping away fabric, which can make the problem harder to reverse.
- Side seams swing forwards: Check front-to-back hip and thigh balance. You may need to redistribute room rather than enlarge the whole leg.
- Fullness starts too low on a petite frame: Shorten above the knee as well as at the hem so the shaping sits at the right height.
For a tall wearer, add length where it's missing rather than attaching it all below the knee. For a fuller thigh, check the upper inseam and front leg even when the lower leg looks generous.
Record waist circumference, finished length and cut length separately. Once the toile passes, transfer every alteration to the paper, including notches and grainlines, and date the tracing so you know which version to use.
Fabrics That Drape for Palazzo Pants
Hang a narrow strip of your proposed cloth from your hand and watch how it falls. Does it collapse into soft folds, form a rounded column or stand away like a lampshade? That simple comparison is more useful than choosing by colour alone.
Choose the cloth before committing to the pattern size and fitting approach. A firm cotton can make pleats look deliberate, while a fluid viscose lets the same volume fall closer to the body. Neither is wrong, but they won't produce the same trousers.
Fabric choices for a palazzo pant sewing pattern
| Fabric | Hand | Best for | Watch before cutting |
|---|---|---|---|
| Viscose or rayon | Fluid, often light | Classic flowing palazzos | Check washing-related dimensional change and bias growth |
| Tencel or lyocell | Soft drape, breathable | Everyday wide legs | Rest the length and recheck the hem after hanging |
| Cotton lawn | Light and crisp | Structured summer palazzos | Less flow than viscose; presses cleanly |
| Lightweight chambray | Stable plain weave | Casual trousers | Choose a light weight or the leg will stand away |
| Linen or linen mix | Cool, textured | Relaxed holiday palazzos | Wrinkles and can grow; retain a generous hem allowance |
| Crepe | Dry hand, fluid | Smarter trousers | Test for seam waviness with a fine needle and light foot pressure |
Wash the sample before the whole length
Prewash or condition the fabric using the care method you intend for the finished trousers. Mark a test square before treatment, measure it afterwards and record the change in both directions. Press it without stretching before comparing measurements.
The UK and EU apparel-testing manual gives dimensional-change tolerance benchmarks of approximately ±3% for woven fabrics and ±5% for knitted fabrics or fabrics containing more than 55% viscose, under specified washing conditions. Those are testing benchmarks, not a promise about your particular length or permission to skip preparation.
If the sample changes noticeably, reassess the washing method and allow for that behaviour before cutting. Check opacity too: hold pale lawn or lightweight viscose against your leg in daylight, rather than discovering the need for lining after assembly.
Give slippery cloth proper support
Lay viscose and lyocell fully on the table. A length dangling over the edge can pull the section you're trying to straighten, leaving a fold that looks tidy but isn't on grain.
A neat fold isn't proof of straight grain. Check the pattern grainline against the selvedge along its length.
Let bias-prone cloth settle flat before arranging the pieces. Leave stiff coating-weight fabric for a different silhouette, and test crepe seams before committing to a machine setting.
Gather the Kit and Cut the Real Fabric
Cut the good cloth only after the toile has passed. Collect the corrected tracing, prepared fabric, matching thread, the specified zip or elastic, lightweight interfacing and suitable seam-finishing supplies. Add narrow stay tape if a fluid weave needs local support, but test it first so it doesn't make the crotch seam rigid.
At More Sewing, we sell dressmaking sewing kits alongside cloth suited to this project, including cotton, cotton lawn, chambray, crepe, linen and linen mix, linings, and viscose and Tencel. Our haberdashery includes elastic, binding and tapes, interfacing, Vilene, needles and pins, threads and zips, so you can gather the cloth and compatible notions together.
Read the pattern envelope before buying
A kit can simplify gathering supplies, but still check what your chosen pattern requires. Don't assume an elastic-waist kit contains the fastenings for a fitted waistband.
- Count the pieces: Identify fronts, backs, waistband, pocket bags, facings and any fly pieces before laying out fabric.
- Check allowances: Read whether seam and hem allowances are included. Mark any changes clearly on your tracing.
- Plan the layout: Use the yardage chart for your size and fabric width, then allow extra for straightening, directional prints and future hem adjustment.
- Test the machine: Sew a scrap with the intended needle, thread and seam finish. Check both sides for puckering or loose stitches.
If you're deciding between similar fabrics, wash samples and compare their drape before ordering the full length. Keep a labelled scrap with the care method and machine settings.
Cutting checkpoint: Commit to the real cloth when the waist stays level, sitting is comfortable and the legs hang as a balanced pair.
How to Cut and Sew Palazzo Pants
Keep the fitted upper trousers intact while you organise the leg volume. Three-dimensional body-scanning and parametric trouser-pattern research treated ease as a controlled gap at key locations, then trued the resulting pattern lines. For home sewing, that means making deliberate changes rather than adding width wherever the paper is easiest to cut.
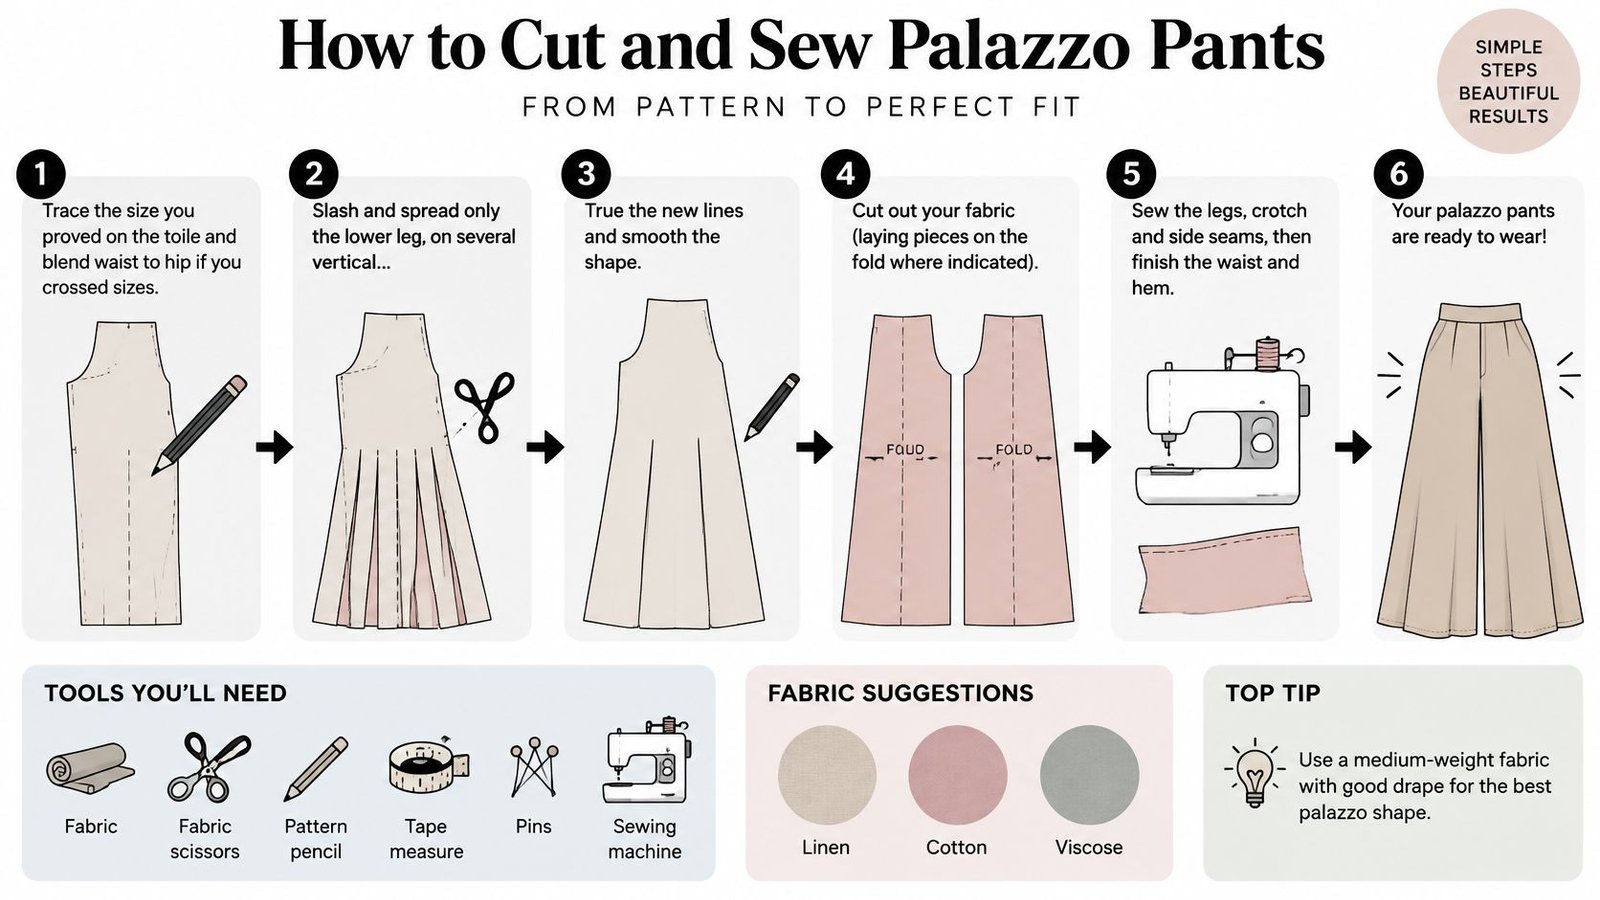
Use this visual sequence beside your pattern pieces while you prepare the work.
Prepare the pattern and protect the grain
Trace the size you proved on the toile and blend waist to hip if you crossed sizes. Transfer the fitted seam lines, not just the rough cut edges. Missing a corrected dart or notch can put the original fitting fault straight back into the trousers.
Slash and spread only the lower leg, on several vertical lines, if you're adding volume. Distribute the opening across the leg, preserve the upper fit and redraw a smooth hem. Don't add more width automatically if the pattern already has the silhouette you want.
True and check adjoining seams. Walk the front and back side seams together, then check the inseams separately, allowing for any intentional easing. The Scottish Qualifications Authority's pattern-construction guidance specifies pattern measurements within 0.5 cm, a useful accuracy target when checking your alterations at the seam line rather than the paper edge.
Cut conditioned fabric on grain. Measure from the grainline to the selvedge at separated points, and cut a single layer if the cloth slips. Remember to mirror paired pieces; matching shapes cut facing the same way won't make a left and right leg.
Stay-stitch curved waist edges and pocket openings immediately. Keep this stitching within the seam allowance and handle the pieces gently. Carrying an unsupported viscose front by its waist can stretch it before you reach the machine.
Assemble without twisting the legs
Press seams as you sew, before another seam crosses them. Lift and lower the iron rather than pushing it along a fluid weave, and use a pressing cloth where the surface marks easily.
Interface the waistband with a lightweight fusible suited to the cloth. Test the bond and finished feel on a scrap. Heavy interfacing can turn a soft waistband into a stiff ring that fights the trousers beneath it.
Complete and press a leg, then sew its partner. Make pockets and any fly components at the stage required by your pattern. Compare inseam length, side-seam length and pocket position before joining the crotch; don't tug a mismatched leg into agreement.
Sew the crotch seam and support the curve where needed. Place the legs right sides together and match the inseam junction carefully. Press the curve over a tailor's ham without flattening the seat shape, and avoid clipping more than necessary.
Fit the closure and test the waist in use. Baste a zip or elastic casing before final finishing, then sit and move in the trousers. For elastic, test recovery as well as stretch, and leave a discreet opening so replacement remains possible.
Hang the trousers overnight before marking the hem. Check the length from the floor while wearing the intended shoes and keep usable allowance inside. Trimming both legs flat on the table can preserve an uneven hang rather than correct it.
For a moving demonstration alongside your pattern instructions, keep the pieces labelled so you can compare the construction stages without losing track of front and back.
Hems Pressing and Repairs That Last
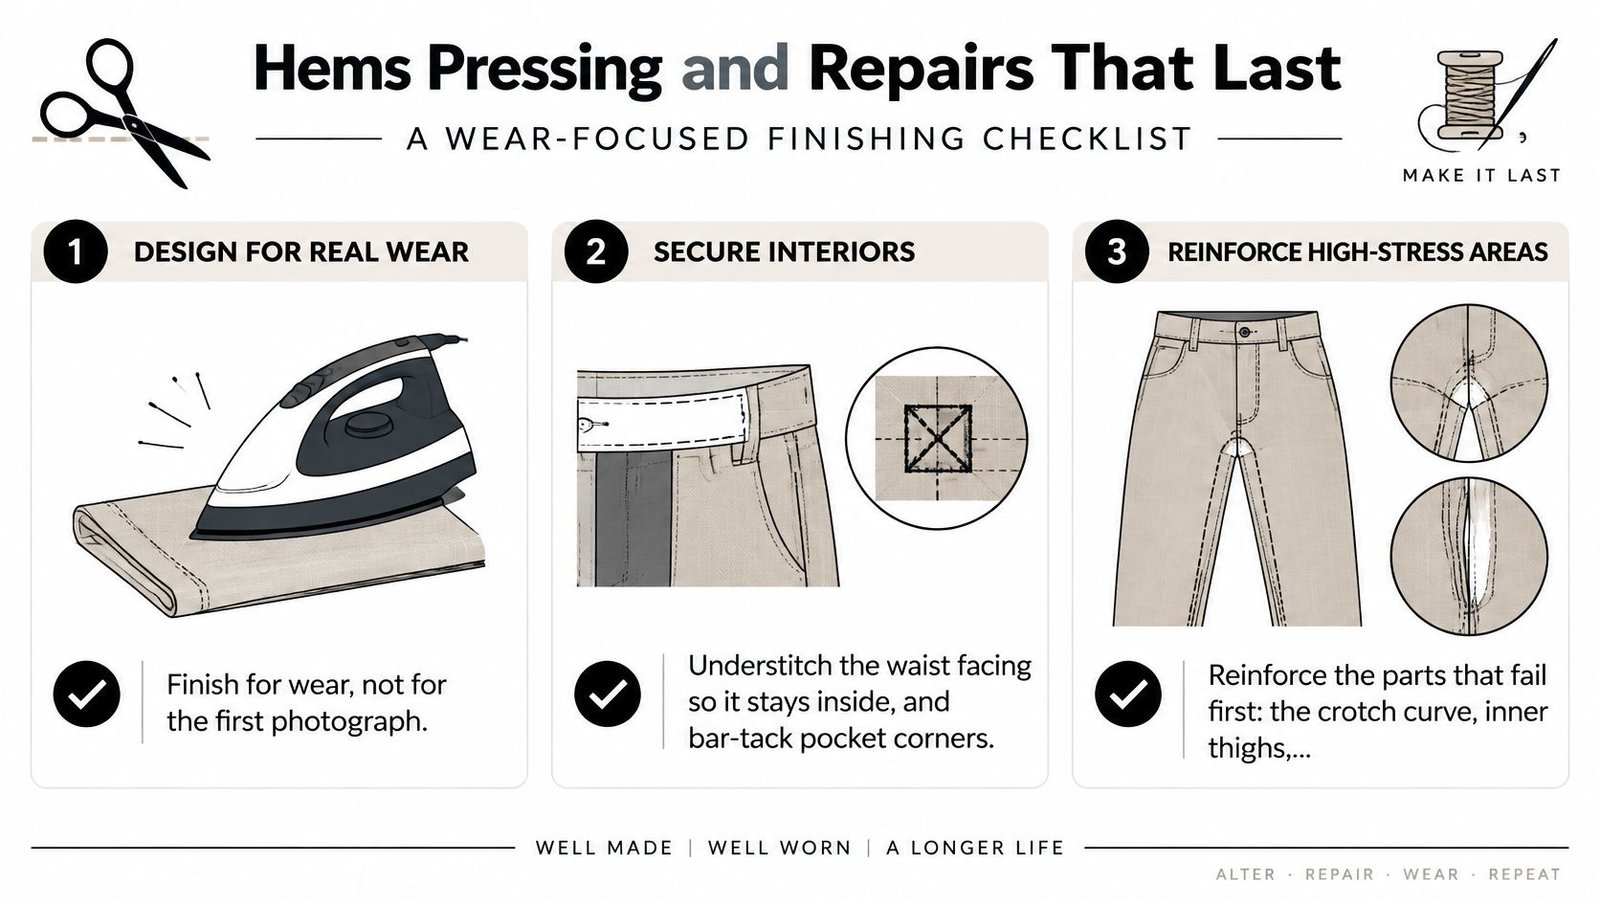
Finish for wear, not for the first photograph. Understitch a waist facing so it stays inside, and bar-tack pocket corners after checking that the openings sit comfortably. Use a press cloth on dark crepe and textured linen, where a hard iron edge can leave an unwanted shine or impression.
Build repair access into the finish. Neaten seam allowances separately where practical, rather than enclosing everything in a finish that makes letting out difficult. Keep labelled scraps large enough for an inner-thigh patch, not just tiny pieces for testing stitches.
Reinforce without making the cloth rigid
The crotch curve, inner thighs, waistband elastic and ground-brushing hems deserve attention before the trousers enter regular use. On light cloth, add a supporting row of stitching close to the crotch seam, or test a short, soft stay where the weave needs support. Avoid a thick reinforcement that only moves strain to its edge.
- Replaceable elastic: Secure the casing opening with removable hand stitches and keep spare matching elastic. Don't stitch through the entire band unless the design needs it.
- Linen and chambray repairs: A visible patch can suit the cloth, provided it doesn't restrict movement. Round patch corners and stitch into sound fabric.
- Fluid viscose repairs: Use a lightweight internal patch with a compatible drape. Dense decorative stitching can leave the repaired thigh noticeably stiffer.
Use this checklist before you put away the remaining fabric and notions.
Keep enough hem to make another adjustment
Retain a generous hem allowance where the fabric and silhouette permit it. As a practical example, you might reserve 4 to 5 cm on a linen pair for later re-levelling, while testing a lighter finish on fine viscose. A deep allowance doesn't have to mean a bulky double turn: neaten the raw edge and hand-stitch the turned hem with relaxed tension.
If you need help choosing and working a discreet hand finish, Display Guru's guide to how to hem pants by hand is a useful companion. Catch only a little of the outer cloth and check the right side frequently for dimples.
After the first proper wash, reassess length and ease before removing spare allowance. Re-mark the hem in the shoes you'll wear most often, and repair thinning fabric before it becomes a hole.
Keep the means to repair the trousers with the trousers' pattern: scraps, care notes, elastic details and the final alterations.
WRAP findings reported by Drapers indicate that 82.2% of clothing repairs displace a new garment purchase, while extending clothing use by nine months can reduce carbon, waste and water footprints by approximately 20–30%. A useful palazzo pattern gives you something you can let out, re-hem and keep wearing, rather than merely finish.
We offer dressmaking fabrics, sewing kits and haberdashery to help you turn a fitted toile into a wearable pair of palazzo trousers. Visit More Sewing to choose your cloth, matching thread, waistband supplies and the notions you'll want to keep for future repairs.
