
You're at the haberdashery counter with a beautiful length of fabric over one arm and a packet of yellow universal needles in the other. The packet says “general purpose”, so it's tempting to use one for everything. That shortcut can turn an otherwise well-cut project into a row of puckered seams, skipped stitches or visible holes.
Learning how to choose the right sewing machine needle for fabric type starts with one simple change in habit. Treat the needle as part of the fabric specification, not as an afterthought. The right choice comes from construction, needle system, point type, size, thread and the way the fabric behaves under pressure.
Why the Wrong Needle Can Ruin a Perfect Project
A customer once brought a metre of unfamiliar cloth to the haberdashery counter, holding it beside a universal needle. The fabric looked delicate, yet its weave was surprisingly dense. Rather than trust the packet label, I would run a short test seam with a finer, sharper point. That small check shows how the fabric responds before valuable material is cut.
The needle is the first machine component to meet the fabric. It carries the upper thread down through the layers, helps form the loop with the bobbin thread, then returns through the hole it has made. Point shape, size and the fabric's construction must work together. A poor match makes the machine force its way through the material.
The result usually appears as a clear failure:
- Chiffon can show pulled threads or visible holes.
- Jersey can ladder or develop skipped stitches.
- Coated canvas can resist the point and produce uneven stitch formation.
- Leather can bend or snap a general-purpose needle.
- A humming, popping or knocking sound can signal resistance before damage is obvious.
A universal needle handles many ordinary wovens, but its label describes a starting point, not a guarantee. UK sizing and point guidance distinguish between fabric behaviours. The UK sewing machine needle guide recommends Microtex or sharp points for silk and tightly woven cotton, ballpoint or jersey needles for knits, and denim or jeans needles for heavy twills and multiple layers.
Needle size matters alongside point type. A fine fabric can be marked by an oversized needle, while a dense fabric may bend a needle that is too light. The thread must also pass cleanly through the eye, or friction and uneven stitches can follow.
Shop-floor rule: If the fabric looks expensive, unusual or difficult to replace, test the needle before cutting the garment pieces.
Use this order at the machine: identify the fabric family, match the needle system and point to its construction, choose the UK size for its weight and fibre, then check that the thread suits the eye and seam.
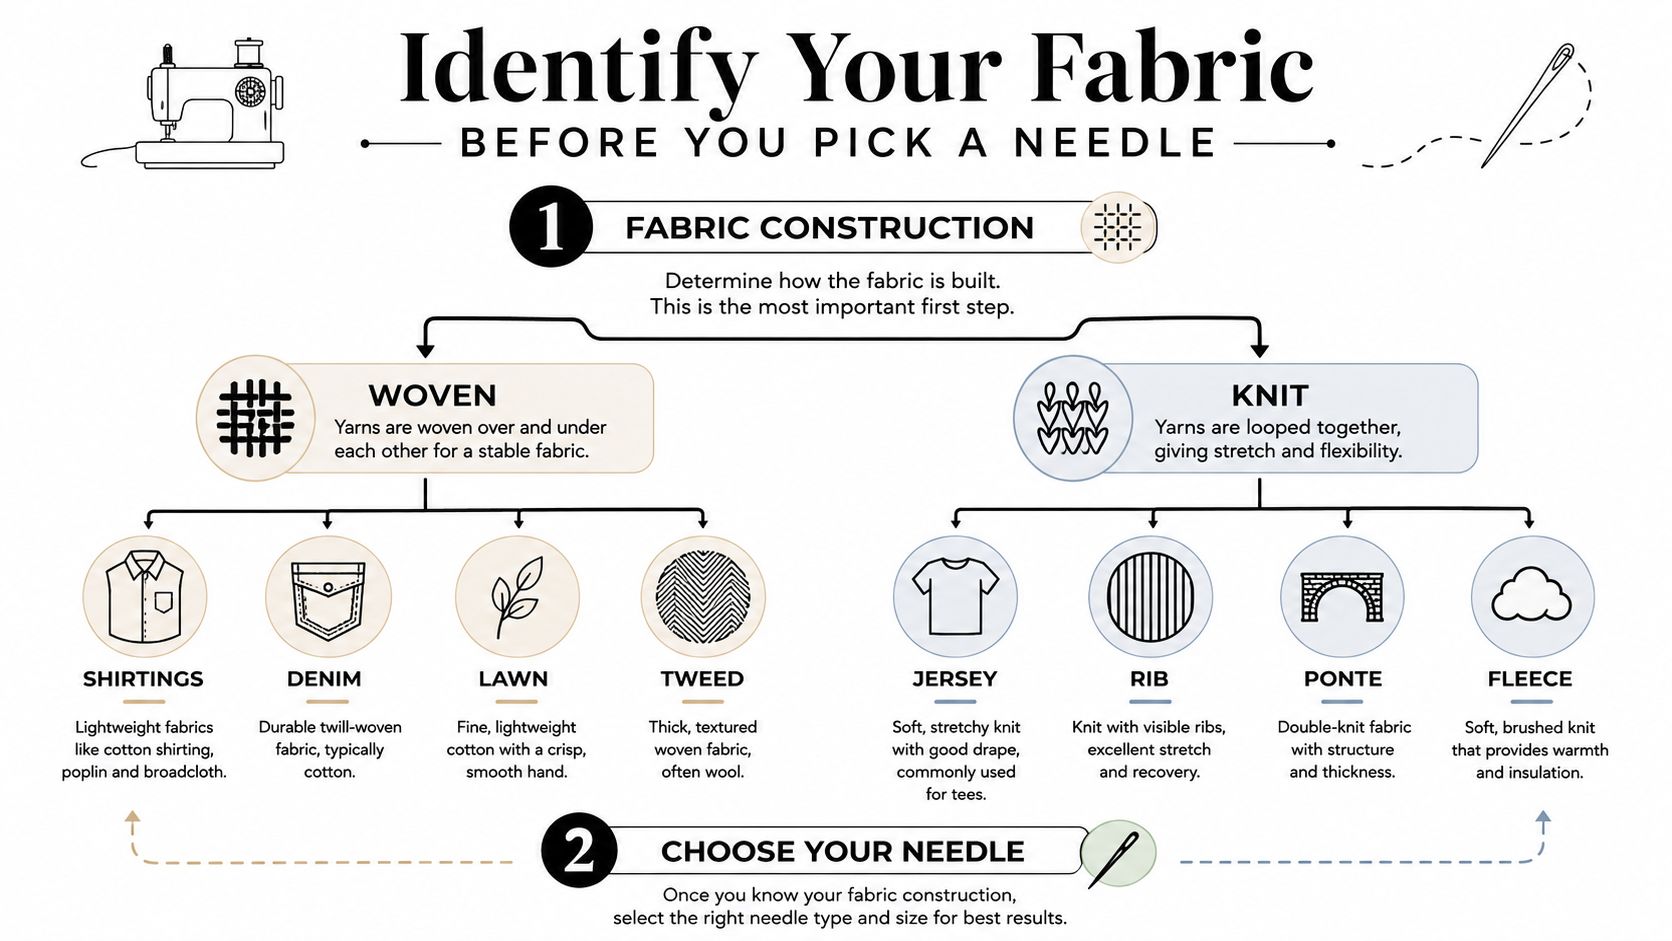
Identify Your Fabric Before You Pick a Needle
The practical UK workflow has two stages. Choose the needle first by fabric construction and weight, then confirm the size against fibre type and thread thickness. This prevents the common mistake of treating all cottons, all wovens or all stretch fabrics as interchangeable.
Start with construction
A woven fabric is made from interlaced threads. Shirting, denim, lawn and tweed belong in this group, but they don't behave alike because their density and weight differ. A knit is built from loops, so jersey, rib, ponte and fleece need a point that can move between loops rather than cutting through them.
Non-woven materials behave differently again. Felt, interfacing, vinyl, leather and laminated canvas don't have a conventional woven structure for the point to pass through. Some need a cutting point, while others need a sharp point that can enter a dense surface without dragging the coating.
Then assess weight, fibre and thread
Hold the fabric to the light, feel its drape and consider how much resistance it offers when folded. UK guidance maps 60/8 to 65/9 to very thin fabrics such as silk, chiffon and organza, 70/10 to 75/11 to lightweight wovens such as voile, taffeta and batiste, 80/12 to 90/14 to medium-weight cotton, linen, poplin and quilting fabrics, and 100/16 and above to denim, canvas and upholstery-weight materials, as shown in this needle and thread reference guide.
Work through the diagnosis rather than guessing:
- Polyester chiffon: Lightweight woven construction, so start with a 60/8 Microtex.
- Loop-back fleece: Medium knit construction, so a 90/14 ballpoint is a sensible test.
- Waxed cotton canvas: Heavy, resistant material, so test a 100/16 denim or leather needle carefully.
The fibre still matters after construction and weight. Fine cotton lawn and dense cotton denim share the same fibre family, but their needle diameters and point requirements are far apart. The correct order is construction, weight, fibre, then thread thickness.
Match Point Type to Fabric Behaviour
Point geometry controls how the needle enters the material. A universal point has a slightly rounded tip, which works well across many standard wovens but sacrifices precision when a fabric demands either a softer entry or a cleaner cut.
A ballpoint or jersey needle pushes between knit loops instead of slicing through them. Start with it for jersey, interlock, rib and many fleece fabrics. UK guidance advises a rounded point for knits, because a sharp Microtex needle can damage knit fibres and contribute to skipped stitches.
Stretch needles extend that rounded-point design. Their point and scarf are shaped for elastic fabrics such as Lycra, spandex, swimwear and highly elastic performance knits. If an ordinary ballpoint still produces skipped stitches as the fabric recovers, test a stretch needle next.
Microtex, or sharp, needles address tightly woven fabrics. Their slim, acute point enters silk, microfibre, ripstop and coated cloth accurately, reducing the tendency to push threads aside. Denim or jeans needles have a reinforced blade and sharp point for heavy twills, thick seams and multiple layers. Leather needles use a wedge-shaped cutting tip for leather and faux leather, where a rounded point may struggle to penetrate cleanly.
| Point type | Best fabric family | Failure mode it prevents | Typical needle sizes (UK/Metric) |
|---|---|---|---|
| Universal | Standard woven fabrics | General stitch instability on ordinary wovens | 70/10 to 90/14 |
| Ballpoint or jersey | Jersey, interlock, rib and fleece | Snags, laddering and pierced knit loops | 70/10 to 90/14 |
| Stretch | Lycra, spandex and elastic knits | Skipped stitches caused by fabric recovery | 70/10 to 90/14 |
| Microtex or sharp | Silk, tightly woven cotton, microfibre and ripstop | Puckering, deflected stitches and fibre damage | 60/8 to 90/14 |
| Denim or jeans | Denim, canvas and heavy twills | Skipped stitches and breakage through thick layers | 90/14 to 100/16 and above |
| Leather | Leather and faux leather | Resistance, bending and ragged entry holes | 90/14 to 100/16 |
Use this working rule: knit fabric plus rounded tip, dense woven plus sharp tip, coated or non-woven material plus an appropriate cutting point. Size and point solve different problems. A reinforced denim blade gives extra support through dense layers, while a larger diameter mainly increases the hole and shaft strength. Choose between them according to the failure you see, such as deflection, bending, skipped stitches or ragged entry, then test the smallest suitable UK size.
Pair Thread and Tension with Your Needle Choice
Thread, needle and tension work as one system. If the needle is wrong for the fabric or thread, turning the tension dial rarely solves the fault. The thread should pass freely through the eye, while the needle should enter cleanly without leaving an oversized hole.
For cotton lawn, fine 60s/2 cotton thread suits a 70 or 80 Microtex needle and a lighter tension setting, roughly 3 to 4. Denim needs a different specification: heavy 12s topstitching thread, a 100 denim or leather needle, and tension around 5 to 6. These examples follow the practical approach to how to choose the right sewing machine needle for fabric type, matching thread to needle and needle to fabric.
| Fabric | Thread weight | Needle size | Approx. tension |
|---|---|---|---|
| Cotton lawn | Fine 60s/2 cotton | 70 or 80 Microtex | Roughly 3 to 4 |
| Denim | Heavy 12s topstitching thread | 100 denim or leather | Around 5 to 6 |
A needle that is too fine for the thread leaves insufficient room in the eye. Friction can shred the thread, cause skipped stitches and lead to early breakage. An oversized needle makes a larger hole, allowing loops to wander and making balanced tension harder to maintain.
Thread fibre also affects the setting. Polyester has more stretch than cotton, so it may need a small tension adjustment rather than the setting used for a similar cotton thread. Standard sewing thread in a topstitching needle is another mismatch. The larger eye and groove do not turn ordinary thread into heavy topstitching thread.
Set the combination by fabric behaviour, then adjust tension one notch at a time. A heavier fabric generally needs thicker thread and a larger needle, but the scrap test confirms whether that pairing is clean before the finished seam.
Test on a Scrap and Troubleshoot by Symptom
A scrap test reveals quickly whether the needle, thread and machine settings agree before you commit to the first important seam. Use the same fabric layers, interfacing and thread planned for the finished item. A spare piece from the cutting table can expose a poor specification match before it reaches the garment.
Cut a 20 cm scrap, fold it where the project includes a seam allowance or several layers, then sew a straight seam followed by a small circle. The straight line exposes skipped stitches and tension faults. The curve shows whether the fabric shifts, puckers or resists as the feed changes direction.
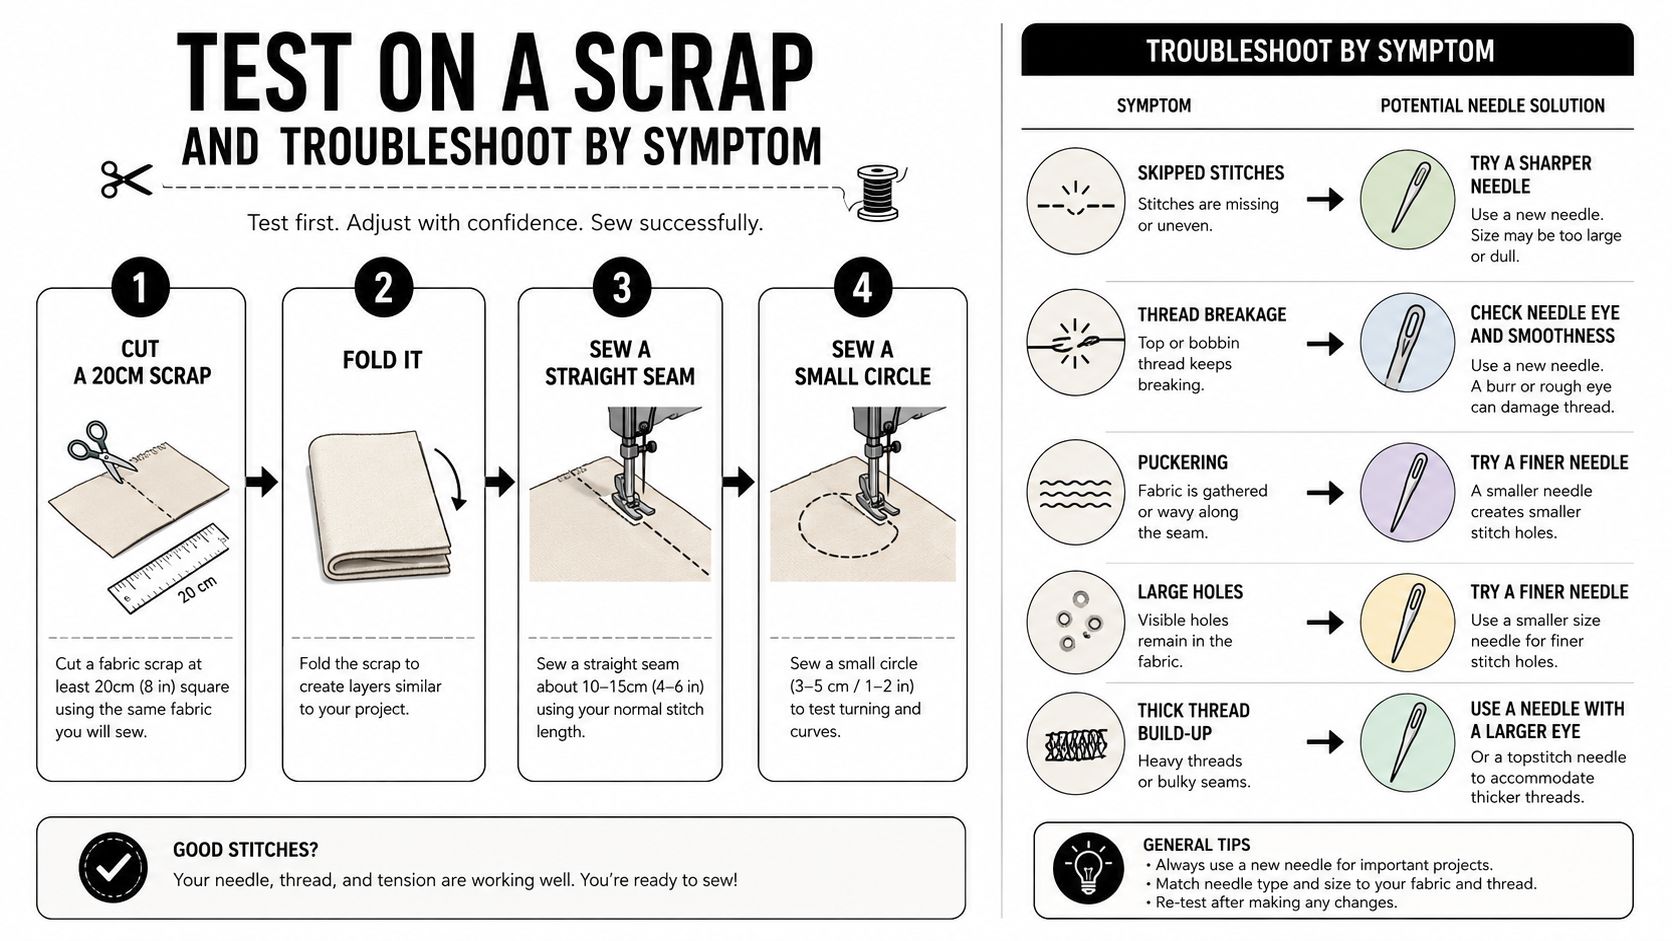
Use each symptom to choose the next adjustment:
- Skipped stitches on a knit: Change from a universal needle to a ballpoint. For highly elastic knit, try a stretch needle.
- Skipped stitches on tightly woven cotton: Replace the needle first, then check that the thread follows the correct path.
- Puckering or shredded thread: Try a smaller needle with finer thread. Excessive tension can make the damage more visible.
- Snags or pulled threads on velvet or laminated cloth: Use a Microtex or sharp point.
- A bent needle or audible thump on denim or leather: Fit a reinforced denim or leather needle, test the next suitable UK size and slow the machine.
Match the needle to the failure mode. Skipped stitches usually call for a different point geometry. Ladders, snags or visible holes may require a less aggressive point or smaller needle. If thick seams break needles, use a reinforced denim or quilting needle rather than increasing thread tension.
Listen as well as inspect the stitching. Humming, popping or knocking can signal resistance before the seam looks wrong. Replace a needle at regular intervals, with practical guidance commonly placing replacement around 6 to 8 hours of sewing, and sooner if it bends, blunts or develops a burr, as noted in this quilting and sewing needle selection guide.
If the needle matches the fabric and the upper thread is routed correctly, inspect the bobbin area. Uneven bobbin tension, lint, a damaged bobbin case or incorrect threading can produce symptoms that resemble a needle fault.
Quick Reference Chart and Needle Care Essentials
Keep this chart beside the machine, then confirm the choice on a fabric scrap. Fabric weight, weave and surface can vary within the same family, so construction takes priority over a label such as “cotton” or “stretch”.
| Fabric family | Recommended size | Point type |
|---|---|---|
| Cotton lawn | 70 | Microtex |
| Cotton poplin and shirting | 80 | Universal |
| Denim and canvas | 90 to 100 | Denim |
| Jersey and stretch fabrics | 80 | Ballpoint or stretch |
| Silk and satin | 70 to 80 | Microtex |
| Fleece and minky | 90 | Ballpoint |
| Leather and faux leather | 90 to 100 | Leather |
| Vinyl and laminated fabrics | 90 | Microtex |
| Shearling and heavy coat fabrics | 100 | Leather |
These are UK size references. A larger number indicates a heavier needle, but the point still needs to suit the fabric's behaviour. A size 90 needle is not automatically right for every thick material, just as a size 70 is not suitable for every fine one.
Needle care prevents avoidable stitching faults. Fit the needle with the flat shank facing the direction specified for your machine, tighten the screw securely and never sew over pins. Keep spare needles in labelled slots or a dedicated case, arranged by size, so you can change one without interrupting your work. Loose needles in a tin quickly become difficult to identify.
Retire a needle when it bends, feels blunt, develops a burr or starts producing skipped stitches, snags or unexplained holes. Adhesive from interfacing, dense layers and repeated impact can affect performance before the needle breaks. If the same fault remains after fitting a fresh needle, check threading, bobbin tension, lint and the bobbin case rather than repeatedly changing sizes. This quilting and sewing needle maintenance reference also covers practical needle care.
More Sewing's “Picking The Right Sewing Machine Needle” page includes guidance for denim and heavy fabric, including jeans or denim needles in 90 to 100.
Use the chart as a starting point, then let the test seam and failure mode decide the final needle.
