
Blog, Dressmaking, Guides
How to Use Bias Tape for Clean, Curved Edges
You've just taken a blouse off the machine and the neckline looks more like a ripple than a smooth curve. The fabric may have behaved perfectly through the seams, yet the opening has stretched, puckered, or refused to lie flat. That's the moment bias tape earns its place in the sewing box. A carefully chosen strip can turn an untidy raw edge into a clean, durable finish without relying on a bulky facing.
The technique is simple once you understand which fold to use, how much ease to allow, and when to stop handling the fabric. The wrong tape, stretched around a curve, will make the problem worse. The right tape, pressed and stitched in controlled stages, will follow a neckline, armhole, casing, or opening neatly.
What Bias Tape Actually Does in a Garment
In a fitting room, a cotton lawn blouse can look almost finished until the neckline begins to ripple like a mouth. The edge has been cut and sewn, but it hasn't been stabilised. Once a self-made strip is cut on the bias, attached carefully, pressed around the curve, and stitched down, the neckline settles into a much cleaner shape.
Bias tape is a narrow strip of woven fabric cut diagonally across the grain. The weft threads run at an angle rather than parallel or perpendicular to the fabric edge, allowing the strip to flex around arcs. UK sewing guidance describes this diagonal grain as the reason bias binding can travel around necklines, armholes, and other shaped edges without puckering when it's handled correctly, as explained in this UK guide to bias binding.
Three jobs in one narrow strip
Bias tape does more than hide an unfinished edge.
- It encloses fraying fibres. A raw neckline or armhole is vulnerable to handling and laundering. Wrapping it inside the tape gives the edge a finished barrier.
- It follows a curve. A straight-grain strip has very little give and tends to pull, kink, or form small ridges around an arc. Bias-cut fabric can mould to the shape more readily.
- It creates a visible design line. Matching tape produces a quiet internal finish. Contrast tape can outline a neckline, hem, pocket, or bag edge deliberately.
That makes bias tape useful alongside familiar dressmaking techniques. It can replace a facing on a lightweight top, bind a seam allowance, form a casing, finish a quilt edge, cover cord for piping, or frame a bound buttonhole.
A straight-grain strip may look similar on the cutting table, but it behaves differently under the presser foot. It resists the curve instead of absorbing it. Bias tape works because the diagonal arrangement lets the woven structure shift enough to sit around the opening.
Practical rule: Bias tape should be eased around a curve, never dragged around it under tension.
The method below assumes you're comfortable threading a sewing machine, controlling a seam allowance, pinning accurately, and pressing without scorching delicate fabric. If the neckline is already stretched, stabilise it before binding. Tape can finish a curve beautifully, but it can't correct careless handling of an unstable edge on its own.
Single-Fold vs Double-Fold Bias Tape
For a simple cotton lawn cami neckline, the choice between single-fold and double-fold tape changes both the appearance and the amount of work at the machine. Neither format is universally better. They solve different finishing problems.
Single-fold bias tape is pressed with both long edges folded towards the centre crease, leaving a flat strip with a crease along each side. It's useful when you want the tape to sit as a flat facing or a visible contrast band. It also gives you a convenient starting point if you're making your own double-fold tape.
Double-fold tape is folded in half again along its length. The fold encloses the raw edge, so the tape can slip over the seam and be secured with a controlled second pass. That makes it particularly practical for a neckline, armhole, casing, hem binding, or any edge where you want a tidy finish without separately turning and pressing a facing.
| Feature | Single-Fold | Double-Fold |
|---|---|---|
| Shape | Both long edges fold towards the centre | Single-fold tape folds in half again |
| Best garment use | Flat facings, decorative bands, selected wider openings | Necklines, armholes, casings, and hem bindings |
| Visible finish | Can create a broader exposed line | Gives a compact edge that encloses the raw fabric |
| Fabric pairing | Useful on stable, heavier work or craft projects | Lightweight versions suit cotton lawn, voile, and viscose |
| Handling | Needs accurate placement and often a separate wrap or fold | Faster for a clean edge finish |
Match the format to the fabric
On delicate cotton lawn, voile, or viscose, lightweight double-fold tape usually keeps the edge supple. Heavy tape can overpower the drape and leave a ridge inside the garment. For canvas and craft projects, single-fold tape can be easier to position as a broad, deliberate trim, particularly where the finished piece needs visual weight.
Ready-made tape is often discussed by its finished width, so check the packaging before cutting or ordering. 12 mm finished tape suits compact bindings, while 25 mm finished tape is useful for casings and waistbands. For self-made tape, a sewing reference gives the planning formula as four times the finished width plus two seam allowances, as outlined in this bias and bias-binding guidance.
The shop-floor rule is straightforward: choose double-fold for garment bindings, and single-fold for homewares and decoration. There are exceptions, especially when a pattern specifies a facing-style application, but that rule prevents most beginners from adding unnecessary bulk to a light garment.
Making Your Own Bias Tape From Fabric
Self-made tape is worth the effort when a blouse, dress, or accessory needs an exact colour match. Cotton lawn, viscose, and quilting cotton can all produce useful binding, although the softer fabrics need more careful pressing and support.
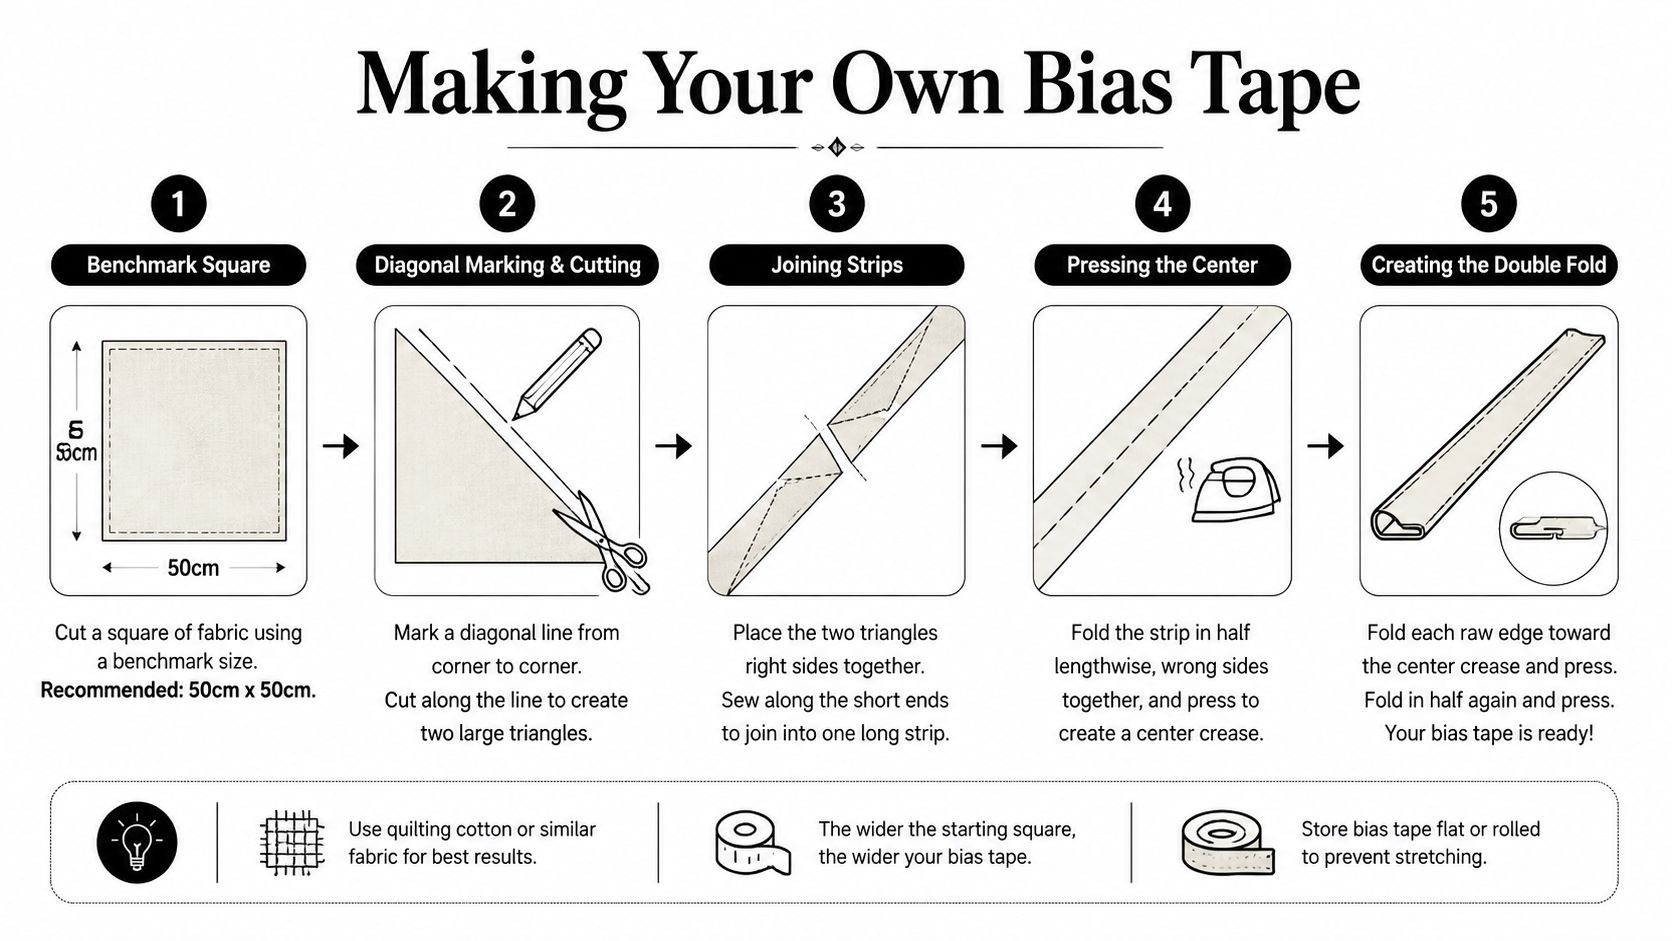
Use a 50 cm × 50 cm square as a planning benchmark. One UK tutorial states that this square yields about 70 cm of finished binding, while another describes the continuous-strip method using the same square as a starting point. Treat the result as a planning guide, then allow extra for joins, corners, and any waste. You can read the cutting and joining approach in this tutorial on making bias binding.
Mark and cut the strips
- Place the fabric right side down and mark the true diagonal from corner to corner. This is the bias line.
- Mark parallel lines across the square at the required cutting width. For 12 mm finished tape, a 24 mm strip is a practical starting point when working with a narrow seam allowance.
- Cut accurately with a 45 mm rotary cutter and a quilting ruler. Scissors work, but a rotary cutter makes long, parallel edges easier to maintain.
- Test the strip before joining it. Pull gently across its width and along its length. It should show the flexible behaviour you need around the garment opening.
A UK-made guide recommends cutting along a 2.5 cm line from the fabric edge when using a ruler and rotary cutter, as described in this bias-binding method. Width control matters because an uneven strip produces an uneven finished edge.
Join the strips into one length
Place two strips right sides together at a 90-degree angle, offsetting them by one strip width. Stitch diagonally across the join, then trim the seam to about 6 mm and press it open. Joining at a right angle distributes the bulk and keeps the finished strip flexible, which is particularly helpful when the binding must travel around a long neckline or armhole. Sew Magazine's instructions for joining bias binding show this approach for creating enough continuous length.
Press the folds
Press the seam allowances open before folding the long edges. For single-fold tape, press each long edge towards the centre crease. For double-fold tape, fold the prepared strip in half again so the raw edges sit inside the fold.
A bias tape maker keeps the folds consistent. A small amount of lightweight interfacing can add body when the fabric is too soft to hold a clean crease, but test it first because extra structure can make a fine neckline feel stiff.
Roll the finished tape onto a bobbin or a strip of card. Keeping it flat prevents new creases from appearing in storage and makes it easier to feed the binding smoothly while you sew.
Applying Bias Tape to Straight and Curved Edges
Start with a straight edge, such as a table runner, pocket edge, or hem sample. Straight lines let you learn the two-pass sequence without also managing the movement of a curve.
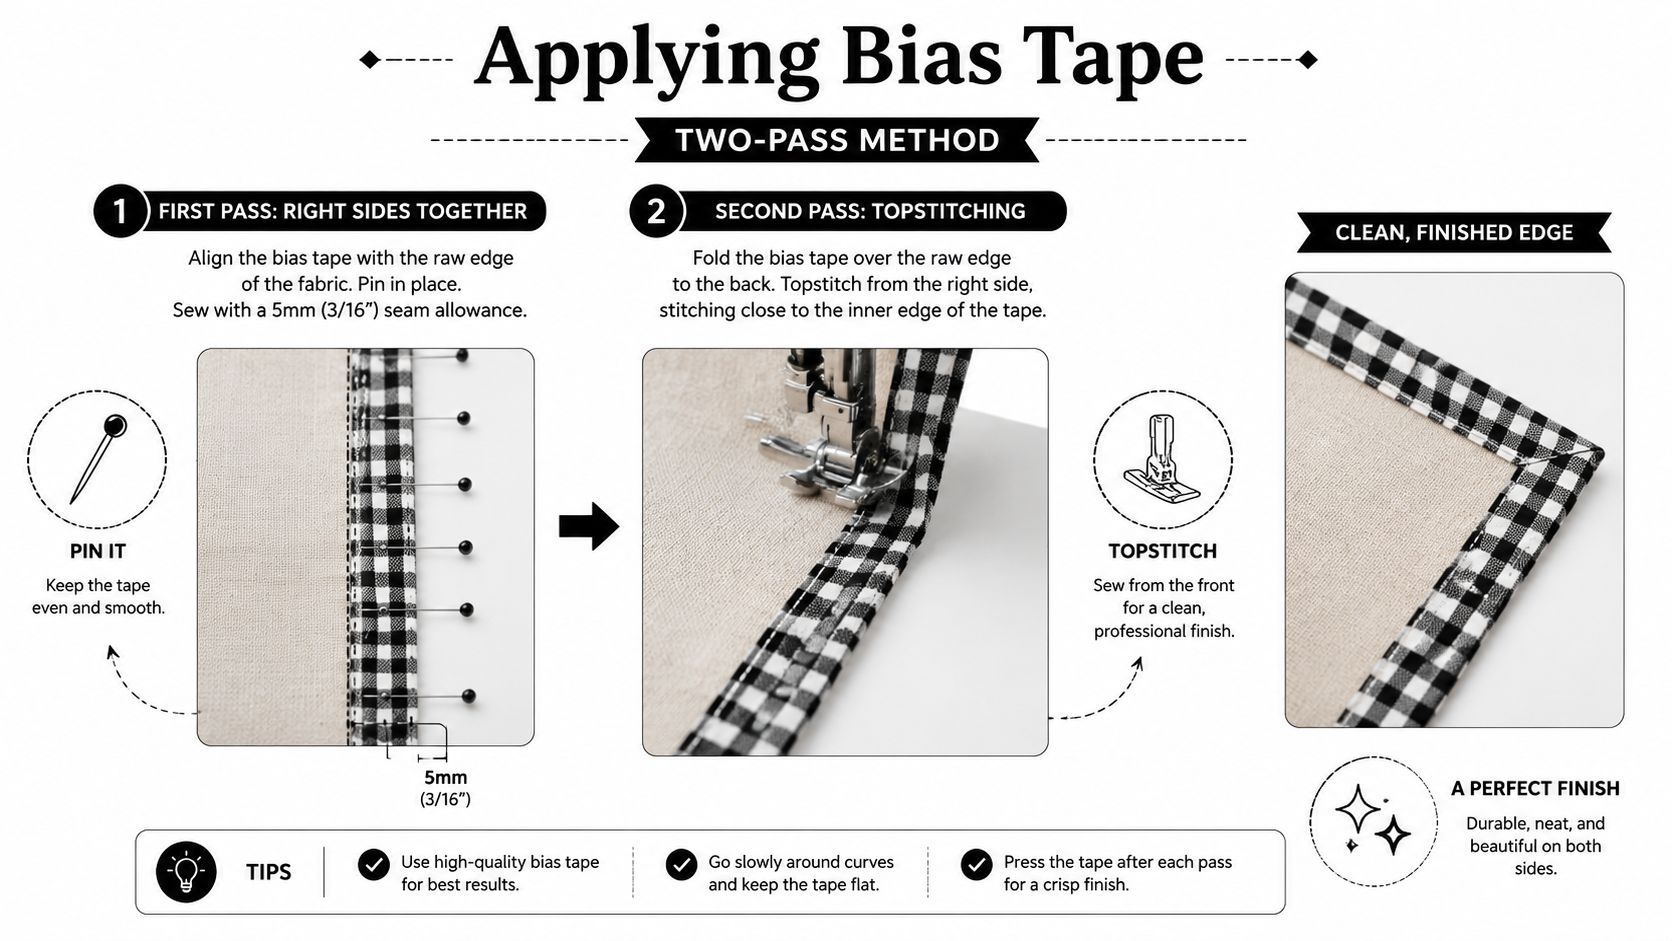
Open the double-fold tape and align one folded edge with the fabric's raw edge, right sides together. Sew along the crease closest to the raw edge, using the seam allowance your project requires. For some UK sewing projects, the first row is worked on the crease with a 2.0–2.8 mm stitch length, as described in this practical bias-tape guide. Keep the tape and fabric edges aligned rather than allowing the tape to drift.
Press the seam allowance towards the tape or open it where the fabric benefits from reduced bulk. Then wrap the tape over the raw edge so it covers the first line of stitching. From the right side, stitch in the ditch or close to the folded edge, catching the reverse side underneath. This bias-binding explanation describes the same open, sew, wrap, and secure sequence.
Let the bias take the curve
On a scoop neckline cut in cotton lawn, pin or clip the tape gradually around the opening. Ease it into the curve without stretching. If the tape is pulled, it contracts after stitching and creates a wavy neckline. If the fabric itself has stretched, support it while applying the binding rather than trying to force the tape to correct the shape.
Use more pins around a tight curve and fewer along a gentle one. Clips are often kinder to slippery lawn and viscose because they don't distort the edge as you handle it. A walking foot can also help feed layers evenly when the fabric shifts beneath a standard foot.
Press after the first pass, then press the wrapped edge again before the final stitch. Pressing flat at each stage is a recurring recommendation in UK sewing guidance because it sets the fold and helps the binding settle around shaped openings.
Check the machine setup
- Needle: Match the needle to the fabric. A fine needle suits lawn, while a microtex needle can help with a smooth woven surface.
- Thread: Use a thread weight that doesn't overpower the tape, and match the thread colour to the binding when you want the stitching to disappear.
- Stitching: Begin with a moderate stitch length and test on scraps. The first pass should control the seam, while the second should secure the fold without drawing up the edge.
Here's a clear visual reference for the sequence:
Mitred Corners, Piping and Bound Openings
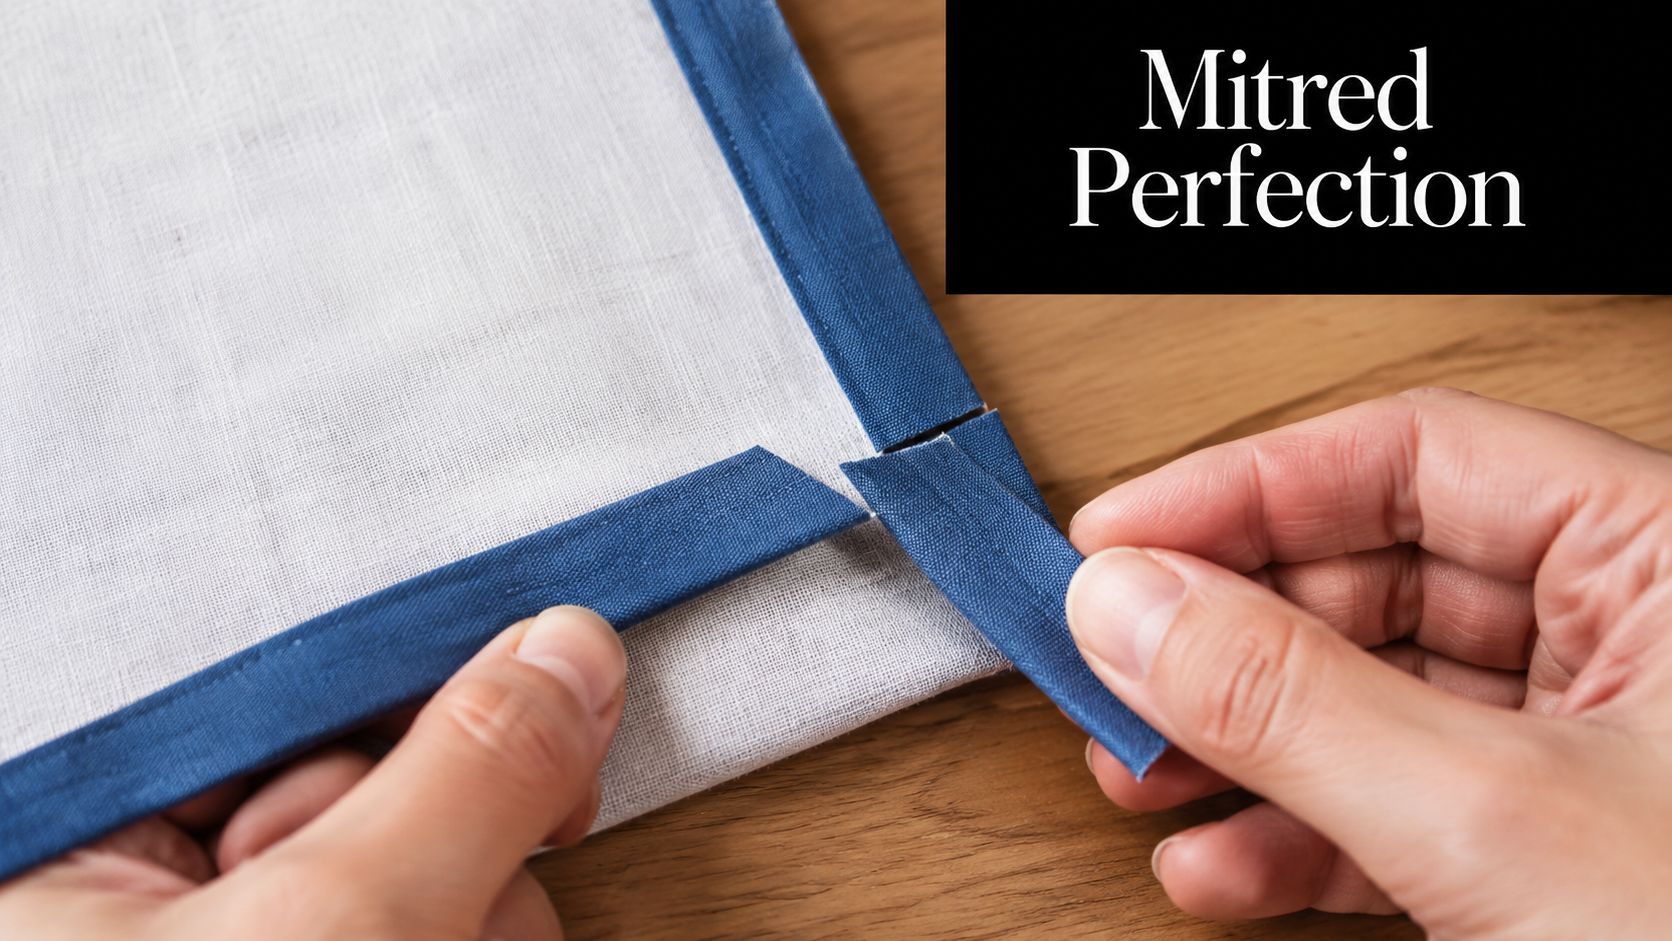
Bias tape isn't limited to round necklines. On a square cushion or placemat, a mitred corner keeps the binding from forming a thick, untidy lump.
Sew along the first edge and stop a tape-width before the corner. Snip diagonally towards, but not through, the stitching. Fold the tape back on itself, then fold it down along the next edge to create the mitre. Press the fold, check that the outer edges meet cleanly, and resume stitching. Practise the movement on calico before cutting into linen, lawn, or a special deadstock fabric.
Turn single-fold tape into piping
For piping, single-fold tape wraps around narrow cord. Place the cord inside the fold and stitch close to it with a zipper foot. The foot lets you get close to the cord without sewing over it, producing a raised edge for a cushion, bag, jacket lapel, or pocket.
Stable cottons and medium-weight linens are forgiving choices for practice. Very loose cloth can fray at the cut edge, while thick canvas may resist a narrow fold. If the fabric lacks body, a suitable lightweight interlining can help the piping hold its shape, particularly on structured accessories.
Frame an opening
Bound buttonholes use narrow strips to frame a slit with two clean lips. The strips need accurate placement, firm pressing, and secure bar tacks at the ends. A keyhole opening on a linen shirt uses the same principle on a smaller, more curved scale. Bias tape can also outline the edge of an exposed opening where a conventional facing would add too much bulk.
The critical difference is control. Mark the opening clearly, stitch the construction lines precisely, and clip only where the seam needs to turn. Rushing the corner or trimming too aggressively can weaken the detail before it reaches the garment.
Common Bias Tape Mistakes and How to Fix Them
The assumption that bias tape will automatically flatten a curve causes most disappointing results. Bias tape has flexibility, but it still needs an even cut, a stable edge, and careful handling.
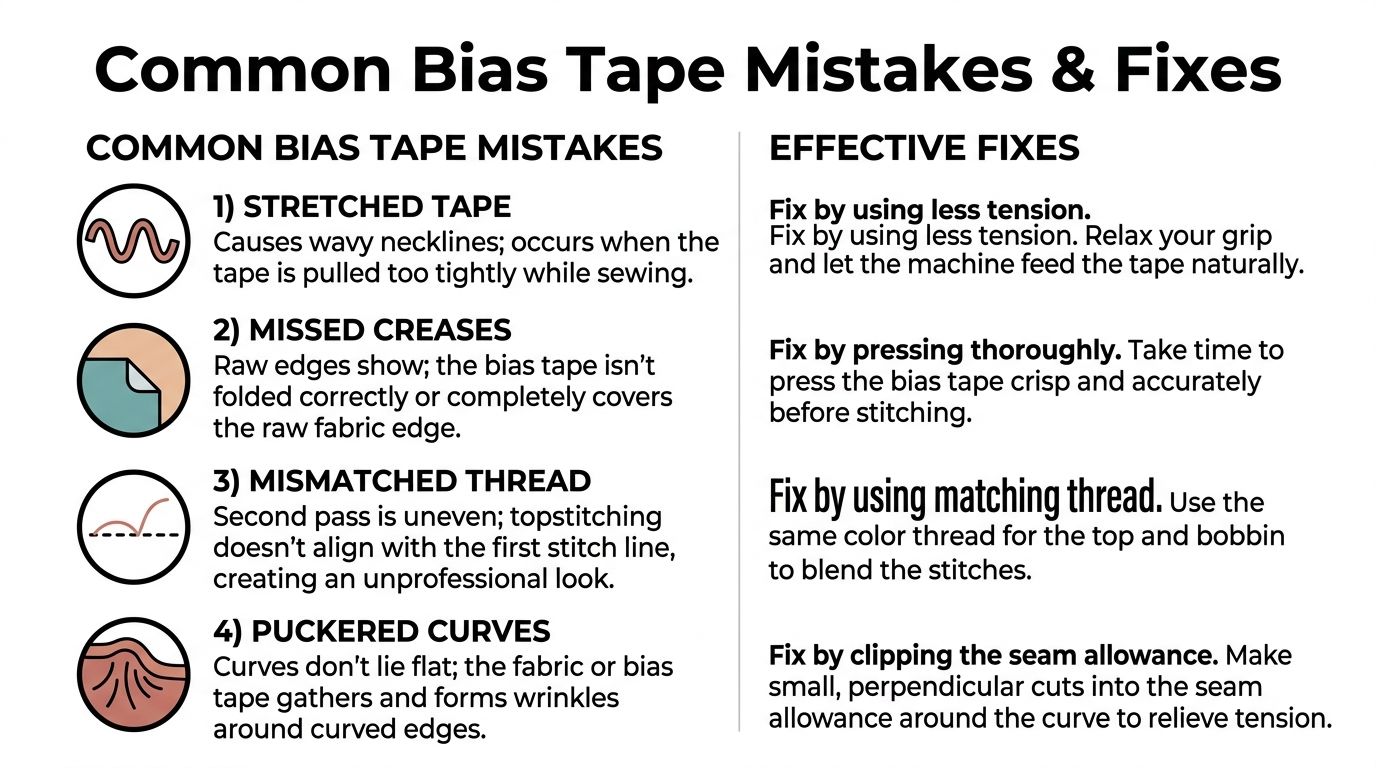
- Stretched tape creates a wavy neckline. Unpick the affected section if necessary and replace it with a relaxed strip. Let the bias follow the edge rather than pulling it into place.
- Missed creases leave raw fabric showing. Press the fold before pinning, then check from both sides before the final pass. The second row should cover the first line cleanly.
- Uneven thread colour makes the second pass conspicuous. Match the thread to the tape when you want a discreet finish. A contrasting thread can work, but only when the stitching is intentional and even.
- Tight tension puckers the curve. A 90/14 ballpoint needle, matching polyester thread, top tension lowered to 3, and a stitch length of 2.5 mm are suggested settings for one slippery or stretchy setup, but test them on a scrap first. The correct combination depends on the fabric and machine.
For slippery lawns or viscose, a walking foot can reduce uneven feeding. Clips may also keep the layers aligned without piercing or shifting the fabric.
Bench test: Bind a calico scrap with the same tape, needle, thread, and machine settings before touching the garment.
If the sample ripples, inspect the tape first. Re-cut a relaxed strip, press the folds again, and check that the seam allowance is fully enclosed. More Sewing's range of fabrics and haberdashery can supply the practical materials needed to test and correct these problems.
Fabrics and Notions to Stock for Bias Tape Projects
A useful bias-tape kit starts with fabric that presses cleanly. Cotton lawn, viscose challis, and Liberty Tana Lawn are suitable choices for self-made tape when you need a soft garment finish. Stable shirtings and quilting cottons are better practice fabrics because they hold a crease and make the stitching easier to inspect.
For ready-made projects, look for Hemline and Wrights single-fold and double-fold packs. The essential tools are a 45 mm rotary cutter, quilting ruler, fabric-marking pencil, fine ballpoint pins, and a Clover clip-on bias tape maker in 12 mm and 18 mm sizes. Gutermann Sulky cotton thread is useful where a cotton thread suits the project, while a size 90 microtex needle can handle finer lawn fabrics when the machine and fabric combination calls for it.
Match the thread colour to the tape, not automatically to the garment. A small contrast binding reel inside a hem or neckline is an easy way to make an otherwise hidden finish look considered.
More Sewing offers fabrics, haberdashery, ready-to-sew kits, and practical tools for making and applying bias tape, including options for lightweight garments and stable practice samples. Visit More Sewing to choose your fabric, binding, cutting tools, and finishing notions for the next curved-edge project.
