
Blog, Dressmaking
How to Sew a Collar That Sits Flat and Looks Sharp
You've finished sewing the shirt, slipped it over your head, and reached for the mirror. The neckline looks promising, but the collar flips at the back, one point droops, and a glimpse of the underside appears above the roll. It's tempting to blame the pattern or the machine, but a crisp collar usually comes from small, repeatable habits rather than advanced equipment.
Learning how to sew a collar becomes much easier when you treat it as a sequence of checkpoints. You'll prepare the fabric, control the curved edges, remove bulk at the corners, press before moving on, and check the right side before a small problem becomes difficult to undo.
Why Most Homemade Collars Don't Look Quite Right
A collar rarely looks wrong because of one dramatic mistake. More often, several tiny shortcuts collect in the same place. You may have pinned the neckline without matching every marking, stitched around a curve while the fabric stretched, turned the points before trimming the seam allowance, and left all the pressing until the garment was almost complete.
The result is familiar. The back seam twists slightly when the shirt is worn. The collar points look rounded rather than defined. The under-collar creeps above the upper collar, or the stand ripples where it joins the neckline. None of these problems means you're incapable of sewing garments. They're signs that the collar needed more preparation and less rushing.
Practical rule: Most “hard” collars are simply well-pressed collars.
Pressing shapes the construction, settles the seam allowance and encourages the upper collar to roll over the underside. It can't correct an incorrectly cut piece or a badly matched neckline, but it can make accurate sewing look remarkably polished. Press with the iron lifting and lowering rather than dragging it across the fabric, especially around the curved stand.
Read the symptoms before unpicking
A twisted collar usually points to mismatched centre-back or shoulder markings. Soft points often indicate excess fabric trapped inside the corner. A visible under-collar may mean the lower layer wasn't trimmed or graded enough, while a wavy stand can come from stretching the neckline or skipping understitching.
The construction itself has a long history. By the mid-19th century in the UK, the shirt collar had settled into a visible shaped collar joined to a separate stand or band. The shaped collar used two matching fabric pieces, stitched right sides together, turned and pressed flat, a method that remained unchanged through the 19th and 20th centuries (Gardner's research on shirt-collar construction). That continuity explains why modern patterns still depend on accurate seam lines, careful turning and deliberate pressing.
The rest of the process works the same way. Each stage has a simple checkpoint, so you're not blindly following a pattern instruction. You're building a habit you can use on a shirt, blouse, dress or costume collar.
Picking Fabric and Interfacing for a Crisp Finish
Start with the garment you want to wear, not with the stiffest interfacing in your sewing box. A collar should support the fabric's character. Interfacing adds stability, but it shouldn't turn a soft blouse into a cardboard bib or make a lightweight collar too bulky to turn cleanly.
For a cotton poplin shirt, choose a crisp woven fusible interfacing that's slightly lighter than the fashion fabric. You might cut the stand interfacing on the bias to give the neck area controlled flexibility, while keeping the upper-collar interfacing on the grain for stability. For a drapier rayon blouse, a lightweight knit interfacing can preserve movement. A narrow strip of organza in the stand can also support the neckline without making the whole collar rigid.
Test before cutting the final pieces. Fuse a small swatch, allow it to cool, then fold it along the intended collar edge. Hold it upright and check whether the fabric still rolls naturally. Scrunch the sample gently in your hand, then press it again. If the interfacing bubbles, feels much heavier than the fabric or makes the fold resist your fingers, choose a lighter option.
| Fabric | Interfacing for upper collar | Interfacing for stand |
|---|---|---|
| Cotton poplin | Light woven fusible, on grain | Light woven fusible, bias-cut where the pattern permits |
| Rayon or viscose | Lightweight knit fusible | Lightweight knit fusible or a narrow organza support |
| Lawn | Very light woven fusible | Very light woven fusible, tested carefully |
| Sheer fabric | Sheer sew-in support or very light interfacing | Narrow organza strip or another unobtrusive support |
| Quilting cotton | Light woven fusible if the fabric is stable | Light woven fusible, avoiding unnecessary thickness |
Fusible or sew-in
Fusible interfacing is the friendliest starting point because it stays in place while you assemble the layers. Use a pressing cloth and follow the temperature recommended for your fabric. Avoid sliding the iron, which can distort the adhesive and stretch the collar.
Sew-in interfacing gives you more control with delicate or heat-sensitive fabrics. Baste it inside the seam allowance or tack it lightly to the wrong side before joining the collar layers. On fine fabric, trimming the interfacing seam allowance before fusing or tacking can reduce thickness, a technique also described in this UK collar-sewing guidance.
Pattern instructions may specify a different weight for the collar and stand, so treat the pattern recommendation as your starting point, then confirm it with a fabric sample. Before cutting, gather the fabric, interfacing, paper pattern, fabric scissors, thread, pins or clips, a point-turning tool, a seam gauge and a reliable iron.
Preparing Your Pattern and Collar Pieces
A collar can look wrong before the first seam is sewn. If its marks shift, its neckline stretches, or its two halves differ slightly, accurate stitching cannot fully correct the finished shape. Set up each piece carefully, then use a checkpoint before continuing.
Transfer every pattern marking to the fabric, including the centre back, front notches, shoulder points, foldlines, and dots showing where the collar meets the stand. Tailor's tacks stay visible on medium-weight fabric during handling. A water-soluble pen suits stable, washable fabric, but test it on a scrap first. Mark both collar pieces. The under-collar often controls how the completed collar rolls, so it needs the same information as the upper collar.
Stabilise before the curve stretches
Stay-stitch the curved neckline edges on both stand pieces immediately after cutting. Sew from one end towards the centre, then start at the opposite end and sew back towards the centre. The two stitching lines meet in the middle, helping the curve remain balanced instead of being pushed in one direction. The The Pattern Pages guide to attaching a collar on a stand also describes this centre-out method and uses a seam allowance slightly shorter than the pattern's usual allowance.
If the pattern permits, trim the under-collar by about 2 mm along its outer seam. Taper the adjustment towards the edges, rather than cutting a blunt step. The upper collar can then roll underneath more easily, reducing the risk of the under-collar showing on the outside, as demonstrated in The Avid Seamstress collar tutorial.
For symmetry, cut on folded fabric when its print, nap, or weave allows. Use single-layer cutting when matching requires it. Before removing the pattern, compare both pieces. Place them with right sides facing and check the points, curves, and centre-back edges.
Press both collar pieces flat. Fuse the interfacing without stretching, then let the fabric cool completely so the adhesive sets. Fold the paper pattern along its seamlines to check the intended shape. Your checkpoint is simple: the pieces should match, lie flat, and carry all markings before you pin their right sides together.
Sewing the Collar and Stand Together
Think of the shaped collar and the stand as one developing unit. The shaped collar creates the visible points and roll, while the stand controls how that shape sits around the neck. If you rush the first part, the stand has to carry every distortion into the neckline.
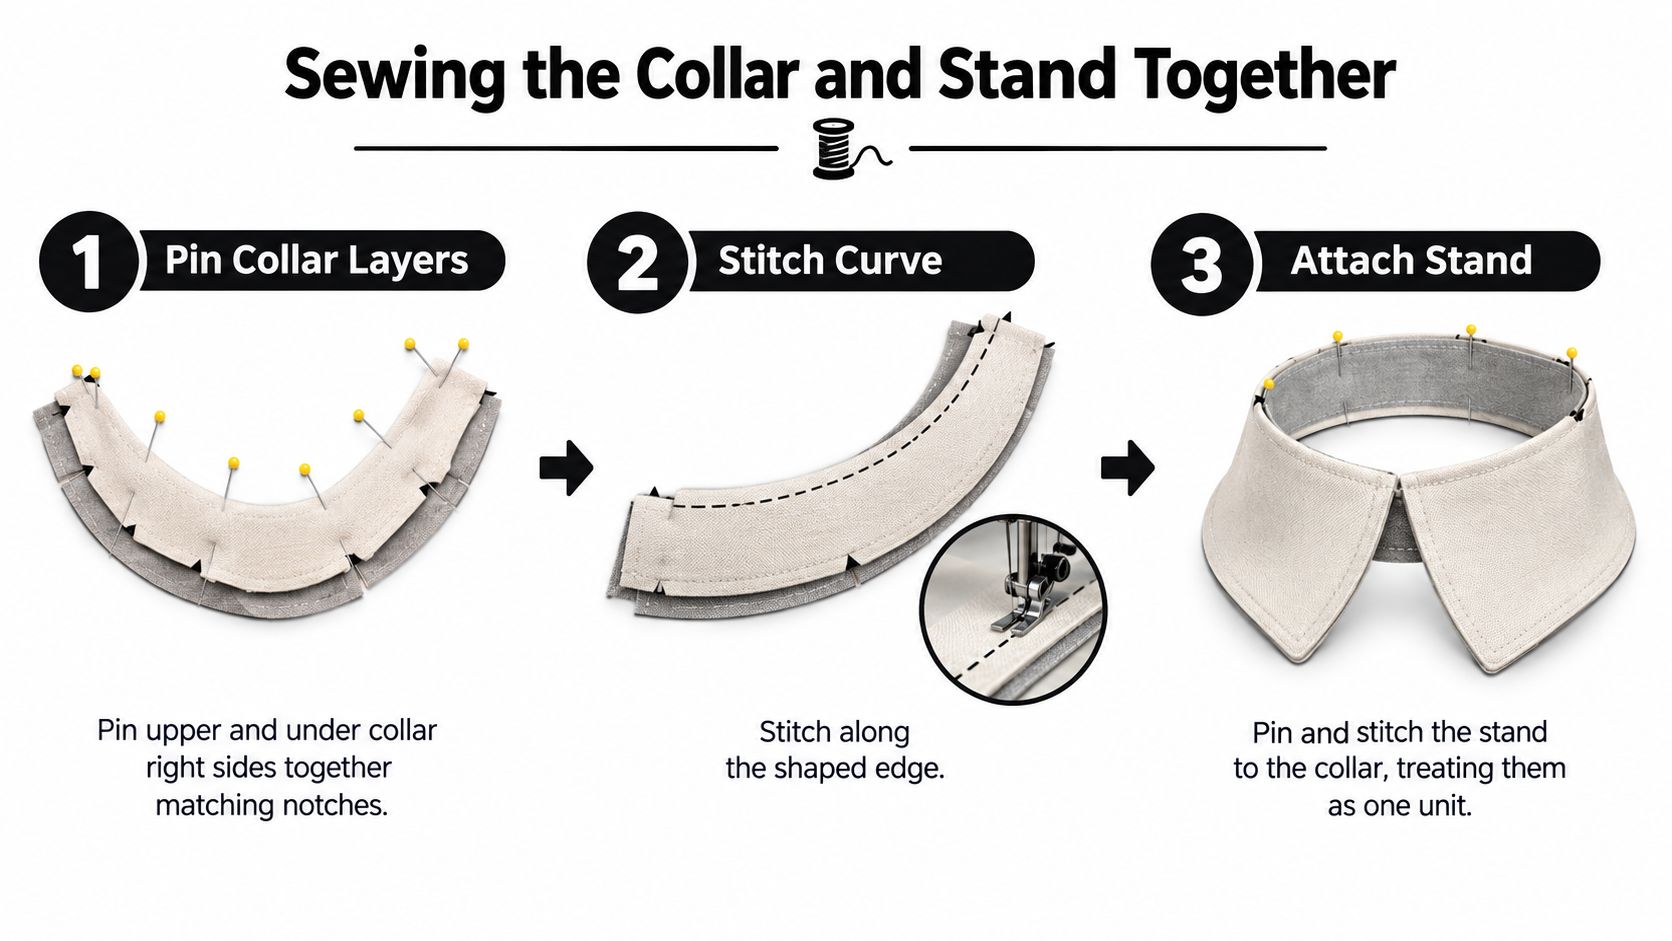
Place the upper and under collar right sides together. Match the centre-back mark and notches first, then pin towards each point. Stitch the outer shaped edge at the pattern's seam allowance, leaving the neckline edge open. Keep the seam allowance consistent rather than chasing the raw edge, especially around the corners.
Give the points room to turn
Trim the outer seam allowance to about 4 mm where the pattern and fabric permit. Cut diagonally across each corner close to, but not through, the stitching. The diagonal cut removes the wedge of fabric that would otherwise bunch inside the point.
Grade the seam allowances so the upper-collar allowance is slightly shorter than the under-collar allowance. This difference reduces bulk and encourages the seam to roll towards the underside. Clip the curved sections at regular intervals, about every 1.5 cm, taking care not to cut into the stitching.
Turn the collar through the open neckline edge. Use a stiletto, a blunt tapestry needle or a thick knitting needle to ease the points out from inside. Don't stab aggressively into the tip. Work the seam gently from the base towards the point, then shape the corner with your fingers.
Press the collar flat from the wrong side first. Turn it over and press from the right side with a pressing cloth if the fabric is delicate. Aim for the seam to sit just behind the edge, not visibly on top of it.
Build the stand around the collar
Place the interfaced upper stand and under stand right sides together. Sandwich the shaped collar between them, matching the collar neckline edges to the stand's upper edge and matching the centre-back markings. Pin through every layer, checking that the collar points face the correct direction before stitching.
Sew across the short ends and along the lower edge of the stand, following the pattern seamline. Pivot at marked points with the needle down where the shape changes direction. Clip the curves, trim the corners and grade the allowances before turning the stand right side out.
Let the collar cool after pressing. At this checkpoint, hold it against your neck or the garment neckline. The centre back should sit centrally, both points should be similar, and the stand shouldn't twist. If the shape is wrong now, it's much easier to correct before attaching the collar to the garment.
Attaching the Collar to the Neckline
With the garment turned so the neckline is easy to see, place the assembled collar unit on top. The underside of the stand should face the garment's right side. Match the centre back first, then the shoulder seams and front notches. Use the pattern's marked dots rather than guessing from the raw edges. The seam allowance remains the one specified by your pattern, often between 1 cm and 1.5 cm, as shown in The Avid Seamstress collar instructions.
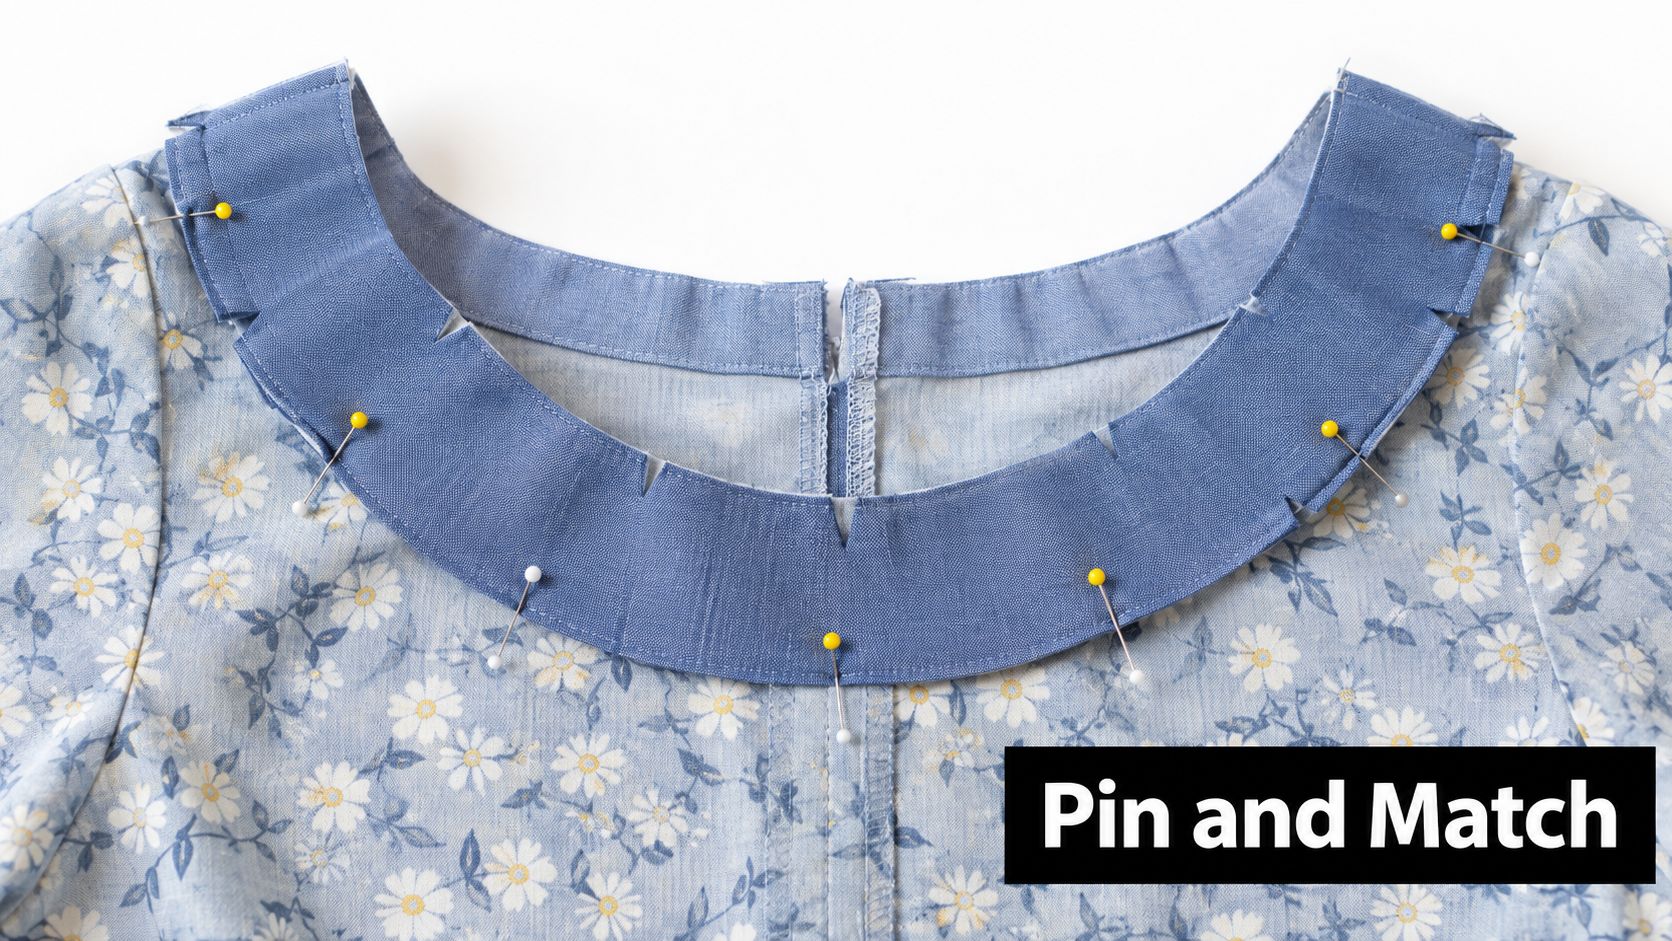
Pin through every layer at each dot. Add extra pins, or hand-tack the shoulder areas, because the stand can shift as it travels around the curve. Before sewing, lift the collar and check that the centre-back mark still meets the garment's centre back. This small checkpoint catches a crooked starting position before it becomes a twisted collar.
Sew the curved neckline steadily
Stitch along the seamline marked on the stand, beginning where the pattern directs. Sew slowly around the neckline. At each change of direction, stop with the needle down, raise the presser foot, turn the garment slightly, lower the foot, and continue. The needle acts like a hinge, keeping the curve smooth instead of creating short, jagged sections.
Let the feed dogs move the fabric. Support the garment with your hands, but do not pull it through the machine. If the neckline starts to ripple, stop and check that you have not stretched the garment or allowed the stand and neckline markings to separate.
Trim the neckline seam allowance and remove excess bulk where the stand meets the collar. Clip the curve if it needs more flexibility. Press the allowance towards the stand, then understitch it to the stand close to the seam. Understitching holds the allowance inside when the stand folds down. First press the allowance towards the stand, then stitch close to the seam, following this expert shirtmaking tutorial on understitching.
Turn the stand upright and press once more. Use a pressing cloth on the right side, especially over the collar points or any fabric that may shine. Wait until the collar is fully shaped and cool before adding topstitching.
Common Collar Mistakes and How to Fix Them
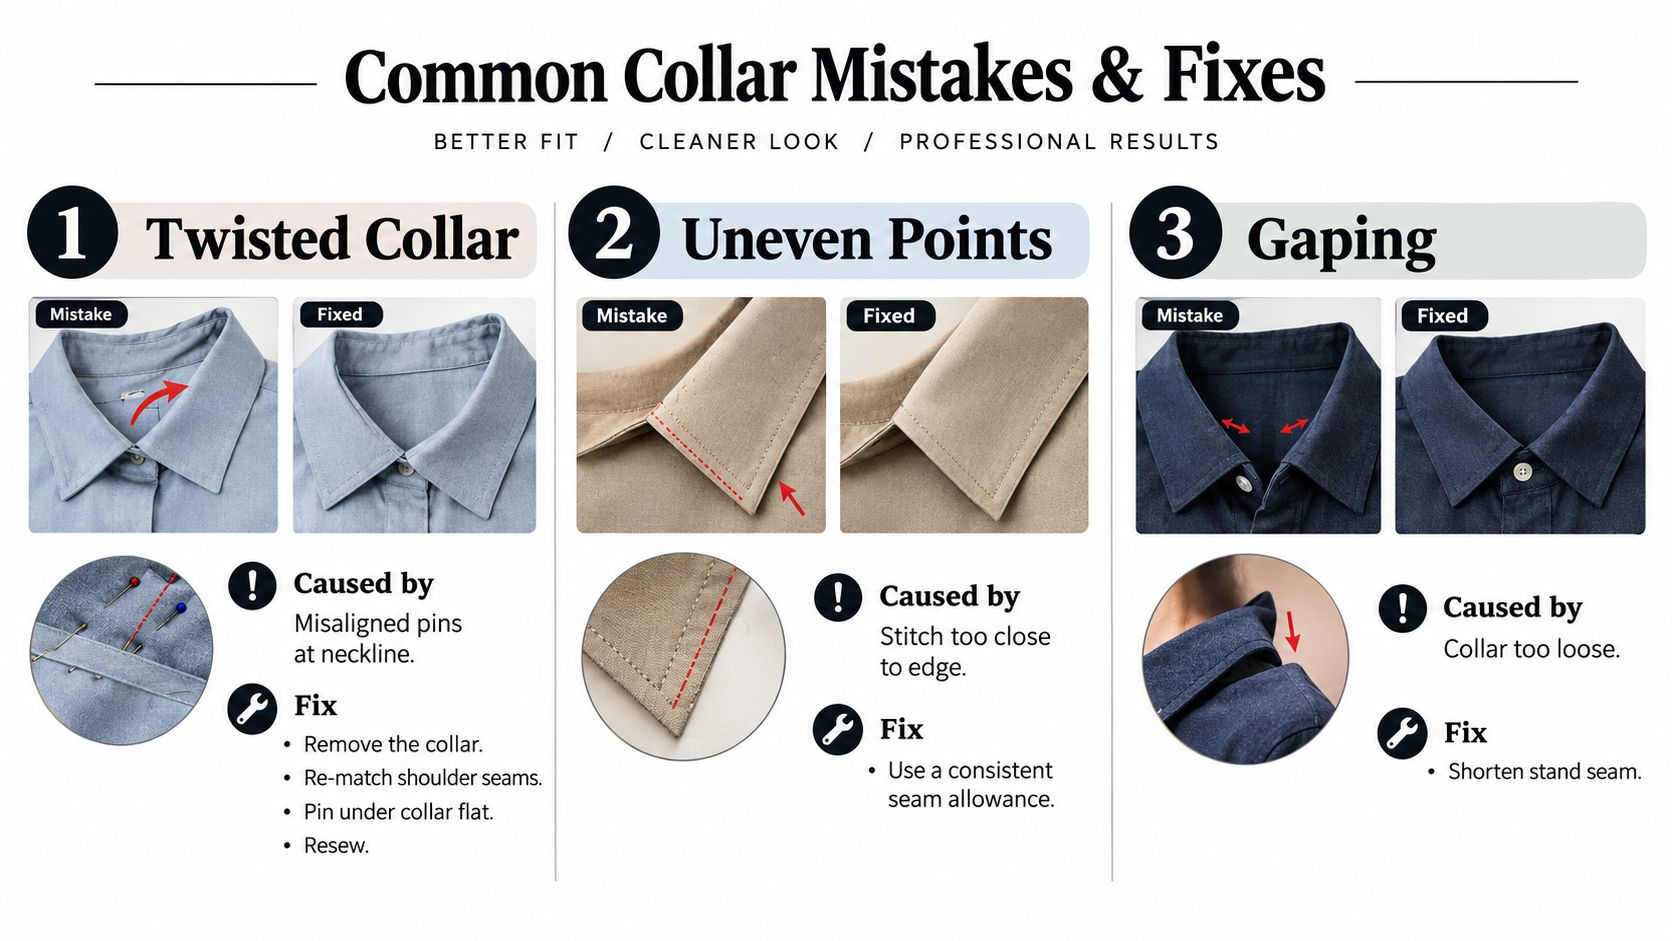
A collar that looks wrong can make the whole garment seem ruined, but the fault is often local and reversible. Turn the garment right side out first. Follow the shape from the neckline to the points, and locate the exact place where it changes. That checkpoint prevents unnecessary unpicking.
The collar twists at the neckline
A twist usually begins with inaccurate matching. Remove the collar from the neckline, then match the centre back and shoulder seams again. Lay the under-collar flat against the neckline before pinning, as if you were fitting one piece of paper along a curved edge.
If one side is longer, use the marked dots rather than the raw edges. Re-pin from the centre back towards the front on both sides. Tack the shoulder areas, check the collar from the right side, and machine stitch only after the shape lies evenly.
The points look puckered or blunt
Puckered points usually hold too much seam allowance. The corners may not have been clipped close enough, or they may have been pressed while still turned inside out.
Unpick only the affected corner if the rest of the seam is sound. Snip nearer to the stitching without cutting it, then turn the point with a sharp, controlled tool. Let the fabric settle before pressing. If the point remains misshapen, resew that corner with a consistent seam allowance instead of forcing it into shape.
The under-collar shows
When the underside peeks above the roll, compare the collar pieces and check whether the upper collar was cut too small. The under-collar may also need to be reduced by about 2 mm, as recommended in this UK collar construction guide. If the pieces are badly mismatched, recut the under-collar slightly smaller rather than trimming the upper collar.
Press the upper collar towards the outside edge, then inspect the right side before topstitching. The seam should favour the underside naturally. This is a useful beginner checkpoint: if the under-collar is visible before stitching, topstitching will not correct the underlying mismatch.
The stand bubbles or ripples
A rippling stand may have stretched during sewing, especially along a bias or curved neckline. Skipping understitching can also allow the seam allowance to push the stand out of position.
Rip back the topstitching. Press the seam allowance towards the stand and understitch close to the seam. If the fabric has stretched, use careful steaming and let it cool flat. Check the right side after each pressing stage, while the collar can still be reshaped.
Historic collar making also shows the value of repeatable habits. Research on Scottish whitework production records that as many as 50,000 collars were printed per day by the early 1850s, before embroidery and finishing (research on Scottish whitework production). Careful cutting, matching and finishing mattered in that production setting, and the same checks help at a domestic sewing machine.
Choosing Between Collar Variations
The right first collar depends on which skill you want to practise. A band collar removes pointed corners, a Peter Pan collar teaches curved edges, a shirt collar adds a stand, and a notched collar introduces lapel folds. Choosing by construction challenge, rather than appearance alone, gives you clear checkpoints and a safer route towards a crisp finish.
| Collar Type | Difficulty | Best Fabric | Recommended For |
|---|---|---|---|
| Shirt collar with stand | Intermediate | Cotton poplin, shirting and stable woven fabric | A clear next goal after basic collar practice |
| Peter Pan collar | Beginner-friendly | Lawn, cotton, linen and light woven fabric | A first shaped collar with a forgiving flat fit |
| Band collar, also called mandarin | Easiest | Stable cotton, linen and lightweight woven fabric | A confident first project |
| Notched collar | Advanced | Suiting, wool, stable jacket fabric | Sewists ready for lapel folds and precise corners |
Start with a band collar
A band collar omits the shaped upper collar, so you can focus on accurate cutting, even seam allowances and controlled topstitching. Use stable cotton for the first version. Before stitching, compare the collar's neckline curve with the garment neckline. After stitching, check that the stand lies flat before turning or pressing further. These small pauses catch errors while they are still easy to correct.
A graduation garment or another formal outfit may need a separate white collar rather than a complete shirt pattern. The Gradshop graduation collar products offer a useful reference for the simple, clean banded shape used in ceremonial clothing.
The Peter Pan collar is a good second project. Without a stand, it lies flat against the bodice, and minor seam-allowance differences are less visible. Its curved outer edge provides practice with clipping and turning the underside neatly. Use cotton lawn or another stable light woven fabric. Stitch slowly around the curve, clip only as far as the seam line allows, then check that the edge rolls under evenly before pressing.
Work towards the shirt collar
When the band and Peter Pan sequences feel familiar, try a shirt collar with a stand. Keep the first version plain, using stable cotton and a manageable shape. Sew one stage, press it, and inspect both sides before continuing. The collar should behave like a small hinge: each seam and fold needs to move cleanly before the next layer is added.
Leave the notched collar for later. Blazer and jacket collars combine a lapel fold with precise corner turning, and stripes or plaid require careful matching. They suit a sewist who can already pivot accurately and control several layers without rushing.
The same habits support all four variations:
- Reduce bulk: Trim the under-collar by about 2 mm where the pattern supports it, clip corners diagonally without cutting the stitching, and grade layered seam allowances.
- Press in stages: Press after fusing, stitching, turning and attaching the neckline. Waiting until the end allows earlier distortion to remain.
- Control shaped edges: Understitch close to curved or faced seams so the inside layer stays hidden.
- Check both sides: Inspect the right side after each press, then examine the underside before final topstitching.
- Slow down at pivots: Keep the needle down when turning at a centre point or sharp change of direction.
If a point refuses to turn, first check whether the seam allowance is too bulky or the corner was clipped too little. Trim and grade carefully, turn with a blunt point turner, and press over a folded towel. If the under-collar peeks out, return to the seam before topstitching. Ease the layers so the under-collar sits slightly inside, then understitch or baste again. Topstitching can secure a correct edge, but it cannot repair a collar that was mismatched during turning.
Sewing and needlework are described as among the UK's “most endangered” domestic skills, and a 2025 survey of UK adults commissioned by the survey organisers found that only 27% of respondents could confidently use a sewing machine (reporting on the UK sewing survey). If machine control is still developing, practise on a scrap first. Stitch straight lines, stop with the needle down, and turn a corner before beginning the collar. Stable fabric, a fresh needle and slower machine speed make the first attempt more manageable.
A collar rewards patience over speed. Trim, turn and press between stages, and the finished piece is far more likely to keep a crisp, store-bought roll.
More Sewing offers fabrics, haberdashery, dressmaking kits and practical tools for building collar skills, including Vilene S320 Flexi Firm Interfacing for adding shape to shirt collars and cuffs without unnecessary bulk. Visit More Sewing to choose stable cotton, test suitable interfacing and gather supplies for a band collar or shirt collar project.
