
You're standing in a fitting room with a pinned toile, trying to understand why the side seam is climbing towards the armhole. The pattern looked right, the fabric was cut carefully, and yet the bust sits too high because the measurement came from a stretched tape and was read slightly low. That small slip can affect the bodice, sleeve placement, and waist seam before you've even reached the final fitting.
A sewing measuring tape deserves the same care you give your shears. Its construction, scale, condition, and the way you read it all influence the result. The UK has a long relationship with flexible measuring tools, from cloth tapes first used for sewing in the 1860s to regulated flexible line standards used today. The Museum of English Rural Life's history of the tape measure places the sewing tape within the shift towards more standardised garment production in Victorian Britain.
Whether you're following a beginner project such as those in Pinwheel Crafts' beginner sewing collection, altering a vintage pattern, or fitting a client, the practical questions remain the same. Which tape construction suits the job, which scale should you read, and how can you recognise when the tape itself is no longer trustworthy?
Why Your Tape Measure Deserves More Attention
A dressmaker's tape often looks harmless, just a strip of printed material rolled into a case or left loose in a drawer. At the fitting table, though, it controls decisions about ease, balance, seam placement, and proportion. If the tape has stretched, the numerals have faded, or the wearer is measured with the tape pulled tight, the pattern can be perfectly drafted and still produce a poor fit.
Suppose a bust measurement is read 8 mm low because a soft cloth tape has elongated. That figure becomes the basis for choosing a size or adjusting a bodice. A further 3 mm reading error in another area may seem insignificant, but separate discrepancies can appear at the bust, sleeve cap, and waist seam. The finished garment then fits each section differently, leaving the side seam, neckline, or sleeve balance out of position.
Practical rule: Accuracy matters most where several measurements meet. A small error at one point can become obvious when joined to other pattern lines.
The problem isn't that every sewing project demands laboratory equipment. Most home dressmaking can be handled perfectly well with a sound, flexible tape and disciplined reading. The problem is assuming that a cheap tape is automatically accurate because its markings look neat.
Treat the tape as part of the fitting process
Start by inspecting the tool before you inspect the pattern. Hold the tape against a straight rule or another known reference. Check the zero end, look for stretched sections, and compare the graduations near the areas you use most. If the first centimetres have distorted, taking a body measurement from the middle of the tape won't rescue the reading.
The UK specification for flexible line standards shows why this deserves attention. Metric tapes are required to read to the nearest millimetre, with maximum permissible error defined as 0.3 mm plus 0.2 mm per metre. Imperial tapes are required to read to one-sixteenth of an inch, with their own stated tolerance in the specification for flexible line standards from the National Weights and Measures Laboratory. These requirements apply to regulated standards, not automatically to every haberdashery tape sold to home sewists, but they provide a useful benchmark for what precision means.
A reliable routine is simple. Use a soft tape for body curves, a flatter and more stable tape for pattern work, and read from directly above the mark. Keep the tape level, avoid switching units halfway through a measurement, and record the number immediately. Those habits cost nothing, yet they prevent the most common fit failures.
The Three Tape Constructions Every Sewist Meets
The tape's material determines how it behaves under tension, around curves, and across paper. The printed scale can be excellent, but a construction that stretches or twists will still produce an unreliable result.
| Tape Construction Compared for Sewing Tasks | Best For | Weakness at the Table |
|---|---|---|
| Cloth | Body measurements and soft curves | Can stretch under pull and drift across longer distances |
| Fibreglass-coated vinyl | Pattern pieces, fabric checks, and general cutting-table work | Less supple than cloth around complicated body curves |
| Metal-tipped vinyl | Hem allowances, fabric edges, and short repeated checks | The tip can catch, bend, or make curved body measurements awkward |
Cloth tapes
A cloth tape conforms comfortably to the bust, waist, hip, and sleeve. That flexibility makes it pleasant for body measuring, especially when you're checking a rounded area rather than a straight pattern edge. It also makes the tape vulnerable to handling. Pull it firmly around the body or use it repeatedly on long skirt lengths, and the cloth can gradually elongate.
A cloth tape is useful when the tape must follow a curve. It's less suitable when you're checking whether a long pattern edge has the correct length, because even a small amount of stretch can alter the result. Never pull it as though you're trying to flatten a wrinkle. Lay it smoothly, then apply only enough tension to remove slack.
Fibreglass-coated vinyl
Fibreglass-coated tapes are a dependable choice for the cutting table. The internal reinforcement helps them resist stretch, while the vinyl surface lies flatter against tissue, paper, or fabric. Chalk dust and ordinary handling are less troublesome than they are with a soft cloth tape.
Use this construction to compare a pattern's waistline, hip line, cross-front, or seam length. It's also useful when checking a fabric's grainline or confirming that two corresponding pieces match before sewing. It won't drape around the body as naturally as cloth, but that's a reasonable trade-off for pattern stability.
Metal-tipped vinyl
The metal tip gives the tape a defined zero end. Hook it over the edge of a fabric piece when checking a hem allowance, or place it against a straight edge when you need a repeatable starting point. This can be convenient for short measurements where losing the zero would otherwise slow you down.
The metal end can become a nuisance on a body curve. It may catch on delicate cloth or prevent the tape from settling smoothly against the figure. For most UK dressmakers, the sensible arrangement is to keep a soft cloth tape for body work and a fibreglass-coated tape beside the pattern table. A metal-tipped vinyl tape is a useful secondary tool, not a universal replacement.
Reading Metric and Imperial Without Mixing Them Up
Most UK dressmaking tapes show centimetres and inches, often on opposite sides or along separate edges. That arrangement reflects the country's mixed measurement habits. The yard was standardised in England under Henry I as 36 inches, Parliament authorised the Imperial Standard Yard in 1855, and contemporary sewing still draws on both imperial and metric instructions.
The dual-scale format is practical, but it can also catch beginners. A pattern may give a body measurement in inches, a seam allowance in centimetres, and a fabric requirement in metres. If you read the wrong edge of the tape, the mistake can look plausible until the garment is assembled.
| Metric vs Imperial on a Sewing Tape | Units | Common UK Pattern Source |
|---|---|---|
| Metric | Millimetres and centimetres, with fabric often discussed in metres | Modern metric pattern instructions, textile education, and many UK supply descriptions |
| Imperial | Inches and fractions of an inch | Older British patterns, vintage instructions, and patterns developed around traditional tailoring practice |
Choose the working scale before measuring
Put the pattern or instruction sheet beside you and identify its unit first. Turn the tape so the relevant scale faces you, then keep that scale in view for the entire measurement. Don't begin in centimetres and switch to inches because the other side appears easier to read.
A common example is a 5/8-inch seam allowance. The exact conversion is 1.59 cm, not a casually rounded 1.5 cm. If you're converting for a pattern alteration, write the converted value beside the instruction before cutting. For a seam allowance, consistency across every corresponding edge matters more than mental arithmetic at the table.
Reading habit: Pick one scale, read to the nearest graduation, and write only that figure in your notebook until the garment has been cut.
Some tapes print centimetres along one edge and inches along the other. Others place both systems close together, which makes visual slips easier when you're tired or working quickly. Cover the unused side with your hand if necessary. That simple physical cue is particularly useful for students learning from mixed pattern sources.
Be cautious with seam allowances printed in metric on an otherwise imperial pattern. A line labelled in centimetres may sit beside inch-based body measurements, so don't assume that every number on the page belongs to the same system. Read the unit symbol, set the tape deliberately, and mark the converted value before transferring it to fabric.
Measuring the Body the Right Way
Body measuring fails most often because the wearer changes position or the tape changes tension. The bust is a useful example because the tape must pass over a soft, rounded area while staying level around the back.
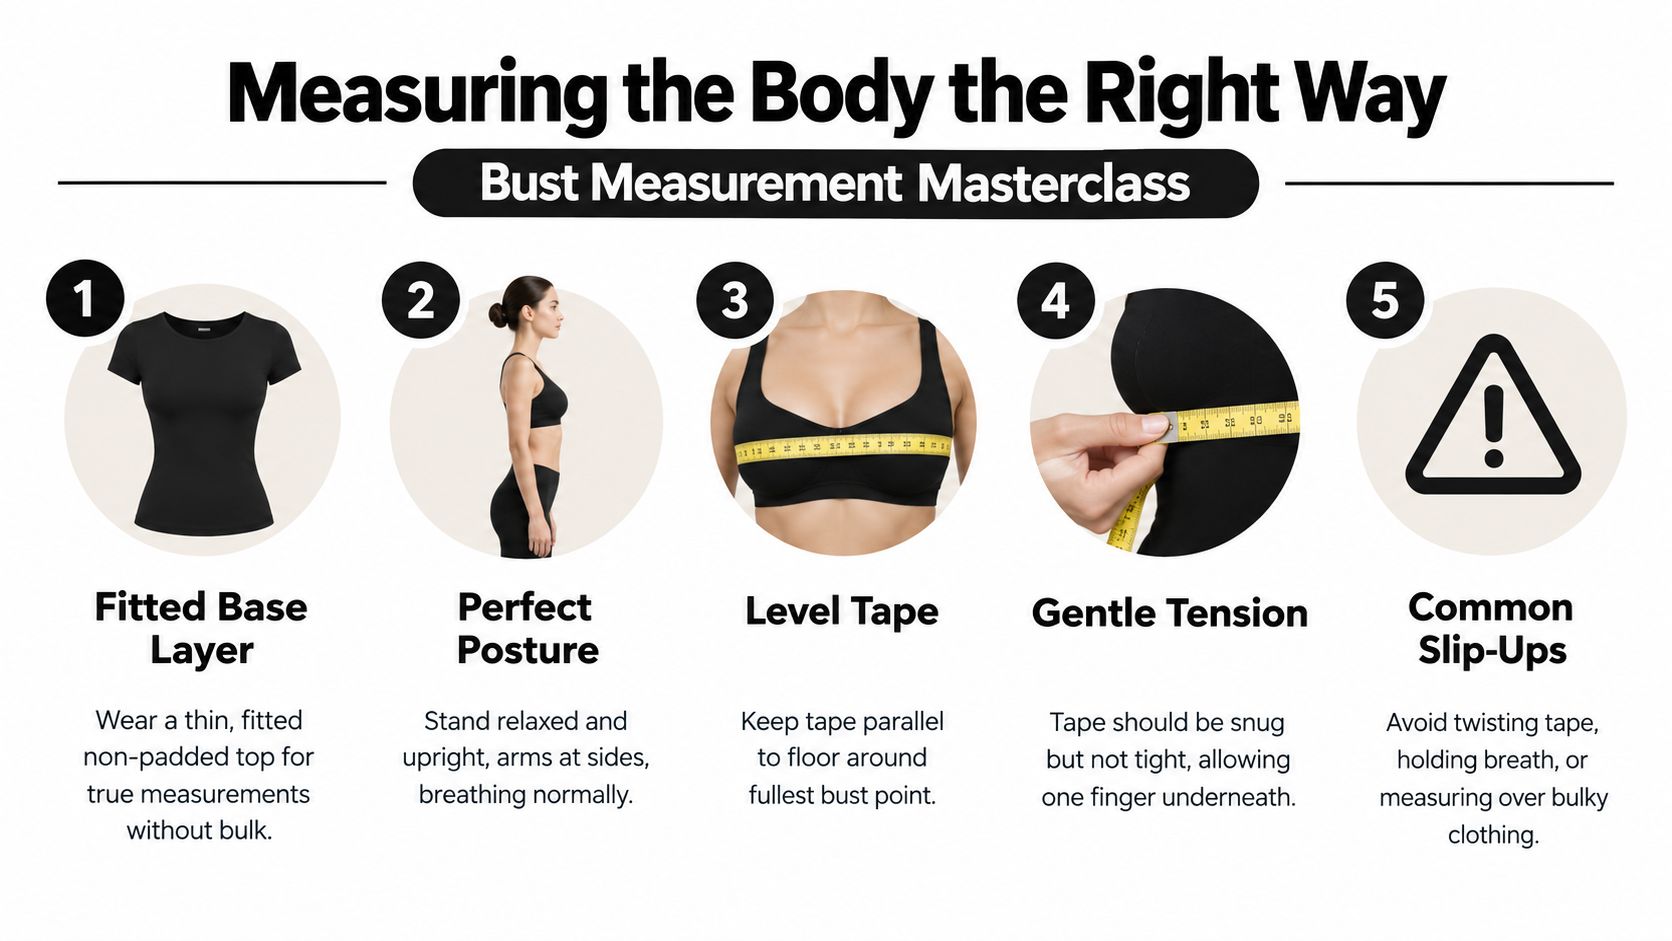
Ask the wearer to put on a fitted, non-padded top. Thick bras, jumpers, and loose knits add bulk or create compression, so they're poor foundations for a close-fitting garment. The wearer should stand relaxed and upright, with weight evenly distributed, arms resting at the sides, and normal breathing.
A repeatable bust measurement
Place the sewing measuring tape around the fullest part of the bust. At the front, position it over the fullest point. At the back, keep it level and parallel with the floor. A mirror can help the wearer check the front, but a helper is far better for confirming that the tape hasn't dropped between the shoulder blades.
The tape should sit flat against the body with zero slack, but it mustn't indent the skin. You should be able to slide a finger beneath it without forcing the tape away from the body. If the wearer holds their breath, lifts their shoulders, or pulls their arms away from the sides, the reading won't represent their normal posture.
Watch for these common slips
- Dropped tape at the back: The front may look level while the back slopes down, adding unwanted length to the measurement.
- Diagonal placement: A tape that crosses the bust at an angle measures a longer path than the true horizontal circumference.
- Bulky clothing: A padded bra, jumper, or thick knit changes the body's apparent dimensions.
- Tensed posture: Raised shoulders and held breath alter the circumference and can make the garment unnecessarily large.
- Uncontrolled tension: Pulling until the tape marks the skin produces a smaller reading than a smooth, supported fit.
Write the result on a measurement chart immediately. Don't rely on memory between the bust, waist, hip, and back measurements, especially when fitting more than one person. Take the measurement again if the figure moves or the tape position looks doubtful. For larger bodies, a 200 cm tape can be preferable because it reduces the temptation to pull a shorter tape too tightly, a point highlighted in UK textile education guidance on choosing sewing tapes.
For a wider visual demonstration of careful measuring, the following video can be useful alongside hands-on practice.
Working Accurately Across a Pattern Piece
A commercial pattern rarely lies perfectly flat when it first comes out of the envelope. Tissue paper carries folds, and stretching it while trying to smooth those folds can change the shape you're attempting to measure. Press it lightly if appropriate, or flatten it with weights before placing the tape.
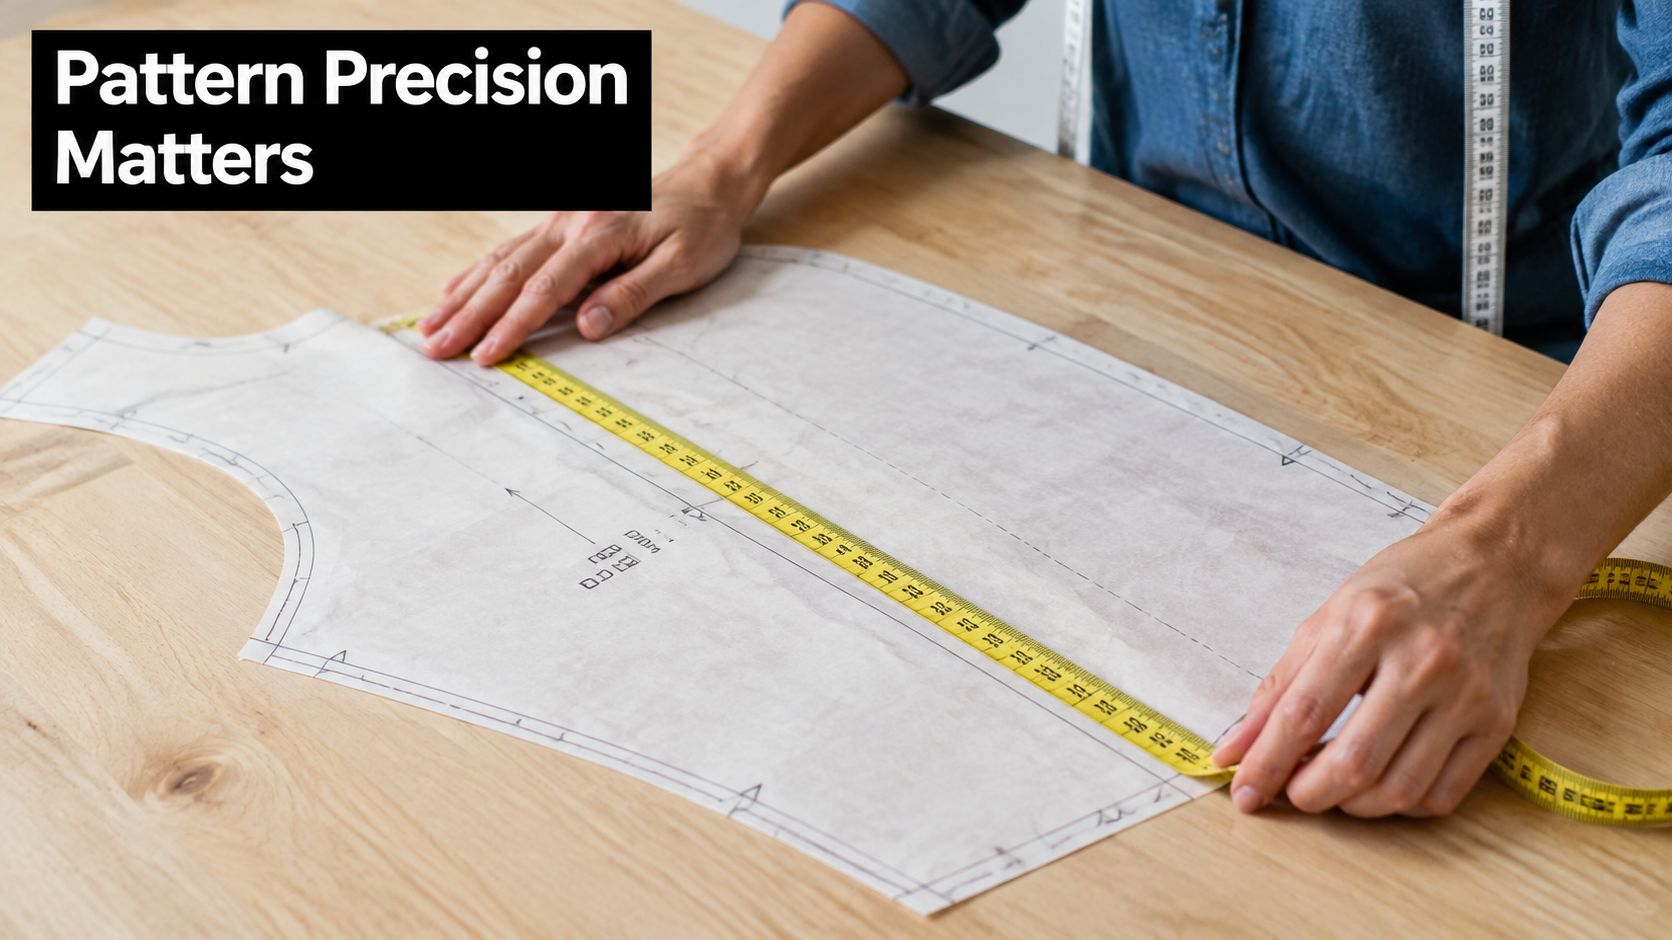
A dressmaker checking a skirt pattern might pin the tape's zero end at one notch, then walk the tape along the cutting line towards the second notch. The tape must follow the intended line, not cut across a curve. If it drifts onto its own bias, the reading becomes a measurement of the tape's shortcut rather than the pattern edge.
Set up the pattern first
Place the tissue on a stable surface and smooth creases without pulling the paper. Use a pin, pattern weight, or fingertip to hold the zero at the starting point. Keep the tape's edge aligned with the printed line, and move it in short sections around curves rather than forcing it straight across.
Read from directly above the graduation. Looking from the side creates parallax, so a mark can appear aligned when it isn't. This is particularly noticeable when checking a waist-to-hip length or comparing the cross-front width between sizes.
Check the features that control fit
Measure the waist-to-hip length, cross-front width, and relevant seam allowances. Compare those figures with the pattern envelope and the printed measurement chart, allowing for the designer's stated ease where it's provided. If a pattern has been enlarged on a home printer, confirm that the test square or scale indicator matches the intended dimensions before trusting the printed lines.
Three small habits prevent a surprising number of errors:
- Keep the zero visible: When the tape reverses direction, confirm that you haven't started from the wrong end.
- Measure the line, not the empty space: A tape placed beside a curved seam can slowly wander away from the actual stitching or cutting line.
- Distinguish inside from on-the-line readings: Decide whether you're checking the seamline, the cutting edge, or the allowance before placing the tape.
For repeated short measurements, a hand gauge or seam gauge is often more controlled than a full-length tape. UK sewing suppliers describe this tool as particularly useful for seams, buttonholes, and hems at the sewing machine. Use the tape for larger curves and distances, then switch to the gauge for consistent small allowances.
How Accurate Is Accurate Enough
A sewing measuring tape doesn't need to be treated like a surveying instrument for every home project, but it shouldn't be treated as decoration either. UK and EC-style classifications give dressmakers a practical way to judge the difference between general-purpose accuracy and tighter control.
The available classes state maximum errors of 1.1 mm over 10 m for Class I, 2.3 mm for Class II, and 4.6 mm for Class III. At shorter lengths, the stated proportional deviations include 0.30 mm at 2 m for Class I and 1.40 mm for Class III. These figures come from the UK tape-measure guidance published by RS.
| Tape Tolerance and Suitable Dressmaking Tasks | Typical Permitted Error | Best Suited To |
|---|---|---|
| Class I | 1.1 mm over 10 m, with 0.30 mm stated at 2 m | Grading, fitting, repeatable sampling, and detailed balance checks |
| Class II | 2.3 mm over 10 m | General garment work and routine dressmaking |
| Class III | 4.6 mm over 10 m, with 1.40 mm stated at 2 m | Less demanding checks and tasks where later fitting will absorb small variation |
A Class II tape is usually a sensible working standard for ordinary garment construction. Class I becomes more valuable when you're grading, setting sleeves repeatedly, balancing a small brand's sample, or checking symmetry where small drift can become visible.
Use a condition checklist
Replace the tape, or at least remove it from accuracy-sensitive work, when you find:
- A stretched end: Compare the first section with a reliable steel rule.
- Faded numerals: If you're guessing whether a mark is a 6 or an 8, the tape has already failed its practical purpose.
- Kinked coils: A permanent fold can shorten the path or stop the tape lying flat.
- A sticky zero tang: A damaged metal end can shift the starting point.
- A mismatch against a reference: Check a known length with a rigid rule before trusting the tape again.
For detailed guidance on posture, tension, and repeatable readings, these expert apparel measuring tips are a useful companion to workshop practice. The central judgement remains practical: use the best tape you have for the task, and replace any tape that gives you a reason to doubt it.
Care, Storage, and Choosing the Right Tape
A tape measure deteriorates. It gets dragged through chalk, folded into a project bag, left damp after pressing, or stored beside a radiator. By the time the numerals fade or the vinyl stiffens, the tape may have been influencing fittings for weeks.
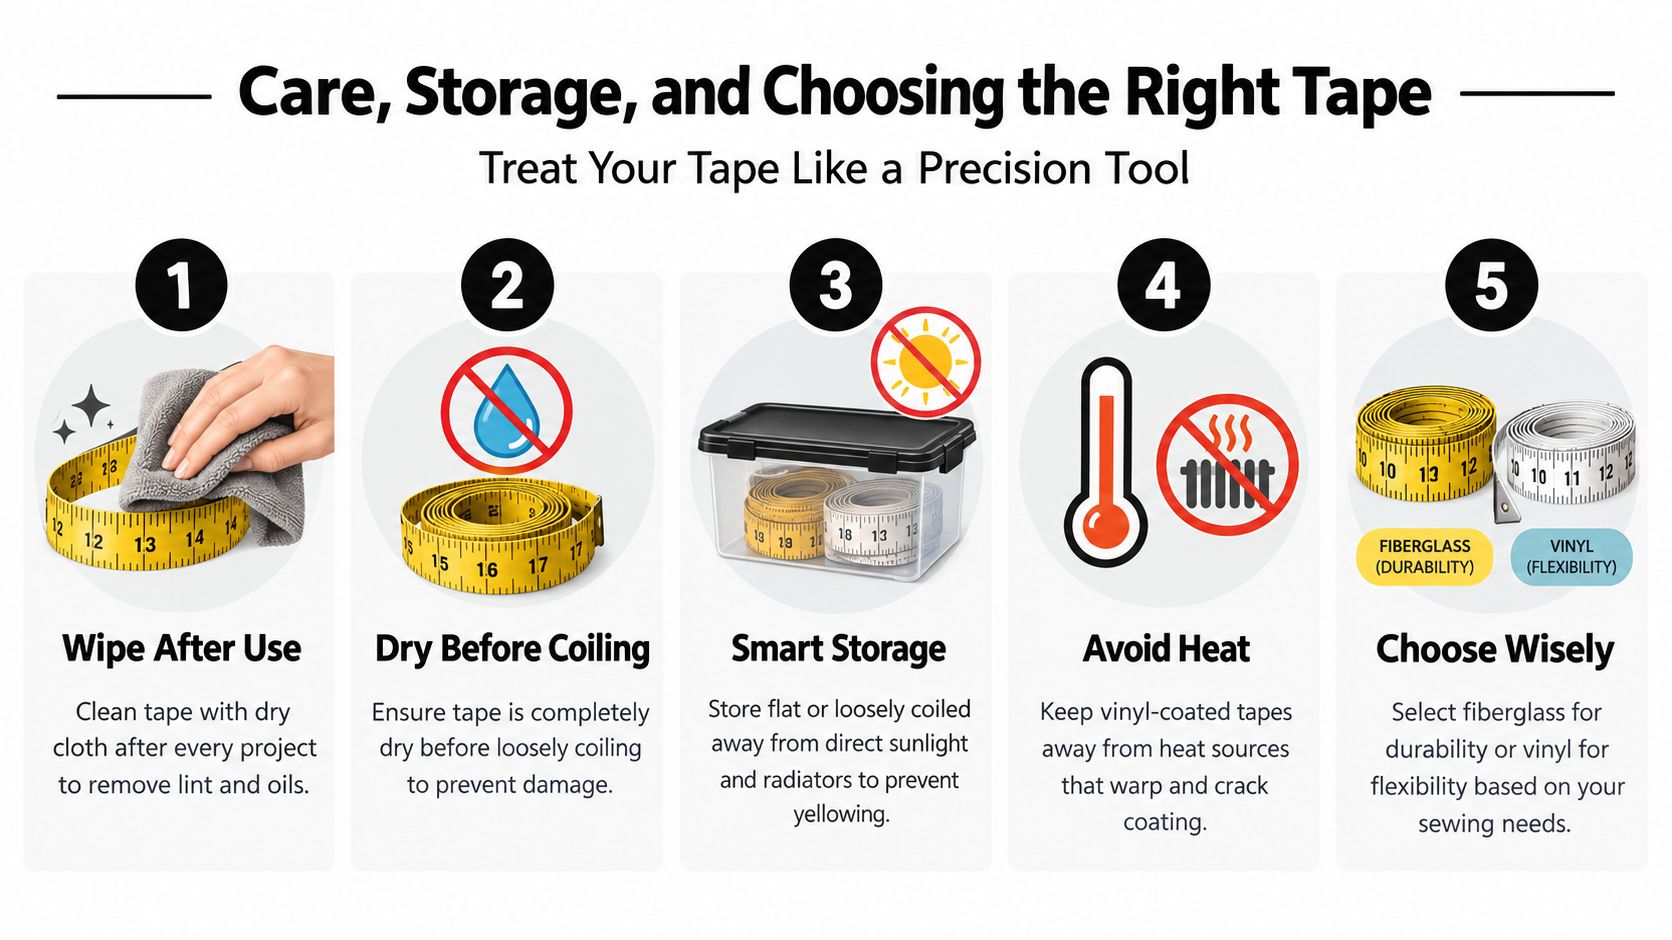
Wipe the tape after each project with a dry cloth. Let it dry fully before coiling, then store it loosely rather than crushing it into a tight knot. Keep vinyl-coated tapes away from direct sunlight and radiators, since heat and prolonged exposure can encourage yellowing, stiffness, or coating damage.
Match the tape to the work
A 150 cm / 60 in tape is the standard length for most garment work in the UK. It covers common bust, waist, hip, sleeve, and fabric checks without repeated repositioning. A 200 cm tape gives more room for larger body measurements and curtain work, while a 300 cm option can be useful for unusually long projects.
Choose cloth when body comfort and curved drape matter most. Choose fibreglass-coated vinyl for daily pattern work because it lies flat and resists stretch. Keep a steel tape for short, rigid reference checks or seam allowances, not for wrapping around a body.
Before buying, check the case or product label for the accuracy class where one is supplied, and confirm that the scale includes the units your patterns use. A dual-scale tape is convenient, but only if you deliberately choose the correct side before each measurement.
A quick buying decision
- For body fitting: Choose a soft cloth tape that sits comfortably without cutting into the skin.
- For pattern drafting: Choose a fibreglass-coated tape with clear graduations and a stable edge.
- For hems and edges: A metal-tipped vinyl tape gives a useful starting point.
- For larger measurements: Select a longer tape so you won't pull a shorter one tight.
- For occasional emergencies: Treat a free promotional tape as temporary until it has been checked against a known reference.
The aim isn't to own every tape in the haberdashery drawer. It's to keep the right construction in the right place, maintain it, and replace it before an unreliable reading becomes a fitting problem.
More Sewing offers fabrics, haberdashery, dressmaking kits, and practical sewing supplies for projects that depend on accurate measuring and careful cutting. Visit More Sewing to browse tools and materials, order fabric samples, or find support for your next garment.
