Dressmaking
How To Sew A Lined Jacket Like A Pro
You've sewn skirts, shirts, maybe even an unlined jacket, and now you're staring at a pattern with facings, a separate lining, sleeve heads, and instructions that seem to fold back on themselves. That's a normal point to pause. A lined jacket looks like a leap because the inside has to work just as well as the outside.
The good news is that how to sew a lined jacket isn't mysterious. It's a series of deliberate choices, careful preparation, and a handful of finishing techniques that make all the difference. Once you understand why the lining is cut a little differently, why understitching matters, and why turning a jacket through a hidden opening is quite logical, the whole process becomes far less intimidating.
A homemade jacket starts to look high-end when the edges stay crisp, the lining doesn't peek out, the sleeves move comfortably, and the whole garment hangs cleanly on the body. That comes from method, not luck.
The Foundation Planning Your Perfect Jacket
A good lined jacket starts before the scissors come out. The pattern, fabric pairing, and support materials decide whether the sewing feels orderly or like a wrestling match.
If you're moving into jackets for the first time, choose a pattern with clear facings, a separate lining, and straightforward collar construction. A jacket with built-in front facings is easier to finish neatly than one that leaves you inventing the inside edge. Two-piece sleeves can also give a smarter shape, though a simple one-piece sleeve is often easier if you're still building confidence.
Choose a pattern that helps you
Some features make life easier from the start:
- Front facings included. These give the lining somewhere clean to attach and help the front edge hold its shape.
- A jacket drafted for lining. That sounds obvious, but it matters. You want the lining pieces planned into the pattern, not added as an afterthought.
- Manageable details. Welt pockets and complex vents are lovely, but a first lined jacket is often better with patch pockets or simple inseam pockets.
If you're still deciding what sort of cloth will suit your project, it helps to find your ideal garment fabric before committing. Even when that guide isn't jacket-specific, thinking about drape, recovery, softness, and wear helps you avoid pairing a structured shell with a lining that fights it.
Practical rule: If the outer fabric feels bulky in the hand, simplify somewhere else. Pick a lighter lining, reduce layers where you can, and be strict about trimming and grading later.
Match the shell and lining sensibly
The best pairings are about behaviour, not just colour. A sturdy denim, twill, or wool coating wants a lining that slides over clothing and doesn't cling. A lighter linen jacket can take a softer lining, provided it doesn't collapse the shape.
Here's a useful starting point.
| Outer Fabric | Recommended Lining | Sewing Tip |
|---|---|---|
| Wool suiting | Viscose lining | Press every seam as you sew, and test iron temperature first |
| Denim | Cotton lawn or smooth viscose | Reduce bulk at pocket and cuff seams before topstitching |
| Linen | Cotton lawn or lightweight viscose | Staystitch early because linen can shift and grow |
| Gabardine | Slippery anti-static lining or viscose | Use plenty of pins or hand-baste facings before final stitching |
| Heavy twill | Lightweight lining fabric | Keep the inside light so the jacket doesn't feel stiff |
Interfacing decides the jacket's character
A lined jacket without proper support can look limp, even if the stitching is tidy. Interfacing is what helps the collar sit nicely, the lapel edge stay clean, and the hem avoid collapsing into ripples.
Use fusible interfacing when you want speed and stability, especially on facings, collars, and cuffs. Use sew-in interfacing when the outer fabric marks easily, dislikes heat, or needs a softer result. Some makers also block fuse larger sections before cutting, which can give very even support if you're working with a fabric that shifts.
A few practical pairings:
- Collars and lapels often suit a firmer support than the body.
- Cuffs and front facings benefit from structure, but too much makes them cardboard-like.
- Soft linen jackets usually want lighter support than a structured wool blazer.
If you're not sure, make a test sandwich of shell, interfacing, and lining. Press it. Fold it. Scrunch it. That little sample will tell you more than the packet description ever will.
Precision Cutting and Essential Marking
This is the part many sewists rush, then regret. Jackets are much less forgiving than simple tops. If one front is slightly off grain or one collar stand is cut carelessly, you'll feel it all the way to the final press.
Think of cutting as your sewing room version of mise en place. Once every piece is accurate and every mark is where it should be, construction becomes calmer.
Cut with control, not speed
A rotary cutter is brilliant for smooth, stable cloth on a large mat. Tailor's shears are often better for thicker coating, layered cutting, or areas where you want more tactile control. Neither tool is “more professional”. The professional choice is the one that keeps the fabric flat and the edges true.
For anyone interested in how tool choice affects accuracy on other materials too, this guide to cutting EVA foam for giant flowers is a useful reminder that clean cutting always comes down to matching tool to material.
Mark what matters
Notches, darts, pocket placement, roll lines, and sleeve match points aren't optional on a jacket. They're what keep the whole thing in register.
Try these marking methods according to fabric:
- Tailor's tacks for delicate or dark fabric where chalk vanishes or distorts the surface.
- Chalk pencil or chaco pen for wools and coatings.
- Disappearing marker only if you've tested it thoroughly on a scrap first.
Mark both shell and lining pieces before you unpin the pattern. It's much easier to transfer details while everything is still flat and obvious.
A final habit that saves a lot of grief is bundling pieces together as you cut. Keep each sleeve pair, facing set, and lining section grouped with a note if needed. Jackets involve enough similar-looking pieces that a little organisation pays off quickly.
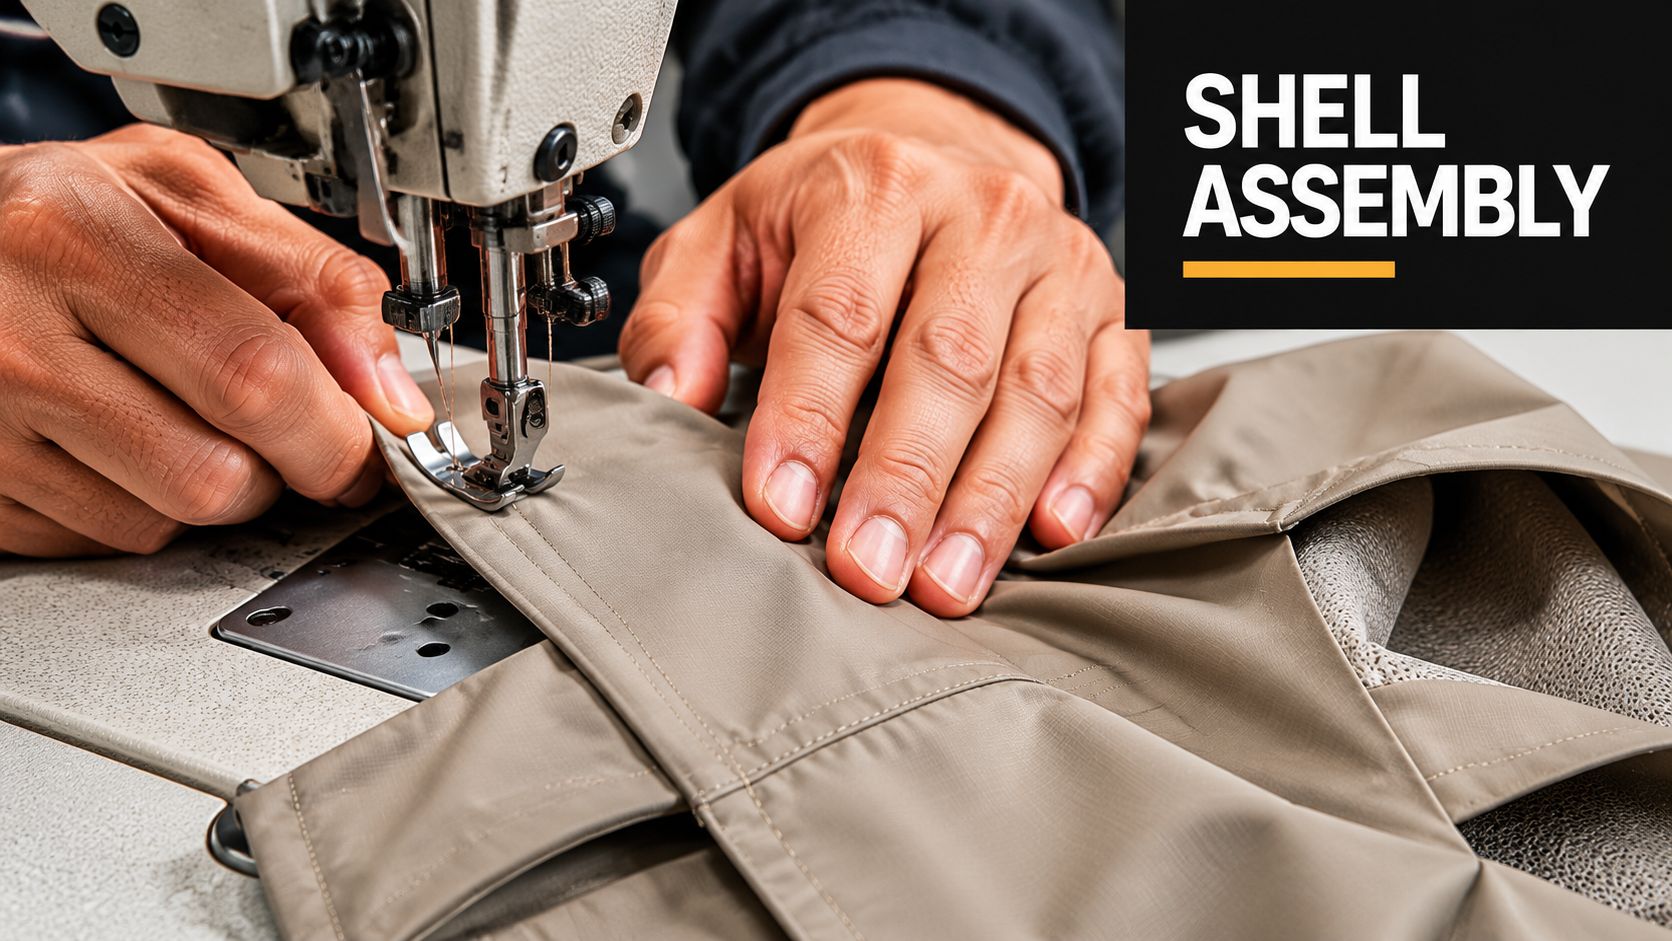
Constructing the Outer Jacket Shell
The outer shell is the visible architecture of the jacket. If this part is rushed, no beautiful lining will rescue it. I always treat the shell as if it could almost be worn on its own, because that standard keeps the seams, shaping, and pressing honest.
Build the body before chasing details
Start with darts, princess seams, or panel seams first. These establish the jacket's shape. Press each seam as soon as it's sewn, and decide whether it should be pressed open or to one side based on bulk and design.
Then handle pockets before the side seams if the pattern allows it. Patch pockets are straightforward but still need care. Fuse where needed, mark placement precisely, and sew both pockets in the same direction so they match in look as well as position.
A few shell habits worth keeping:
- Staystitch curved edges such as the neckline if your fabric is likely to stretch while handled.
- Check left and right fronts together before moving on. The eye spots asymmetry better when both pieces are laid side by side.
- Trim bulk gradually. Don't wait until the end to discover four heavy seam allowances meeting at one corner.
Sleeves are easier than they look
Set-in sleeves frighten people because puckers show. The fix isn't brute force. It's preparation.
Run easing stitches in the sleeve cap where the pattern indicates. Don't gather it like a puff sleeve. You're only coaxing extra fabric into the curve so the sleeve rounds over the shoulder instead of collapsing into a flat tube.
When I teach this, the turning point is usually getting people to stop pulling. The sleeve cap needs gentle persuasion, not tightening until it wrinkles.
Try this order:
- Sew and press the shoulder seams.
- Assemble the sleeves.
- Mark the cap notches clearly.
- Stitch easing rows within the seam allowance.
- Pin sleeve to armscye with underarm seam first, then shoulder point, then notches.
- Draw up the easing threads slightly and distribute the fullness before sewing.
If puckers appear, don't keep going and hope the iron fixes them. Unpick that area, steam the sleeve cap back into shape, and resew it. Wool and many jacket fabrics respond well to patient pressing.
Collars and facings deserve patience
Collars look expensive when the points are sharp, the seams are smooth, and the underside doesn't fight the top collar. Sew accurately, trim corners carefully, and use a point turner gently. Jabbing too hard can push the point right through.
Facings should be stable and flat before they meet the lining later. Interface them properly, sew them cleanly, and press the front edge with care. If the shell is neat at this stage, the later assembly feels far less risky.
Assembling Your Jacket Lining
The lining is sewn almost like a second jacket, but not quite. That “not quite” is where most of the professionalism lives. A lining that copies the shell exactly can tug, peek out, or feel oddly tight in wear.
The shell is built for appearance. The lining is built for movement and concealment.
How the lining differs from the shell
The main shape often mirrors the outer jacket, but the handling changes. The lining fabric is usually more slippery, more prone to shifting, and less forgiving of inaccurate cutting. Shorter stitches can help on lightweight lining, and a fine needle usually gives a cleaner result.
A particularly useful bit of UK dressmaking guidance is that jacket linings are often sewn with a slightly smaller seam allowance than the shell so the lining sits neatly inside. A common UK practice is using a 1.5 cm (5/8 in) seam allowance for the shell, but reducing it to around 1.2 cm for the lining to help it fit properly.
That small adjustment matters. It encourages the lining to remain inside the jacket rather than pushing against the edge.
Leave room to move
Many linings benefit from a little wearing ease, especially through the back. Some patterns build this in with a centre back pleat. Others rely on the drafting of the lining pieces themselves. Either way, the lining shouldn't act like a second outer shell.
Keep an eye on these problem areas:
- Across the upper back where movement strains a tight lining
- At the sleeve hem where excess length can poke out
- At the front facing edge where a too-tight lining can roll forward
The turning opening matters too. Leave it in the place your pattern suggests, often in a lining side seam or sleeve seam. Make it neat, visible, and impossible to forget. If you accidentally sew it closed during assembly, you'll find out at exactly the wrong moment.
A lining should feel a little submissive. It supports the jacket, slips over your clothes, and stays out of sight. If it's trying to behave like the outer fabric, something is off.
The Magic of Bagging Your Lining
Bagging sounds technical, but the idea is simple. You build the shell and lining separately, join them around the outer edges, and turn the whole jacket through the opening left in the lining. It's the cleanest way to finish a lined jacket without visible topstitching all around the edges.
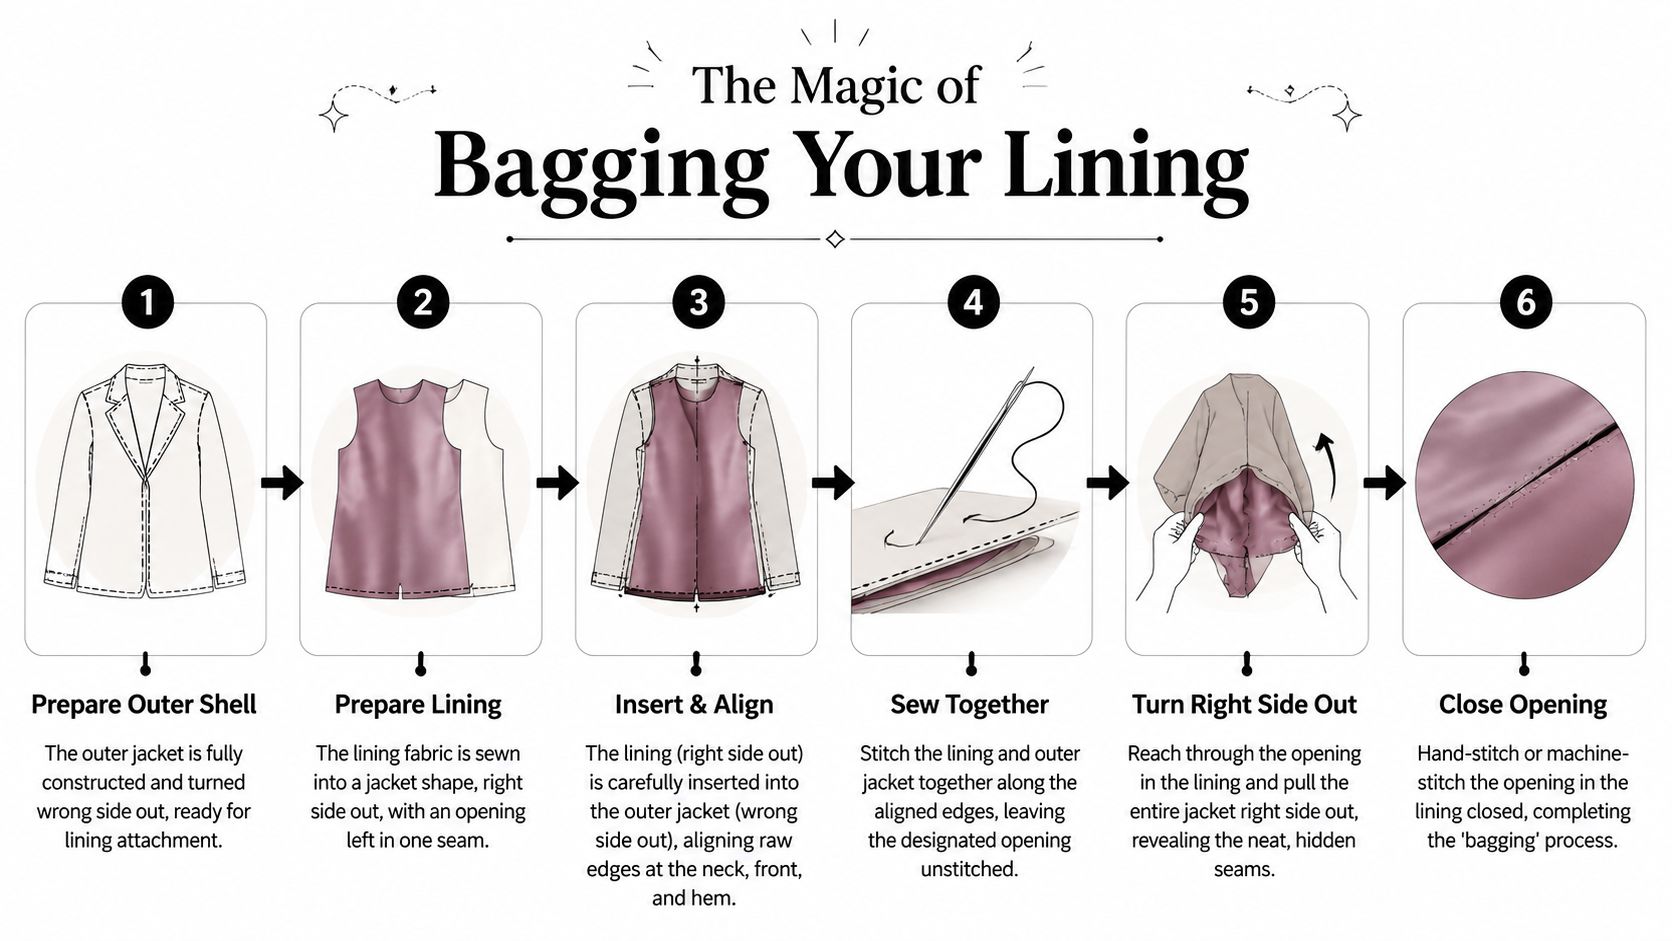
Before you start, lay both pieces out properly. The shell is usually wrong side out and the lining right side out, so the lining can be placed inside the shell with right sides facing where they need to be stitched.
The sequence that keeps it orderly
A reliable UK method is to construct the shell and lining separately, leave an unsewn opening in the lining, then stitch the shell and lining together around the outer edges before turning the garment through that opening. UK tutorials also stress leaving hems and sleeve bottoms unsewn until after turning, then closing the remaining gap by hand, which helps reduce bulk and avoids visible stitching on the outside. One tutorial also recommends trimming the bodice lining by 2 5/8 in (6.6 cm) and the sleeve lining by 1 in (2.5 cm) before assembly so the lining helps draw the hem and cuffs inward.
That shortening is one of those details that separates a tidy jacket from one that constantly needs tugging.
Use this order:
- Prepare the shell fully except for the parts your pattern leaves open for bagging.
- Prepare the lining fully and double-check that your turning gap is open.
- Nest the pieces together and match shoulder seams, neckline points, front edges, and facing joins.
- Pin or hand-baste carefully around the collar, front, and hem.
- Sew the perimeter with steady accuracy, especially through corners and curves.
- Turn through the opening and gently work out edges and corners.
There's a video walkthrough here if you like seeing the logic in motion before sewing:
What usually goes wrong
Most bagging problems are mechanical rather than mysterious. The sleeves twist because one layer got rotated during assembly. The hem drops because the lining was allowed to match the shell edge too exactly. The facings pull because the seam allowance or clipping wasn't handled properly.
Watch for these specific traps:
- Twisted sleeves. Before sewing anything permanently, reach into the jacket and check that each sleeve hangs naturally.
- Misaligned facings. If one side is even slightly off at the neckline or breakpoint, the front edge won't sit evenly.
- A lining that hangs too low. This is one of the most common homemade-looking problems.
Think of bagging like turning a pillowcase, only with more landmarks. If the landmarks are matched properly before stitching, the turning step feels almost magical. If they aren't, the jacket tells on you immediately.
Pin the lining slightly higher
This matters especially at the hem and cuffs. You don't want the lining to sit level with the outer raw edge and then behave as though it has the same job. It doesn't. Its job is to stay tucked in and allow the outer edge to look clean.
When a sewist tells me their lining keeps showing, this is often the first thing I check. Not fabric choice. Not the machine. Just whether the lining was given the little bit of height it needed before the seams were joined.
Once turned, give the jacket a gentle shake, pull everything into place, and resist the urge to declare victory too soon. The next finishing steps are what lock in that polished result.
Professional Finishing Touches
At this stage, a jacket stops looking merely completed and starts looking considered. The shell and lining may now be joined, but the quality lives in what you do to the seam allowances, edges, corners, and anchor points.
Understitching is one of the best-kept secrets
If you've ever made a garment where the lining or facing insists on rolling to the outside, this is usually the missing step. After sewing the outer edge, you stitch the seam allowances to the facing or lining side so the seam naturally rolls inward.
For a crisp finish, UK tailoring sources recommend understitching and seam grading. After sewing, trim and grade seam allowances, clip corners, then understitch the facing to ensure the lining rolls neatly to the inside. Professionals also tack the lining at the shoulder and underarm seams to prevent it from shifting during wear, as explained in this UK bagged jacket lining tutorial.
That combination does far more than people expect. Understitching controls the edge. Grading removes bulk. Tacking stops the lining migrating after a few wears.
Grade, clip, and reduce bulk
Don't leave every seam allowance the same width where several layers meet. Grade them so one layer is widest, the next is narrower, and the next narrower again. That helps the seam sit flatter from the outside.
Pay close attention to:
- Collar corners where bulk can blunt the point
- Lapel areas where an ungraded seam creates ridges
- Hem joins where shell, facing, and lining all meet
Clip into curves where needed so the seam can spread and turn properly. Trim corners so they don't bunch. Then press, not by scrubbing the iron around, but by placing it carefully and letting steam do some of the work.
Small inside jobs create the outside finish. If the seam allowances are bulky, uneven, or untamed, the jacket edge won't look sharp no matter how lovely the fabric is.
Close the gap neatly and secure the inside
Use a slip stitch or ladder stitch to close the turning opening invisibly. Take small stitches, keep the tension even, and steam it lightly afterwards. A rushed closure is surprisingly easy to spot inside an otherwise beautiful jacket.
Then add those discreet tacks at the shoulder and underarm if the jacket needs them. Just a few hand stitches can stop the lining twisting or drooping with wear. It's a tiny job, but it makes the jacket feel settled on the body.
If your style includes buttons or buttonholes, mark them carefully after the jacket has had a good press and a brief hang. Edges can relax slightly after construction, and final placement is better judged on the finished garment than on flat pieces cut days earlier.
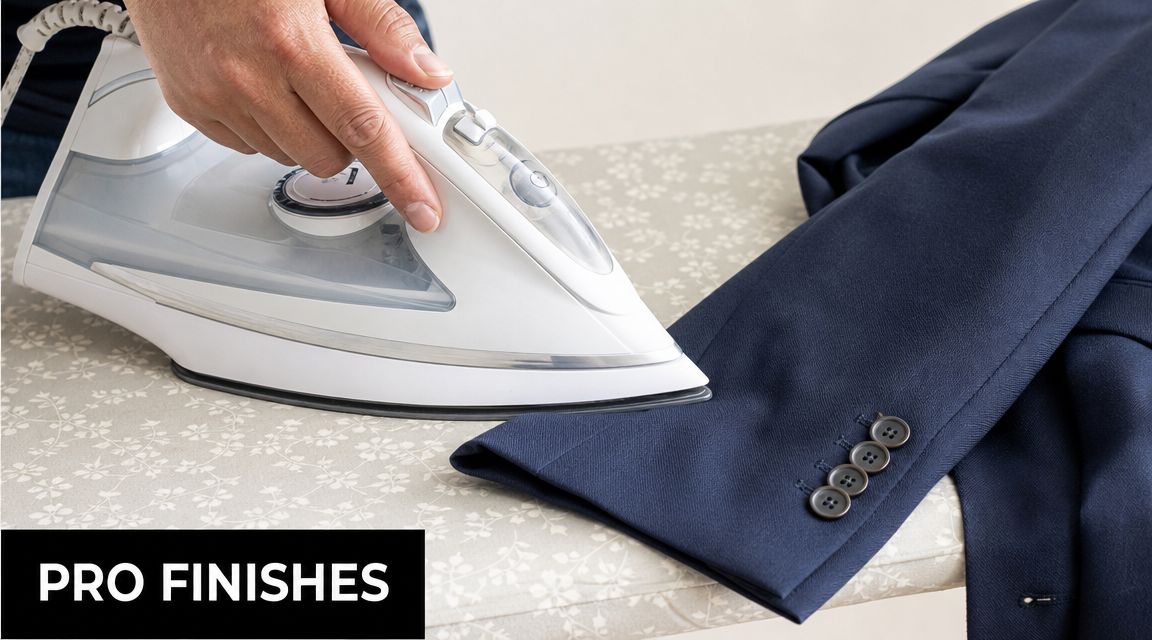
Final Pressing and Fit Adjustments
A jacket can be perfectly sewn and still look unfinished if it hasn't been pressed properly. Tailoring relies on shape, and shape comes from heat, steam, pressure, and patience.
Pressing isn't the same as ironing. Ironing slides the iron around. Pressing lifts and places it. For jackets, pressing is what you want, because dragging the iron can stretch edges, flatten sleeve heads, and distort lapels.
Press the jacket into its final shape
Use the right support under the cloth if you have it. A tailor's ham helps with curved areas like bust shaping, collars, and lapel rolls. A seam roll keeps sleeve seams and narrow areas from showing an imprint on the right side.
Give extra attention to these areas:
- Front edges so they roll cleanly and evenly
- Sleeve caps so they keep a rounded shape
- Hems and cuffs so the lining stays hidden and the edge doesn't ripple
Then put the jacket on, or try it on a stand if that's how you work. Check sleeve length, hem balance, and whether the lining is sitting smoothly inside.
Make small adjustments while the jacket is calm
Minor issues often show up only at the end. A sleeve may need taking up slightly. One hem corner may need redistributing if it's pulling. A collar may want one more careful press with a cloth.
Don't chase perfection by overworking it. Most final tweaks are small and local. If the jacket hangs well, feels comfortable, and the lining stays where it belongs, you've done the hard part properly.
A lined jacket teaches a lot in one project. You learn that the polished look comes from controlled seam allowances, tidy internal engineering, and finishing steps that nobody sees directly but everybody notices.
If you're ready to start your own jacket, More Sewing is a useful place to browse quality dressmaking fabrics, linings, interfacing, and the practical haberdashery that makes tailoring easier. It's especially handy when you want to compare textures and plan a shell-and-lining pairing that will behave well from cutting table to final press.