Guides
Children Sewing Pattern A Complete UK Guide
You've bought a lovely print, perhaps a soft cotton with tiny animals on it, and you can already see the finished outfit in your mind. Then you open a children sewing pattern and hit a wall. The envelope has size ranges that don't seem to match shop clothes, the tissue pieces look like a puzzle, and every term feels like it belongs in a different language.
That feeling is normal.
Children's sewing has a reputation for being quick and cheerful, and it can be. But children's clothes also bring their own little fitting puzzles. One child is tall and slim. Another has a round tummy and narrow shoulders. Another fits the width of one size and the length of the next. If we rely on age labels alone, we often end up cutting the wrong size and wondering where it all went wrong.
The good news is that a pattern isn't a test. It's a tool. Once we understand what the markings mean, why measurements matter more than age, and how fabric choice changes the result, the whole process gets much calmer. We stop guessing and start making deliberate choices.
Your Journey into Sewing for Children Starts Here
A lot of us begin the same way. We want to make something practical and personal for a child we know. Maybe it's pyjama bottoms for a grandchild, a party dress for a niece, or a simple top for our own little one. We choose fabric first because that part feels fun. Then the pattern has to turn that fabric into a real garment, and suddenly the fun turns into hesitation.
I see this often in workshops. Someone brings in a pattern labelled for children, assumes the age on the front will be enough, and then gets stuck before they've even threaded the machine. They ask good questions. Why are there several size ranges? Why doesn't the child's shop size match the pattern size? Why does the pattern say one fabric but the online photo looks like something else?
Those questions matter because children's garments need to do more than look sweet. They need room to run, crawl, climb, sit cross-legged on the floor, and survive regular washing. A good result comes from understanding the pattern as a practical guide, not a strict set of mysterious rules.
Practical rule: The pattern is there to help you make decisions. It isn't there to catch you out.
If you're new, keep your aim modest. We're not trying to master every fitting technique in one go. We're trying to make one garment that fits comfortably, hangs properly, and teaches us something useful for the next project.
That's why it helps to treat a children sewing pattern as both a plan and a conversation. The pattern tells us what shape the designer intended. The child's body tells us how to adapt that shape. The fabric tells us how the garment will behave once it's worn.
When we listen to all three, things fall into place much faster.
Decoding Your First Childrens Pattern
A sewing pattern is really two things at once. It's a recipe and a blueprint. The recipe tells us the order of work. The blueprint gives us the shapes and markings that make the garment fit together.
Once you start seeing those two roles clearly, the pattern becomes far less intimidating.
The envelope tells you more than the picture
The front of the pattern package is the part that sells the dream. It shows you the finished garment and often several versions of it. That's useful, but the back or inside pages are where the practical information lives.
Look for these details before you buy or cut:
- Size range. Children's patterns often cover a group of sizes rather than every size in one set.
- Fabric suggestions. These tell you what the design was intended for, such as a woven cotton or a knit jersey.
- Notions. This means the extras, like elastic, buttons, snaps, zip, or interfacing.
- Finished garment clues. Some patterns also hint at shape, fullness, or fit through technical drawings.
One historical point helps explain why this matters. Threads Magazine's discussion of children's pattern sizing notes that Simplicity historically sold children's patterns in overlapping ranges such as “infants,” “1/2 thru 4,” “2 thru 4,” and “3 thru 8,” and that a size 2 in one range is not the same as a size 2 in another. That's why experienced sewists check the measurement chart instead of trusting the number on the front.
The instruction sheet is your recipe
The instruction sheet tells you what to cut, how many pieces you need, and the order of assembly. Beginners often skip straight to the diagrams, but it's better to read the sheet once before touching the fabric.
Pay special attention to:
- Cutting instructions. These tell you whether a piece is cut on the fold, cut in pairs, or cut from lining as well as main fabric.
- Layout diagrams. These show how to place pieces on folded fabric efficiently.
- Construction order. The sequence matters more than many beginners realise. A collar or placket is usually much easier to sew before side seams are closed.
- Pressing guidance. Pressing at each stage helps the garment look neat and professional.
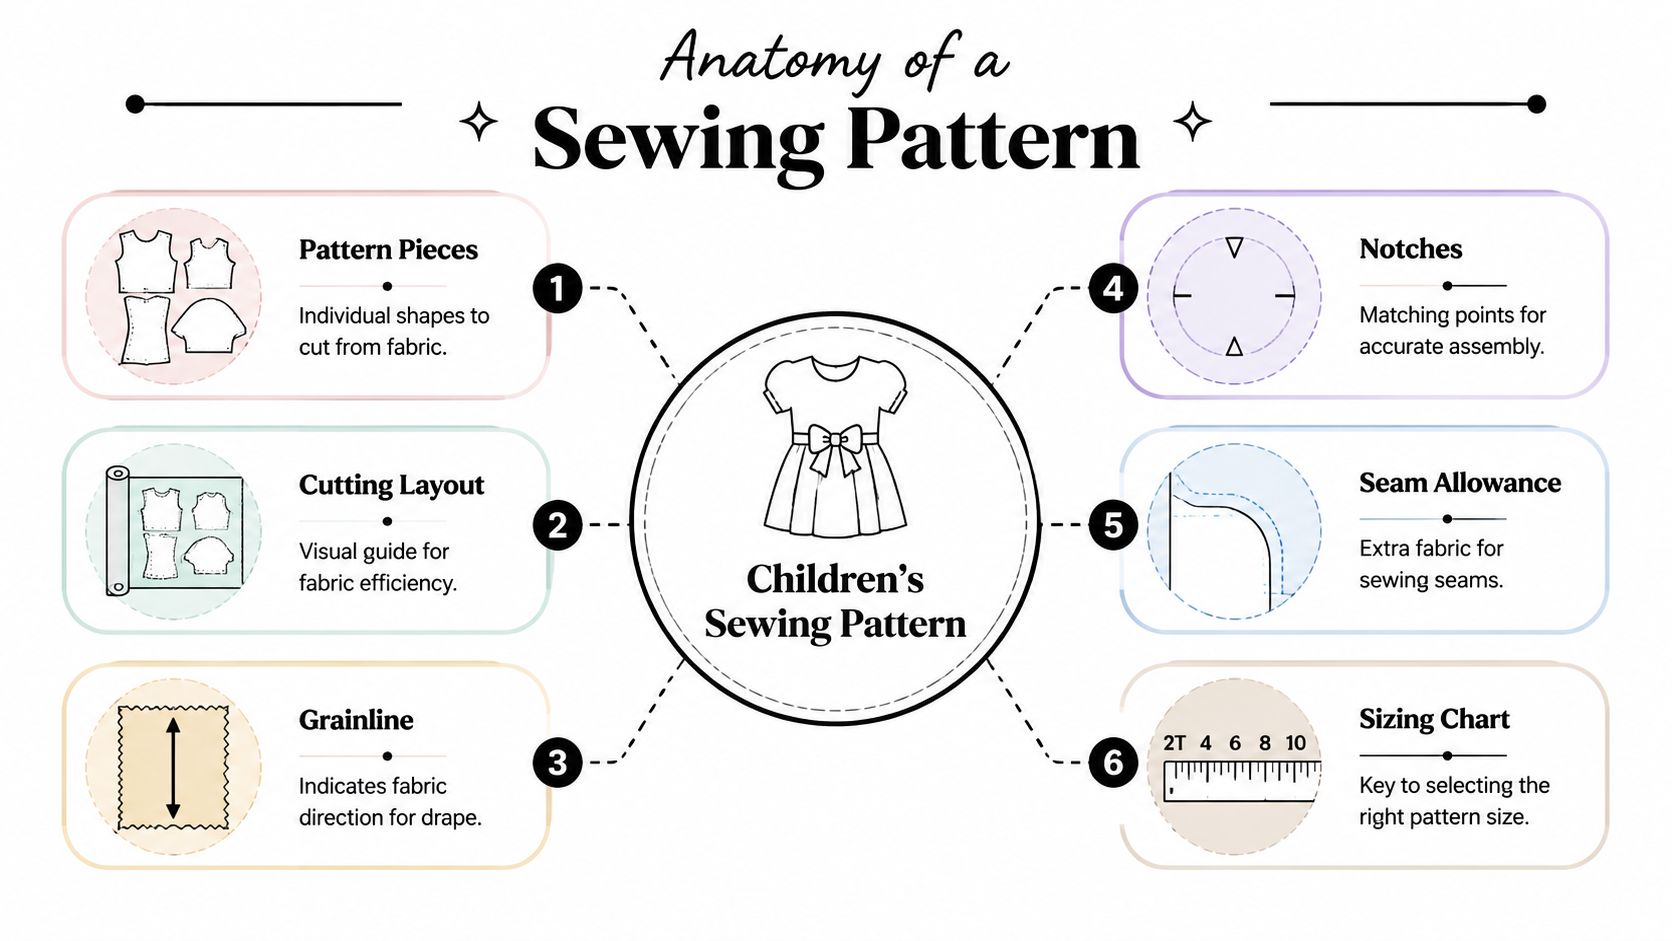
The pattern pieces are your blueprint
Each tissue or printed piece is a shape with instructions built into it. If we ignore the markings, we usually create trouble for ourselves later.
Here are the markings that matter most:
- Grainline. This long arrow shows how the piece should sit on the fabric. Follow it carefully. Fabric hangs and stretches differently depending on direction, so a crooked grainline can make a leg twist or a bodice pull oddly.
- Notches. These little marks help you match one piece to another. If two sleeve notches meet two armhole notches, they're telling you exactly where that sleeve belongs.
- Fold line. If a piece says “place on fold”, don't cut around both sides. The fold creates a symmetrical full piece.
- Lengthen or shorten line. This line allows you to adjust length while keeping the pattern's proportions balanced.
- Seam allowance note. Some patterns include seam allowance; some don't. Check before cutting. It's one of the easiest mistakes to make.
- View markings. If one pattern includes several versions, the piece may tell you which version it belongs to.
If a pattern feels confusing, trace one piece and study it on its own. Most of the confusion comes from looking at everything at once.
A children sewing pattern starts to feel manageable when we stop seeing it as a pile of paper and start reading it like instructions with a purpose.
Getting the Right Fit Every Time
A child can wear age 5 trousers from one shop, age 6 pyjamas from another, and still need a completely different pattern size. That catches many beginners out. In sewing, age is only a rough label. Measurements give us something practical to use.
The primary goal is a garment that sits comfortably on the child in front of us. Children do not grow in one neat, even way. One may be tall and narrow, another rounder through the tummy, another broad at the chest with shorter legs. A pattern has to start somewhere, so we use the measurement that affects fit most strongly first, then adjust the easier areas after.
Why age labels cause trouble
Shop sizing is made for selling ready-to-wear clothes quickly. Pattern sizing is made for cutting a garment from a drafted shape. Those two systems often disagree, which is why a child's usual shop size can send us in the wrong direction.
A helpful point from children's size guidance at Boo and Lu is that many UK pattern makers suggest choosing the starting size from the child's largest upper-body circumference, usually chest or waist. Height is then used to adjust length. This approach is important because shoulders, necklines, and armholes are awkward to fix once cut, while hems, sleeves, and trouser legs are usually straightforward to shorten or lengthen.
If you remember one fitting rule, make it this one. Choose width first. Tweak length second.
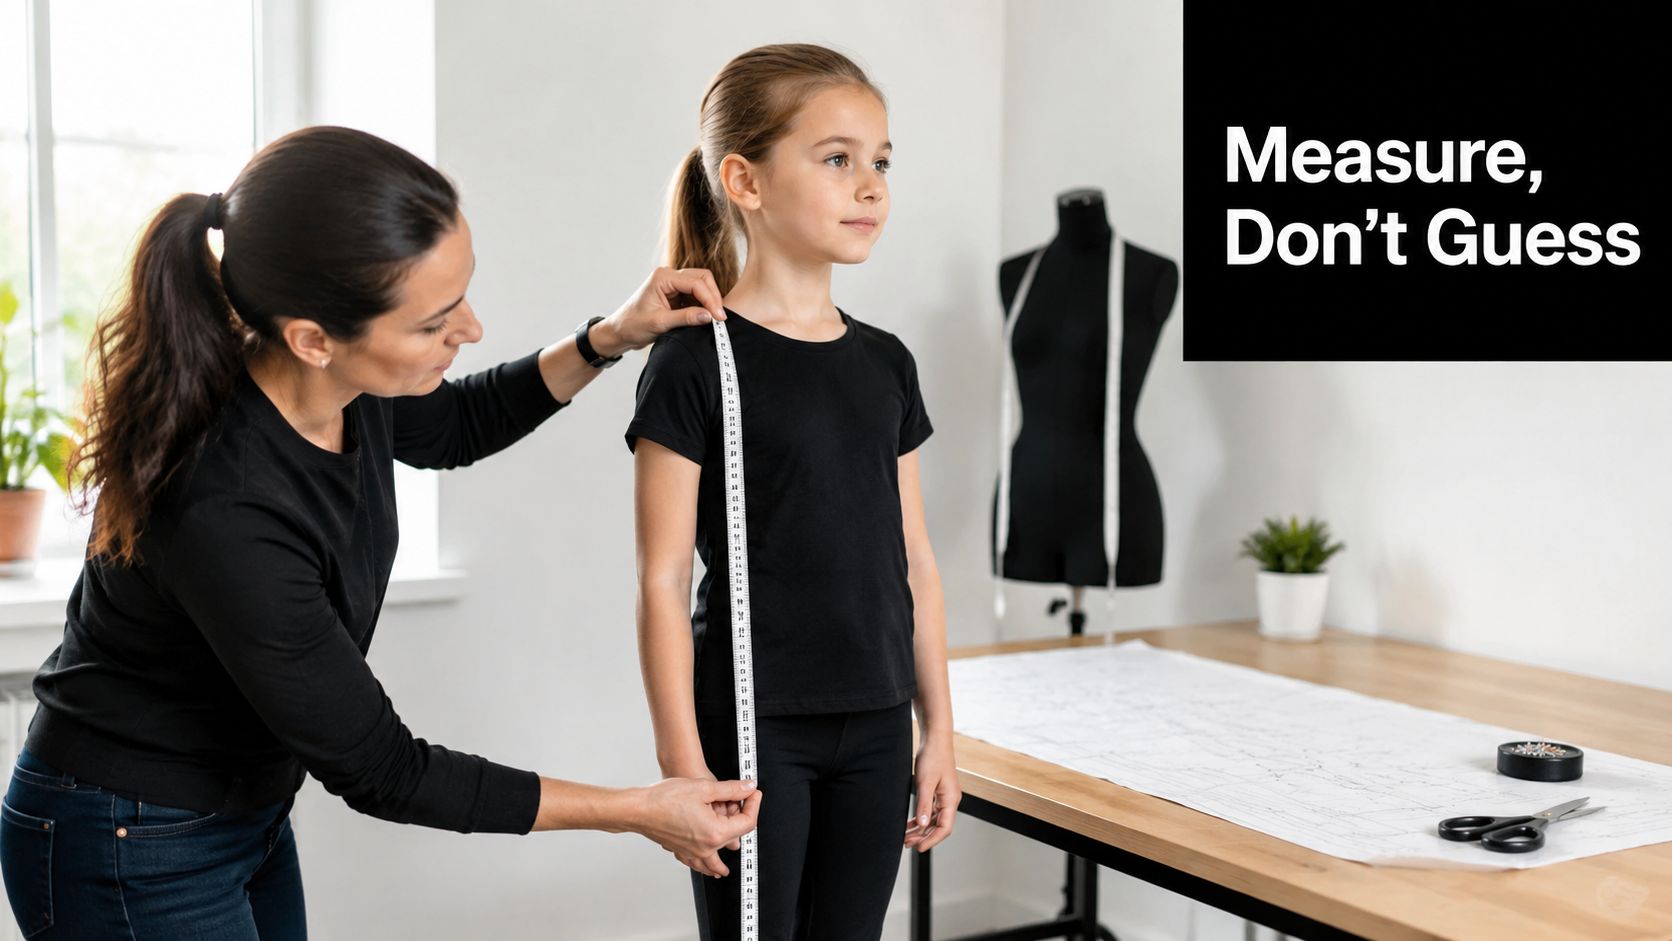
How to measure a child without a battle
We only need a few measurements to make a far better decision than guessing by age.
Use a soft tape measure. Keep it level all the way round the body. Ask the child to stand as they normally do, without pulling in their tummy or stretching up tall like a soldier. If they are fidgety, take each measurement twice and use the one that repeats.
Start with these:
- Chest. Measure around the fullest part of the chest, under the arms, with the tape snug but not tight.
- Waist. Measure around the natural waist if you can see it clearly. For many younger children, the fullest tummy area is often the more useful guide.
- Height. Measure from the top of the head to the floor while the child stands straight.
For dresses, coats, trousers, and long sleeves, an extra check helps. You might note back waist length, sleeve length, or inside leg so you can compare the child's proportions with the pattern before cutting into fabric.
Which size should you pick
Lay the child's measurements beside the pattern chart and look at chest and waist first. If those point to different sizes, start from the larger upper-body measurement. Then check height to see whether the body, sleeve, or leg length needs adjusting.
That can feel strange at first. A child may wear a smaller age in shop clothes and still need a larger pattern size through the body. That does not mean the pattern is wrong or that you measured badly. It means you are fitting a real child, not a retail label.
A good confidence check is to compare the chart with a garment the child already enjoys wearing. The previously mentioned Threads Magazine discussion also notes that many sewists use a well-fitting ready-to-wear garment as a reference instead of trusting age alone.
Here is a simple guide:
| Situation | Best choice |
|---|---|
| Chest and waist both match one size | Cut that size |
| Chest and waist fall into different sizes | Start with the larger upper-body size |
| Width fits but the child is taller or shorter | Adjust length on the pattern |
| Unsure between two sizes | Check the style, fabric, and how much growing room you want |
A short fitting demo can make these ideas easier to picture:
Why patterns don't fit every child straight away
Patterns are drafted from a standard shape, and children rarely match a standard shape exactly. Pink Hollybush Designs' guide to choosing children's sewing pattern sizes explains that one company drafts for a broad portion of children in the target age range rather than every possible body shape. That is a useful reminder. A pattern gives us a starting map, not a perfect custom fit straight from the envelope.
The same guide recommends checking the child's largest upper-body circumference before choosing a size. That is why chest and waist are our first checkpoints. Once the upper body is sitting properly, we can alter length with much less fuss.
This is also where fabric choice helps. If you are buying from a UK retailer such as More Sewing, a stable cotton poplin will behave very differently from a stretchy jersey or a soft French terry. Woven fabrics usually need a little more fitting care through the body because they do not stretch to forgive a tight chest or waist. Knits can be more flexible, but only if the pattern was drafted for stretch. The better we match the child's measurements to the pattern at the start, the easier those fabric decisions become.
The best-fitting children's clothes usually come from one accurate size choice and one small adjustment, not from chasing the age printed on the packet.
Choosing Your Format Paper vs PDF Patterns
Once you understand sizing, the next practical choice is format. Should you buy a traditional paper pattern or a PDF pattern to print at home or at a copy shop?
Neither option is automatically better. It depends on how you like to work, how much space you have, and whether you want the pattern immediately or don't mind waiting.
Why some sewists still love paper
Paper patterns feel familiar. You open the packet, unfold the sheets, and start tracing or cutting. There's no printer setup, no page trimming, and no taping printed tiles together on the dining table.
They also suit sewists who like a physical envelope with all the instructions in one place. If you enjoy leafing through pattern drawers or keeping projects in labelled folders, paper often feels tidy and satisfying.
The drawbacks are practical. Tissue can tear. Multi-size sheets can be busy to read. If you cut your size straight from the original, you can't go back easily if you want another size later unless you've traced it first.
Why PDF patterns work well for many home sewists
PDF patterns are popular because they're fast and flexible. You buy, download, and can usually start the same day. If the child grows, you can print a different size later. If a page gets damaged, you print it again.
Many sewists also like the option to print only the layers they need if the pattern includes that feature. That can make the lines far easier to read than a densely printed tissue sheet.
The trade-off is assembly. Home-printed patterns often need taping together, and that part can test your patience if you're eager to sew. You'll also need to check the print scale carefully before cutting anything.
Choose the format that removes the biggest obstacle between you and sewing. For some people that's waiting for the post. For others it's taping thirty pages together.
Paper vs. PDF Sewing Patterns Which is Right for You
| Feature | Paper Patterns | PDF Patterns |
|---|---|---|
| Getting started | Ready once it arrives | Instant download and access |
| Storage | Needs physical space | Stored digitally, though printed copies still take room |
| Reusability | Best if traced before cutting | Easy to reprint in another size |
| Reading the lines | Can be crowded on multi-size sheets | Often easier if layer printing is available |
| Set-up effort | Little prep before tracing or cutting | Printing and assembling takes time |
| Portability | Easy to tuck into a project bag | Digital files are handy, printed copies less so |
| Best for | Sewists who like physical patterns | Sewists who want flexibility and instant access |
If you're a beginner, think about your own habits. If you dislike technical faff, a paper pattern may feel calmer. If you sew for fast-growing children and expect to make the same garment again, PDF can be extremely practical.
Selecting Perfect Fabrics and Notions for Kids Clothes
You trace a lovely children sewing pattern, cut it in a fabric with a print your child adores, sew carefully, then wonder why the finished garment feels stiff, twisty, or awkward to get on. In many cases, the problem is not your sewing. It is the match between the pattern and the fabric.
That is why fabric choice matters so much. The pattern gives us the shape, but the fabric decides how that shape behaves on a real child who runs, climbs, sits cross-legged, and goes through frequent washing.
Match the fabric to the job
A good starting question is simple. What does this garment need to do?
A party dress and a pair of playground trousers ask very different things from fabric. One may need soft drape and comfort against the skin. The other needs enough body to cope with kneeling on tarmac and repeated trips through the wash. If we choose by purpose first, the rest gets easier.
For everyday tops, simple dresses, and shirts, cotton poplin is often a friendly beginner fabric because it presses well and stays fairly stable while we sew. Cotton lawn is lighter and softer, so it suits blouses or warm-weather dresses where you want a gentler fall.
For T-shirts, leggings, and relaxed clothes, jersey usually makes more sense. It stretches as the child moves and often makes dressing easier, especially for children who dislike anything tight over the head.
For dungarees, pinafores, skirts with structure, and hard-working trousers, denim, corduroy, or another sturdier bottom-weight fabric will usually wear better than a delicate dress cotton.
If you are buying in the UK, it helps to look at the fabric description with the finished garment in mind. At More Sewing, for example, you might choose a soft cotton jersey for pyjamas or play tops, a crisp poplin for a school-ready shirt, or needlecord for autumn pinafores that need a bit of warmth and shape. The useful question is not “is this fabric pretty?” It is “will this fabric behave the way this pattern expects?”
A quick guide helps:
- Blouse or simple dress. Cotton lawn or poplin for easy handling and neat seams.
- Pyjama bottoms. Soft woven cotton for breathability and comfort.
- T-shirt or leggings. Jersey, because the stretch is built into the garment's comfort.
- Dungarees or trousers. Denim or corduroy for better durability.
- Special outfit. Choose a fabric that still feels comfortable, then add interest with trim or piping if needed.
Why woven and knit patterns behave differently
This catches many beginners out.
A woven fabric is like a paper shopping bag. It holds its shape, but it does not give much when pushed. A knit fabric behaves more like a soft jumper. It stretches and springs back. Because of that, the same pattern shape will not act the same way in both fabrics.
Patterns drafted for woven cloth usually include enough room for movement because the fabric itself does not stretch. Knit patterns often rely on the fabric's stretch to provide some of that comfort. So if we swap one type for the other without checking, neck openings can become too tight, bodices can sag, or trousers can end up oddly baggy.
The short version is this. If the pattern says woven, start with woven. If it says stretch knit, use a knit with similar stretch. That one decision prevents a surprising number of fitting and sewing problems.
Pre-wash before you cut
Children's clothes are washed often, so pre-washing is part of preparation, not an optional extra.
Wash and dry your fabric the way the finished garment will be washed and dried at home. If a cotton fabric is going into the usual family wash, treat it that way before cutting. That helps prevent the unhappy moment when a neatly sewn dress comes out smaller, tighter, or slightly twisted after its first laundry day.
Pre-washing also tells us useful things early. Some fabrics soften beautifully. Some fray a lot. Some crease at the slightest glance and need a cooler iron than we expected.
Don't overlook notions and comfort
Notions are the supporting cast. They do not get much attention, but they often decide whether a child enjoys wearing the garment.
Choose soft elastic for waistbands where possible, especially for younger children or anyone sensitive to scratchy textures. Pick snaps, buttons, or zips based on both the pattern and the child. A back button may look sweet, but a zip or poppers might make dressing far easier. Use interfacing where the pattern calls for support, such as collars, plackets, or facings, so those areas keep their shape after washing. Match your thread to the fabric weight, not just the colour.
For babies and very young children, treat trims carefully. Buttons, bows, and decorative extras must be attached securely, and it is often wisest to keep embellishment simple.
Good fabric and sensible notions do a lot of quiet work. They make the sewing easier, the fit more comfortable, and the finished clothes more likely to be worn again and again.
Simple Pattern Alterations for Growing Children
You sew a pair of trousers that fit beautifully in April, then by June the hems are hovering above the ankle while the waist still fits perfectly. That is normal with children's clothes. Growth rarely happens evenly, which is why a children sewing pattern often needs a few small changes to suit the child in front of us, not an imaginary average size.
The useful part is this. We usually do not need to redraw the whole pattern. We just adjust the area that has changed, while keeping the rest of the shape steady.
Lengthen or shorten in the right place
Many children's patterns include a lengthen/shorten line, and it is there for a practical reason. The pattern designer has chosen that spot because it adds or removes length without disturbing the balance of the garment.
If we only add length at the hem, the garment can start to behave oddly. A dress waist may creep too high. Knee markings on trousers can sit in the wrong place. A sleeve can end up wider at the wrist than intended because we extended the shape at the bottom rather than through the middle. The pattern grading guidance discussed in this pattern grading video tutorial shows why keeping shoulder slope, armhole depth, and overall proportion in balance matters as sizes change.
A simple method is:
- Draw across the marked adjustment line.
- Cut along that line.
- Spread the pieces to add length, or overlap them to remove length.
- Tape the pattern down.
- Redraw the side seams so the lines flow smoothly again.
This method works especially well on sleeves, trouser legs, skirts, and dress bodices.
Blend between sizes where the child actually needs it
Children rarely match one size from neck to hem. A child may fit one size at the chest and shoulders, another at the waist, and need extra length because they are tall for their age. This is why body measurements matter more than the age printed on the envelope. Age is only a rough guide. Chest, waist, height, and sometimes hip tell us where the garment needs room and where it does not.
Blending between sizes involves drawing a gentle line from one size to another. If the shoulders fit a smaller size but the waist needs more ease, start on the smaller line at the top and curve gradually to the larger line lower down. It works like merging lanes on a road. A slow, smooth change keeps everything balanced. A sudden angle creates bumps, and fabric will show them.
Small changes usually give a better result than making the whole garment bigger.
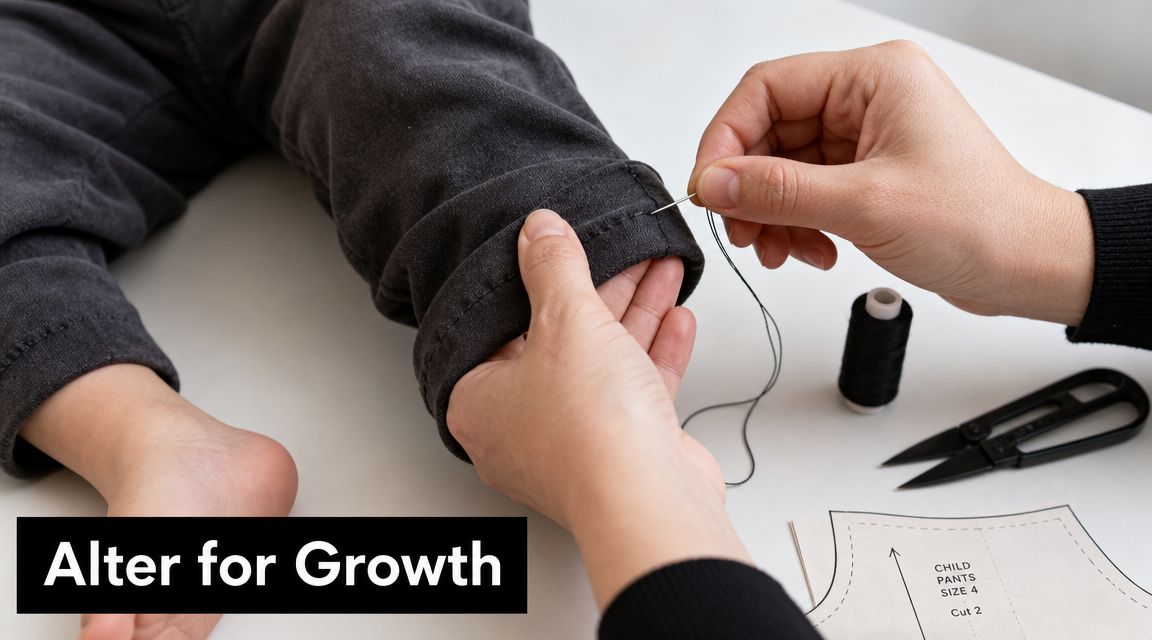
Add growing room on purpose
Some alterations are about today's fit. Others are about getting a little longer wear from the garment, which matters a lot with children.
You might:
- sew a deeper hem that can be let down later
- choose turn-up cuffs on trousers
- use elastic casings for waists and sleeves where the pattern allows
- place straps with buttonholes so they can be moved as the child grows
These are practical choices rather than advanced fitting techniques, but they make handmade clothes far more useful in real family life.
If you are ever unsure, start with length before width. Many children outgrow clothes vertically first, and length adjustments are usually the safest place to begin. Preserve the original shape, change one area at a time, and you will quickly build the kind of fitting judgement that makes children's sewing much less mysterious.
Your First Project Suggestions and Sewing Kits
If you're ready to stop reading and start sewing, choose a project that teaches useful skills without asking too much at once. The best beginner projects aren't always the fanciest. They're the ones that let you finish successfully and want to make another.
A few very good first choices are worth keeping in regular rotation.
Projects that build confidence quickly
Elastic-waist pyjama bottoms are one of the best places to begin. You practise cutting, sewing long seams, forming a casing, and hemming. Fit is forgiving, and the result gets worn often.
A simple A-line skirt is another strong starter. It introduces waistband work, gathering or basic shaping depending on the design, and hemming, but without the complication of sleeves or necklines.
A kimono-style top or other loose wrap-style child's top can also be excellent. It gives you experience with facings or bindings and helps you understand construction order, but the fit is generally less fussy than a set-in sleeve bodice.
If you'd like a few simple criteria for choosing your first pattern, use this checklist:
- Few pattern pieces. Less to manage at the cutting stage.
- Minimal closures. Elastic is easier than a zip.
- Loose fit. More forgiving while you learn.
- Clear fabric recommendation. A stable cotton is kinder to beginners than a slippery or very stretchy fabric.
- Everyday usefulness. The child is more likely to wear it, which makes the work feel worthwhile.
Why all-in-one kits help beginners
A beginner often loses momentum before sewing starts. Not because the sewing is impossible, but because choosing a pattern, matching it to the right fabric, and remembering all the notions can feel like several projects instead of one.
That's why ready-to-sew kits can be such a sensible first step. They remove a lot of decision fatigue. Instead of wondering whether your fabric is too stiff, whether you've forgotten interfacing, or whether the trim really works with the pattern, you can focus on measuring, cutting, and stitching well.
A first project should leave you feeling, “I can do this again”. That matters far more than producing something elaborate.
If you're ready to try your first children sewing pattern with less guesswork, More Sewing is a helpful UK place to start. You'll find quality dressmaking fabrics, haberdashery, and beginner-friendly sewing kits that make it easier to match the right materials to the project you want to sew.