
Blog, Dressmaking, Guides
Shirt Dress Patterns for Sewing: Choose, Fit and Finish
You've got a Saturday set aside, a length of poplin you really like, and a pattern envelope open on the kitchen table. It all looks doable until you count the pieces, look at the collar stand, and wonder whether your usual dress size means anything here at all. That's where most shirt dresses go wrong, before you've cut a single piece.
The fix isn't rushing to the machine. It's choosing shirt dress patterns for sewing by what you can fit, change and repair later, then proving the fit on a toile. A dress you can let out, take in, re-hem and re-button will get worn. One you can't adjust usually won't.
Shirt Dress Pattern Styles and How Hard They Are
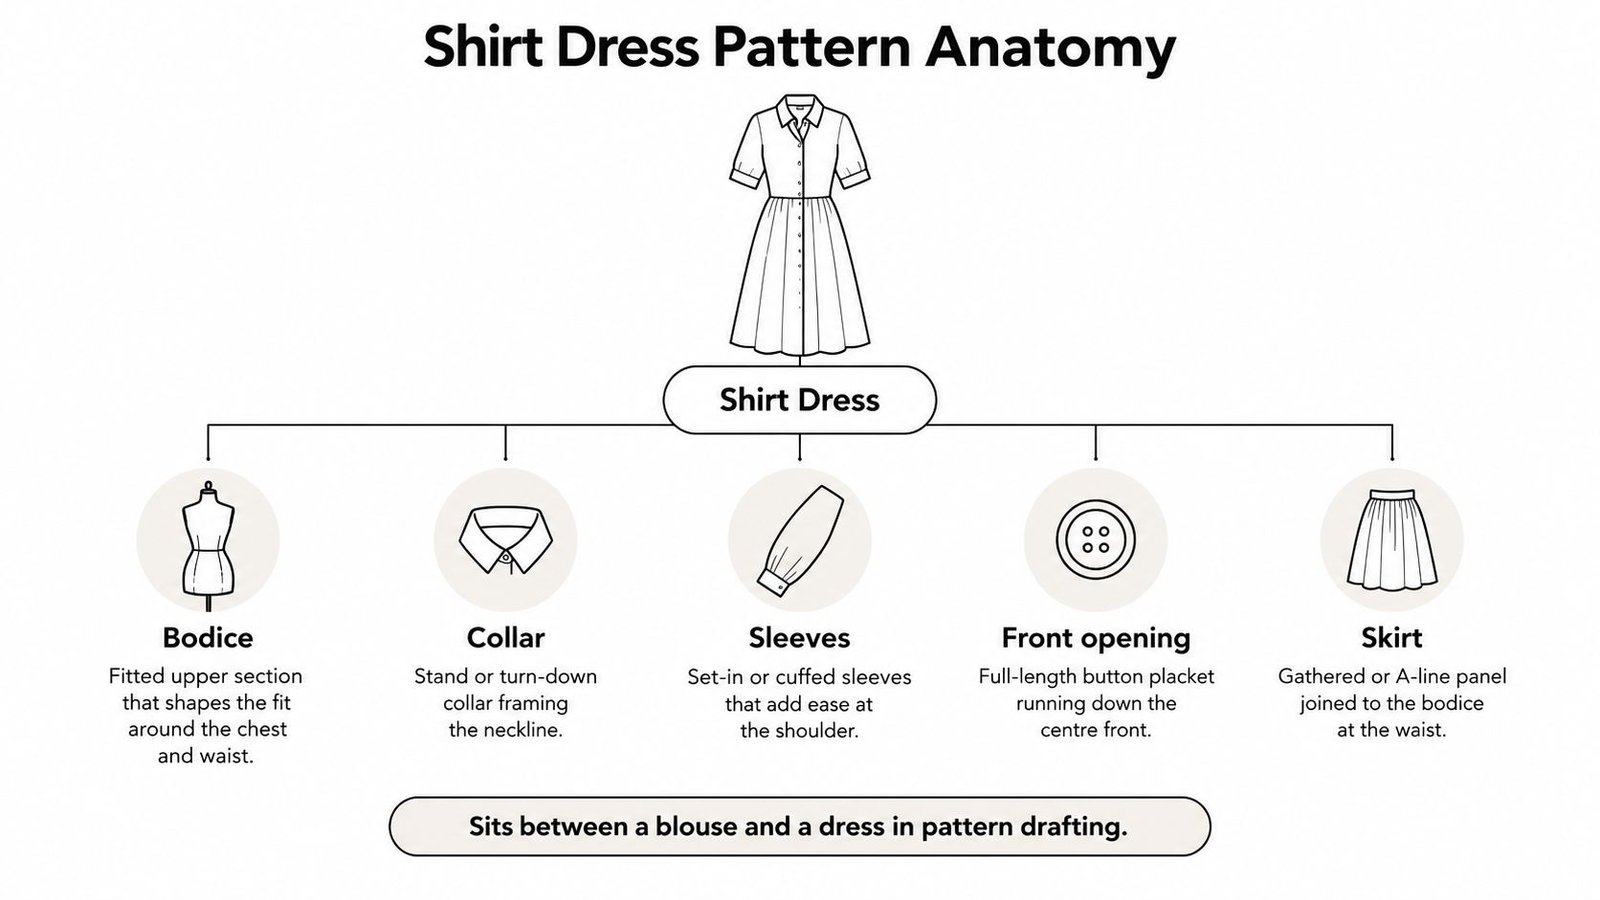
A shirt dress is five garments in one. You've got a bodice, collar, sleeves, front opening and skirt, which is why it sits between a blouse and a dress in pattern drafting. UK paper patterns became a home sewing staple through the twentieth century, with Du Barry patterns especially popular in the 1930s, as the Woolworths Museum records.
This diagram breaks down those five components before you judge any pattern envelope.
Don't trust the word easy on the envelope. Rate it yourself.
How to Rate Difficulty Yourself
Count four things. Closures come first, since a continuous button placket is easier than a concealed zip. Then collars, where a collar stand is harder than a flat neckline, and sleeves, where dropped sleeves forgive mistakes but a set-in sleeve cap needs careful easing. Finally count extras such as pleats, pockets and yokes.
| Style variation | Difficulty | Skills it needs | Suits a first project? |
|---|---|---|---|
| Button-front, no collar, dropped sleeves | Beginner | Straight seams, one buttonhole row, simple hem | Yes, a good first project |
| Stand collar and cuffs, straight skirt | Intermediate | Collar stand, cuff placket, buttonholes | Yes, after one simple shirt dress |
| Yoked back, gathered skirt, short sleeves | Intermediate | Yoke matching, gathering, easing | Possible with careful pressing |
| Shaped waistband, pleats, patch pockets | Advanced | Pleat placement, pocket corners, precise pressing | Not as a first project |
| Notched lapel collar, sleeve tabs, interfaced front | Advanced | Tailored collar, tab construction, interfacing | Not as a first project |
Piece count tells you a lot. For example, a pattern with around 18 pieces, a collar stand and cuffs is usually a second project, not a first, even if the photos look simple.
Practical rule: Choose the style whose hardest feature you have already sewn once.
That one rule saves more weekends than any shortcut. If you've never sewn buttonholes, a full front placket plus cuffs plus a collar stand means three new skills landing on the same garment, and the last one usually suffers.
Pick a Pattern Licence, Size Range and Yardage
Buy the pattern before you measure or shop for fabric. Pick the style first, then read the listing properly, whether it is a paid indie pattern, a free designer download or a printed PDF you have had in a folder for months.
A free pattern with no finished measurements, thin instructions and no diagrams can cost you a full length of fabric in wasted cutting. A paid pattern that tells you exactly what you are making is often the cheaper option in the end.
Six Checks Before You Pay or Print
- Licence: Most patterns allow personal printing and sewing but not sharing the file. Check before you pass a copy to a friend.
- Size range: Confirm your measurements sit comfortably inside it, not right at the edge.
- Finished measurements: Prefer designers who publish these. They show the actual ease, not just the body size the envelope claims to fit.
- Yardage for your fabric width: Use the figure listed for your width, and add about 10 per cent for pattern matching or nap.
- Seam allowance and construction: Generous seam allowances and a separate placket or button band mean you can let the dress out, take it in, or replace a worn front band later.
- Diagrams: Instructions should show the collar, placket and sleeve steps visually, not only describe them.
That construction check is the one people skip. If you judge a pattern by how easily it can be adjusted and repaired in five years, seam allowance and a modular placket matter more than the cover photo. Sew a quick toile of the bodice in cheap calico before you touch your real fabric, and the wear-test tells you whether the button spacing gapes or the shoulders sit forward.
Avoid unlicensed copies. They cost designers income and often print at the wrong scale, which quietly ruins every measurement that follows. Check the test square on the first printed page before you tape anything together.
For fabric, shops such as More Sewing sell cottons, viscose and Tencel blends and offer swatches, so you can test drape and washing on a small piece before committing to the full length. A fabric that shrinks unevenly or fades in one wash will not stay in your wardrobe long, no matter how well the pattern fits.
Do one thing today. Write down your full-bust measurement and compare it with the size chart of the pattern you are considering. Everything else follows from that number.
Matching Patterns and Fabrics to Your Body and Use
Start with your shape, not the size chart. Broad shoulders and a narrow waist suit a fitted bodice with a defined waist seam or belt. A fuller bust needs enough bodice depth, plus a dart or a full-bust adjustment, rather than just a bigger size everywhere. If you're petite, shorten the bodice above the waist and the skirt by a set amount before cutting. Hemming shorter later leaves the waist seam sitting in the wrong place.
Then match fabric to how you'll really wear it. Crisp poplin holds its shape through a workday. Soft lawn or viscose feels better in summer but moves more on the cutting table.
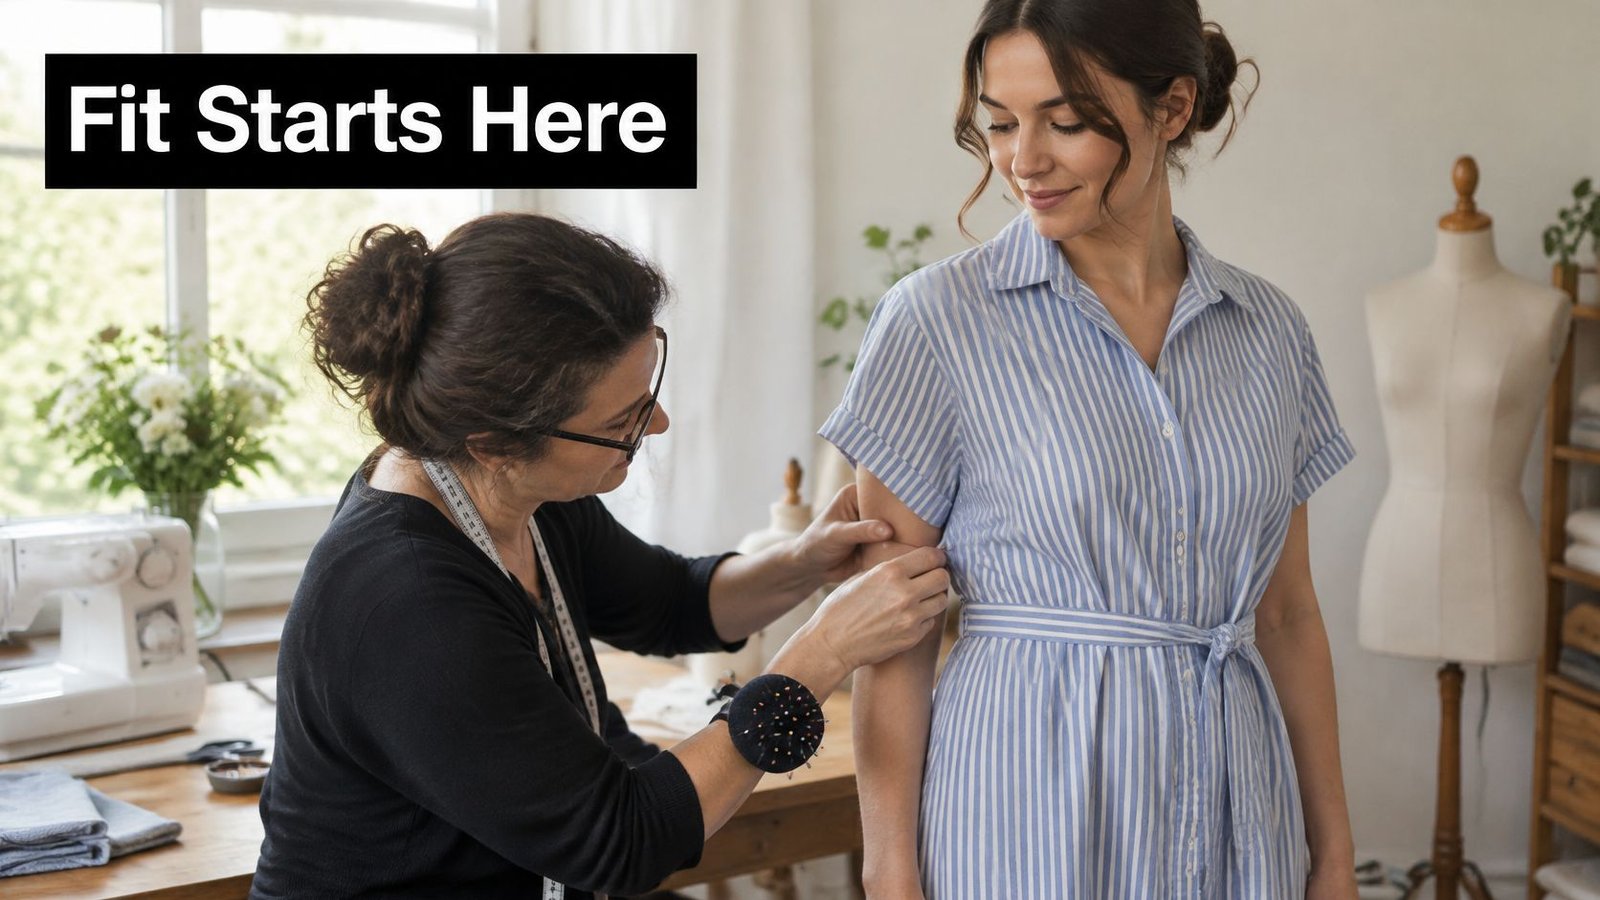
This fitting stage is where fabric behaviour shows up on a real body.
| Fabric | Drape and behaviour | Best pattern match | Watch for |
|---|---|---|---|
| Cotton poplin | Crisp, holds creases and pressed edges | Button-front with stand collar and cuffs | Shows needle holes; test pressing on a scrap first |
| Cotton lawn | Light, soft, slightly sheer | Gathered or flared skirt, dropped sleeves | Sheer at the bust; add a lining or underlay |
| Viscose | Fluid, drapes well, creases easily, weaker when wet | Loose button-front, soft gathered waist | Pre-wash and dry first; use a fine needle and pattern weights |
| Linen blend | Textured, stiffer at first, crushes | Relaxed, loose-fitting shirt dress | Allow extra ease; creasing suits relaxed styles but not fitted collars |
| Denim or heavy cotton | Stiff, sturdy, low drape | Utility style with patch pockets and topstitching | Needs a strong needle and longer stitch; bulk at collar seams |
| Jersey or stretch knit | Stretchy, recovers well | Knit shirt dress pattern with built-in stretch ease | Woven patterns will not fit without stretch; use a ballpoint needle |
Cotton is your reference point. UK curriculum guidance describes cotton as cool, strong, absorbent and able to withstand high temperatures, and it's associated with shirts and lightweight clothing. Those properties give you crisp collars, button bands and cuffs that press into defined lines. A medium-weight poplin also stays put while you're cutting, which matters more than people admit.
A knit shirt dress needs a knit pattern with built-in stretch. A woven pattern won't fit jersey without distortion.
Do a quick wear test before cutting. Wash a sample, hold it up to daylight for opacity, scrunch it to check crease recovery, and press an offcut with interfacing to see whether it bonds cleanly. Ten minutes here beats unpicking later.
Choosing Your Size from Measurements, Not Labels
Take seven measurements, compare them with the pattern chart, choose your base size from the full bust, then check waist and hip. That order matters. Your ready-to-wear size doesn't describe ease, silhouette or the body shape a pattern was drafted for, so it can't choose your pattern size for you.
Labels mislead for a measurable reason. SizeUK scanned approximately 11,000 adults and extracted about 130 measurements per person, as summarised in this overview of clothing sizes. If fit needs that many data points to describe, one number on a label was never going to predict it.
Measure over the underwear you'll wear with the dress, standing relaxed. Write the numbers down, don't round them from memory.
The Seven Measurements That Decide Fit
| Measurement | How to take it | Use it to |
|---|---|---|
| Full bust | Around the fullest point, tape level and snug but not tight | Choose the base size |
| High bust | Around the upper chest, just above the bust | Check bodice depth and neckline fit |
| Waist | Around the natural waist, relaxed | Grade the waist seam and side seams |
| Hip | Around the fullest point, about 20 cm below the waist | Grade the hip and check skirt ease |
| Back waist length | From the neck base bone to the natural waist | Adjust bodice length |
| Shoulder width | Across the back from one shoulder point to the other | Check shoulder seam position |
| Biceps | Around the upper arm, arm relaxed | Choose sleeve width and check the armhole |
Grading Between Sizes with Real Numbers
Say you measure a 92 cm bust, 74 cm waist and 100 cm hip. Your bust might match one size while your waist matches a size smaller. Don't just cut the smaller size and hope, and don't cut the larger one and belt away the excess.
Trace the larger size at the bust and the smaller at the waist. Then blend the side seam smoothly between them over about 8 to 10 cm so the line doesn't kink. A kink in the traced line becomes a strange pull or fold in the finished dress, right where you'll see it in the mirror.
Check the finished measurements printed on the pattern tissue against your own. Woven shirt dresses commonly carry roughly 8 to 12 cm of bust ease, so a finished bust measurement much larger than yours isn't automatically wrong. It's the design ease doing its job, and it tells you how the dress is meant to hang.
Your size isn't confirmed yet. It's confirmed on a toile made in fabric with similar weight and drape, before the final cloth gets cut. Treat the chart as your starting point and the toile as your evidence.
How to Sew a Shirt Dress in the Right Order
Order matters because each stage depends on the last one being pressed and checked. UK textile construction guidance identifies stitch selection and stitch length as variables to match to the fabric, warning that inappropriate settings can cause puckering. Keep a sewn sample for every critical decision, needle, stitch and interfacing included.
This sequence shows the ten stages in the order that keeps options open longest.
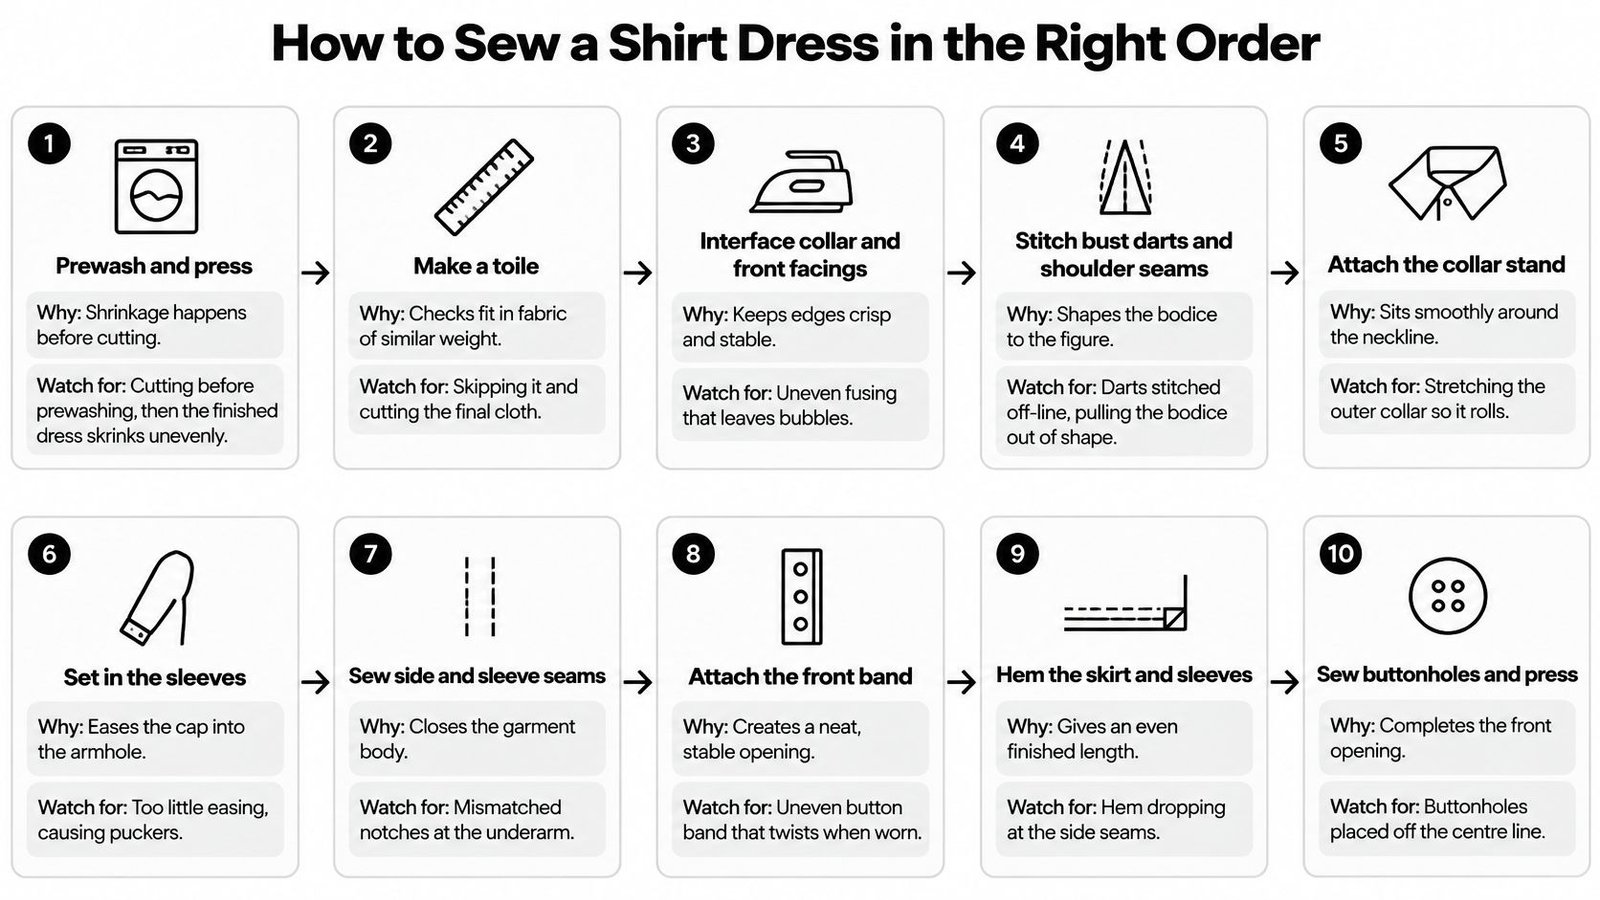
- Prewash and press the fabric as its care label says, so shrinkage happens before cutting. The common slip is cutting first, then washing a dress that no longer fits.
- Make a toile in fabric of similar weight and drape. Check bust pull, collar roll and shoulder position before anything else.
- Cut with pattern weights and mark notches with tailor's tacks. Weights stop lawn and viscose creeping, and tacks survive handling better than chalk.
- Test interfacing on a layered scrap, then fuse the collar, collar stand and button band. Bubbles on the scrap mean adjust heat or pressure now, not on the actual collar.
- Sew darts and shoulder seams, press them, and check the neckline sits flat. A dart sewn off line pulls the whole bodice out of shape.
- Make the collar. Stitch, grade the seam allowances, turn, press, and topstitch 3 to 5 mm from the edge. Grading removes the bulk that makes collar points look blunt.
- Attach the collar stand, matching centre back and notches. Don't stretch the neckline to fit the stand, or the collar will stand away from your neck.
- Sew the button band, test buttonholes on a scrap with the same interfacing layers, then stitch the final ones. Mark spacing from the bust point outward so a button lands where gaping starts.
- Set the sleeves with two gathering rows between the notches, pulling the threads to distribute ease evenly. Ease gathered into visible folds means it wasn't spread out enough.
- Sew side seams and hem, attach buttons, and press everything. Press each seam before you judge it, because unpressed seams look worse than they are.
This video walkthrough shows the construction sequence in motion, which helps when a written collar step feels abstract.
Needle and Stitch Settings Worth Testing
Use a 70/10 or 80/12 needle for poplin, 60/8 to 70/10 for lawn and viscose, and 90/14 for denim. Start with a 2.5 mm stitch as standard, drop to 2 mm on fine fabric, and lengthen to 3 to 3.5 mm on denim. These are starting points for your test seam, not guarantees, because your exact weave decides.
On thicker shirting and denim, grade seam allowances at intersections to reduce bulk. That one habit is the difference between a collar that lies flat and one that fights you at every press.
Fitting Fixes and Troubleshooting Before You Finish
The symptom sewers usually notice first is horizontal pulling across the bust on the toile. It looks like a sizing problem, and sometimes it is, but it often means the front bodice has no depth where you need it. Read the symptom before you reach for a fix.
Try the toile on, button it fully, sit down, and reach forward. A shirt dress that only works standing still in front of a mirror won't survive a bus journey or a desk chair.
| Symptom | Likely cause | Fix |
|---|---|---|
| Horizontal pulling across the bust | Bust circumference too small or no bust depth | Move up one size at the bust or add a full bust adjustment |
| Gaping between buttons | Button band too narrow or waist too loose | Add about 1 cm to the band or take in the waist seam |
| Collar standing away from the neck | Collar stand too long or neckline not eased | Shorten the stand by 3 to 5 mm and recheck the neck edge |
| Shoulder seam sliding down the arm | Shoulders too wide for the pattern | Take in the shoulder by 5 mm per side and reshape the armhole |
| Puckered placket | Stitch too short, no stabiliser, or thread tension too tight | Lengthen the stitch, interface the placket and test on a scrap |
| Folds in sleeve cap | Too little or uneven easing | Regather between notches and check the sleeve cap against the armhole |
| Hem dropping at one side | Side seams uneven or fabric stretched in cutting | Remeasure from the floor, trim evenly and press the hem before stitching |
Pattern Fix or One-Off Fix
Decide which kind of fix you're making. If the same problem will appear on every future version of this pattern, change the pattern piece and keep a dated note on it. If it only affects this fabric or this one dress, adjust the garment and leave the pattern alone.
A full bust adjustment works like this in plain terms. When the front bodice pulls horizontally, you add length to the front bodice through the bust point or enlarge the dart, adding roughly 2.5 cm to the front bodice for each cup size above the pattern's base. That gives the fabric somewhere to go instead of straining across you.
Mark changes properly. Draw them in pencil on the toile, pin the change, try it on again, then transfer it to the paper pattern before cutting the final fabric. Skipping the transfer step is how people remake the same dress with the same problem six months later.
Gaping between buttons deserves a special mention. It usually means the button band needs 1 cm more width or the waist needs taking in. Moving the buttonholes rarely fixes it, because the strain causing the gap is still there.
Finishing and Customising a Shirt Dress That Lasts
A shirt dress that can't be mended usually gets dropped after the first wash or the first lost button. The skills gap behind that is common: 26% of surveyed adults lacked confidence attaching a button and 44% were not confident stitching a hem, according to UKFT research. Building repair into the dress from the start closes it.
A slightly slower finish extends the dress's usable life and keeps fit changes possible. Standard buttons you can replace beat concealed fastenings you can't. A failed invisible zip means binning the dress or paying for a repair; a failed button means ten minutes with a needle.
Finishes That Allow Future Alterations
- French seams: Use on lawn and viscose to enclose raw edges neatly, and they unpick cleanly if a side seam ever needs resewing.
- Flat-felled seams: Use on denim and poplin for durability at side seams that take real strain.
- Serged or zigzag finish: Use on heavier cloth where French seams would add too much bulk.
- Generous allowances: Keep 1.5 to 2 cm seam allowances and a 4 cm hem allowance, so the dress can be let out or lengthened later.
Choose standard 15 mm shank buttons and sew them on with a 2 to 3 mm thread shank, so the button sits over the placket layers without pulling. Add bar tacks at pocket corners and the top buttonhole, the two places that take the most repeated stress.
Customise in ways you can finish in a weekend. Swap a stand collar for a Peter Pan collar, add patch pockets in a contrasting fabric, make a self-fabric belt with loops, or cut a two-tone yoke. Each change reuses skills you already practised on the toile.
Sew spare buttons inside the side seam allowance while you're at it. Future you, standing in front of the wardrobe with a button missing, will be grateful.
Order a swatch first, wash it, press it, and check it in daylight before you commit to a full length. More Sewing carries the cottons, viscose and Tencel blends worth swatching, so order one, run the wear test, and cut your toile this weekend.
