
You've got the fabric in your hands, the machine is threaded, and you're staring at a shelf full of prints that all look promising. Then the doubts start. Will this fray? Should you wash it first? Is a fat quarter enough, or do you need yardage for the whole thing?
That's a normal first-step feeling, and it's exactly why the beginners guide to sewing with quilting cotton starts with choices, not perfection. Quilting cotton gives you a stable, forgiving starting point, and the right habits at the beginning make the rest of the project calmer, cleaner, and a lot more enjoyable.
Why Quilting Cotton Is Perfect for Beginners
The first time a beginner holds quilting cotton beside a slippery dress fabric, the difference is obvious. Quilting cotton feels steady in the hand, it lies flat on the table, and it does not seem to run away from the scissors. That calm behavior helps a nervous first-time sewist get through the first cut with less second-guessing.
What makes it easier to control
Quilting cotton is a 100% cotton, plain-weave, medium-weight woven fabric that cuts cleanly, presses well, and has little to no stretch. That makes seam allowance control much easier than on floaty or slippery fabrics. Typical quilting cotton is about 40 to 44 inches wide, and one reference source estimates its weight at 4.0 to 4.5 ounces per square yard (Sewing Made Clear). The fabric sits predictably under the needle, which matters when you are still learning how to start, stop, and pivot without drifting.
Practical rule: if you are still learning to cut and stitch straight, choose the fabric that stays where you put it.
That stability helps most on simple patchwork. Beginner quilt tutorials commonly build around a 1/4-inch seam allowance and square-piecing methods, because quilting cotton makes that kind of precision achievable even when your hands are still learning the feel of the machine. When the fabric does not stretch much, your corners line up more easily and your blocks are less likely to distort before you press them.
Quilt fabric or garment fabric
A lot of new sewists want to know whether quilting cotton can be used for garments. It can, but it behaves differently from fabrics chosen for drape. For a first project, it usually works better for structured items, patchwork, tote bags, cushion covers, table runners, and simple quilts than for flowing clothing.
The plain answer is that quilting cotton is kind to beginners because it does not add extra problems. You are already learning seam allowance, pressing, thread tension, and reading a pattern. You do not need a fabric that slides, stretches, or shifts while you are trying to understand the basics. If fraying worries you on those first projects, a simple seam finish, such as zigzag stitching, pinking shears, or a clean overlock edge, can keep the inside of the project neat without making the sewing harder.
Preparing Your Fabric Before the First Cut
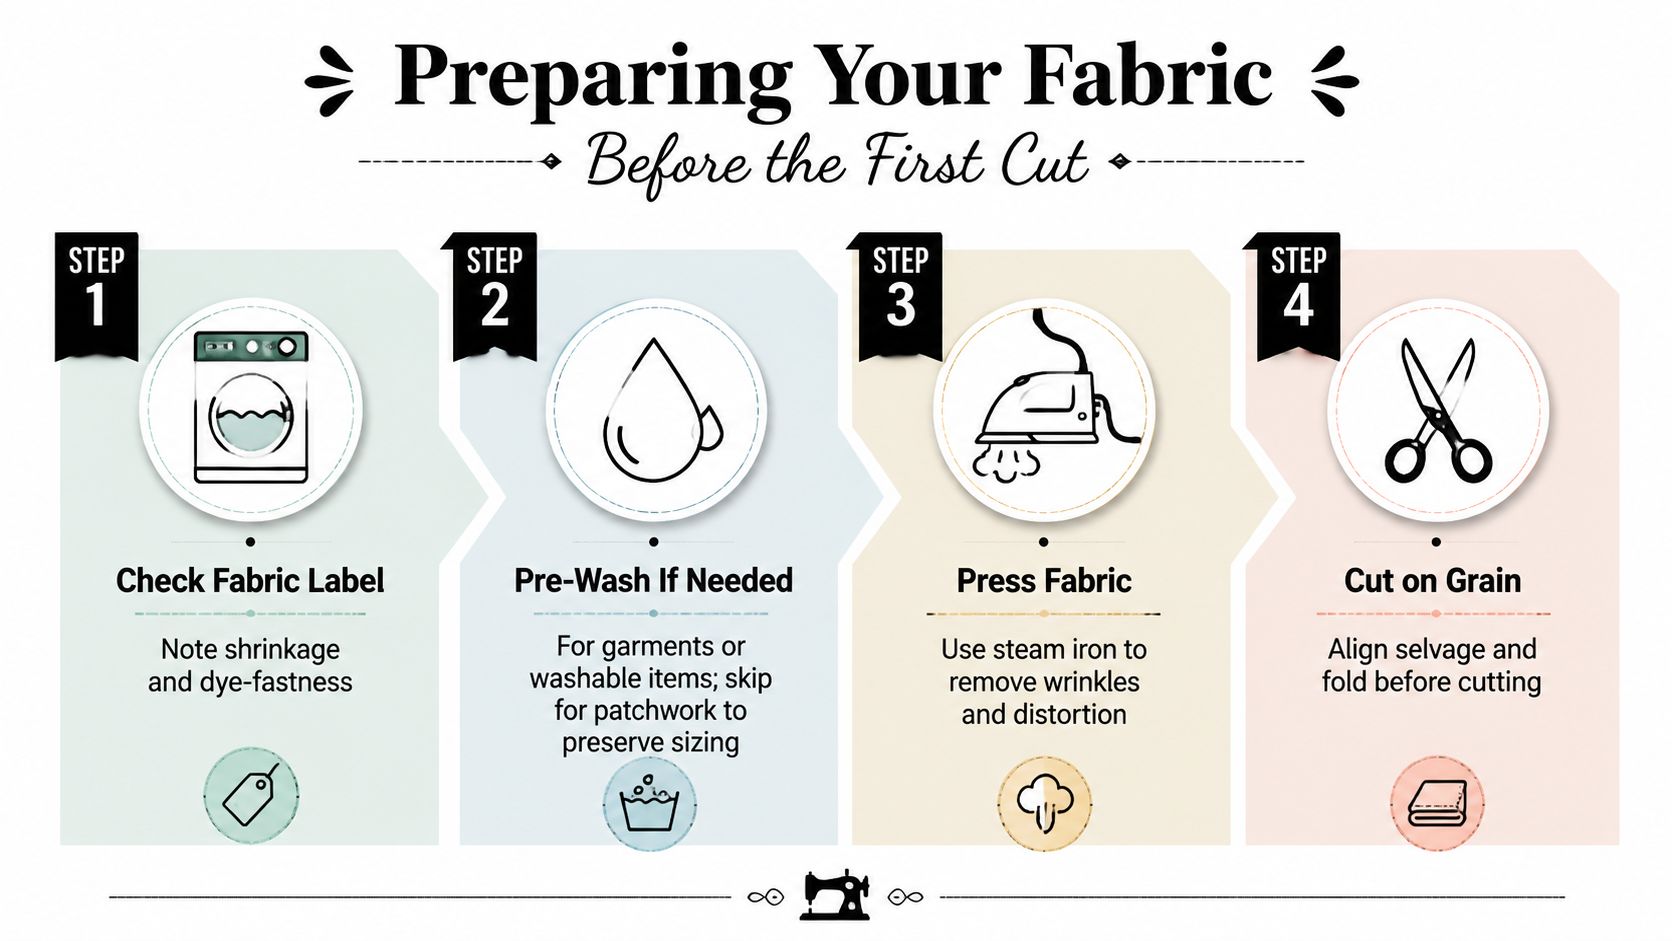
The most useful habit you can build before cutting anything is to decide what the finished item needs to survive. A quilt that will be washed often needs a different fabric-prep approach from a wall hanging that will mostly sit on display. That decision is where a lot of beginner confusion comes from.
Decide whether to pre-wash
For patchwork quilts that will be laundered regularly, pre-washing is usually the safer choice because cotton can shrink by up to 5% (Prima). If you cut first and wash later, pieces can change size after you've already spent time matching them. That's how blocks end up slightly off, even when the stitching looked neat on the machine.
For decorative items, small wall hangings, or projects where a tiny bit of texture won't matter, some sewists skip pre-washing and go straight to cutting. The key is to match the fabric prep to the project, not to treat every job the same way. A quilt top and a display item don't have the same risk level.
Wash, dry, and press in a stable way
If you do pre-wash, wash the fabric the way you expect to care for the finished item, then dry it fully before pressing. Pressing matters because it removes wrinkles without dragging the cloth out of shape. Use a hot iron, and press rather than scrub the iron across the surface.
Aligning the selvage edges before you square up the fabric helps keep the grain straight. That matters because grain lines affect how blocks sit together, and a skewed cut can lead to distorted seams later. Once the cloth is smooth and square, fold it neatly and cut from the prepared edge.
Cotton behaves better when you treat it gently before the scissors come out.
Check colour bleed before you commit
Mixed prints and solids from different dye lots can behave differently in the wash. If you're unsure, test a small piece before the project begins, especially when using dark colours beside pale ones. That small check is faster than rescuing a finished quilt after colour transfer has already happened.
A common beginner mistake is to skip all of this because the fabric looks fine on the shelf. It may look fine. It still needs to be ready for the way you plan to sew and wash it.
Cutting and Marking Techniques for Accurate Pieces
The cleanest-looking quilt blocks usually come from boring, careful cutting. That sounds less exciting than choosing prints, but accuracy at this stage saves you from redoing work later. Beginners often think their stitching caused the problem, when the issue started at the cutting table.
Keep the quarter-inch seam consistent
The 1/4-inch seam allowance is the standard starting point for quilting cotton projects, because it creates predictable block sizes and keeps piecing tidy. Use a quarter-inch presser foot or a marked seam guide so the distance stays the same every time. A small shift may not look like much in one seam, but it changes the size of the whole unit once several pieces are joined together.
A simple example shows why this matters. If each seam drifts only a little, the error compounds across multiple pieces, and the block no longer matches the pattern. That's why consistency beats speed at the beginning. A tidy, repeatable seam is more valuable than sewing quickly.
Cut on grain and avoid distortion
Lay the fabric flat, align your ruler carefully, and keep the rotary cutter straight and controlled. Cutting on grain helps the fabric keep its shape, while off-grain cuts can introduce stretch where you don't want it. Quilting cotton is stable, but it can still move when it's cut at the wrong angle.
For curves and bias edges, stay-stitching helps stop the cloth from stretching out of shape. That extra line of stitching gives the edge some support before the piece is joined into the quilt. It's a small step, but it can save a lot of frustration.
Mark sparingly and clearly
Use marking tools that show up on the cloth without leaving permanent residue. A washable fabric pen, a chalk pencil, or a fine mechanical marking tool usually works better than anything thick or greasy. Mark only what you need, then cut and stitch while the lines are still easy to follow.
Keep your ruler still, let the cutter move, and don't chase the fabric with the blade.
The big beginner trap here is trying to “fix” the fabric while cutting. Fabric won't behave better because you hurry it. It behaves better when the grain is respected and the seam guide stays the same from piece to piece.
Machine Settings and Pressing for Professional Results
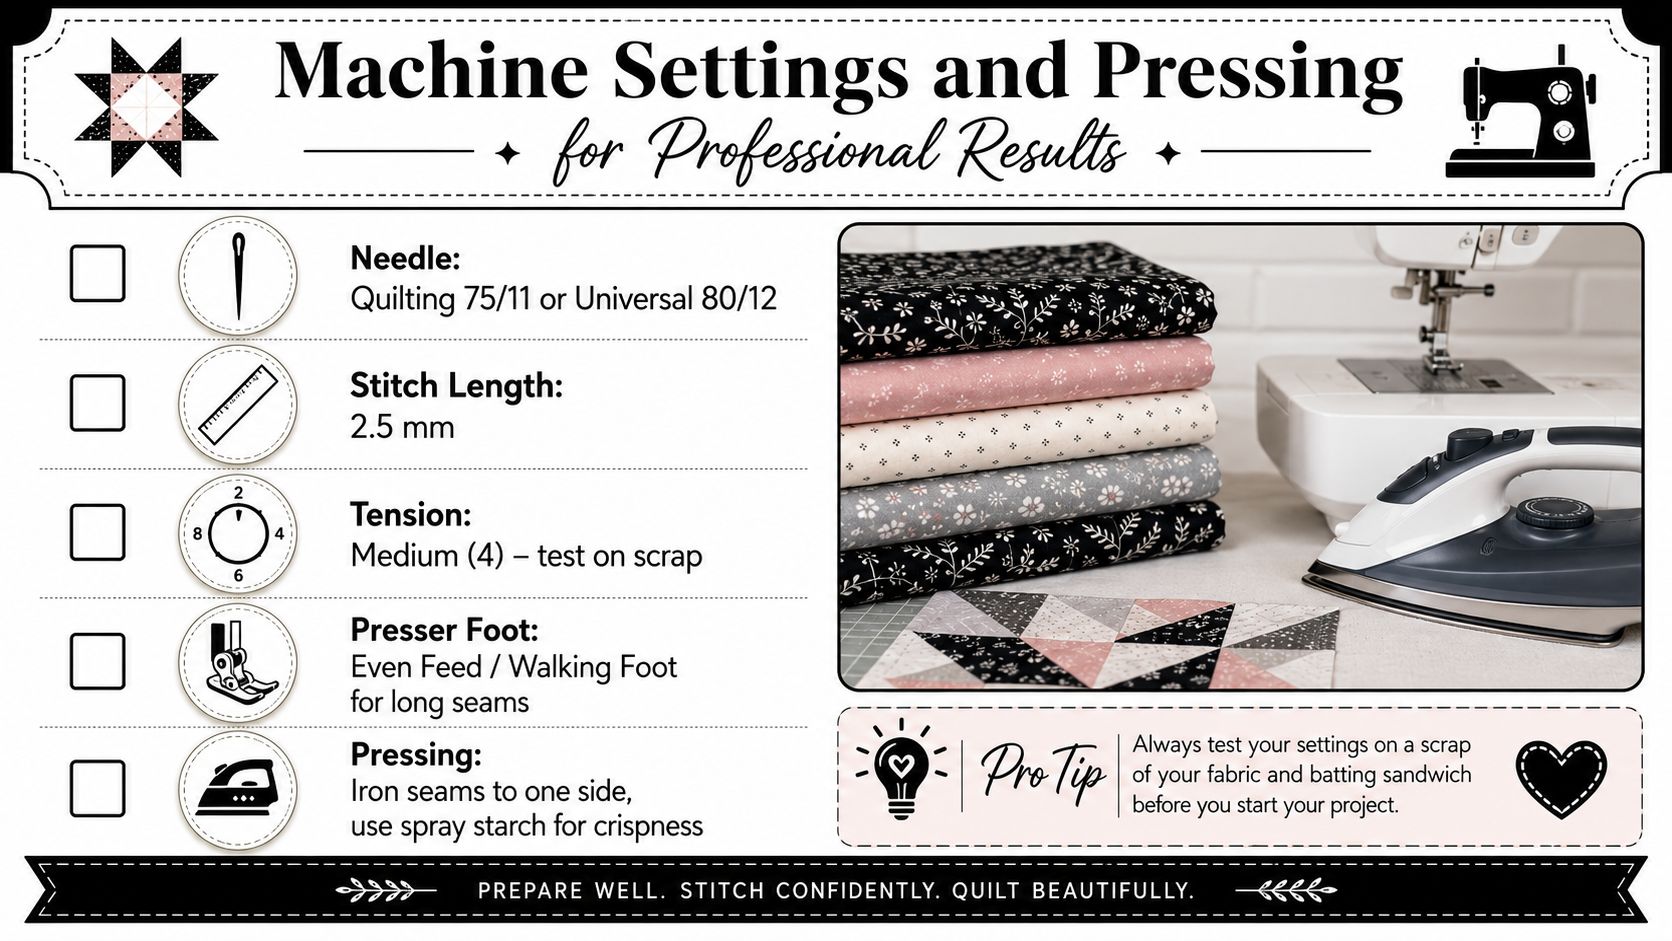
A first project can look uneven even when the seams were sewn carefully, because the machine setup does not match the fabric. Quilting cotton is easy to work with, but it still does best with the right needle, thread, and stitch length. Pressing then finishes the job by flattening seams without crushing the shape you just stitched.
Set up the machine for stable stitching
WeAllSew recommends a quilting needle in size 75/11 or a Microtex needle in size 80/12, paired with a thin but strong cotton thread (WeAllSew). A separate beginner lesson also recommends a regular Universal needle in size 80/12 for quilting cotton (YouTube lesson). Both approaches point to the same practical choice, use a sharp needle that can pass through woven cotton cleanly instead of pushing and snagging the cloth.
For stitch length, beginner quilting guides commonly suggest 2.0 to 2.5 mm for piecing, and about 10 to 12 stitches per inch for quilting (WeAllSew). Those settings help reduce puckering and keep the seam compact without adding extra bulk where several seams meet. If your machine has a habit of eating the first few stitches, start with a leader scrap and feed the fabric in slowly.
Press every seam as you go
Pressing is not the same as ironing a shirt. Pressing means lifting, setting the iron down, and lifting it again, rather than sliding the iron across the fabric. Cotton responds well to heat and steam, so use both when the cloth needs to settle flat (YouTube lesson). If you press one seam before it crosses another, the block keeps its size more reliably.
That matters when you are joining rows. A seam that was not pressed early can create a lump at the intersection, and that lump pushes the next seam off course. Once that happens, the alignment gets harder to recover, especially on small blocks where every little ridge shows.
Fix the beginner mistakes early
Sewing over pins slows you down and can nudge the fabric out of place, so remove pins before the needle reaches them. Overhandling the cloth also causes trouble, because your hands can stretch the piece while you are trying to guide it. If your seams look uneven, slow down and check your seam guide instead of forcing the fabric to behave.
Consistency in seam allowance matters more than raw speed.
Beginners often think their stitching caused the problem, when the issue started at the cutting table. A machine set for the fabric, plus careful pressing, makes quilting cotton look much more polished, even on a simple project. That difference shows up fast on a first pillow, tote, or a western-style quilt collection print that has clear seams and straight edges to show off.
Three Starter Projects to Build Your Skills
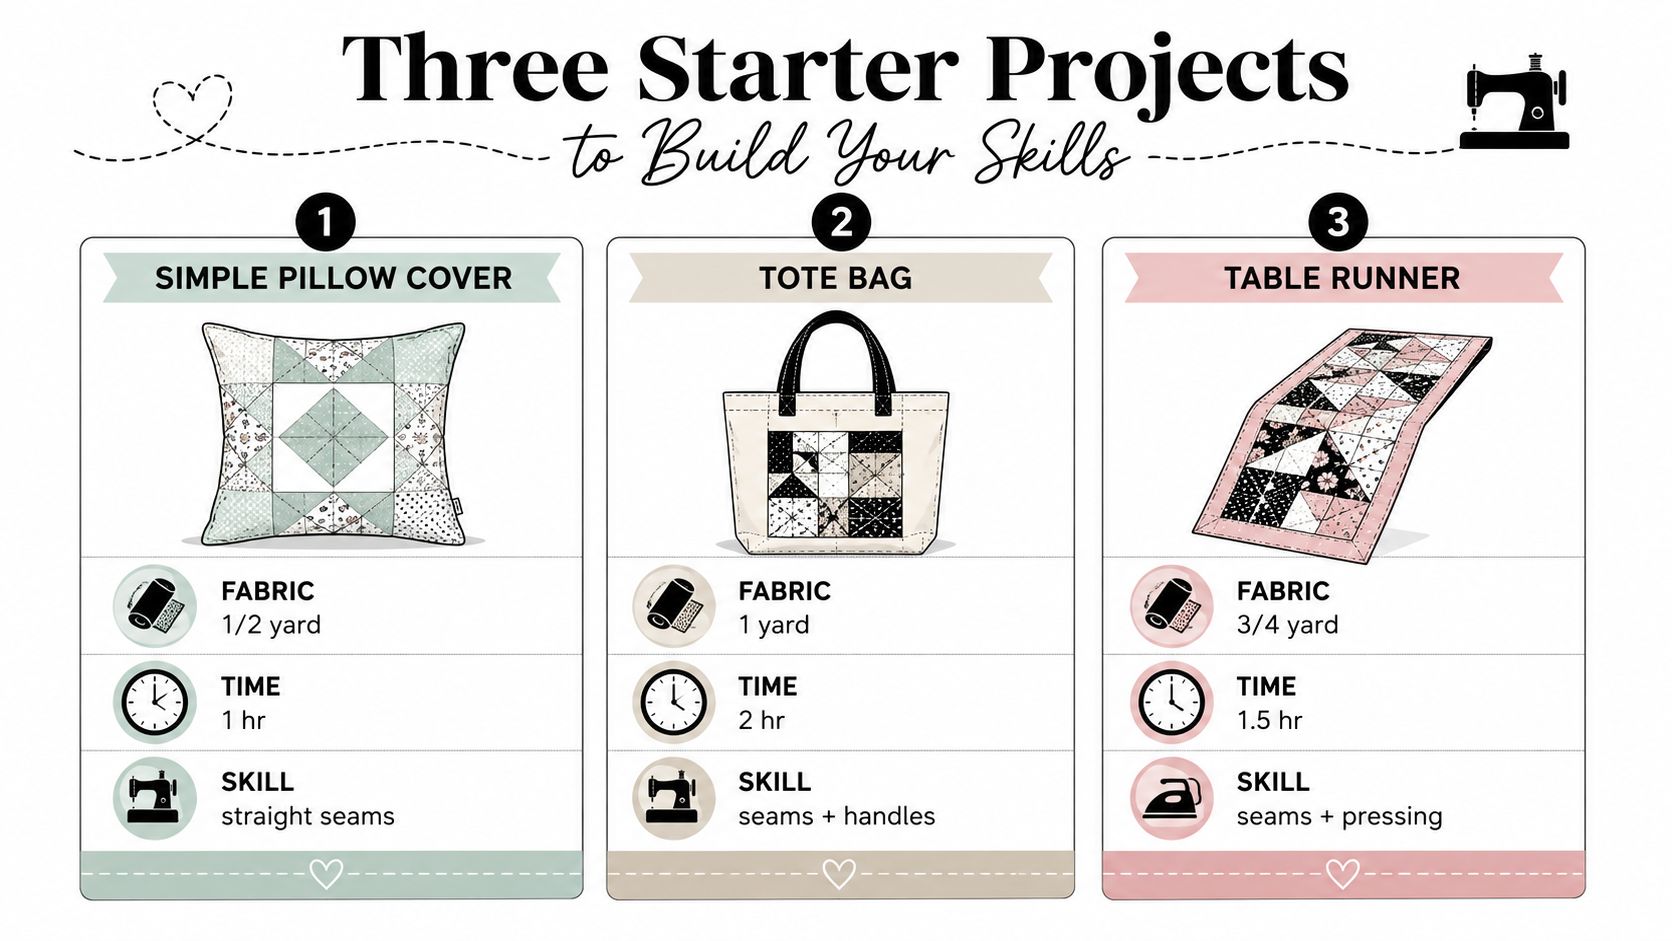
The easiest way to learn quilting cotton is to start with a project that matches your confidence, not your ambition. A good first project teaches one or two skills clearly, then lets you finish before you lose steam. These projects work in that order, so you can decide what to make based on the fabric you have, how much cutting you want to do, and how much fraying you are willing to manage on the edges.
The simplest place to begin
Three to five fat quarters, each about 18 by 22 inches, give you enough fabric for a small pieced project (Grandmaws). That size helps because you can cut, sew, and press without feeling like one mistake has swallowed the whole stack. It also keeps the seam edges manageable, which matters on a first project because quilting cotton will fray if the raw edges stay loose for too long.
The same source identifies the four-patch as the simplest pieced square, made by sewing four smaller squares into one larger block. A four-patch is a good first exercise because it shows you, in a very direct way, whether your cutting was square, your seam allowance stayed steady, and your pressing kept the block flat.
If your seam allowance wanders, the block tells you quickly. That immediate feedback is useful on a first project, since you can correct your cutting or stitching before you move on to something larger.
When yardage makes more sense
Yardage is easier to use when the project needs longer cuts or when one fabric should carry most of the design. A simple tote bag or table runner usually has fewer joins across the main body, so a single cut of cloth can be easier to handle than several small pieces. Fat quarters work better when you want to test colour combinations without buying a larger amount of each print, especially if you are still deciding how bold you want the finished piece to look.
The decision is simpler than it first seems. If the project is mainly about practising patchwork, choose fat quarters. If the project depends on larger panels, or you want fewer seams to keep straight, choose yardage.
A useful resource and a good reference point
If you want to see how a beginner-friendly quilt collection comes together, the western-style quilt collection gives a clear sense of how coordinated cotton prints can work in a themed project. A reference like that helps you see why some fabrics sit well together while others compete for attention, which is useful when you are trying to choose prints for your own first project.
A beginner who finishes a small project learns more than someone who keeps gathering supplies for a bigger one. The point is a finished object, not a perfect plan.
Troubleshooting Common Quilting Cotton Problems
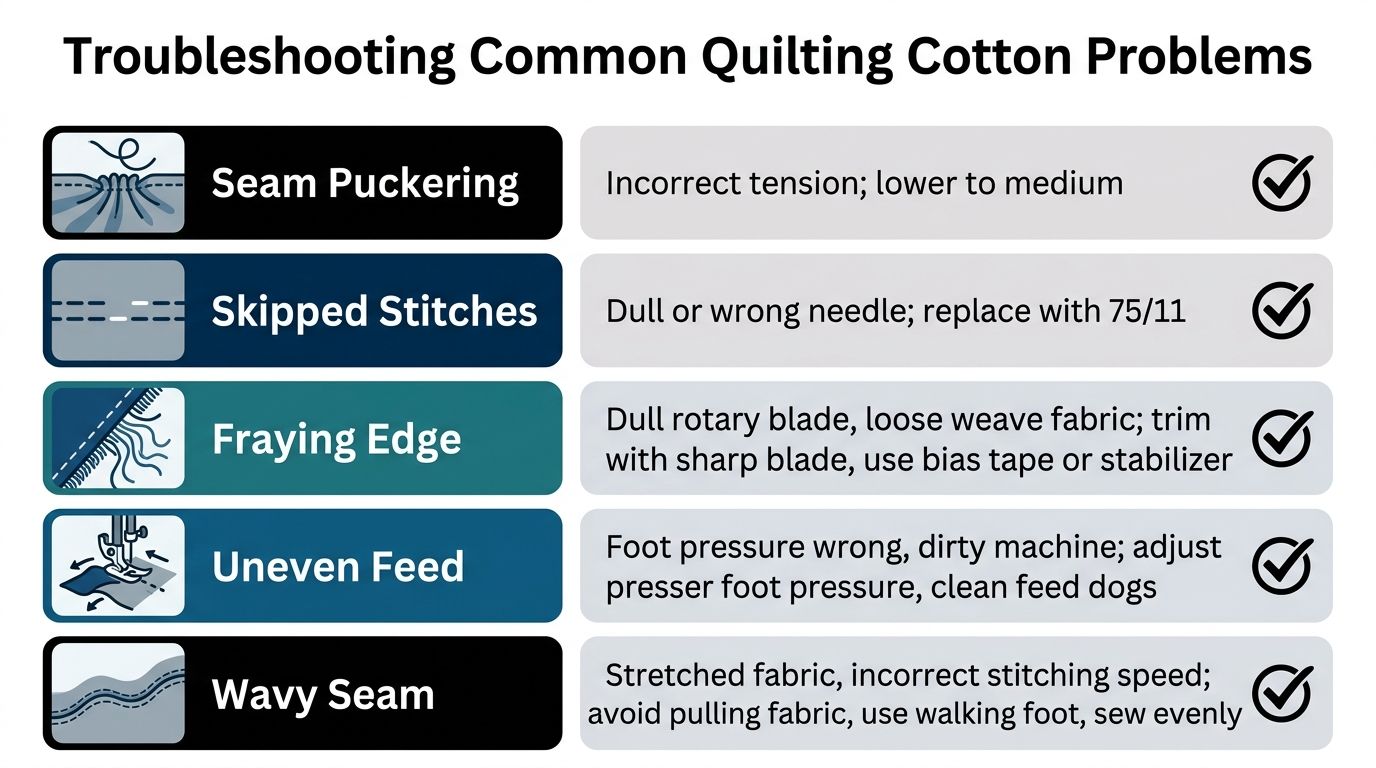
Most quilting cotton problems look mysterious at first, but they usually come from a small group of causes. If something goes wrong, don't assume the whole project is ruined. Start by checking the symptom, then trace it back to tension, needle choice, seam allowance, grain, or pressing.
Read the problem before you touch the seam
- Seam puckering: This often points to stitch length or tension that's too tight. Reset the machine to a more suitable quilting setting, then test on a scrap before returning to the project.
- Blocks that don't align: The usual cause is inconsistent seam allowance or uneven pressing. Check your guide, then measure a test unit before you keep piecing.
- Wavy seams: This usually happens when the cloth was handled too much or cut off grain. Recheck the grain line and use pressing, not sliding, on the next section.
- Fraying edges: Raw cotton edges can fray if they're left exposed and handled repeatedly. Finish the edge before it gets rough.
- Colour bleed after washing: This points back to fabric prep, especially if mixed prints and solids weren't tested first.
A small error is easier to fix than a whole row of distorted blocks. That's why the earlier preparation steps matter so much.
Use the right fix for the cause
If the seam is puckering, don't jump straight to ripping everything out. Try a fresh needle, confirm the stitch length, and sew a short sample first. If the block is out of square, press the seam properly and check whether the seam allowance was even along the whole edge.
Fraying is one of the easiest issues to prevent on first projects. A simple seam finish, such as zigzagging the raw edge or using an overcast finish if your machine supports it, helps protect the cloth while you learn. The key is to finish raw edges before they've had time to wear themselves apart.
If you're washing a finished quilt, the earlier pre-wash decision becomes important again. If colour bleed shows up, there's no substitute for having tested the fabric beforehand. The safest habit is still the one you set before the first cut.
For care guidance around spills and fabric maintenance, the care advice from The Sofa Cover Crafter is a useful reminder that cotton care starts with acting early and treating stains gently.
Buying Quality Quilting Cotton and Essential Tools
Good quilting cotton looks tidy before you sew it. The weave should feel even, the print should sit smoothly on the cloth, and the fabric should not feel flimsy or wildly inconsistent from edge to edge. For beginners, that matters more than building a huge stash all at once.
What to buy first
Start with fat quarters if you want variety and small practice pieces. Choose yardage when the project needs longer continuous cuts or when you want one print to carry the design. That simple decision saves waste and makes the cutting stage easier to manage.
For a beginner stash, versatile solids and basic prints are usually easier to pair than highly specialised designs. They let you focus on piecing, pressing, and seam accuracy without asking the eye to manage too many competing patterns.
Tools worth having
A practical quilting kit starts small. You'll want a rotary cutter, a cutting mat, a quilting ruler, a quarter-inch presser foot, quality cotton thread, and the right needles for your machine. Those tools support the work you're already doing, instead of distracting you with extras.
If you're building a first shopping list, your first quilting kit shopping list is a helpful way to compare the basics against your own setup. It's also a good reminder that beginner quilting doesn't require a studio full of gadgets.
A few optional tools can make life easier, but they're not essential on day one. Glass-head pins, a seam ripper, fabric scissors reserved for cloth, and a lint brush all help, but none of them replace accurate cutting and careful pressing.
Buy for the project in front of you, not for the quilter you hope to become next year.
More Sewing also offers a beginners guide to quilting and a full course on beginners quilting, which can be helpful if you want structured support while you're learning to handle quilting cotton in real projects. That kind of guidance pairs well with a small, well-chosen fabric purchase and a short tool list.
Finished quilts are easier to care for when you've planned ahead. Wash them in a way that suits the fabric, dry them carefully, and store unused cotton flat or neatly folded so the grain doesn't get distorted before the next project.
If you're ready to start with fabric that behaves well and tools that make sense, visit More Sewing for quilting cotton, haberdashery, and beginner-friendly sewing essentials. Pick a small project, choose a few coordinating prints, and give yourself a clear path from first cut to finished piece.
