
You can lay a beautiful coated-fabric bag on the cutting table and still feel the machine fight you on the first seam. The fabric looks friendly enough, then the pins leave marks, the foot sticks, and the corners refuse to sit flat. That's the point where oilcloth and laminated cotton stop being “just bag fabric” and start behaving like the distinct materials they are.
Why Oilcloth and Laminated Cotton Behave So Differently
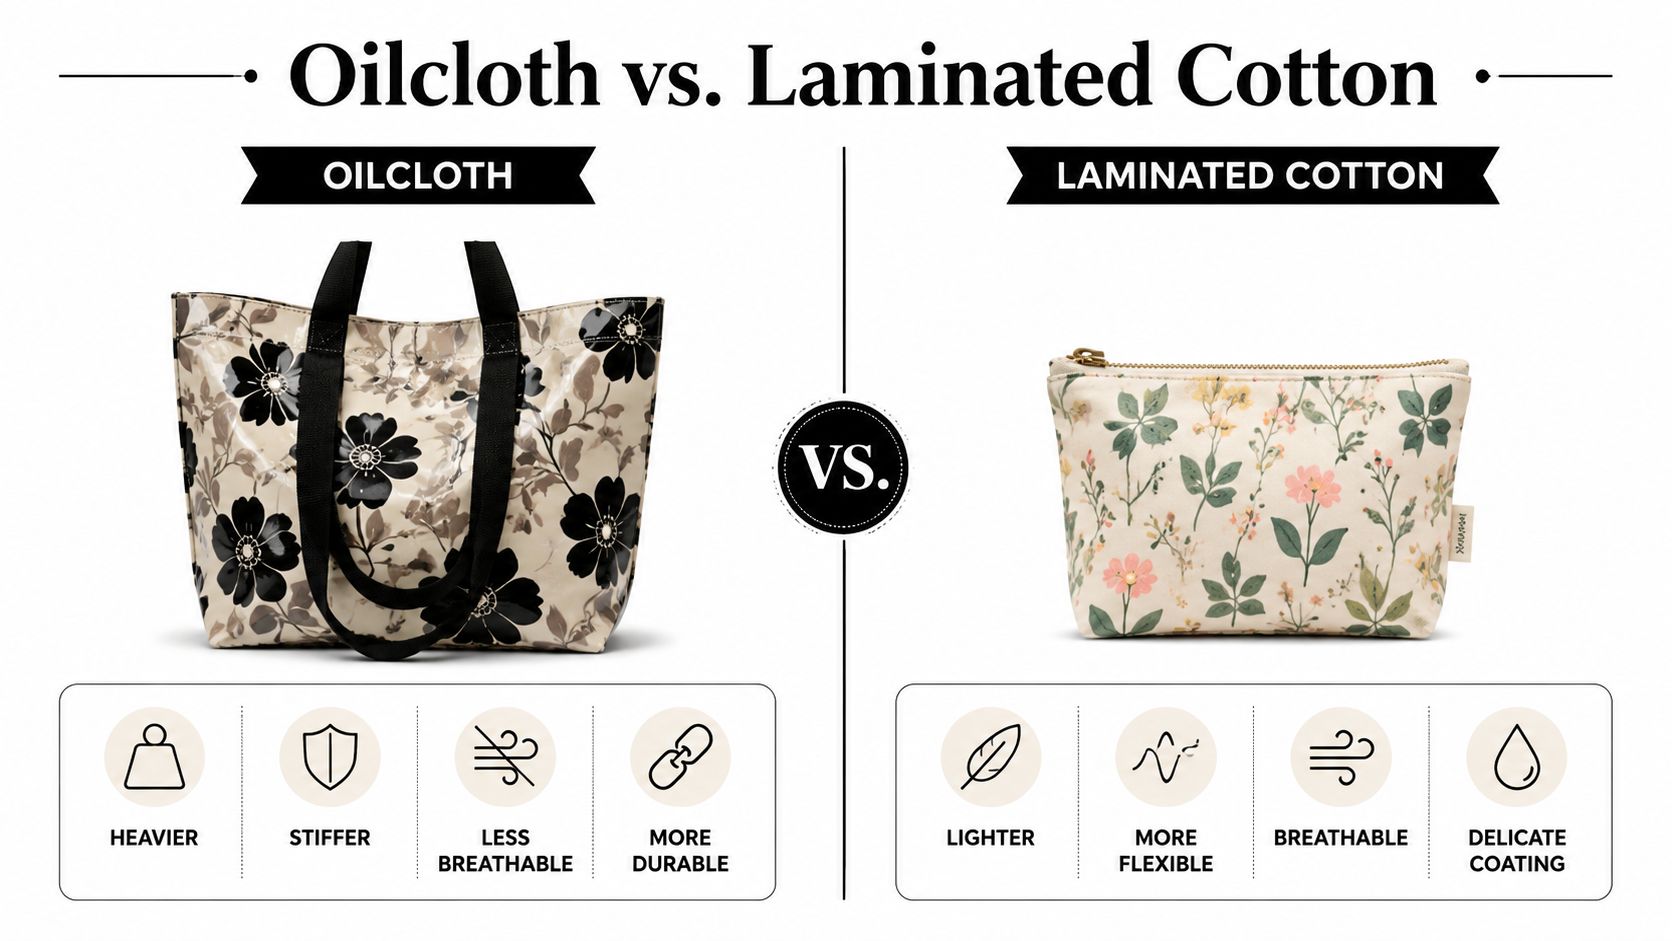
The first time someone spreads out an oilcloth tote on the table, the mistake is usually assumption. It looks like a cousin of laminated cotton at a glance, but the hand-feel tells the truth fast. Traditional oilcloth began as close-woven cotton or linen treated with boiled linseed oil, later versions moved into vinyl-backed constructions, and the material's place in UK textile history goes back to its English patent in 1860 by Samuel Blake, all of which explains why it behaves like a firm, waterproof workhorse rather than a soft dress fabric (oilcloth history and construction).
That stiffness is exactly why it works so well for a structured market tote, a lunch carrier that has to stand up on a table, or a utility pouch that needs body. It also explains why the same fabric can feel stubborn under the presser foot. A heavier coating, a rougher backing, and a thicker edge all demand slower, cleaner handling than ordinary cotton.
The bag shape tells you which fabric makes sense
A soft foldable lunch bag is usually a better match for laminated cotton. Laminated cotton is standard woven cotton with a thin polyurethane film on the right side, so it still feels like cloth in your hands, just with a wipe-clean finish. It drapes more than oilcloth, which makes it kinder for zip pouches and everyday bags that need to collapse neatly when empty (laminated cotton fabric guidance).
Oilcloth earns its keep when the bag needs to hold shape without much help. Laminated cotton earns its place when you want the wipe-clean finish but don't want the bag to feel like a placemat.
Practical rule: if the finished bag has to stand proud on a table, lean towards oilcloth. If it needs to fold, tuck, or bend around its contents, laminated cotton is usually the easier cloth to live with.
That difference is why stitch choice, needle size, and finishing method matter before you even thread the machine. A tote body, a lunch bag, and a zip pouch can all be “coated fabric bags”, but they won't ask the same things from the sewing room.
Building Your Bag-Making Kit for Coated Fabrics
Coated fabrics are easier to sew when the kit is chosen for the material, not copied from a general cotton project. I keep the same small group of tools beside the machine because they solve the same handful of problems, pins, drag, perforation, and bulky seams. That kit makes a lunch bag feel manageable instead of temperamental.
The tools that earn their place
Start with clips or clothes pegs instead of pins. They hold layers together without punching permanent holes through the coated surface, which matters on an oilcloth tote where every hole shows, and on a laminated cotton pouch where neatness is part of the finish. A standard Teflon foot helps the fabric slide rather than grab, and a walking foot is useful when both layers need to feed evenly, especially on a lined lunch bag with seams crossing each other (coated fabric sewing advice).
Needles deserve the same attention. A Universal needle size 12/14 covers a lot of laminated cotton work, while 90/14 to 100/16 is the safer range when the oilcloth is thicker or the bag has several layers at one corner (needle and foot guidance). For the stubborn layers, a denim needle is a sensible swap, especially when you're top-stitching strap ends or bag corners.
Polyester thread is the quiet workhorse here because it stands up to the friction of coated fabric seams. Add sharp scissors or a rotary cutter with a fresh blade, a flexible tape measure, tailor's chalk, and a wooden chopstick or turning tool for easing seams flat without heat. A normal iron can stay parked for coated surfaces, because most heat-based finishing on the coated side is a bad idea.
A small test panel saves more fabric than any clever pattern choice. Sew a scrap from each cloth, then check whether the foot drags, the stitch length feels crowded, or the seam edge wants to climb away from you.
That test piece is where you tune the machine before you cut the good cloth for a tote or pouch.
Setting Up Your Sewing Machine for Coated Fabrics
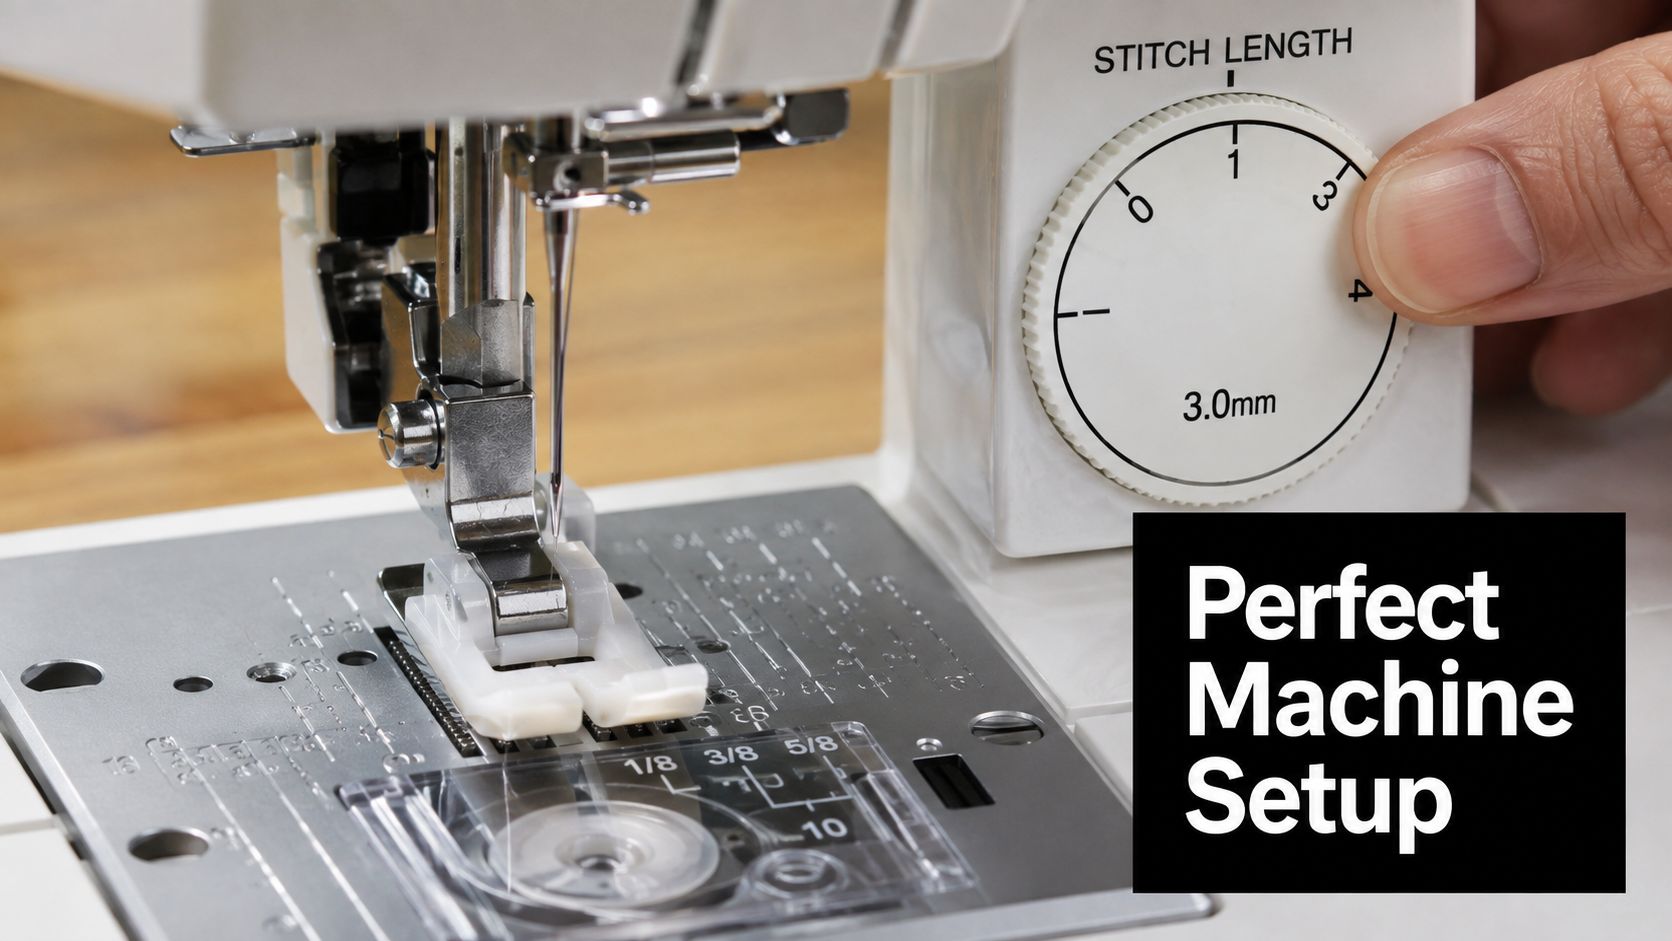
The machine needs to be set up for glide, not speed. Short cotton stitches can perforate coated fabric faster than you realise, so I start with a 3.0 to 3.5 mm stitch length and only shorten it if the fabric and project need it. On a laminated cotton lunch bag, that longer stitch leaves a cleaner line and less drag, while on a shaped oilcloth tote it helps the seam stay smooth instead of serrated (coated fabric stitch guidance).
Match the needle and foot to the job
For most bag sewing, a Universal 12/14 is a good starting point, and I switch to a heavier 90/14 to 100/16 when the oilcloth stack gets thick or the strap ends overlap. A Teflon foot is the easiest fix for sticky feeding, while a walking foot is the better choice when both layers need to travel together, such as on a laminated cotton lunch bag with a lining and a boxed base (coated fabric stitch guidance).
The foot choice changes the feel of the project in a real way. A Teflon foot makes an oilcloth tote move more freely under the needle, while a walking foot helps a laminated cotton pouch keep its seam lines from wandering when the top layer starts to hesitate.
Check tension on a scrap before you touch the real pieces
Thread tension is one of those settings that looks fine until you fold the seam and notice the top thread sitting loose underneath. On coated fabric, a balanced stitch should sit cleanly through the layers without loops, puckers, or a pinched edge. If the top thread loops on the underside, test again on a scrap before you commit to the bag body.
If the machine sounds strained, stop and change one thing at a time. On coated fabric, that usually means needle, foot, or stitch length, not all three at once.
That approach is slow, but it saves a finished bag from looking overworked before it's even been used.
Cutting, Marking, and Sewing Seams Step by Step
Cut coated fabric with the wrong side up whenever possible. You see the layout more clearly that way, and the finished face stays cleaner while you work. A rotary cutter is best for long straight runs, while sharp scissors do fine on shorter cuts and strap ends. Oilcloth often comes in widths around 47 inches, so a tote body and gusset usually need careful nesting to cut waste and awkward leftovers.
Mark gently. Tailor's chalk on the wrong side, painter's tape as a temporary guide, or tiny snips in the seam allowance all work better than pen marks that may show through the coating. I use tape most often on a lunch bag top edge, then pull it away once the seam is stitched.
A simple tote layout that makes sense on the table
A straightforward tote can be cut with 18 inches by 13.5 inches for the front and back, 15.5 inches by 6 inches for the side panels, and 28 inches by 3 inches for the straps. That size is generous enough for a market shopper and still simple enough that a first-time coated-fabric sewer can keep the layers square. On the bench, pegs are easier than pins because they leave the surface clean while the seams are joined (oilcloth bag tutorial dimensions).
Sew that tote with a 3.0 mm stitch, then trim the seam allowances to about 1/4 inch to cut bulk. Back-stitch at the strap ends and the top edge, because those points take the load first when the bag is filled with shopping or school kit.
For needle choice, foot choice, and tension setup, refer back to the earlier kit and machine setup sections. They matter here, but this stage is about clean layout, accurate marks, and controlled seams.
What a clean seam looks like on coated fabric
A good seam on oilcloth lies flat, with no bubbling and no stray punctures beside the stitching line. On a laminated cotton zip pouch, the seam can be lighter, but it still needs to sit evenly without dog-ears at the corners. If the layers start creeping, stop and check the feed instead of forcing the seam through.
The same rhythm works on both fabrics, but the tolerance is different. Oilcloth gives you more structure, laminated cotton gives you more softness, and neither rewards rushing.
Choosing Seams, Finishes, Linings, and Hardware
Construction choices need to match the bag's job. A laminated cotton zip pouch wants a neat plain seam with a trimmed allowance because the cloth already has enough drape to sit close to the body. An oilcloth market tote takes a heavier hand better, so a double top-stitched seam or a clean bound edge feels more appropriate when the bag is going to be dragged, filled, and wiped down often.
Seam type changes the whole feel of the bag
A plain seam is the tidy option for a lunch bag or make-up pouch. It keeps the inside neat without adding much thickness, which matters because laminated cotton can become bulky if the seam allowance is left wide. A double top-stitched seam gives an oilcloth tote more visual structure, and it suits a utility bag that has to be rinsed or wiped clean after use.
Finishes should work with the cloth instead of fighting it. Folding and top-stitching the raw edge is the most straightforward choice, and binding with coordinating cotton can make the inside look polished when the bag is open. A Hong Kong finish on the wrong side is a strong choice for a smarter tote lining, especially when you want the inside to feel as finished as the outside.
| Element | Oilcloth Bags | Laminated Cotton Bags |
|---|---|---|
| Seam choice | Double top-stitched seam for a sturdier tote | Plain seam with trimmed allowance for a pouch or lunch bag |
| Finish | Fold and top-stitch, or bind for a neat inside | Fold and top-stitch, or use a lighter bound edge |
| Interfacing | Usually unnecessary because the fabric already has body | Light woven interfacing can help strap tops and stress points |
| Hardware | Metal D-rings and sliders for shoulder bags | Magnetic snaps for make-up bags and lighter closures |
Lining and hardware should follow the fabric, not the habit
Oilcloth usually does not need interfacing because it already has stiffness built in, which is why it works so well for a boxy tote. Laminated cotton often benefits from a light woven interfacing at the stress points, especially strap tops and closure areas where the bag gets pulled open again and again. That little bit of support can keep a lunch bag from sagging at the mouth.
Hardware should be installed with the coating in mind. A magnetic snap in a laminated cotton make-up bag works well when the washer pieces are backed by a stable patch. Metal D-rings and sliders suit an oilcloth shoulder bag, but they need a sensible backing so the coating doesn't crack around the stress point. The trick is to place the hardware where the bag naturally pulls, not where it looks symmetrical on the pattern sheet.
Fixing the Problems You Will Actually Hit
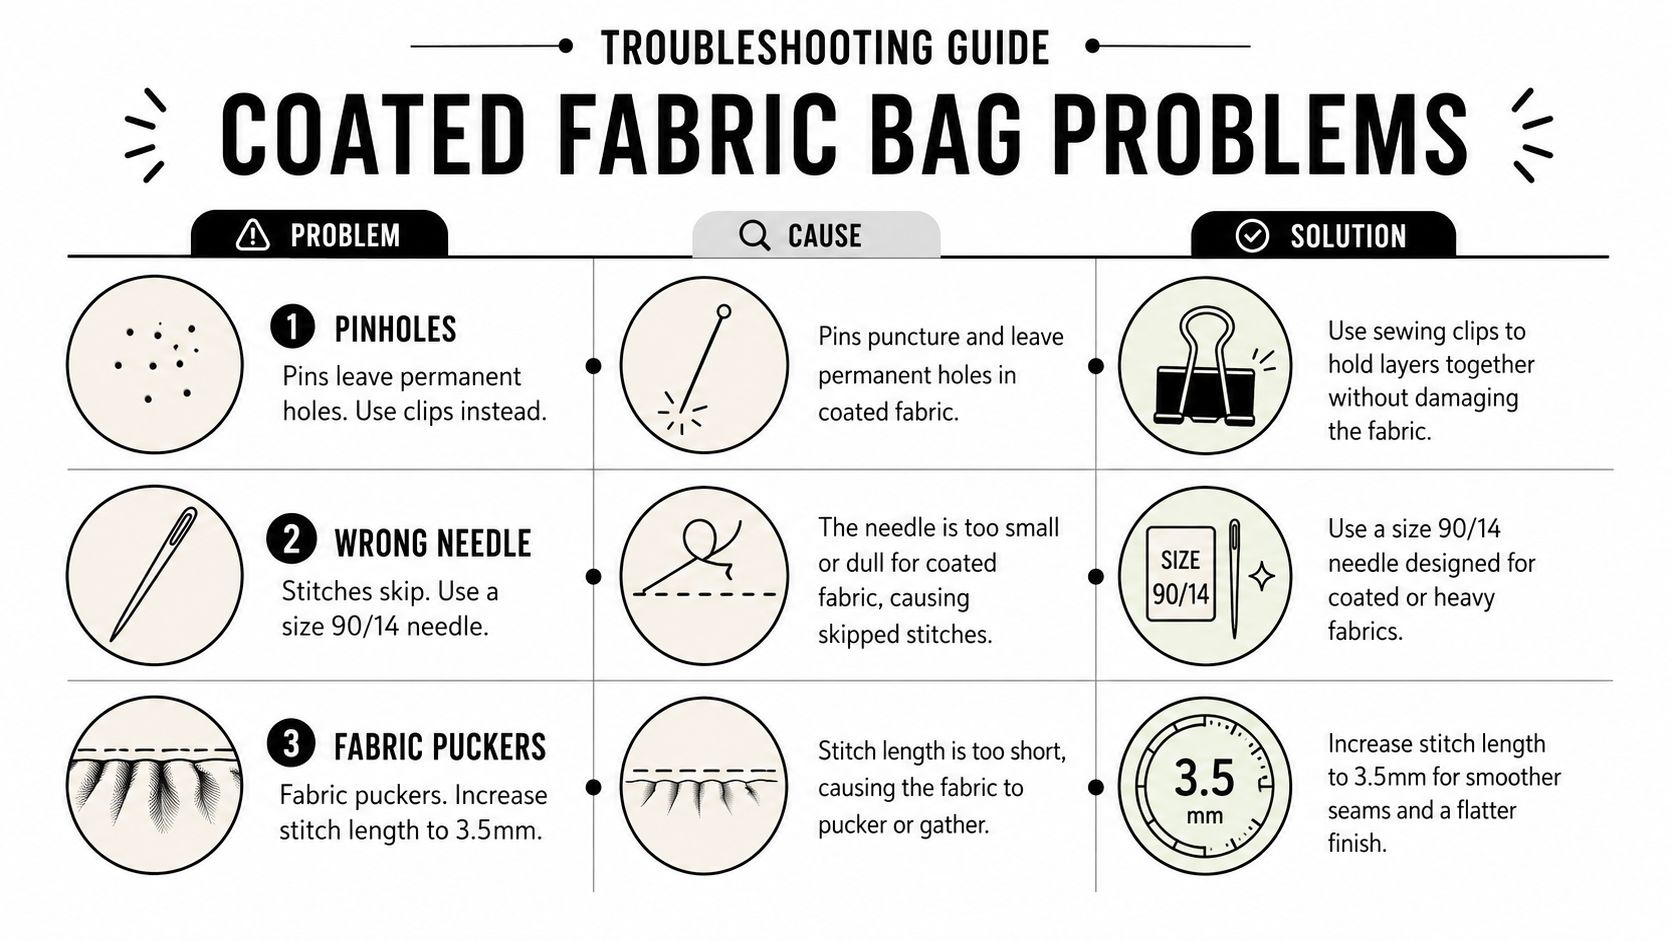
The first coated-fabric bag teaches the same lessons to almost everyone. Pin holes show first, then the machine starts skipping, then the seams pucker where you expected a neat straight line. None of that means the fabric is impossible, it usually means one setting is wrong or one habit needs changing.
Read the fault before you force the seam
Pin holes are the easiest problem to spot. They happen because the coating records every puncture, and pins make a line of weak marks that can stay visible on the finished bag. The fix is simple, clips or pegs instead of pins, especially on an oilcloth tote or a bright laminated cotton lunch bag where the surface has nowhere to hide.
Skipped stitches usually mean the needle is too fine or the foot is sticking to the surface. Change to a size 90/14 or a heavier denim needle where needed, then try a Teflon foot so the fabric can move cleanly. If the machine still hesitates, test a scrap before you blame the whole project.
Puckered seams are often a stitch-length problem, especially on oilcloth. Lengthen the stitch toward 3.5 mm and let a walking foot or better feed control do the work, particularly on long seams in a tote body or around a zip pouch base. Sticky fabric under a standard foot can also benefit from lowering foot pressure if your machine allows it.
Know what can be corrected and what can't
Laminated cotton is a little more forgiving because a stitched line can sometimes be gently unpicked and the perforation eased closed with a warm cloth. Oilcloth is less forgiving once stitched, so the scrap test matters every time before you commit to the final pieces. That's the practical difference between a lunch bag you can tweak and a tote that needs to be right on the first pass.
Test the seam the same way you'll use the bag. Lift it, fold it, and check the corner under the same strain it will feel in daily life.
That habit catches weak stitching long before the bag reaches the door handle or the market checkout.
Project Ideas, Patterns, and Where to Start
The easiest first project is a peg-clipped oilcloth tote for shopping. A square-based tote is forgiving because it gives you straight seams, visible corners, and a shape that doesn't require elaborate easing. A laminated cotton zippered make-up pouch is the next sensible step, because it teaches you how coated fabric behaves around closures without demanding a large amount of material.
A wipe-clean lunch bag is the best hybrid project if you want the practical finish of laminated cotton with a cotton lining inside for comfort. The outer layer stays easy to wipe, while the lining makes the bag nicer to pack and less slippery to handle. That combination is also a good way to practise your top-stitching on a smaller, more manageable shape.
Patterns and practice pieces make the learning gentler
Curved tote shapes and messenger bags are more demanding because they ask the fabric to bend gracefully around corners and hardware. A square tote or a simple pouch lets you concentrate on stitch length, foot choice, and seam finish instead of wrestling with the pattern itself. If you're comparing materials for more specialised bag work, the knife roll bag material guide is a useful reminder that structure, wipe-clean surfaces, and edge durability all matter in the same way they do for coated fabric bags.
Swatches and small kits are worth asking for before you commit to a full metre. They let you see how the coating feeds, how the seam folds, and whether the colour and finish suit the project you've got in mind. A good kit also makes it easier to practise a strap, a corner, or a closure without wasting the fabric you've saved for the finished bag.
For a first coated-fabric sewing session, pack clips, the right needle, a Teflon foot, polyester thread, a scrap for testing, and a pattern with straight seams. That short list keeps the project practical and stops the machine from becoming the centre of the conversation. Once those pieces are ready, the bag has a real chance of turning out as neat as it looked on the table.
If you want coated-fabric bag projects that feel achievable from the first cut, visit More Sewing for quality fabrics, useful haberdashery, and ready-to-sew kits that suit this kind of work. It's a solid place to find the materials and tools that make oilcloth and laminated cotton behave properly, without guessing at what will sew well together.
