
Guides
Best Interfacing for Bags: A UK Sewist’s Guide
You've chosen the outer fabric, matched the zip, maybe even upgraded the hardware, and then you hit the interfacing shelf and everything goes blurry. Light, medium, woven, non-woven, fusible, foam, fleece. Most bag problems start right there.
The fabric gets the attention, but the structure decides whether a bag looks crisp or collapses into itself. If you've ever finished a project that looked excellent on the cutting table and oddly homemade once turned through, the interfacing choice was probably doing the damage.
The best interfacing for bags depends on two things. First, how you want the finished bag to behave. Second, how your fabric responds to support. In the UK, there's a third factor that gets ignored far too often: humidity. A bag that lives through damp commutes, radiators, and repeated weather changes doesn't always behave like one made in a dry studio.
The Secret to Professional Bags Is Not the Fabric
A beautiful cotton canvas can still make a disappointing tote. A lovely quilting cotton can turn limp in a weekend. Even expensive faux leather can look rumpled if the support underneath is wrong. That's why the best bag makers think about interfacing before they cut into the fabric.
Interfacing is the bag's scaffolding. It controls shape, stops sagging, supports stress points, and changes the whole feel of the finished piece in your hand. When people say a handmade bag looks “shop bought”, they're usually responding to structure more than fabric print.
Three areas show the difference immediately:
- Body panels need enough support to hold shape without becoming cardboard.
- Flaps, pockets, and straps need firmness so they don't wrinkle after use.
- Linings need stability so they don't puddle inside the bag.
A common mistake is assuming more stiffness always means a better result. It doesn't. Overbuild a casual tote and it fights every seam. Underbuild a structured handbag and it looks tired before it's even used. The right choice is balanced, not extreme.
Workshop rule: If a bag feels wrong in your hands before you sew the final seams, it won't improve by magic at the end.
For many home sewists, the turning point comes when they stop asking “Which interfacing is best?” and start asking “What structure does this specific bag need?” That question leads to much better results.
It also stops a lot of project-ruining mistakes. Bubbling fusibles, bulky seam allowances, warped panels, floppy bases, and linings that sag after a few uses all come from the same place: mismatching the support to the project.
Understanding the Main Interfacing Families
Before choosing products, it helps to sort interfacing into families. Once you understand the language, the shelves stop looking so random.
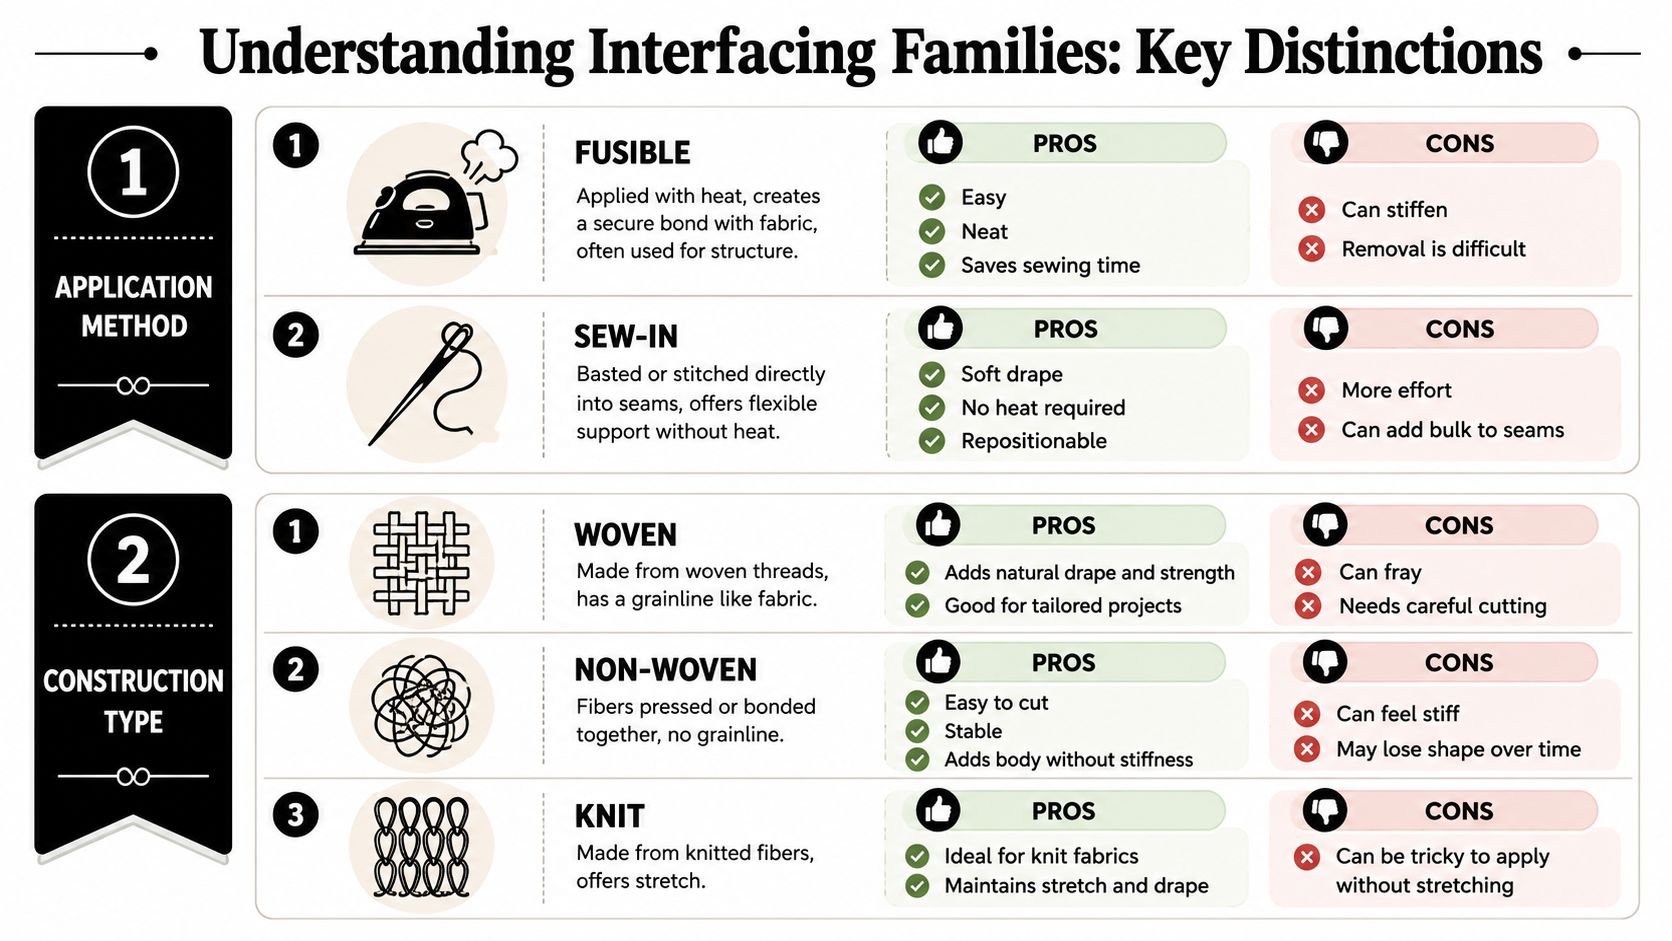
Fusible and sew-in
Fusible interfacing bonds to fabric with heat. It's quick, tidy, and very useful when you want precise placement on straps, pocket pieces, flap backs, and smaller components. It also reduces shifting while you sew, which is a relief on domestic machines.
Sew-in interfacing or stabiliser gets basted or stitched in place. It takes longer, but gives you more control and avoids heat issues. It's especially handy when you want structure without fusing a large area solidly to the fabric.
The trade-off is practical:
| Family | What it does well | What can go wrong | Best use in bag making |
|---|---|---|---|
| Fusible | Fast application, neat finish, keeps layers from shifting | Can bubble, can feel stiff, can add bulk on large pieces | Pockets, straps, flaps, linings, smaller outer panels |
| Sew-in | Better drape control, no heat needed, easier to keep out of seam allowances | More handling, more basting, less convenient | Foam, bulky stabilisers, larger bag bodies, delicate or awkward fabrics |
In the workshop, fusible is often the cleanest way to stabilise detail pieces. Sew-in is often the smarter way to build body.
Woven, non-woven, and knit
Woven interfacing behaves like fabric. It has grain, it supports fabric without making it feel dead, and it's usually the nicest option when you want a polished result. For many bag makers, woven fusibles give the most natural finish on cottons, linens, and bag exteriors that still need some movement.
Non-woven interfacing has no grainline. You can cut it any direction, and it's often chosen when the goal is firmness rather than drape. Some non-wovens feel papery. That can be useful in small areas, but less appealing across a whole bag body if you want a refined feel.
Knit interfacing has stretch and is more common in garment sewing, but it does have a place when you want to support stretch fabrics without removing flexibility. For highly structured bags, it usually isn't the first choice.
A simple way to understand it:
- Woven supports fabric like another cloth layer.
- Non-woven imposes structure more evenly in all directions.
- Knit supports stretch without cancelling it.
If the outer fabric is part of the bag's charm, woven interfacing usually preserves that charm better.
The best interfacing for bags often comes from combining families rather than picking one miracle product. A woven fusible can stabilise the cloth, while a sew-in foam or stiff stabiliser supplies the ultimate shape.
A Practical Guide to Interfacing Weights
A bag can be cut beautifully, stitched neatly, and still disappoint the first damp week it spends in the UK. The usual culprit is weight. Pick interfacing that is too light and the bag slumps after a bit of use. Pick one that is too heavy and the seams fight back, corners go bulky, and the fabric loses its character.
Weight decides how the bag lives day to day. It affects drape, crease resistance, seam bulk, and how well the shape holds in our humid climate, where some fusibles soften more quickly than online tutorials suggest.
Lightweight support
Lightweight interfacing is for control. It steadies fabric that wants to wrinkle, stretch, or sag, but it should not make the piece feel stiff.
Use it where the bag still needs to bend naturally:
- Linings in poplin, lawn, or quilting cotton
- Interior pockets that need a sharper edge
- Zip panels and pouch tops where extra bulk makes insertion untidy
- Small facing pieces that benefit from a cleaner finish
This weight is often the difference between a lining that collapses into the base and one that sits neatly inside the bag. In a humid sewing room, lightweight fusibles also need a careful press. If the glue does not bond properly at the start, edges can lift later, especially on pockets and zip panels that get handled a lot.
Medium-weight support
Medium weight does most of the heavy lifting in bag making. For many everyday projects, this is the category that gives enough body without turning construction into a wrestling match under the presser foot.
It suits:
- Canvas totes
- Crossbody bag exteriors
- Straps and tabs
- Flap backs
- Panels that need shape but still have to turn cleanly
For UK sewists, this is often the safest starting point because our fabrics are not always stored or used in ideal dry conditions. A medium woven fusible usually holds up better than a very crisp paper-like interfacing once the bag has been carried through drizzle, shoved under a chair, and left near a radiator to dry out.
Pairing a medium fusible with a separate stabiliser can give a better result than trying to get all the structure from one very stiff layer. The panel stays polished, while the seam allowances stay more manageable.
Heavyweight support
Heavyweight interfacing has a specific job. It creates firmness where collapse would spoil the shape.
Use it selectively on:
- Bag bases that need to stay flat
- Structured clutches that rely on a crisp silhouette
- Firm flaps that should not curl or sink
- Boxy handbags that need to stand on their own
Restraint matters here. Heavy support across an entire soft cotton or linen bag can make the outside look strained and the inside feel clumsy. It can also trap moisture longer in our climate, which is one reason some bags end up feeling oddly limp after storage even though they started out very stiff.
A good test is simple. Squeeze the fused sample in your hand, then let it go. If it springs back without looking cracked or papery, you are in the right range. If it feels like card wrapped in fabric, step down a weight or confine the heavier stabiliser to the areas that need it most.
Comparing the Most Common Interfacing Types
A bag can look right on the cutting table and still disappoint after a damp commute, a day in the boot of the car, or a week in a heated hallway. The interfacing choice is often the reason. In the UK, where humidity swings and drizzle are part of normal use, the best option is rarely the stiffest one on the shelf. It is the one that holds shape without turning brittle, bubbly, or limp over time.
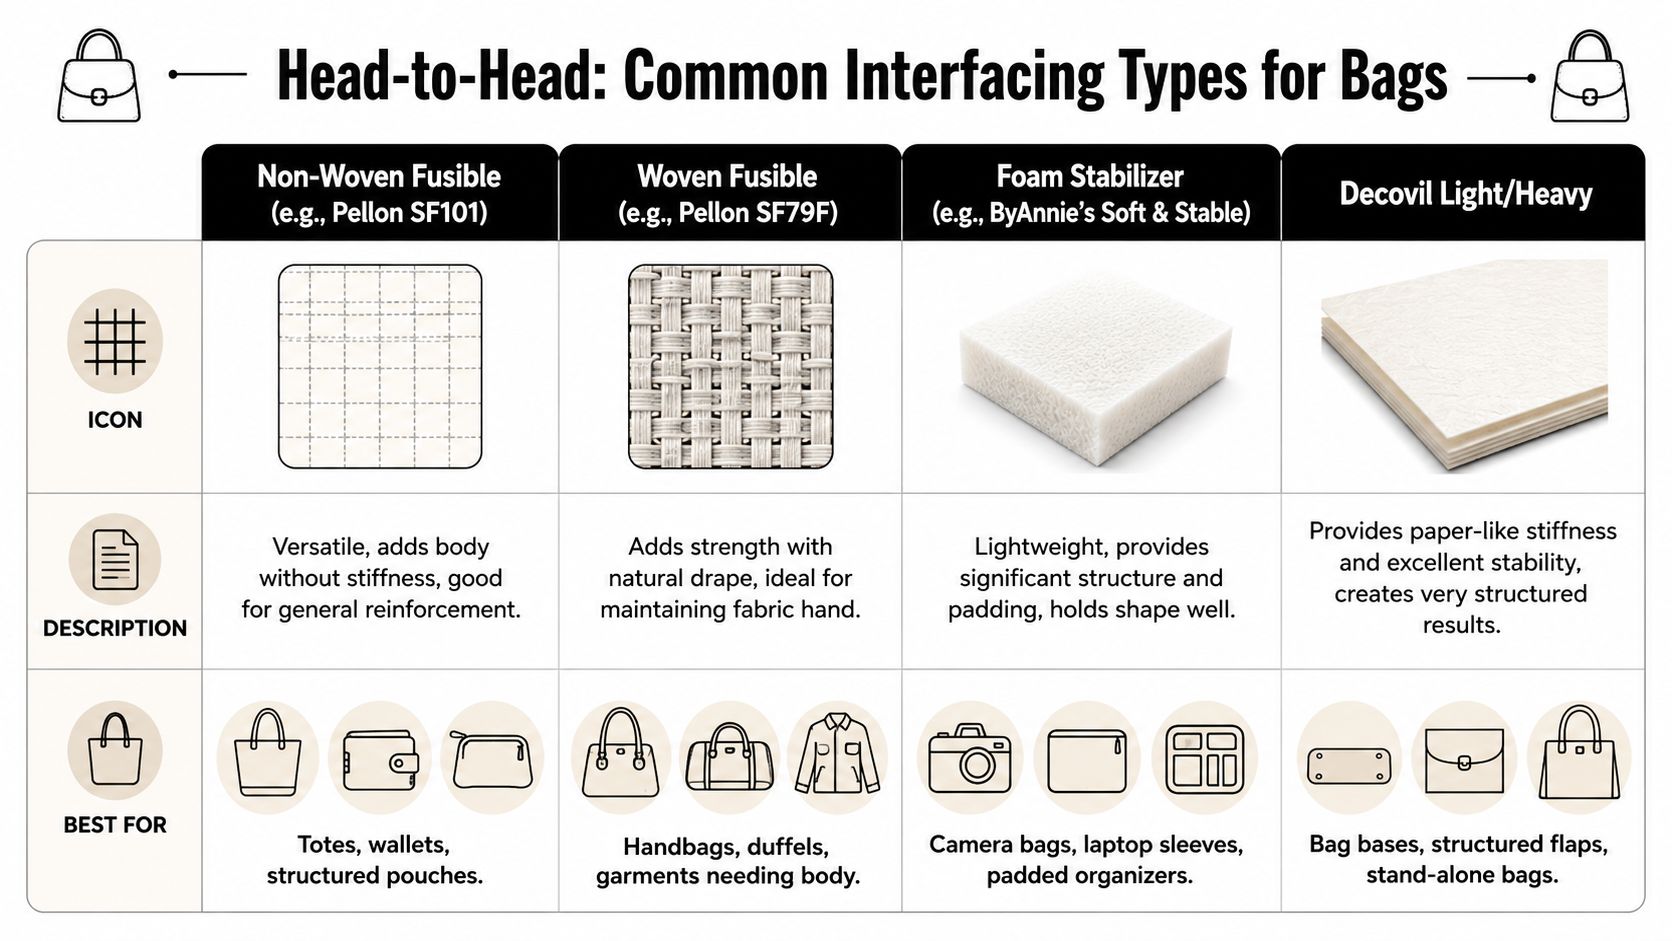
Woven fusible for a clean, professional result
Woven fusibles are usually the safest all-round choice for bags that need a polished finish. They move with the fabric instead of fighting it, so turned corners, flaps, and front panels tend to look smoother after pressing and everyday wear.
Vilene H250 is a familiar example in UK sewing rooms. It sits in a useful middle range for outer panels, pocket pieces, flap backs, and straps where you want support without a board-like feel. It also copes better than many crisp non-wovens when a bag has to deal with our usual mix of damp air, central heating, and repeated handling.
If a customer wants one interfacing to start with, this is often the category I point them to first.
SF101 for linings and light structure
SF101 earns its place because it tidies up fabrics that would otherwise sag, wrinkle, or slump inside the bag. It is especially good on quilting cotton linings, lighter canvas, and small zip pouches where the fabric needs a bit more backbone but still has to fold and sit neatly.
For UK sewists, the main question is availability. SF101 is not always the easiest product to find here, so many makers use an equivalent lightweight woven fusible instead. The principle stays the same. Choose a light woven support when the lining needs to look neat but not stiff.
Use it for:
- Linings that need to sit flat
- Interior pockets
- Small pouches and organisers
- Wallet interiors and similar pieces
Standard non-woven fusibles for small areas
Non-woven fusibles still have a place. They are useful where firmness matters more than drape, especially on parts that do not need to bend naturally.
I keep them for jobs like card slots, zip tabs, narrow facings, and small tabs. They can also help on wallet sections where a bit of crispness makes construction easier.
Across a full bag panel, they are much less forgiving. In humid conditions, cheaper paper-like non-wovens can crease hard, show wear quickly, and sometimes lose their nice first-pressed look after the bag has been crushed and handled a few times.
Use non-woven where you want control in a small piece. Use woven where the finished surface will be seen and felt.
Fusible fleece for softness and rounded shape
Fusible fleece gives body in a completely different way. It adds padding and a softer hand rather than sharp structure, which is why it works so well in casual totes, pouches, lunch bags, and some baby or gift items.
It is not my first pick for a sharply shaped handbag. It is my pick when the bag should feel soft, slightly cushioned, and pleasant to carry. In a damp UK winter, fleece can also hold onto moisture longer than a plain woven fusible, so it is best in projects that can dry out easily and are not expected to stay very crisp.
Foam stabiliser for body without bulk in the wrong places
Foam belongs in this comparison because many bag makers reach for it as soon as they want a bag to stand up. It gives volume and shape without the harsh feel that comes from stacking multiple heavy fusibles.
The trade-off is bulk. Foam is excellent in body panels, but it can make seams untidy if it runs right into every allowance. Used well, it gives a bag presence. Used everywhere, it makes topstitching, binding, and turning much harder than they need to be.
Here is the quick comparison I use at the cutting table:
| Product type | Finished feel | Drape | Best use |
|---|---|---|---|
| Woven fusible | Crisp but natural | Good | Exteriors, flaps, straps, polished everyday bags |
| SF101-type woven support | Light and stable | Very good | Linings, pockets, small pouches, interior parts |
| Non-woven fusible | Firm, sometimes papery | Limited | Tabs, facings, card slots, small reinforced areas |
| Fusible fleece | Soft and padded | Soft | Casual totes, pouches, softer bags |
| Foam stabiliser | Full-bodied and structured | Moderate | Handbags, organisers, tech sleeves, bags that should stand |
Specialty Stabilisers for Next Level Structure
A customer brings in a beautifully sewn tote, then asks why it still collapses in the car footwell and buckles at the base after a wet week in Manchester. The answer is usually not better fabric. It is targeted stabilising in the places that take strain, moisture, and wear.
Specialty stabilisers earn their keep when standard fusibles stop being enough. They let you control how a bag stands, bends, and recovers after use. In the UK, that matters even more because damp air can soften some supports over time, especially in bags stored by the door, carried on rainy commutes, or left in an unheated room.
Foam stabiliser for body and bounce-back
Foam is the material I reach for when a bag needs shape but still has to feel comfortable in the hand. It gives panels a rounded, substantial look and helps the bag spring back after being set down.
It suits:
- Everyday handbags
- Backpacks
- Tech sleeves
- Quilted organisers
Placement matters more than thickness. Keep foam out of seam allowances, trim it back near bulky joins, and avoid running it into narrow tabs or strap anchors. The bag will turn more cleanly, topstitch more neatly, and sit better at the corners.
In humid conditions, foam can also trap a little moisture between layers if the outer fabric is dense or water-resistant. I prefer it in main body panels rather than throughout the whole bag, so the project keeps its shape without feeling clammy or overbuilt.
Peltex for sharp, rigid pieces
Peltex is for bags that need to hold a line. Use it where collapse would spoil the design, such as a boxy case, a framed section, or a firm base insert.
It works well for:
- Boxy cosmetic cases
- Structured purse bodies
- Tote frames
- Firm bag bottoms
Accuracy counts here. A wavy cut edge, a slightly twisted seam, or an uneven turn will show immediately once a rigid support goes in. For that reason, I rarely put Peltex through an entire bag body unless the pattern was drafted for it. It performs best in controlled areas where firmness solves a specific problem.
Thermolam for softer structure
Some bags should mould to the body instead of standing to attention. Thermolam is useful for that middle ground. It adds substance and a gentle padded feel without pushing the project into hard-shell territory.
I use it for:
- Soft shoulder bags
- Casual satchels
- Project bags
- Any design where drape still matters
This is often the safer choice for UK sewists making bags for daily wear in mixed weather. It does not fight the fabric, and it usually ages more gracefully than a stiff support in a bag that gets folded, stuffed, or carried under a coat.
Decovil-style support for leather-like firmness
Decovil Light and Decovil Heavy give a denser, more defined feel than fleece or standard fusible supports. Light works well in flaps, fronts, and side panels that need body. Heavy is better reserved for bases and selected structural sections.
The mistake I see most often is using the heaviest support everywhere. That usually creates a bag that is tiring to sew, awkward to turn, and too stiff to use comfortably. Better results come from zoning the structure. Put the firmness where the bag needs resistance, then let the rest of it move.
The best-structured bags are rarely stiff all over. They are firm exactly where they need to be.
Interfacing Recipes for Popular Bag Projects
A bag can look perfect on the cutting table and still disappoint after a wet school run, a crowded train commute, or a damp week by the coast. That is usually an interfacing problem, not a sewing problem. In the UK, where humidity hangs around longer than many online tutorials allow for, I choose recipes that hold their shape without turning the bag into a board.
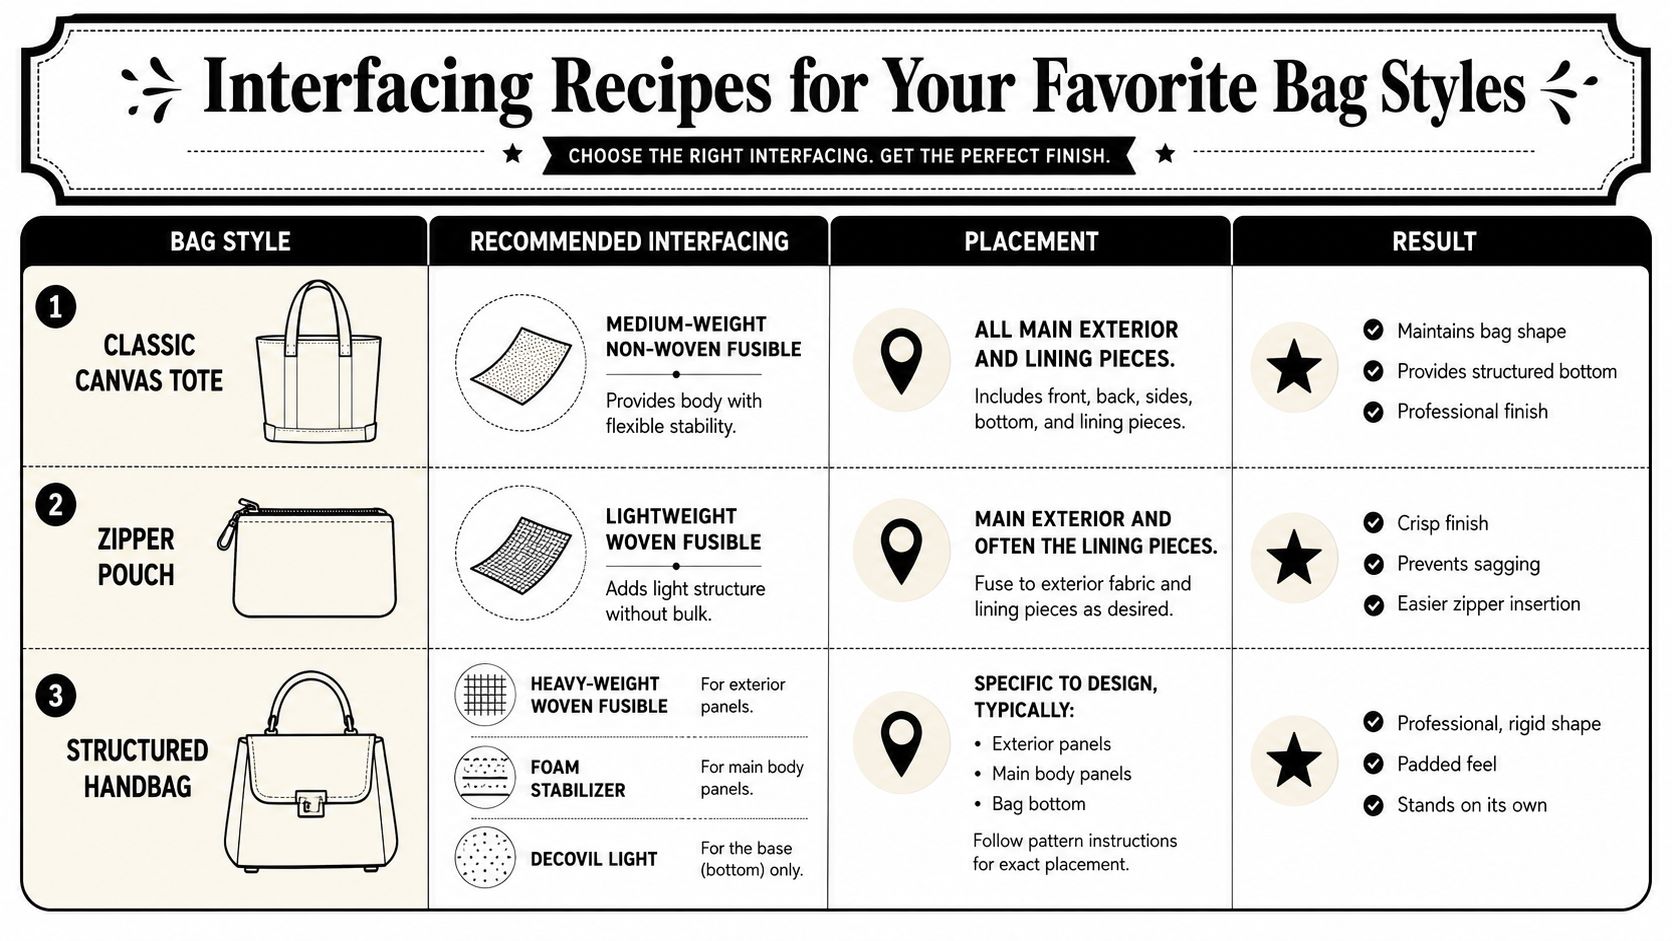
Small to medium everyday tote
For an everyday tote, the aim is simple. The bag should sit upright, carry its contents without sagging, and still go through the machine without a fight.
My standard recipe is:
- H250 on exterior pockets, strap pieces, and flap backs
- Style-Vil foam on the main body panels, trimmed out of the seam allowances
- A lighter woven fusible on the lining if the lining fabric is limp
Keeping the foam clear of the seam allowances matters. It reduces bulk, helps the top edge turn neatly, and gives a cleaner finish at boxed corners. In a humid UK climate, this combination also copes well with day-to-day handling because the structure comes from layers working together, not from one overly stiff interfacing trying to do everything.
Larger tote or shopper
Large bags need a different approach because broad fused panels can become heavy, bubbly, or awkward to manage. I get better results by using a firm sew-in support through the main body, then adding targeted reinforcement only where the bag takes strain.
That suits:
- Roomy shoppers
- Large work totes
- Travel carryalls
If a large tote has ever looked smart when empty but dropped into a tired shape once loaded, the body usually needed support with less seam bulk. A sew-in layer often handles that better, especially in cotton canvas and linen blends that pick up moisture from the air and soften over the course of the day.
Faux leather clutch
Faux leather already brings its own body, so piling fusible onto every panel usually makes the job worse. Corners become bulky, the fold line can look clumsy, and topstitching starts to wobble because the layers are too dense.
Use support only where the shape needs to stay sharp:
- Flap or front panel with Peltex or a Decovil-style stabiliser
- Main body with lighter support, or none at all if the faux leather is thick
- Base or gusset reinforced separately if the pattern needs it
This is one of those projects where less often looks more expensive.
Backpack or daily commuter bag
Backpacks work harder than handbags. They carry more weight, rub against coats, get put on damp floors, and are often used in rain. The interfacing has to support the bag without making it rigid across the back or bulky at the straps.
Here is a practical starting point:
| Bag project | Interfacing recipe | Placement focus | Expected result |
|---|---|---|---|
| Zipper pouch | Lightweight woven fusible | Exterior and often lining | Crisp finish, easier zip insertion |
| Canvas tote | Medium support plus optional foam | Exterior, base, sometimes lining | Better shape and cleaner body |
| Structured handbag | Heavy support plus foam, firmer base support | Exterior panels, body, base | Bag stands on its own |
| Backpack | Stable exterior support plus foam in major panels | Front, back, base, straps as needed | Durable shape with comfort |
For backpacks, reinforce strap anchors and the base separately from the main body. Those are the points that fail first. In wetter parts of the UK, I also avoid making the whole bag overly stiff, because repeated damp-dry cycles can leave a hard bag looking tired at the fold lines while a slightly more flexible build wears better.
Pro Application Tips and Troubleshooting
A bag can be cut beautifully and still look homemade if the interfacing goes on poorly. I see this all the time in the shop. The fabric gets blamed, but the actual problem is usually heat, moisture, or the order of work.
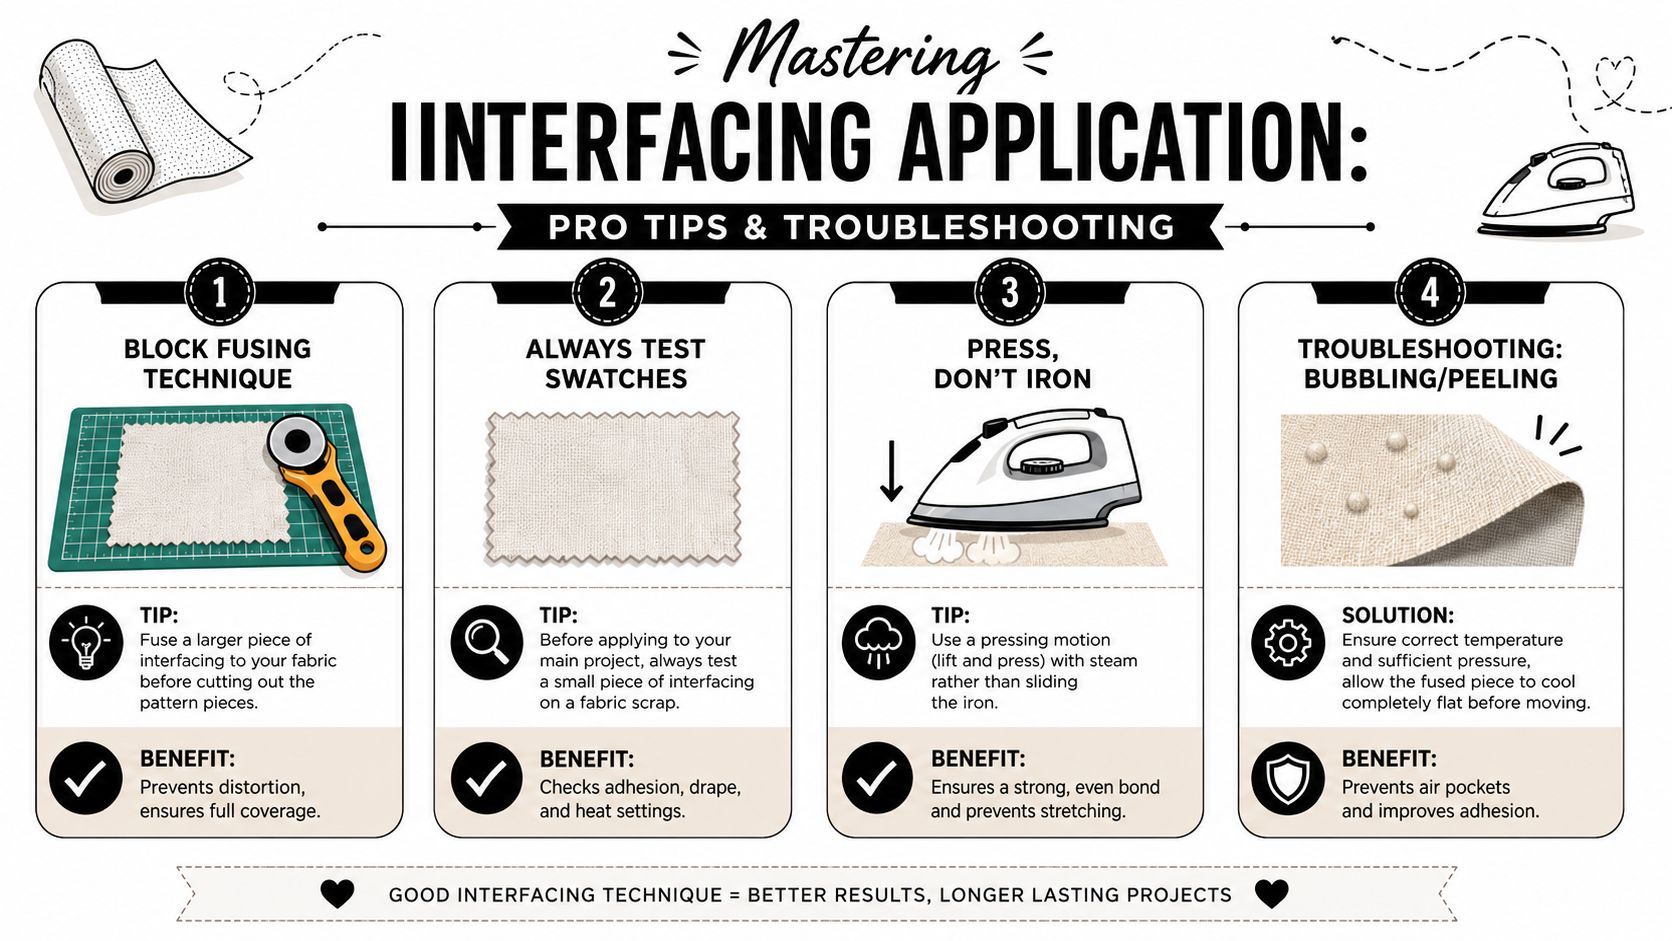
Start with block fusing
Block fusing means applying interfacing to the fabric before cutting out the pattern pieces. For bag making, it gives cleaner edges, more accurate pieces, and a more even bond across the whole panel.
It also reduces one of the most annoying workshop problems. Corners and narrow sections can shrink, ripple, or twist if they are fused after cutting.
Use block fusing with a little margin around the pattern pieces rather than trimming fabric and interfacing to exactly the same size first. That extra allowance helps if the fabric draws in slightly under heat. On checks, stripes, and linens, it can save a whole project.
Press properly and test first
Always test on the actual fabric, lining, and interfacing combination. A swatch that looks fine straight off the ironing board can turn stiff, bubbly, or papery once it has cooled.
Use a press-and-lift motion. Do not slide the iron. Sliding shifts the grain, distorts edges, and can leave bubbles that only show up after the bag is turned through or topstitched.
Let the piece cool completely on a flat surface before moving it.
If the bond looks patchy, the usual causes are easy to spot:
- Bubbles or blistering: too much heat, too little pressure, or a steam setting that is too wet for the adhesive
- Peeling at corners: edges handled while still warm, or seam allowances left too bulky
- Rippling on cotton or linen: fabric and interfacing not pre-tested, or the iron moved across the surface
- Board-like stiffness: support chosen for the whole panel when only the base, flap, or handles needed firm structure
Think like a UK sewist
A bag that behaves perfectly in a dry sewing room can age quite differently in Leeds, Glasgow, or a damp coastal town. High humidity changes how fusibles behave in storage, during application, and over time in daily use. Adhesives can feel tackier before pressing, then less dependable later if the bag is repeatedly exposed to damp air, radiators, and cold hallways.
That is why I treat UK conditions as part of the materials choice, not an afterthought. For bags that will live in porches, cars, school runs, or rainy commutes, I prefer to combine methods. Use fusible interfacing for clean construction, then add sew-in support, foam, or a firmer base insert where the stress sits. Do not ask one adhesive layer to do every job.
Storage matters too. Keep interfacing dry, flat, and sealed if your sewing space gets damp. If a fusible has been sitting through a wet winter in a shed or loft, test it before it goes anywhere near a main project. Some products lose performance long before they look different.
If a bag needs to hold its shape through real British weather, build in some support that does not rely on glue alone.
If you're choosing fabric, interfacing, zips, and bag-making essentials for your next project, take a look at More Sewing, a UK sewing shop with quality materials, haberdashery, and practical supplies for home dressmakers who want better results from the start.
