
Blog, Dressmaking, Guides
Black Lace Trim: A Practical Guide for Sewists and Designers
You've probably got a project half sewn, a length of black lace trim draped over it, and that small pause has hit. Do you stitch it flat to the edge, tuck it into a seam, or abandon the idea before it turns your blouse hem into a wavy mess?
That hesitation is sensible. Black lace trim looks delicate, but the decisions are practical ones: fibre, width, stretch, edge finish, stitch choice, washing, and whether the trim is just decoration or part of the garment's actual textile make-up. If you sew at home, those choices matter more than the mood board.
Black lace has a long place in British textile history. By 1791, Amersham in Buckinghamshire was recorded as the centre of black silk lace production, with makers specialising in fine silk veils and wide flounces of black lace, and later hand-made bobbin lace gave way to machine-made lace according to Amersham Museum. That history still shows up in what you buy now: narrow edgings, soft veiling-style trims, heavier decorative bands, and machine-made versions that are easier to use but still need handling with some respect.
What Black Lace Trim Actually Is
The moment that catches you is this one: you pin the trim at the centre back of a half-finished blouse, hold the presser foot up, and realise you haven't quite decided what this trim is supposed to do. Is it edging, insertion, reinforcement, camouflage, or just decoration?
Black lace trim is a narrow decorative textile trim made in openwork patterns. Threads are twisted, looped, knotted, or knitted into motifs with gaps between them. It's usually sold by the metre and often has one of two useful features: a straight header edge for stitching, and a decorative outer edge that may be scalloped, fringed, corded, or picoted.
That makes it different from allover lace fabric. Lace fabric is the main cloth. Trim is the finishing piece you add to another fabric. If you treat trim like a last-minute garnish, it often behaves badly. If you treat it like part of the construction, your choices get clearer fast.
The three forms most sewists meet
You don't need a museum-level taxonomy, but it helps to recognise the broad families:
- Bobbin-style lace trim often has a more traditional look, with defined motifs and a slightly firmer hand.
- Raschel lace trim is the common machine-made version many sewists buy for dressmaking. It tends to drape more easily and comes in everything from soft floral edging to stretch lace.
- Eyelet-style trim usually reads cleaner and simpler. It has cut-out holes worked into a base and suits garments that want a lighter, less romantic finish.
Practical rule: Before you buy black lace trim for a project, decide whether it needs to bend, drape, stretch, or simply sit on the edge.
That one decision affects your stitch, needle, and pressing plan. A stable trim on a woven cuff needs one approach. A stretchy scalloped lace on a jersey neckline needs another.
Why it helps to think of trim as a sewing material
Black lace trim isn't only about looks. It can add softness to a firm edge, break up a plain hem, bridge two panels, or visually lengthen a camisole hem without adding heavy bulk. It can also shrink, melt, ripple, fray, scratch, or twist if you choose badly.
That's why I'd always decide these points before cutting:
- Will it be stitched on top or inserted into a seam
- Does the trim have a clean header edge
- Is the lace stable or stretchy
- Will the finished piece be hand washed, machine washed, or dry cleaned
There's also a cultural reason black lace keeps returning. It sat inside a long British dress tradition, and black lace became especially visible again in the Victorian period through both fashion and mourning dress. A cultural history source on English lace notes that Victorian mourning created regular demand for dark clothing and trimmings, while museum material also notes black lace became very fashionable from about the 1850s and was reinforced by Empress Eugénie's preference for it in this Oxford-based overview of lace and mourning culture.
Fibres, Motifs and Widths to Know
When sewists say a lace is “nice”, they usually mean one of four things: it feels good, doesn't snag immediately, presses without drama, and behaves under the needle. Fibre is behind most of that.
Fibre first, then pattern
On UK shelves, you'll commonly run into three practical fibre groups.
Cotton lace trim is matte, stable, and straightforward to sew. It doesn't usually skid about much, and it tends to take topstitching well. On the downside, it can crease and can feel a touch dry if the motif is dense.
Polyester or nylon lace trim is often springier and cheaper. It usually holds colour well and survives regular wear better than many people expect, but it can pucker under a hot iron and can feel wiry if the finish is harsh.
Viscose, silk, or wool blends usually feel softer and drape better. They're often the trims people pick up and instantly prefer in the hand. They also ask more of you in care and budget, and some are not everyday-laundry choices.
Under UK fibre labelling rules, fibre names must use approved generic fibre terminology, and if a textile product contains more than one fibre, those fibres must be listed by weight percentage in descending order under the legal framework set out in the textile fibre names and labelling rules. In practice, that means if a listing says only “lace trim” with no proper fibre breakdown, I'd be cautious.
Motif changes the mood and the sewing
Motif isn't just style. It changes visibility, bulk, and how easy the trim is to place.
- Geometric motifs look neat on shirts, pyjama sets, and cleaner modern garments.
- Eyelet patterns suit lighter cottons and summer sewing, especially if you want lace detail without a very ornate finish.
- Floral corded motifs bring more texture and show up strongly at cuffs, necklines, and bridal-adjacent pieces.
A dense cording line can also create a ridge, which matters if you're attaching it to something fine like viscose challis.
Width decides the method
A very narrow trim behaves almost like ribbon. A wide one behaves more like a textile panel.
| Fibre | Common motifs | Typical width range | Handling note |
|---|---|---|---|
| Cotton | Eyelet, geometric, small floral | Narrow to medium | Stable and forgiving, but can crease |
| Polyester or nylon | Floral, scalloped, eyelash-look, geometric | Narrow to wide | Can be springy and heat-sensitive |
| Viscose, silk, or wool blends | Soft floral, fine openwork, delicate borders | Narrow to medium, sometimes wide | Better drape, often fussier in care |
In real sewing terms:
- Narrow trims work well at necklines, lingerie edges, handkerchief hems, and cuff edges.
- Medium widths suit sleeve hems, camisole tops, skirt hems, and insertion work.
- Wide bands often need to be treated more like a panel, especially once they get visually dominant.
If the lace is wide enough that the decorative body wants to collapse away from the garment edge, don't force edge stitching. Use the header edge as your anchor.
One more point matters in the UK if you sew for sale or make small runs. Decorative matter that makes up 7% or less of the product is excluded from fibre-content calculations, but if the trim is a separate textile component or goes beyond that threshold, it must be identified in the product fibre breakdown under UK and EU apparel testing guidance used in the trade.
For a hobby sewist, that sounds dry. It isn't. It tells you whether your lace is just an embellishment or whether it needs to be treated as part of the actual textile content of the garment.
Where Black Lace Trim Works Best
You have a blouse nearly finished, and the neckline still looks raw even though the sewing is tidy. A black lace trim can solve that, but only if the placement suits the trim's structure. The useful question is less “where will lace look pretty?” and more “where can this particular trim be anchored cleanly without fighting the garment?”
Black lace trim earns its keep at edges and seams that already need a clear finish. Necklines, sleeve hems, skirt hems, and insertion panels are the usual winners because they give you an obvious stitching line. They also let you control the trim from one stable point, whether that is the straight header edge, a seam allowance, or a folded garment edge.
A good way to judge placement is to ask how the trim will be held in place while you sew it. If you can pin from the centre back or another fixed point and work evenly in both directions, the job usually behaves well. If the trim has to bend sharply, twist round a curve, or hang unsupported from a scalloped edge alone, expect more handling and more testing first.
Dressmaking placements that behave well
A narrow black lace trim often works best at a V-neck, scoop neck, or camisole edge where a facing would add thickness. In practice, the easiest trims here are ones with a firm header edge. You can align that straight woven or knitted band just inside the garment edge, pin at centre back or centre front first, then stitch with a narrow zigzag that catches the header without flattening the decorative scallop.
Skirt hems are a different job. A wider lace can act almost like a border, especially on simple skirts where you want a neat visual finish without turning up a deep hem. If the lace is broad enough that the decorative body drops away from the cloth, treat the header edge as the working edge and stitch there, rather than trying to force a line through open motifs.
Sleeve hems also tend to be forgiving, particularly on blouses and nightwear. They are short, visible, and easy to control under the machine. If the cuff edge is circular, quarter-mark both the sleeve and the trim before pinning so you do not end up with the last few centimetres either stretched or bunched.
Placements that usually justify the effort include:
- Necklines on camisoles, slips, shell tops, and pyjama tops
- Sleeve hems on blouses, robes, and sleepwear
- Skirt hems where the lace can work as a clear border
- Centre-front, centre-back, or yoke insertion where the lace replaces a strip of fabric rather than sitting on top
Insertion work deserves a separate mention because it asks for a different construction choice. Instead of trimming an outside edge, you are joining lace between two fabric edges. On a soft top or dress, this can be the cleanest use of black lace because both sides of the trim are supported by seams. It also helps with fibre labelling in the UK if you sew to sell, since a decorative edge trim and a separate inserted textile component may not be treated the same way in the finished garment.
If you are also thinking about how black lace reads once the garment is worn, the Guide to dressing in black lace styles gives a useful styling view of how black lace pieces can move beyond occasionwear.
Lingerie and nightwear
Lingerie asks more from a trim than daywear does. The lace has to bend, recover, and sit against skin without itching. A dramatic motif can look lovely on the reel and feel miserable at the underarm.
For bra edges, cami necklines, robe fronts, and tap shorts, soft narrow trims are usually the safer choice. If the trim has a picot or scalloped edge, keep the stitching on the header edge and use a short narrow zigzag rather than a straight stitch. On many domestic machines, a width around 1.5 to 2 mm and a length around 2 to 2.5 mm is a sensible starting point, then adjust on a scrap. The goal is to hold the trim securely while letting it flex.
One quick test saves disappointment. Rub the lace against the inside of your wrist or collarbone before buying a long cut. If it scratches there, it will not improve at the bust or underarm.
At skin-contact edges, softness and recovery matter more than an elaborate motif.
Homewares and smaller accessories
Black lace trim can also work well away from clothing, but the best placements are still the ones with a stable anchor point. Cushion borders, table runner overlays, and decorative flaps on clutches are straightforward because the base is flat and easy to support while stitching.
Good uses include:
- Cushion borders on plain linen or cotton covers
- Curtain leading edges where the lace is decorative rather than load-bearing
- Table runner overlays on a simple cloth
- Inside lapel trims on jackets for a concealed finish
- Tote bag top edges on bags that will not be scrub-washed often
- Felt or wool clutch flaps where the lace sits as appliqued decoration
Hard-wearing projects need a dose of realism. If the item will be washed often, crushed in use, or stitched onto a stiff base, choose a trim with a stable header and a motif that will not snag easily. Fragile eyelash or very open lace is usually better saved for garments or occasional pieces than for things that live on a chair, a windowsill, or the bottom of a bag.
Matching Black Lace Trim to Base Fabrics
You pin a lovely black trim to a blouse hem, step back, and something looks off. The lace is fine on its own, the fabric is fine on its own, but together they pull against each other. That usually comes down to three things: weight, stretch, and edge stability.
A useful way to judge a pairing is to ask one practical question first. Will the base fabric support the lace at the exact line where you plan to sew it? A trim stitched to a firm waistband behaves very differently from the same trim stitched to a bias-cut neckline. Home sewing goes more smoothly when the lace and the base cloth want to move in a similar way.
Four common pairings
Cotton lawn usually suits fine lace with a neat header edge. Lawn is light, crisp, and easy to keep on grain, so a narrow scalloped trim often sits cleanly at cuffs, collars, and hems. If the lace is dense or heavily corded, the edge can turn board-like. For most lawn projects, a trim around 1 cm to 3 cm wide is easier to control than a broad decorative border.
Viscose or rayon challis needs a softer trim than many sewists expect. Challis drops and swings, so a rigid lace can make the garment edge kink in little flats and dips. Raschel lace or a soft nylon blend often behaves better here than a stiff embroidered trim. If you can hold the lace out horizontally and it stays straight like a ribbon, it may be too firm for a drapey fabric.
Jersey needs the closest match. The lace does not have to stretch by the same amount as the knit, but it does need similar recovery if it is going on a neckline, sleeve edge, or any opening you pull over the body. A stable woven lace can still work on jersey if the seam itself is stable, such as a hem band or a non-stretch insertion panel. Problems start when a stretchy garment edge is forced to act like a woven one.
Denim or canvas can carry a larger motif because the base has enough body to hold it up. The risk here is less about drape and more about bulk and needle damage. Open lace with a clear header is often easier to sew than very dense guipure on a heavy base, because you can stitch the stable edge without punching too many holes through the decorative part.
| Base Fabric | Best Lace Weight | How It Tends to Hang | Key Handling Note |
|---|---|---|---|
| Cotton lawn | Fine to light | Clean, lightly structured | Choose a trim that bends easily at the header edge |
| Viscose or rayon challis | Soft and supple | Fluid | Avoid rigid motifs that interrupt the fall of the cloth |
| Jersey | Stretch lace or very flexible trim | Depends on recovery | Test the edge after stretching, not just while flat |
| Denim or canvas | Light-medium to medium | Firm and supported | Stitch through the header where possible to reduce damage |
Match the edge, not just the look
Colour is the easy part. Construction is the part that decides whether the finish looks homemade in a good way or a frustrating way.
Start by comparing the edge you will sew, not the whole fabric. A scalloped lace with only a 4 mm straight header gives you a narrow target. On a slippery challis blouse, that may still be enough. On a bulky denim facing, it can feel like trying to sew along the edge of a postage stamp. If you are new to lace, a trim with a clear straight header of about 6 mm to 10 mm is usually easier to place, pin, and topstitch accurately.
Placement matters too. If the lace motif has a clear repeat, line it up with the garment's centre front or centre back before cutting. That small check saves the common problem where one side ends on a full scallop and the other side ends on half a flower. On black lace over a pale base, every mismatch shows. On black over black, the mismatch is quieter, but puckers and torque still show in the light.
A few fabric-specific decisions that save trouble
On fine wovens, use a lighter trim than your first instinct suggests. Lace nearly always looks a bit heavier once it is stitched down.
On slippery drapey fabrics, pin more closely than usual and test whether the base ripples after stitching. If it does, the lace may be too firm, or your stitch length may be too short for the fabric.
On knits, stretch both the lace and the garment edge gently with your hands before committing. If one springs back and the other stays longer, they are poor partners for an exposed edge.
On heavier fabrics, check whether the machine can form an even stitch through both layers without chewing the motif. A size 90/14 needle is often a better starting point than a finer one on denim or canvas, and a slightly longer straight stitch, around 2.8 mm to 3 mm, often sits flatter than a short stitch.
Do not skip the wash test
Pre-washing is less glamorous than choosing motifs, but it answers two important questions. Will the base fabric shrink, and will the trim change hand after washing?
That matters even more in the UK, where fibre content descriptions on trims can be broad and should not be guessed from appearance alone. A lace sold as polyester, polyamide, cotton, or mixed fibre may react quite differently in water and heat. Check the supplier's fibre label before buying if the trim will touch skin, need pressing, or be washed regularly. If the listing is vague, treat the trim cautiously and test a short offcut first.
A ten-minute sample is worth more than a metre of regret. Sew a small piece of the actual lace onto a scrap of the actual fabric, wash it as you plan to wash the finished item, let it dry, and then check three things: shrinkage, puckering, and scratchiness after laundering. Some black trims soften. Some go wiry.
That is the matching job. You are not only pairing black with black, or lace with lawn. You are pairing one stitched edge with another stitched edge and asking them to behave well together.
Techniques for Attaching and Inserting Lace
You have the neckline sewn, the black lace is cut, and now the awkward part starts. If you pin it from one end and hope for the best, you often finish with a twist at the centre back, a chewed scallop, or a seam that looks neat on the table and ripples once the garment is on. Black lace behaves better when you choose the method by construction, not by mood.
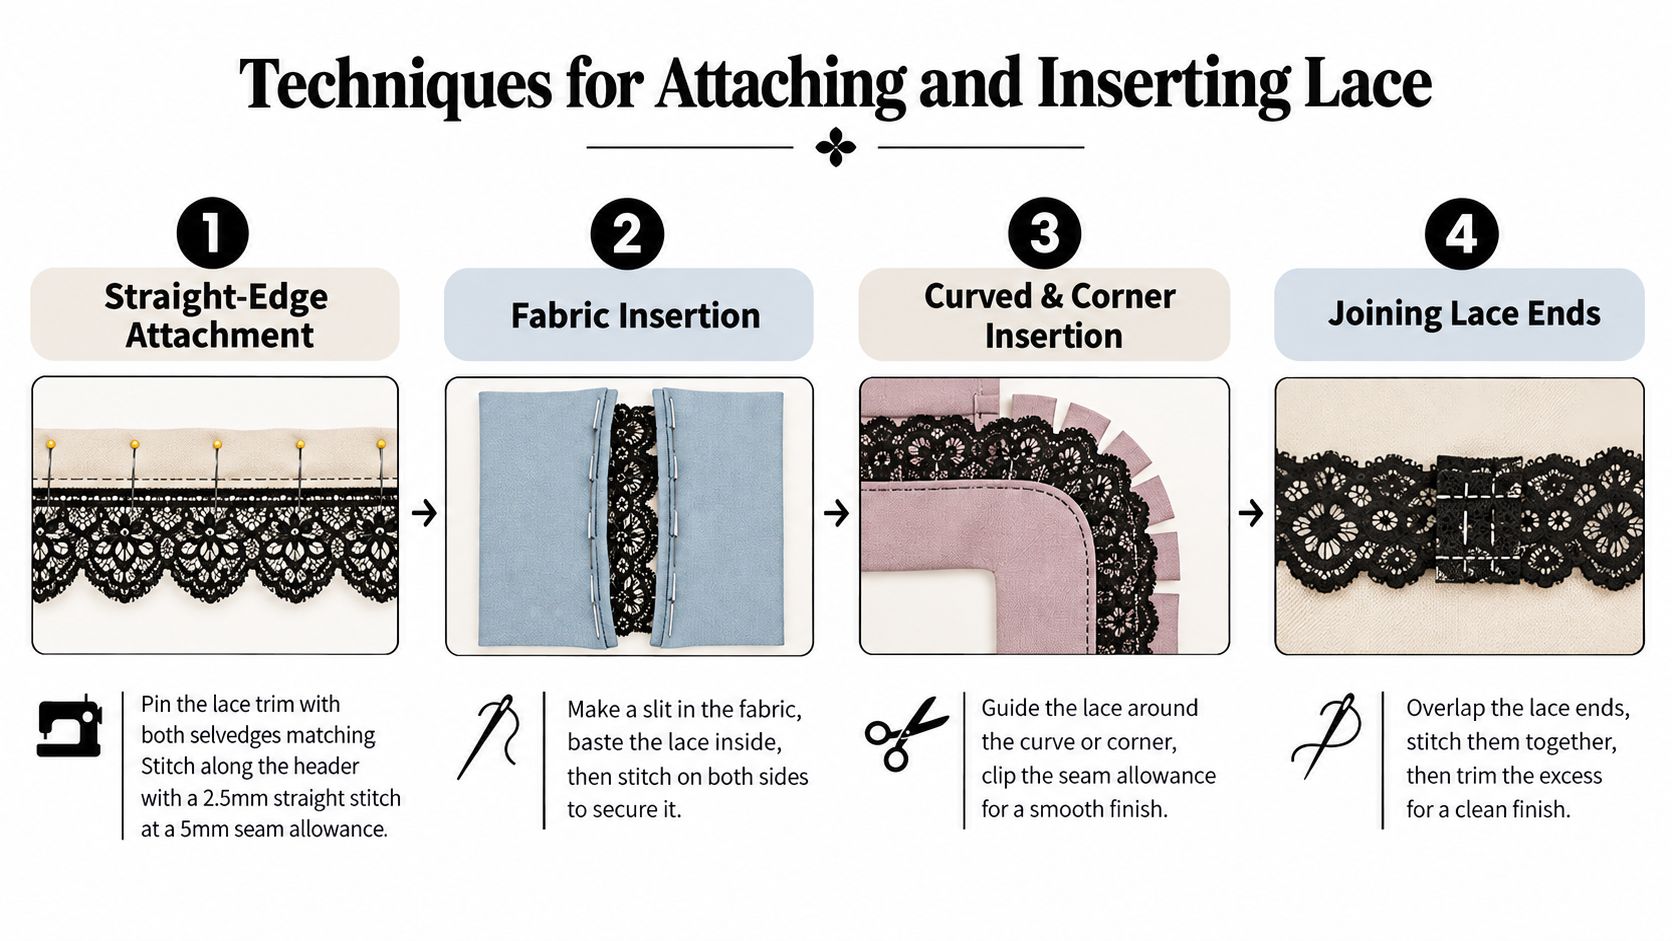
Straight-edge attachment
Use this when the trim has a firm, straight header edge. That woven or knitted strip at the top is your handle. It takes stitching well and gives you a line to follow, which matters far more than trying to sew neatly through a floral motif.
One practical guide shows the basic setup clearly in this lace trim sewing guide. For home sewing, I would keep the idea but soften one point. A stitch length of 1 is very tight for many laces and can make the header pucker, especially on light cottons or viscose. Start around 2.0 to 2.5 mm for a straight stitch, then shorten only if the lace is shifting.
A reliable order is:
- Find the centre back on the garment and on the lace.
- Pin or hand baste from the centre back outward so any tiny mismatch is shared left and right, not dumped at one end.
- Place the lace right side down on the fabric right side if the method calls for turning or edge finishing afterward.
- Stitch on the header edge, not across the openwork, using the straight edge as your guide.
- Press and check before trimming seam allowance. If the lace is pulling, unpick now, not after finishing.
That centre-back start confuses beginners, because it feels slower. It is slower. It also prevents the common problem where a neckline looks balanced at the front but the lace join drifts off to one side at the back.
Edge application and scalloped placement
If the lace is meant to sit on top of the fabric edge, not inside a seam, edge application is simpler. Overlap the trim onto the garment by about 6 mm, then choose the stitch by how the lace needs to move.
A straight stitch suits stable lace on a woven base. Keep it close to the edge, around 2 to 3 mm in, as shown in this practical lace trim tutorial. A narrow zigzag is better when the edge is uneven, the lace has a little give, or the garment needs some movement. Good starting settings are 1.5 to 2 mm wide and 1.5 to 2 mm long. You want the zigzag to catch the edge, not march across the whole motif.
Two common setups work well:
- Straight stitch for rigid lace on collars, apron edges, blouse hems, and other stable woven areas
- Narrow zigzag for lingerie finishes, curved necklines, and trims that curl or fray slightly at the edge
With scalloped lace, let the decorative edge extend past the fabric and sew only through the header or the plain upper edge. The scallop is the show bit. Piercing through each arch usually flattens it.
Here's a useful visual walk-through before you try the method on your own fabric:
Insertion methods for a cleaner finish
Insertion is for lace that belongs between two fabric edges. Picture a blouse front with a black lace panel, or a sleeve band where the lace needs to look built in rather than added on top. The lace works like a bridge between two cut edges.
A classic insertion method is outlined in this lace insertion tutorial. The principle is straightforward. Finish each fabric edge first, press the seam allowances under, place the lace behind or between the folded edges, then stitch close to both folds so the lace is held evenly on each side. After that, cut away the fabric behind the opening if the design needs it.
This method earns its keep on:
- blouse fronts
- yokes
- sleeve bands
- sheer sections
- children's wear where a dangling edge would catch more easily
The part that usually goes wrong is width planning. If your lace is 25 mm wide and each folded fabric edge covers 5 mm, you are not seeing the full 25 mm once sewn. Test the reveal on scraps first. A trim that looked generous on the card can read surprisingly narrow after both stitch lines are in.
Lace hems and joined rounds
Hem lace needs one extra decision. Are you applying a flat length, or joining the lace into a round before attaching it?
For a skirt or slip hem, joining the lace first often looks cleaner. Seamwork demonstrates a practical version from Seamwork's hem method. Measure the hem, add extra length for joining, sew the lace ends together, trim the join neatly, then apply the lace with a narrow zigzag close to the edge. This keeps the join controlled and stops you wrestling a trailing end at the last moment.
If the lace motif has a clear repeat, check where the join lands before sewing. On black lace, a badly matched join can show more than you expect because the eye catches interruptions in the pattern, even in a dark colour.
Corners, curves and stretch
Corners need clipping strategy. Curves need patience.
On an inward curve, do not pull the lace to make it fit. Ease it in, pin densely, and baste if the motif is open and mobile. On an outward curve, the base fabric usually needs the clipping, not the visible lace edge. Clip only the seam allowance area and keep away from any part of the motif that will show on the right side.
Stretch lace on jersey is its own job. Use a ballpoint or stretch needle if the base fabric is knit, test a narrow zigzag or a light stretch stitch, and check two things on the sample: can the seam extend without thread breakage, and does it recover without waviness? If the edge flips or tunnels, lower the presser-foot pressure if your machine allows it, or add a strip of wash-away stabiliser while sewing.
One last practical point. Keep the fibre label or product listing until the job is finished. Under UK fibre-labelling rules, trims should be described by fibre content rather than guesswork from appearance, and that matters here because synthetics, cotton mixes, and stretch laces do not all react the same way under the iron or under a tight zigzag. Construction and fibre are tied together. A stitch that behaves perfectly on a firm polyester header can chew up a softer cotton lace.
Care, Washing and Long-Term Maintenance
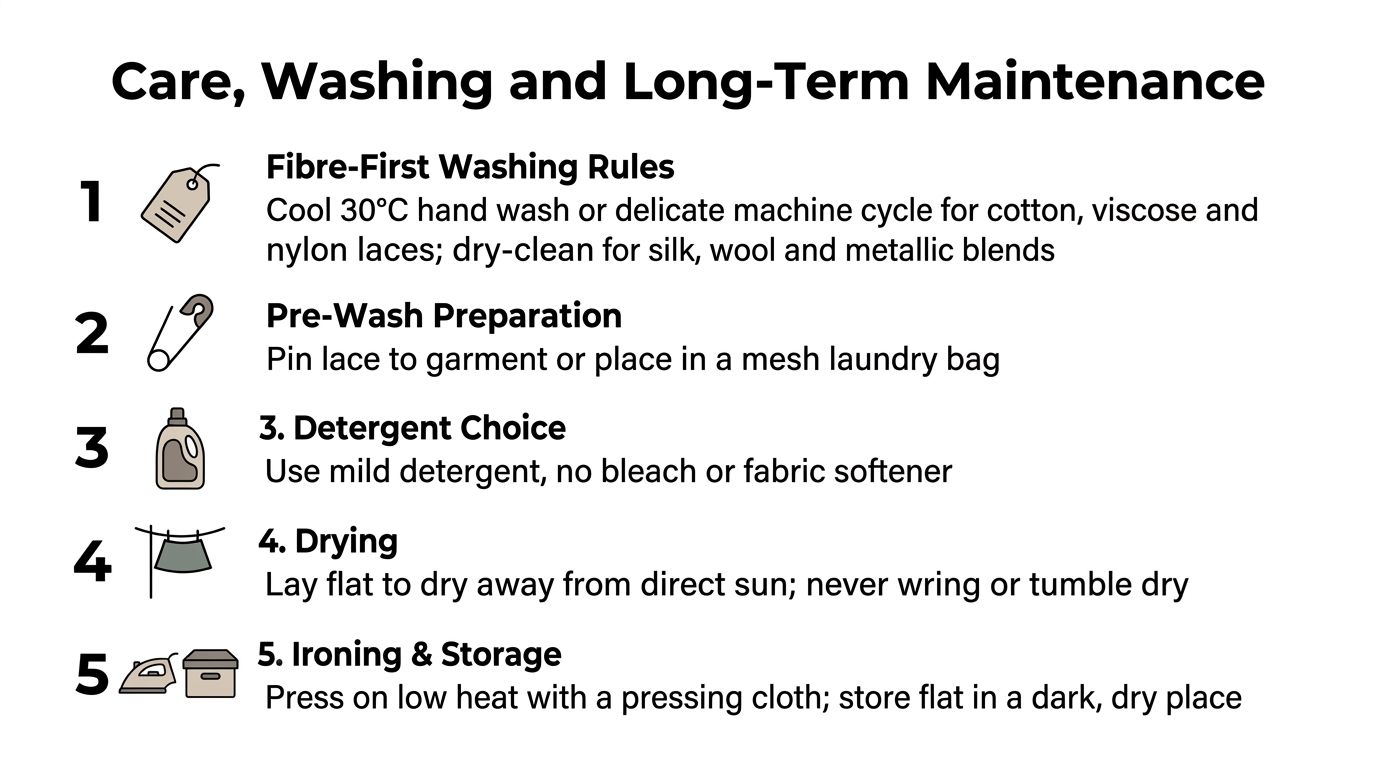
Once black lace trim is sewn in, care starts with fibre, not sentiment. If you don't know what the trim is made from, wash the finished piece cautiously until you do.
Washing without ruining the edge
For washable laces, I'd stick to a cool 30°C hand wash or delicate machine cycle if the whole garment allows it. A mesh bag helps stop snagging, especially where lace sits at a hem or neckline. Mild detergent is safer than anything aggressive.
If the trim is heavily structured, beaded, or made from fussier blend fibres, dry cleaning may be the wiser route. The aim is simple: don't ask a delicate trim to survive the kind of wash meant for towels.
A few habits help:
- Use a mesh laundry bag for machine washing
- Choose a neutral or mild detergent
- Skip harsh treatment like wringing or rough tumble drying
- Keep dark trims out of strong direct sun while drying
Pressing, storing and mending
Use a low iron and a pressing cloth. Synthetic lace can mark or distort fast under direct heat. If the trim has dimension, press from the fabric side where possible rather than flattening the lace face.
Storage matters more than many sewists think. Folding lace hard along the same line can leave a stubborn crease. Rolling is often kinder. For longer storage, tissue between layers helps stop abrasion. If there's wool in the blend, protect it from moths the way you would any other wool textile.
A lifted motif doesn't mean the garment's done for. A fine hand needle and matching polyester thread can usually tack it back quietly.
Small repairs are worth doing early. Once a loose edge catches in wear or washing, the problem gets much larger.
Sourcing Black Lace Trim in the UK
Buying black lace trim in the UK is easier than ever. Buying the right one is still where sewists lose money. The useful question isn't “Is it pretty?” It's “Will it work on my fabric, with my washing routine, and with the finish I want?”
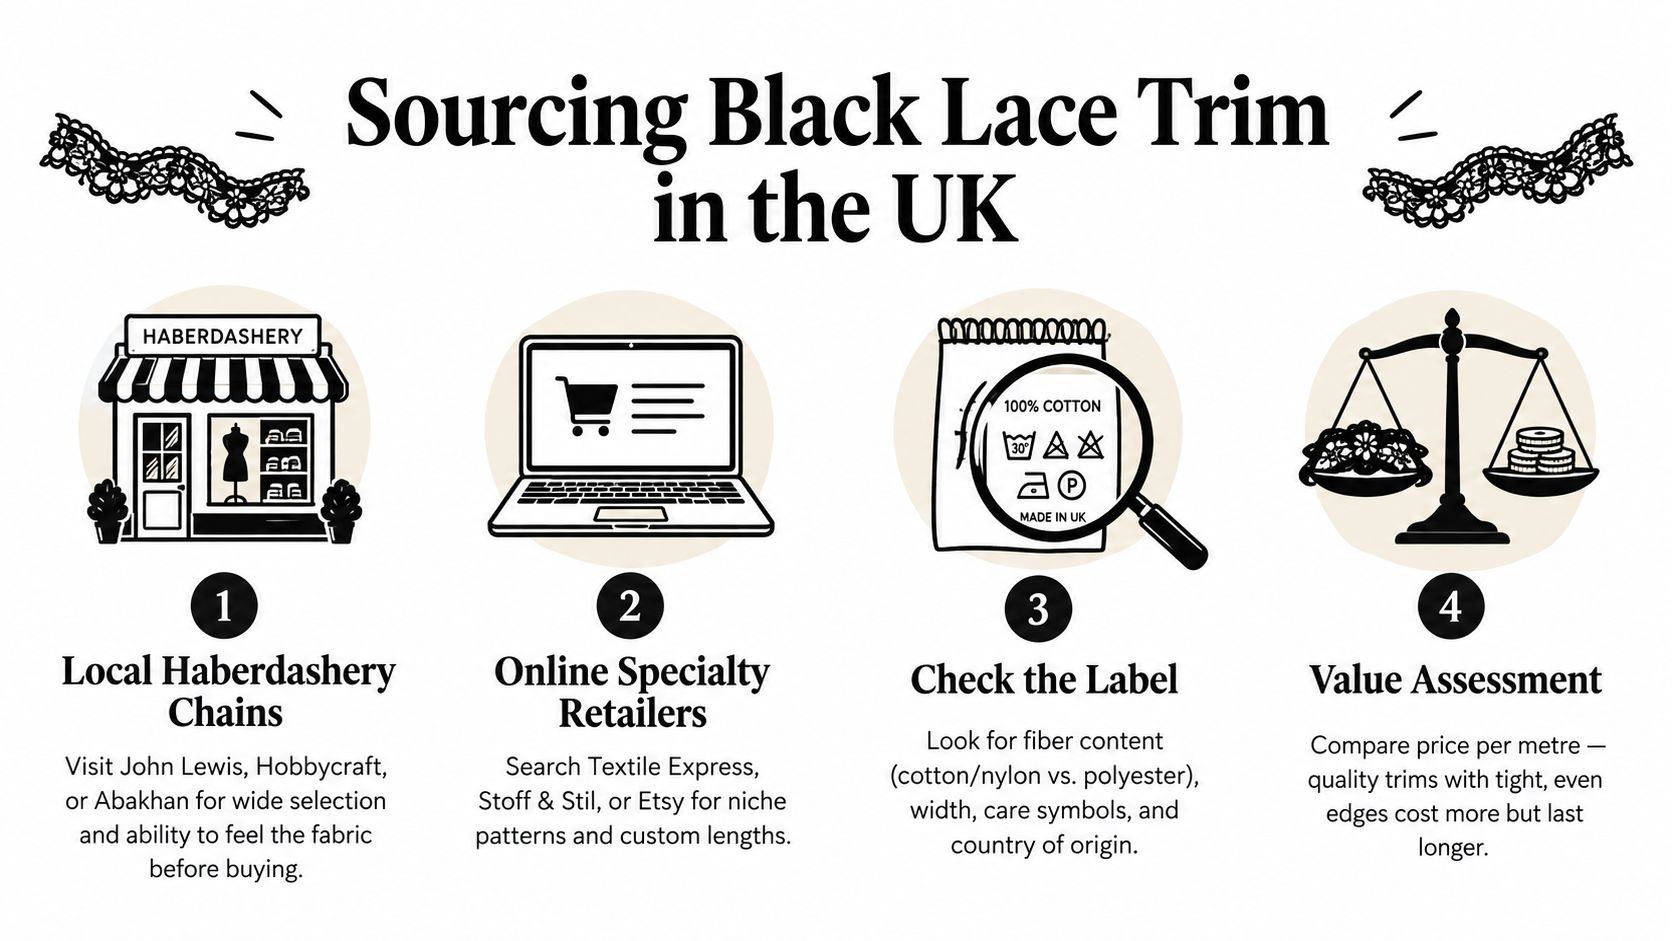
Where to look and what to ask
UK sewists usually buy from a mix of high-street haberdashery chains, independent shops, online trim sellers, marketplace listings, and dressmaking suppliers. Each has a use.
Shops let you handle the trim. That matters with black lace because softness, spring, and scratchiness don't show well in photos. Online listings often offer more widths and motifs, but you need better discipline before clicking buy.
Current UK fashion coverage has pushed lace-trim pieces into daywear, with lace being styled with denim, knits, outerwear, skirts, tights, and scarves rather than only romantic dresses in this UK fashion piece on lace-led styling. That makes practical sourcing more relevant for home sewists because the trim now turns up on garments you'll wear in ordinary weather.
A buying checklist that saves bother
Before buying, I'd check these six points:
- Fibre. If the seller can't tell you what it's made from, pause.
- Width. Measure the actual finished space on your garment, not what you think will look right.
- Stretch. Pull gently across and along the trim. Some only stretch one way.
- Edge finish. Look for a usable header edge if you want easy application.
- Motif repeat. Important if the lace will cross centre front or meet at a seam.
- Care expectation. If your garment will be machine washed, don't buy trim that obviously wants a pampered life.
If you're sewing homewares, looking at finished bedding details can help you judge how lace reads at scale. For example, if you want to see how a lace edge works on household textiles before sewing your own, you can browse embroidered bed pillow covers and study how narrow decorative edges frame a plain base.
One sensible option for sewists who want fabric and notions from the same place is More Sewing, which offers dressmaking fabrics, haberdashery, trims, and sample support in a UK sewing-shop format.
Labelling matters more than people think
If you sew for yourself, poor labelling is annoying. If you sew to sell, it can become a compliance problem. Under the UK rules mentioned earlier, trims used as decorative matter can sometimes be treated differently from the main textile content, but not always. That's why proper fibre details on listings and reels matter.
I'd also be wary of listings using romantic names without useful information. “Chantilly style”, “eyelash effect”, and “bridal lace” can describe appearance, not composition or performance. Ask direct questions and expect direct answers.
A final habit I recommend is simple. Order a small sample or the shortest available cut first when the trim is unfamiliar. Black lace trim doesn't need to be expensive to work well, but it does need to suit the actual job.
More Sewing offers the kind of practical support that helps with projects like this: dressmaking fabrics, haberdashery, trims, sample options, and sewing know-how aimed at people making real garments at home. If you're choosing fabric for a lace-edged blouse, testing pairings for insertion work, or gathering supplies for your next make, have a look at More Sewing.
