
Blog, Dressmaking, Guides
How to Calculate Fabric Yardage for Any Sewing Project
You've laid out your pattern, checked the length on the envelope and started cutting, only to discover that the last pieces won't fit. Often, the problem isn't that you misread the length. It's that your fabric is narrower than the pattern layout assumed.
Knowing how to calculate fabric yardage means checking how much usable width you have as well as how many metres you'll need. Get the layout right before you buy, and you're far less likely to run short or pay for length you don't need.
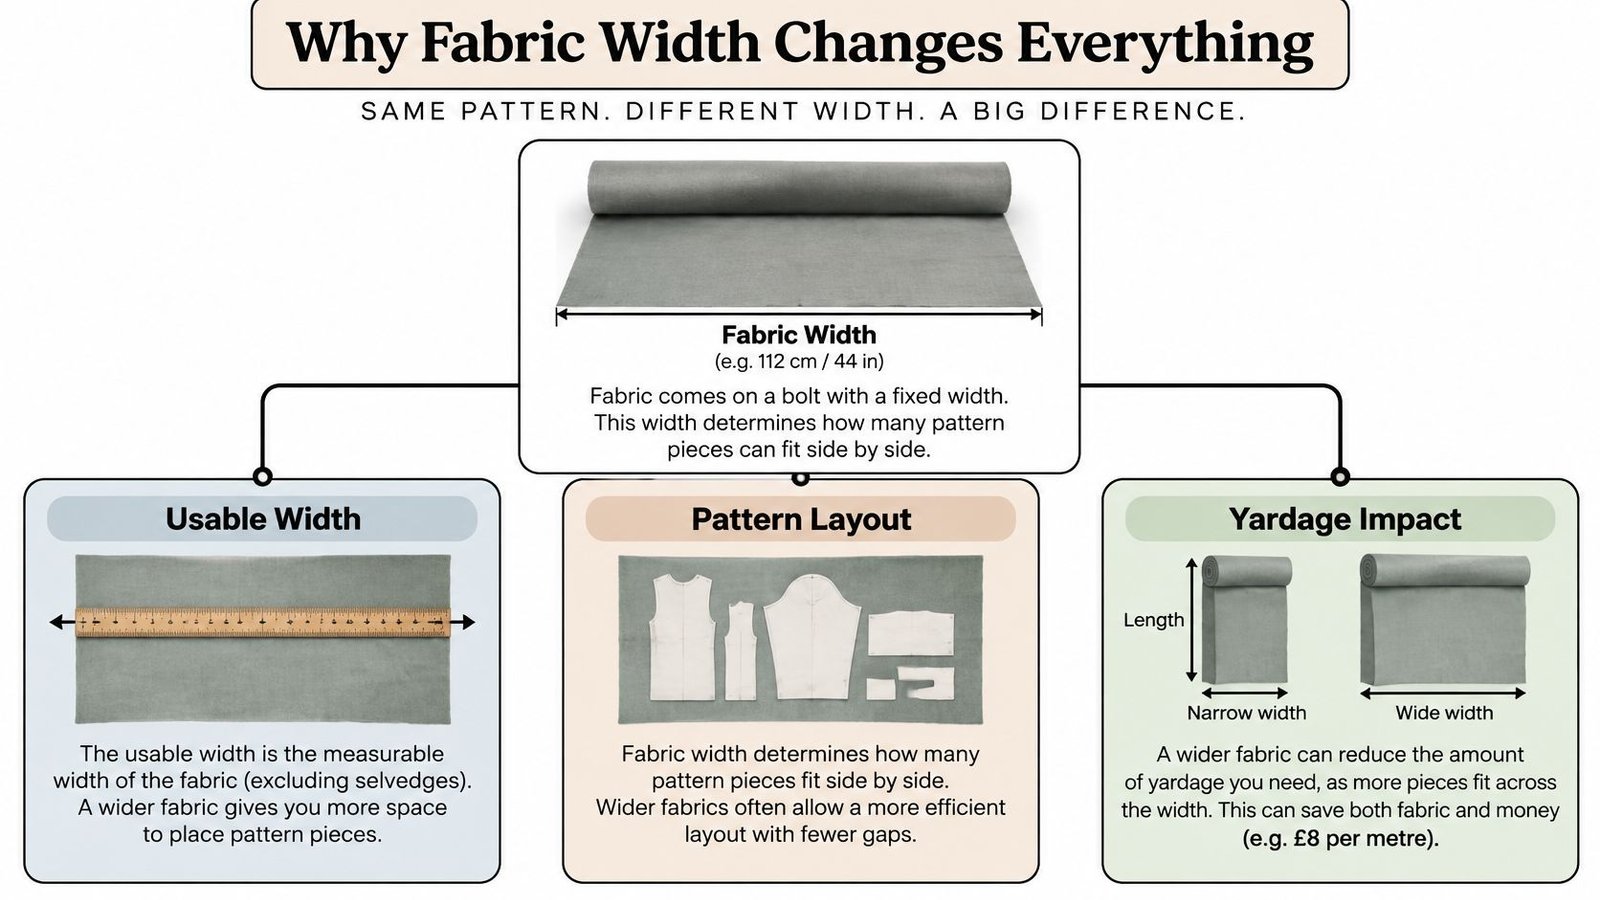
Why Fabric Width Changes Everything
A pattern calls for a certain length, and you buy exactly that much. But if you're working with narrower cloth than the pattern expects, pieces that would sit side by side may have to go one after another. The measured length hasn't changed, but the arrangement has, and your fabric requirement grows.
In the UK, a quantity such as 2 yards or 2 metres doesn't tell you the total area of cloth on its own. Width matters too. A garment that takes 2 metres on fabric that's 150 centimetres wide may need more length on fabric that's only 110 centimetres wide, because fewer pieces can fit across it. The British standard for measuring textile fabric width and length specifies that measurements are taken when the fabric is relaxed and free from tension. Pulling cloth taut while measuring can make its apparent width or length inaccurate, leaving you with less usable fabric than you calculated.
Think in usable width
The width on a product listing may include selvages, the finished edges of the fabric. Depending on the project and fabric, those edges may not be suitable for pattern pieces, so the width you can cut from may be less than the advertised width. That usable width, rather than the number on the listing, is the one to use when planning your layout.
Pattern envelopes usually give fabric requirements for specified widths. Treat the listed amount as a starting point tied to that layout, not a universal quantity for every bolt. If your fabric width differs, the pieces may need to be repacked, and the total length may change.
The practical question isn't only “How many metres?” It's “How many metres at this usable width, with these pieces arranged correctly?” Once you start with that question, the calculation becomes much more reliable.
The Basic Calculation Sequence
Use the pattern's fabric requirement as your baseline, then check whether its assumed width matches the cloth you plan to buy. For home dressmaking, a sound order is: choose the correct garment view and body size, confirm the fabric's usable width, then recreate the pattern layout with the actual pieces. UK fabrics commonly come in widths around 115 cm and 140 cm, often described using their approximate imperial equivalents, as outlined in this guide to reading sewing patterns.
A practical layout check is a little like planning where a rug will sit in a room: you need to compare the item's dimensions with the usable space, rather than relying on one measurement alone. For a separate home-layout perspective, see Giorgi Bros. Furniture rug placement advice.
Recreate the layout, don't scale blindly
- Read the pattern envelope. Choose the correct garment view and size, then note the suggested fabric length and width. Check whether the pattern gives separate requirements for different views or fabric types.
- Measure usable width. Measure the fabric relaxed, without stretching it. Account for selvages or other areas you can't use for cutting.
- Check the largest pieces. Look at the pattern pieces that need the most width or length. Mark out a rectangle representing your usable fabric, then place the pieces within it.
- Respect the markings. Keep grainlines aligned and follow fold lines and layout instructions. Don't turn a piece just to make it fit if doing so would put it off grain or go against a one-way design.
- Add the layout lengths. Work out how much fabric the complete arrangement needs, then round up to the next amount the seller offers. Allow separately for shrinkage, matching and cutting errors where they apply.
Never reduce the fabric length in direct proportion to an increase in width, or increase it by a simple width ratio and assume the result is exact. Pattern pieces don't pack evenly like identical rectangles. Recreate the layout on the width you have. The video below offers an additional visual guide to the yardage calculation process.
Adjusting for Different Fabric Widths
A pattern envelope lists its length for one specific width. Swap to a narrower bolt and pieces that sat side by side have to queue along the length instead, so the same garment can need noticeably more fabric. Most UK dressmaking cloth comes in around 115 cm or 150 cm wide, and moving between the two reshapes the whole layout. A UK fabric-width comparison shows how far the requirement can shift for identical garments:
| Garment | 150 cm width | 115 cm width |
|---|---|---|
| UK size 12 simple top | About 1.3 m | About 1.8 m (example uses 112 cm) |
| A-line skirt | About 1.1 m | About 1.5 m |
| Mid-length dress | About 2.3 m | About 3.2 m |
Treat these as planning examples rather than fixed requirements. The simple-top row uses 112 cm for the narrower cloth, so its figure will not match every bolt sold as 115 cm. Pattern size, garment shape and piece arrangement all move the number.
Use the conversion as a cross-check
A rough UK planning rule: multiply a requirement based on 150 cm-wide fabric by about 1.3 when working with 115 cm-wide cloth, then round up to the next 10 cm. A UK fabric quantity guide illustrates this with a knee-length A-line dress in UK size 16: about 2.0 m on 150 cm-wide fabric becomes about 2.6 m at 115 cm wide before rounding.
I use that rule to check whether a listed length can survive a narrower bolt before committing to buy. It cannot show how your own pieces will sit. A wide skirt panel uses width differently from a fitted bodice, and some pieces refuse narrower cloth at any length. Where the layout test and the shortcut disagree, trust the layout.
Working with Nap, Directional Fabrics and Repeats
Velvet, corduroy, brushed fabrics and one-way prints have a visible direction. If you rotate some pieces to save space, they may catch the light or appear a different shade from the others. Plan the layout so every piece faces the same way, even if that means buying more length than you'd need for a fabric that can be turned freely.
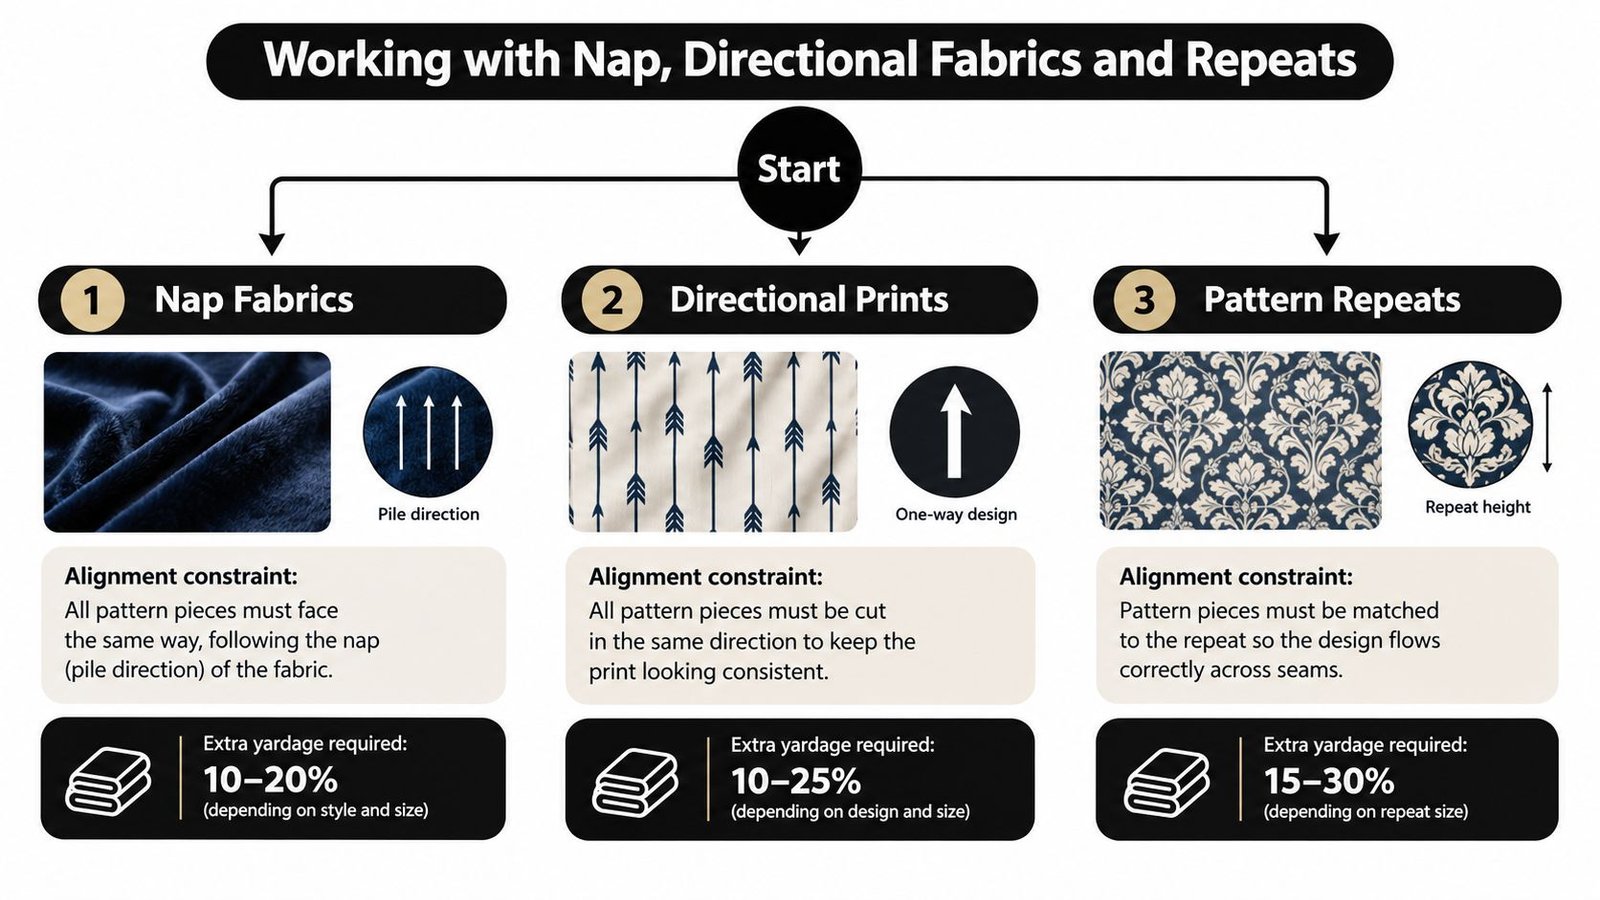
A UK guide to fabric and yardage estimates that nap or one-way designs can require 10–20% more length. For example, if a non-directional layout needs 2.5 m, a directional version may take about 2.75–3.0 m, depending on the actual layout and whether pattern matching is also needed. Treat that as an estimate to check against the pieces, not an automatic amount to add.
Read the repeat in the direction you need
Checks, stripes and large motifs add another constraint: adjoining pieces may need to meet at matching points. Ask the supplier for the vertical repeat, which measures the distance before the design repeats along the length of the fabric. Don't confuse it with the horizontal repeat across the width. The vertical repeat helps you plan how much length each piece needs; the horizontal repeat describes the spacing across the cloth.
For a simple example, if a pattern section needs 240 cm and the vertical repeat is 40 cm, 240 cm already spans a whole number of repeats. If the section needs 250 cm, round it up to 280 cm so the print can begin at a matching point. When separate pieces need to match across seams, plan each relevant cut span and allow for that alignment before ordering.
Lay out every piece in the correct direction and identify where stripes, checks or motifs should meet. Then add the matching allowance to the relevant sections and include a cutting tolerance. This takes more care than a standard layout, but it's safer than discovering after cutting that a motif can't line up across a seam.
Accounting for Shrinkage, Seams and Hem Allowances
A layout gives you a planned cutting length, but the amount you order should reflect how you'll prepare and sew the fabric. If you intend to prewash it, do that before cutting. Measure the fabric relaxed and flat rather than stretching it, since tension can make the apparent width or length unreliable.
Decide what needs extra
Account for expected shrinkage after prewashing, pattern alterations and the chance of cutting errors. Check the pattern before adding anything: seam and hem allowances may already be included in the piece shapes or specified separately. If you're lengthening a bodice, skirt or sleeve, update the layout to include that change rather than treating the original envelope amount as sufficient.
For fabric with checks, stripes, repeats or nap, a small cutting buffer helps protect against matching demands and minor layout inefficiencies. A UK dressmaking guide recommends adding a quarter to half a metre beyond the stated requirement for these situations, with the amount depending on the project and design. A plain, non-directional blouse may need only the lower end; a checked garment or large-repeat print may need the higher end because adjoining pieces must align.
Cutting rule: Add a buffer for a specific reason, such as matching a motif or accommodating an alteration. Extra length can help, but it can't fix a layout that doesn't fit the usable width.
Convert older yardage instructions
Older or imperial patterns may give requirements in yards. Under the international definition adopted in 1959, 1 yard equals exactly 0.9144 metres, and a yard contains 36 inches. The conversion formulas are:
- Metres = yards × 0.9144
- Yards = metres ÷ 0.9144
So, 3 yards converts to 2.7432 metres. If you're buying by the metre, round upward to at least 2.75 m, then consider whether the fabric needs more length for its width, pattern matching, nap, shrinkage or the seller's purchasing increments. The history and standard definition of the yard explain why a consistent conversion matters when working from imperial instructions.
Yardage isn't interchangeable with square metres unless you include the width. Three yards of 110-centimetre fabric provides approximately 3.016 square metres, while the same length at 150 centimetres wide provides approximately 4.1148 square metres, before selvage deductions. That difference is why a pattern's length requirement must be read alongside its width assumption.
Before ordering, write down the pattern's requirement, the actual usable width and any extra allowance you've added. Keeping those figures separate makes it easier to see whether you're allowing for a genuine layout constraint or adding length without checking where it will be used.
Worked Examples for Common Sewing Projects
Every project runs through the same chain: pattern requirement first, width adjustment second, fabric allowances last. The examples below show the arithmetic in that order, so you can see where each metre comes from rather than trusting a category estimate.
Dress, blouse and trousers
Take a knee-length A-line dress in UK size 16 cut from a one-way print. The pattern calls for 2.0 m on 150 cm fabric. The directional print forces every piece to face the same way, which wastes part of the layout, so allow 15% extra and the figure becomes 2.3 m. Most shops cut in 10 cm increments, which means rounding up and ordering 2.4 m. Three separate decisions, each adding length for a reason you can point to.
If that print only comes on 115 cm cloth, apply the 1.3 width conversion explained earlier before adding the nap allowance, since the narrower layout changes how the pieces fit across the fabric.
A blouse starts with the correct view and size on the pattern envelope. Check whether the sleeves, collar and facings fit beside the bodice pieces on the width you're buying. On a generous width they often do. On a narrow bolt a long sleeve can drop onto a second run of fabric, and that extra run counts as length.
For trousers, mark the grainline and the finished leg length before anything else. Lay both leg pieces across the fabric width respecting the grainline, then add any lengthening adjustment to the total. A leg piece can only rotate into an offcut if the grainline and fabric direction allow it, not because the leftover cloth is big enough.
Quilts and linings
For a quilt, work from the cutting plan rather than a pattern envelope. Arrange every required cut across the usable width and nest them before totalling the length. If the design places a motif centrally or runs a border in one direction, position those pieces first and fit the plainer cuts around them.
Calculate a lining separately from the fashion fabric. Lining often comes on a different width, and pieces that packed neatly on a wide wool may sprawl on a narrower lining cloth, so build its own layout and arrive at its own total.
Common Mistakes and How to Avoid Them
Buying extra length feels like the safest response to uncertainty, but more metres don't necessarily solve the underlying problem. If the fabric is narrower than the pattern layout assumes, pieces may need to be rearranged and the extra requirement may be substantial. Wider fabric can reduce the length needed, yet leave larger offcuts. A review of fabric-width planning makes the same practical point: width affects the layout, so extra length isn't a universal fix (fabric-width planning research).
Before buying, check for these common traps:
- Confusing repeats: Confirm whether the repeat information describes the fabric's length or width, then plan matching in the relevant direction.
- Forgetting preparation: If you're prewashing, allow for possible shrinkage before settling on a final purchase quantity.
- Ignoring the fold: Check how mirrored pattern pieces should sit on the fold, and don't place them there if the pattern layout doesn't call for it.
- Treating directional cloth as ordinary fabric: Velvet, corduroy, brushed fabrics and one-way prints may need every piece placed in the same direction.
- Buying by garment category alone: A general estimate can't account for your pattern's size, view, alterations or piece arrangement.
Check before you commit
Width-conversion estimates are useful for planning, but they can't account for every change caused by pattern alterations or large-scale designs. If you have the paper pattern, arrange the pieces within the actual usable width before cutting, keeping grainlines and fold markings in place. That check is more dependable than repeatedly adding length without confirming that the layout works.
For metric and imperial instructions, convert the units first, then round up to an amount you can purchase. Keep the width and length visible in your notes, and add a buffer only when a specific feature, such as nap or pattern matching, warrants it.
For your next project, compare the pattern's width assumption with the fabric's usable width before deciding how much to buy. More Sewing offers fabrics, haberdashery, sample swatches and ready-to-sew kits, so you can check materials and gather supplies for your project in one place.
