
You're standing at the cutting table with a beautiful length of fabric in one hand and several types of interfacing in the other. The packet suggests “medium weight”, but that doesn't tell you whether the result will feel elegant, floppy, stiff, shiny, or full of bubbles. Choosing well isn't a matter of picking the strongest support. It's about matching structure, weight, stretch, heat tolerance and drape to the fabric and the job.
The safest approach is practical: identify what the garment area needs to do, compare suitable interfacings with the fabric, and test the combination before cutting the final pieces. A small sample can reveal a poor choice long before it ruins a collar, waistband or expensive blouse front.
Understanding What Interfacing Actually Does
Interfacing is a support layer, not a substitute for lining. It sits on the wrong side of fabric and gives selected areas more body, stability and shape retention. A collar needs enough support to hold its outline. A cuff needs enough firmness to close neatly. A waistband needs reinforcement so it doesn't collapse or stretch as it's handled.
The mistake is to treat interfacing as something that should cover every piece of a garment. Most projects need it only where fabric must resist strain, retain a defined edge or support construction. Shirt collars, cuffs, facings, button plackets, pocket openings, lapels and waistbands are common examples. A soft blouse front, skirt panel or flowing sleeve may need to remain entirely unstructured.
Support the job, not the whole garment
Start by asking what the fabric must do after construction.
- Hold a crisp edge: A shirt collar or defined cuff needs controlled body.
- Resist repeated handling: Buttonholes, plackets and waistbands benefit from reinforcement.
- Keep a neckline stable: A facing can stop a bias edge from losing its intended shape.
- Preserve softness: A viscose blouse or fluid dress usually needs a lighter, more flexible solution.
A lightweight linen neckline illustrates the balance. Linen can move and distort on the bias, so a light support layer in the facing can help the neckline stay smooth without making the whole garment rigid. By contrast, a wool coat front needs more deliberate reinforcement around the button area because the fabric must retain its shape under repeated opening and closing.
Practical rule: If the fabric needs to bend, drape or stretch in a particular area, the interfacing must support that behaviour rather than fight it.
Structure and decoration are different decisions
Interfacing can also help decorative work, bags, hats and appliqué, where firmness may be more important than a natural garment hand. A firm non-woven product may be perfectly suitable for a structured accessory but feel papery in a dressmaking project.
Before choosing, mark the areas that need support on your pattern. Then consider the finished result from the outside and against the body. A collar that looks professional on the table can become uncomfortable if the support is too harsh. A waistband that feels pleasantly soft before sewing may fold or stretch if it lacks sufficient stability.
The right choice is almost invisible in the finished garment. It lets the fabric perform its intended role while giving vulnerable areas enough control to remain neat through wear.
The Three Main Interfacing Types Explained
Interfacing construction affects how it cuts, moves and responds to the fabric. The three main types are woven, non-woven and knit, and they shouldn't be treated as interchangeable.
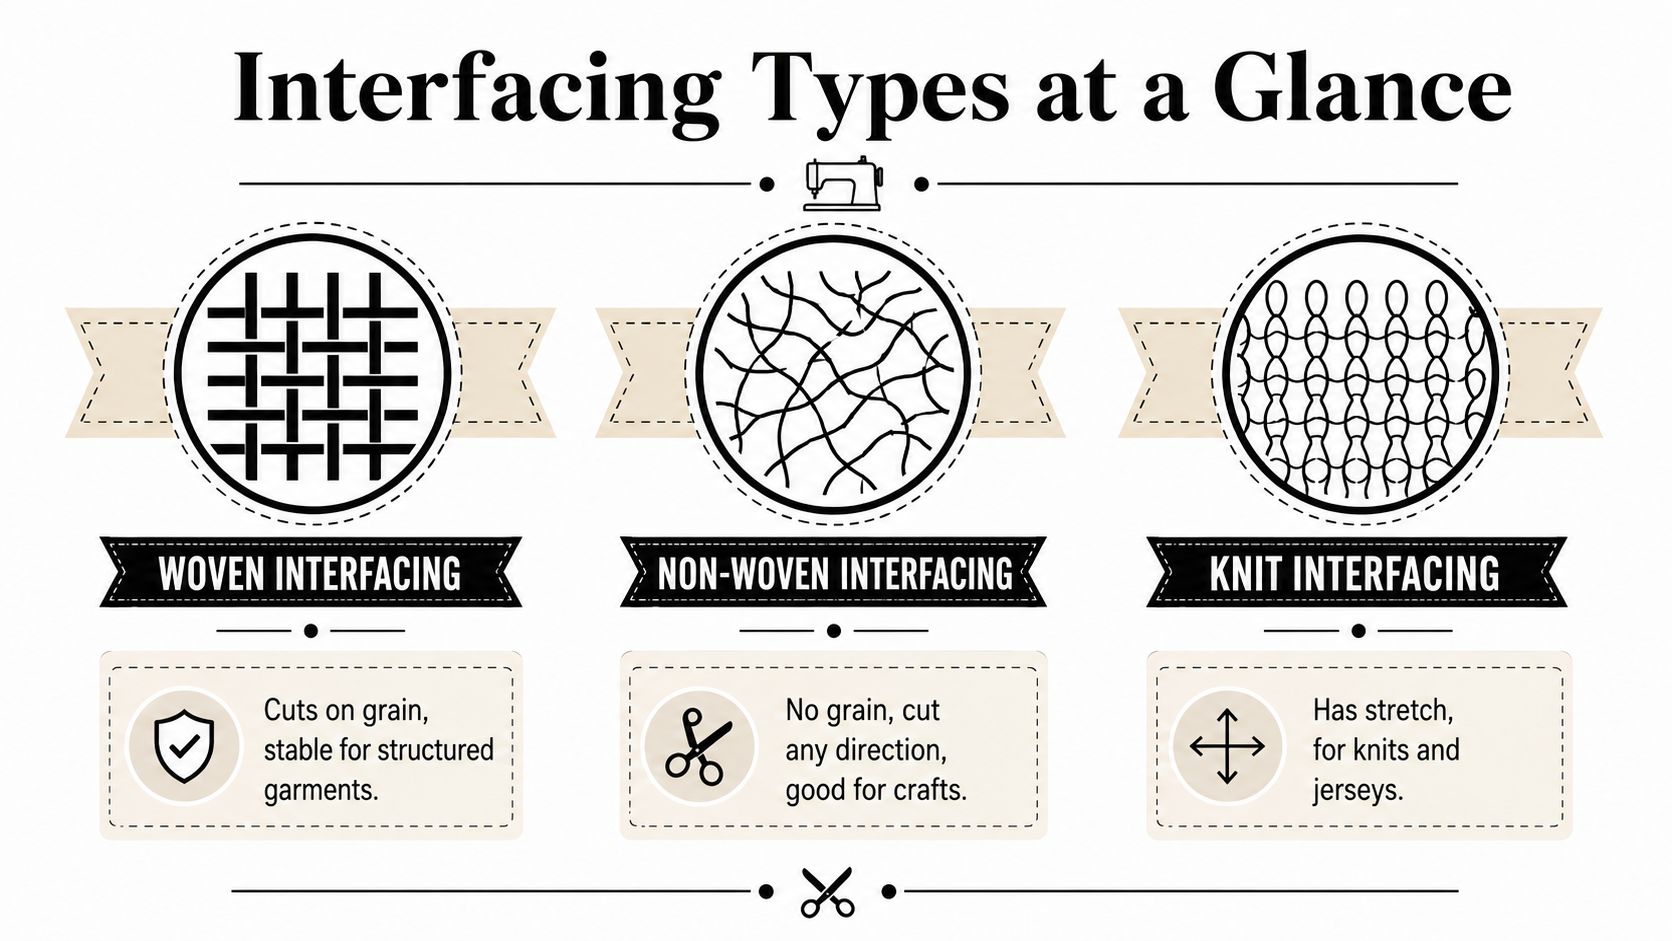
Woven interfacing
Woven interfacing has warp and weft threads, so it has a grainline and should be cut like ordinary fabric. That extra planning pays off in dressmaking because the interfacing can give a more fabric-like hand and flexible support.
Use it for woven shirts, dresses, skirts and structured pieces where the support needs to move naturally with the outer fabric. It's especially useful for a collar or facing that should feel integrated rather than paper-like. Align the interfacing grain with the garment piece grain unless the pattern or fabric-specific test indicates another arrangement.
The trade-off is waste and layout. You can't rotate woven interfacing freely in the way you can with a non-woven product, and cutting against the grain can alter how the piece hangs.
Non-woven interfacing
Non-woven interfacing has no grain, so it can be cut in any direction. It's generally firm, inexpensive and straightforward to handle, which makes it useful for beginners, craft projects, hats, bags and areas where unwanted stretch must be controlled.
It can work well when you want a decisive, stable result. A bag flap or structured accessory may benefit from its firmness. The same quality can be a problem in a soft garment, where the hand may become stiff or papery. Test it carefully before using it for a flowing blouse, fine dress fabric or a piece that must drape.
Knit interfacing
Knit interfacing is the most flexible of the three main constructions and has two-way stretch. It supports jersey and ponte while allowing the garment to retain some of its natural give.
The key is direction. The interfacing stretch should run in the same direction as the garment fabric's stretch. Used this way, it can stabilise a knit neckline, shoulder area or facing without turning the garment into a fixed woven structure. It's a poor choice where you need a crisp, immovable collar or a rigid bag panel.
For makers comparing fusible stabilisers for a particular project, this guide to choose iron on stabilizer offers useful background on the iron-on category. Always return to the fabric sample, because the same construction can behave differently at different weights.
Matching Interfacing Weight to Your Fabric
A fabric can look perfect on the bolt and fail after interfacing is applied. The wrong choice may create bubbling, reveal a firm edge through the cloth, or destroy the drape before the garment is assembled. Start with interfacing that is the same weight as the main fabric or slightly lighter, then judge the combined layers rather than the label alone. Guidance from the UK interfacing guidance also recommends checking the outer fabric, lining and interfacing together for hang, colour and care compatibility.
Weight does not predict hand by itself. A lightweight woven product may remain soft, while a non-woven product of similar weight can feel noticeably firmer. The garment's shape sets the tolerance. A crisp cotton shirt collar can accept more body than the front of a fluid viscose blouse, where stiffness will show quickly.
Use the fabric's hand as your test
Before cutting, place the candidate interfacing behind the actual fabric. Let both layers hang over an edge, fold them, and move them together. Watch the fold line and the edge. Bubbling, a papery feel, visible ridges or a sudden loss of movement indicate that the pairing is too heavy, too rigid, or poorly suited to the fabric surface.
A lightweight cotton lawn usually needs delicate support that keeps its softness. Medium-weight linen can take a stable woven option at a collar or waistband if the combined sample still bends naturally. Denim and wool can handle firmer support in shaped areas, although heavy interfacing across a broad panel may add bulk and flatten the fabric's character.
| Fabric Type | Recommended Interfacing Weight | Best Interfacing Type |
|---|---|---|
| Lightweight cottons and lawns | Same weight or slightly lighter, with a soft hand | Lightweight woven or flexible fusible |
| Medium-weight linens and viscose | Same weight or slightly lighter, selected for the required drape | Woven for natural support, knit for stretch fabrics |
| Heavier denims and wool | Similar or slightly lighter, with firmness limited to the construction need | Woven for garments, non-woven where firm structure is acceptable |
Match the result to the garment
A structured jacket may need added control at the front, lapel or pocket opening, while a loose blouse needs mobility. Apply firmer support only where the construction requires it, rather than stiffening an entire panel.
For a soft blouse facing, a light woven interfacing often gives a cleaner edge than a firm non-woven product. A stable woven option can reinforce a denim waistband and closure without adding unnecessary thickness. If the interfacing dominates the fabric in appearance or feel, reduce the weight or change construction before proceeding. A small sample can expose that failure while the project fabric is still intact.
Testing Before You Commit to Cutting
A scrap test is the cheapest way to discover that an interfacing is wrong. It's especially important when the fabric is expensive, delicate, textured or difficult to replace.
Use the actual fabric, not a similar remnant. Colour, weave, heat sensitivity and surface finish can change the result. UK guidance recommends checking the combination before cutting the final pieces and considering the fabric's fibre behaviour, pressing method and care requirements (fusible interfacing testing guidance).
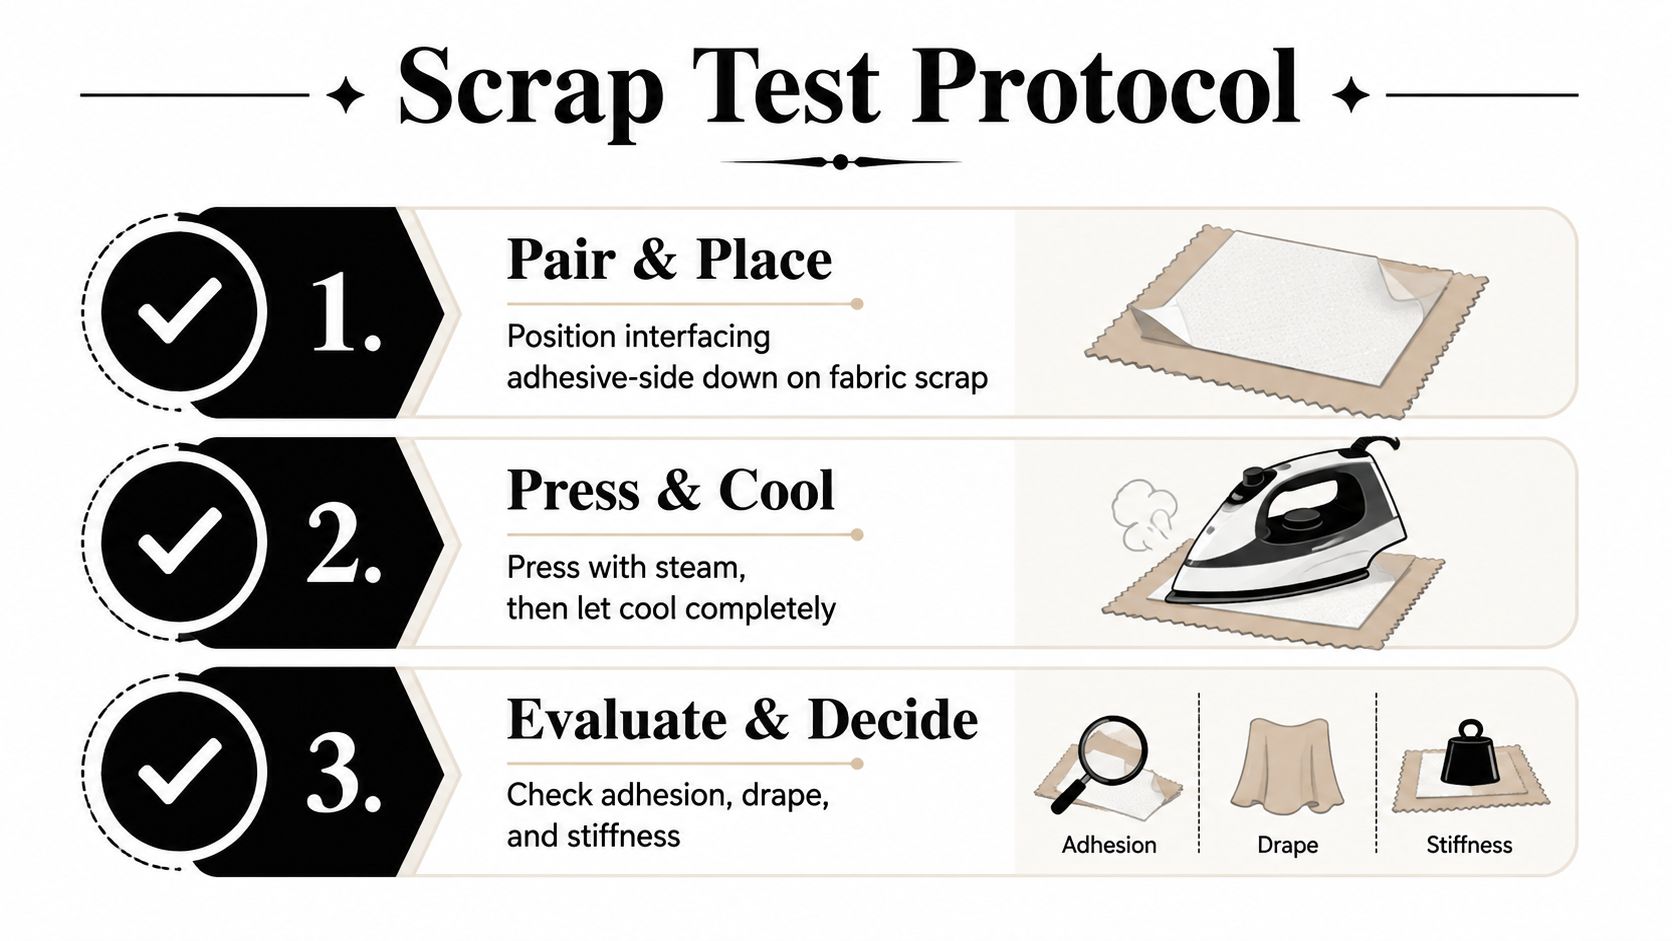
Follow a three-step sample method
Pair the fabric and interfacing at the ironing board. Place the candidate against the wrong side and check the colour through the fabric. Confirm that the adhesive side is correctly identified, then compare the layers before applying heat.
Compare structure and hand on a sample square. Fold, bend and drape the untreated and treated samples. Look for unwanted stiffness, a change in surface appearance or a loss of stretch.
Fuse or sew a test piece and assess it as a construction layer. Check whether the support stays attached, whether the edge remains smooth and whether the fabric still behaves as the finished garment requires.
The sample should cool fully before you judge it. A warm fused piece can feel different from the finished, settled combination. Test the care method too, particularly if the main fabric may shrink while the interfacing doesn't.
Prevent visible edges and later puckering
Interfacing that extends to the cut edge can peek out after construction, especially around collars, facings and curved openings. UK fabric guidance notes that it can be useful to cut interfacing slightly smaller than the garment piece, then trim and grade seam allowances after fusing to reduce bulk (interfacing weight and shrinkage guidance).
Pre-washing the main fabric can also help prevent puckering later if the fabric shrinks but the interfacing doesn't. Treat the sample and the garment fabric consistently, then inspect the bond and surface before committing to the pattern pieces.
Application Techniques for Fusible and Sew-In Interfacing
Fusible interfacing saves time, but the pressing method determines whether the result stays flat. Sliding the iron can stretch the fabric, create shine and move adhesive beyond the area that needs support.
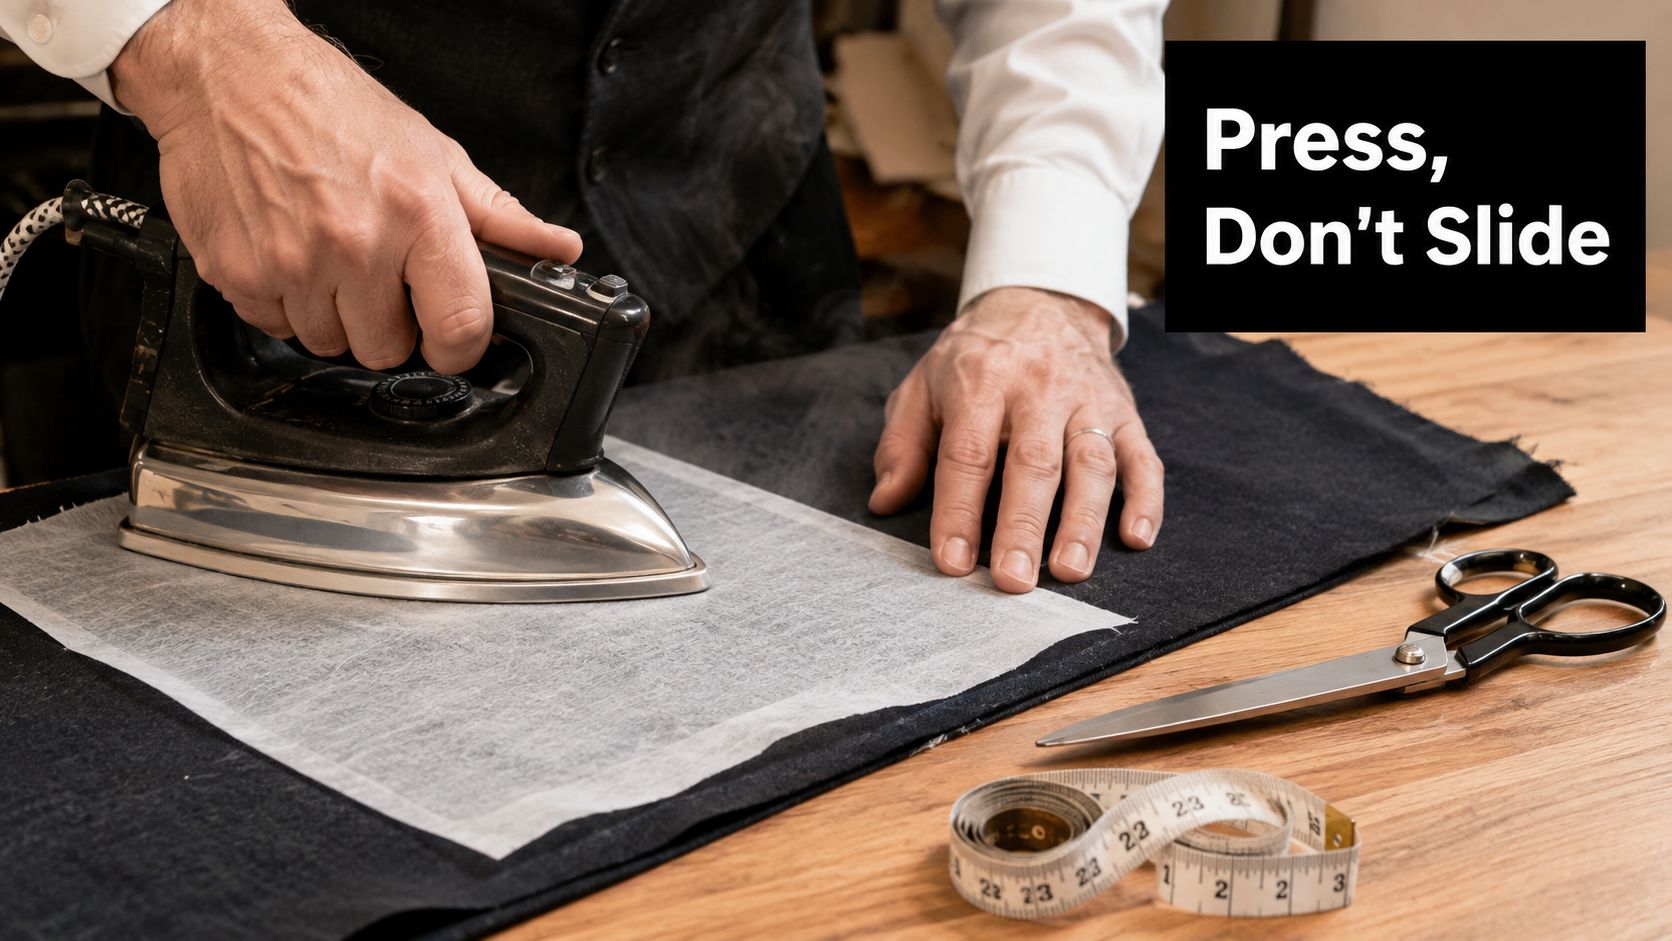
Place the adhesive side against the wrong side of the fabric, then cover the layers with a damp press cloth. Press one section at a time, holding the iron in place for about 15 seconds per section, or about 10 seconds for light fabrics. Lift the iron, move it to the next area and press again. The fusible pressing instructions should take priority if the product specifies different heat, moisture or contact times.
Steam suits some fabrics, but can distort delicate or stretch cloth. Use the product's directions, especially on fabrics that show water marks or change shape under heat. Let the fused piece cool completely on a flat surface before moving it. Warm adhesive can shift, and a layer that looks smooth while hot may settle with bubbles later.
Fusible application checks
Inspect the fabric side after cooling. Lifted areas, loose corners or an uneven surface indicate incomplete bonding. A glossy patch usually means the fabric received too much direct heat or pressure, or that the press cloth did not provide enough protection.
Test the method on a scrap from the actual project fabric before pressing a full garment section. A dark wool, crisp cotton and slippery synthetic may respond very differently to the same interfacing and iron setting. Keep a spare press cloth nearby, and remove adhesive from the iron before it transfers to another piece. For large sections, work methodically in overlapping areas, lifting the iron each time.
Sew-in interfacing is a practical choice for heat-sensitive fabrics, textured surfaces and garments that need softer movement. Baste it to the wrong side within the seam allowance where possible, or handle the interfacing and fabric as one layer during construction. It requires more preparation than a fusible, but avoids adhesive residue, shine and bonding failures.
Control bulk and stretch
After fusing or basting, trim seam allowances where the pattern permits and grade the layers so they do not form a thick ridge. On a collar, cutting the interfacing slightly inside the seam line can make turning and pressing cleaner.
For knit interfacing, keep the fabric relaxed and align the interfacing stretch with the garment's stretch. On bias sections, woven interfacing may preserve movement better than non-woven support, which can restrict the bias. These placement choices often affect the finished result more than a label such as “medium.”
Troubleshooting Common Interfacing Problems
Bubbling isn't always caused by defective interfacing. More often, the layers haven't bonded evenly, the iron has moved during pressing, or the piece has been handled before it cooled.
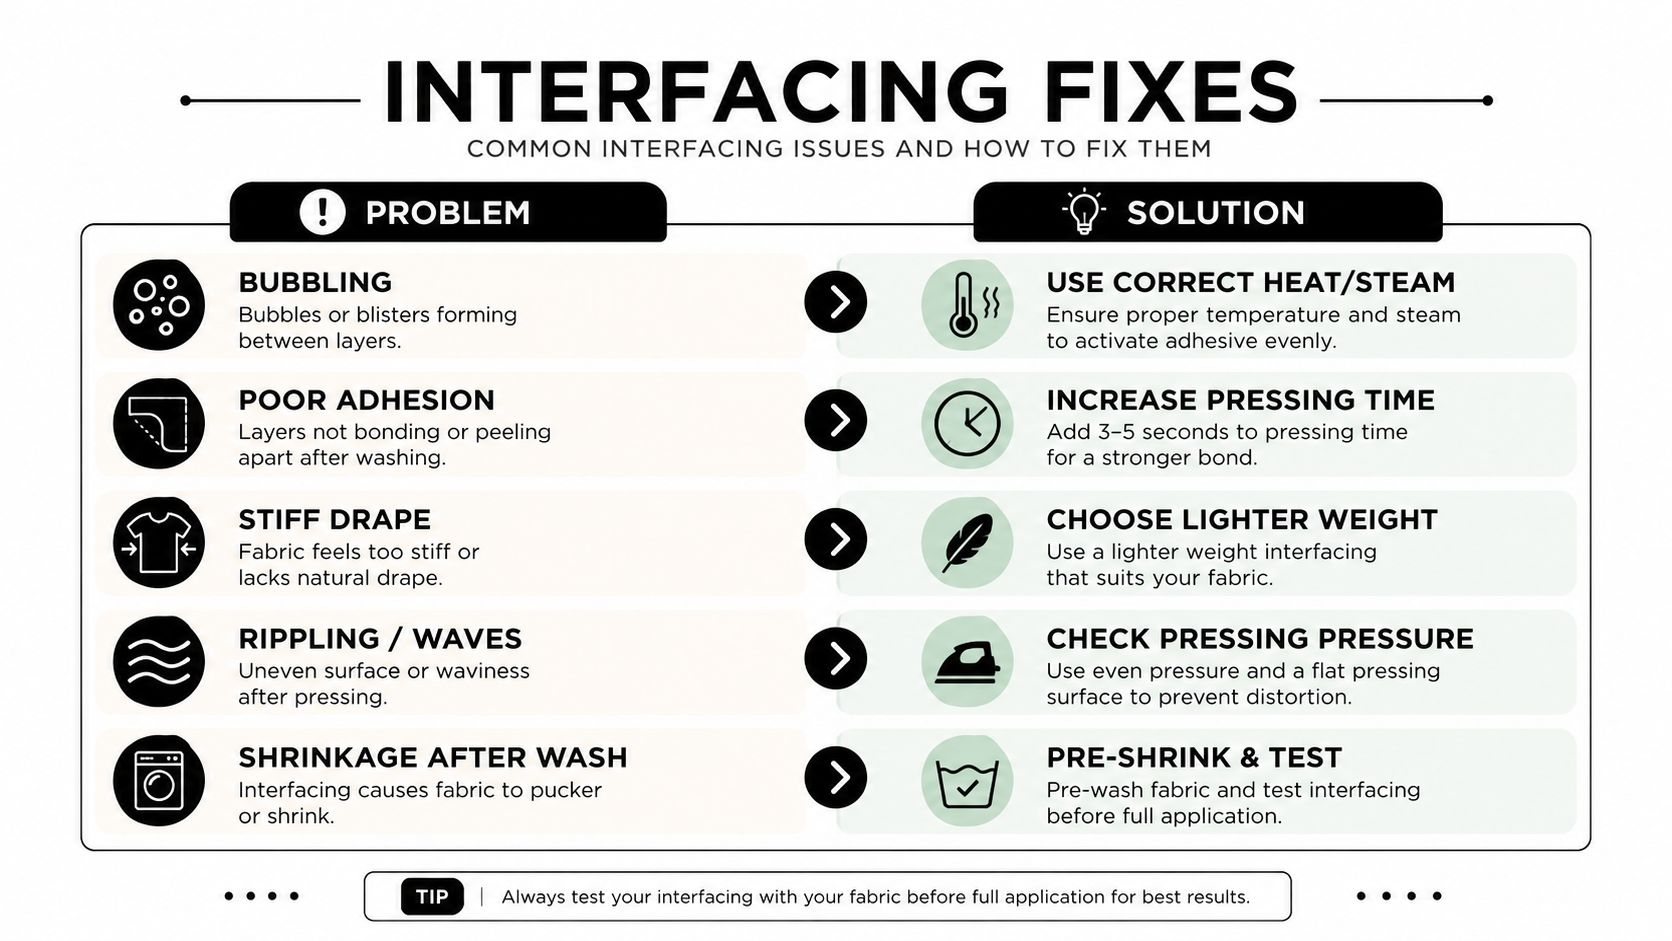
Diagnose the visible failure
- Bubbling: Re-test with a damp press cloth, firm pressure and the product's required heat. Press in sections, don't slide, and allow the piece to cool flat.
- Poor adhesion: Check that the coated side faces the fabric and that each area receives enough contact time. A sample will reveal whether the fabric's heat sensitivity prevents a reliable bond.
- Visible edges: Cut the interfacing slightly inside the garment shape where appropriate. Trim and grade the seam allowances after fusing so the support doesn't project into the finished seam.
- Unwanted stiffness: Choose a lighter weight or a more flexible construction. If a flowing fabric has lost its drape, the current combination has failed even if the adhesive is perfectly bonded.
Correct movement problems
Stretch fabrics expose mismatched interfacing quickly. A firm woven or non-woven layer can stop a jersey neckline from recovering and make the seam feel tight. Knit interfacing is the better direction when the support must move with jersey or ponte, but its stretch must run in the same direction as the garment fabric.
Bias areas need similar care. Non-woven interfacing can restrict movement because it doesn't respond like a bias-woven fabric. A woven option may preserve a more suitable relationship between the support and the garment section.
A bonded layer can still be the wrong layer. Adhesion proves that the glue worked, not that the fabric combination suits the design.
Shrinkage creates a different problem. If the outer fabric changes during washing and the interfacing doesn't, the finished area can pucker. Pre-wash the main fabric where its fibre and care requirements allow, and use the scrap test to assess how the treated combination behaves before sewing.
Quick Reference Guide for Common Projects
Use the garment area and fabric behaviour together:
- Shirt collars and cuffs: Choose a light or moderate woven support for woven shirting. Test for a crisp edge without a cardboard feel.
- Waistbands and buttonhole areas: Use stable support matched to the fabric, keeping bulk away from seam allowances.
- Jacket fronts: A woven interfacing suits a fabric-like tailored hand. Use firmer support only where the design needs it.
- Knit necklines: Choose knit interfacing and align its stretch with the garment's stretch.
- Delicate or textured fabrics: Consider sew-in interfacing if heat, adhesive or surface pressure could cause damage.
- Any project: Pair the layers, compare a sample square, apply the test, let it cool, then check drape, colour, adhesion and care compatibility.
For makers who want to compare fabric, haberdashery and interfacing options in one place, More Sewing offers dressmaking fabrics, sewing supplies and a dedicated interfacing range, including Vlieseline and Vilene products. Visit the shop with your project fabric details in hand, and use samples and product guidance to choose a support layer before cutting.
