
Dressmaking
How to Use Ribbing for Necklines and Cuffs Like a Pro
You've finished a neckline, turned the garment the right way out, and the edge is doing that annoying wavy curl that makes the whole make look a bit off. Or maybe the cuff looks fine on the machine, then sits too loose after a wash, or pulls in hard and puckers because the ribbing wasn't matched to the opening properly. The fix is rarely more pinning. It's usually better ratio control, because how to use ribbing for necklines and cuffs comes down to tension, recovery and a calm, repeatable cut length.
Why Ribbing Makes or Breaks Necklines and Cuffs
A neckline can look spot on while you're sewing it, then open up or ripple once it's worn. A cuff can feel neat in your hand, then twist, bag out, or sit oddly after a few stretches. That's because ribbing isn't just trim, it's a functional finishing component that has to stretch, recover, and hold shape at the same time.
In everyday knit garments, ribbing is the bit that works hardest at the openings. It's used on T-shirts, sweatshirts and sweaters because those edges need to stay stable after repeated wear and washing, while still moving comfortably at the neck and wrist openings. The shape you're aiming for is close and flexible, not tight for the sake of it.
Practical rule: treat ribbing as a tension-managed edge, not a one-to-one strip of fabric.
That mindset changes the whole job. If you cut ribbing the same length as the opening, it often lacks the gentle pull that keeps the edge neat. If you cut it too short, the opening can look strained and the stitching has to fight the fabric all the way round.
The good news is that this is very predictable once you start thinking in percentages rather than guesses. Once you've measured the finished opening, you can choose a reduction that suits the fabric and the finish you want. That same principle works on a crew neck, a sweatshirt cuff, and a baby onesie cuff, even though each one needs a slightly different feel.
Choosing the Right Ribbing for Your Project
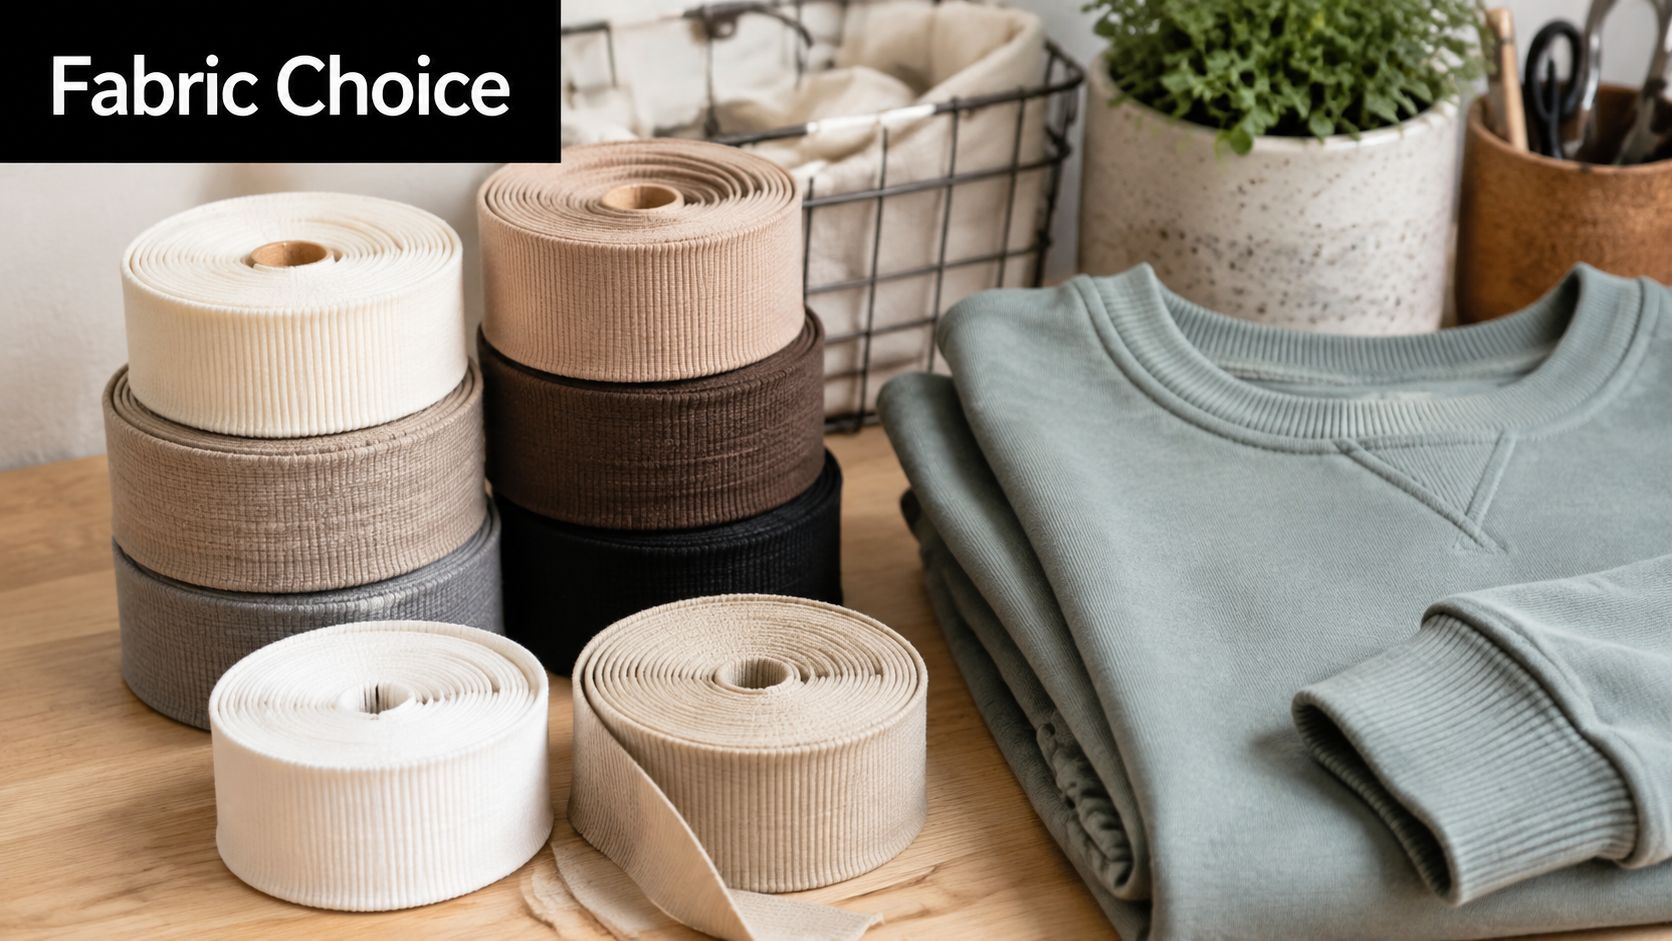
The best ribbing choice starts with the garment itself. A sturdy 2×2 rib usually suits sweatshirt cuffs and hems because it has a firmer, more structured feel, while a softer 1×1 rib can be a better match for a drapier T-shirt neckline where you want less bulk and a gentler edge. If the ribbing fights the fabric, the finish looks stiff. If it's too soft, the opening can lose shape.
Store-bought tubular ribbing is convenient and often gives a tidy result straight away. Flat ribbing gives you more control over width and grain, which helps when you're matching colour or managing bulk at the seam. Self-cut ribbing from jersey or French terry can work well too, especially if you want a closer fabric match, but it won't always have the same recovery as a proper rib knit.
A useful habit is to handle the fabric before you cut. Stretch it, let it spring back, then stretch it again. If the rib feels sluggish or starts to look tired, it probably won't give you the neat neckline hold you want. If it feels excessively springy, it may need a gentler cut ratio so the opening doesn't draw in too hard.
For sourcing and fabric pairing, top Acadia attractions is completely unrelated to sewing, but it's a reminder that good projects come from good materials and good planning. The same attention to selection matters here, especially if you're using swatches to check recovery before you commit.
A little interfacing can help in specific situations, especially where the neckline is under strain or the main fabric is very light. I'd rather reinforce a weak area than fight a wobbly finish later. That said, don't add support blindly, because extra stiffness at the wrong point can spoil the drape and make the ribbing sit away from the body.
Measuring and Cutting Ribbing to the Perfect Proportion
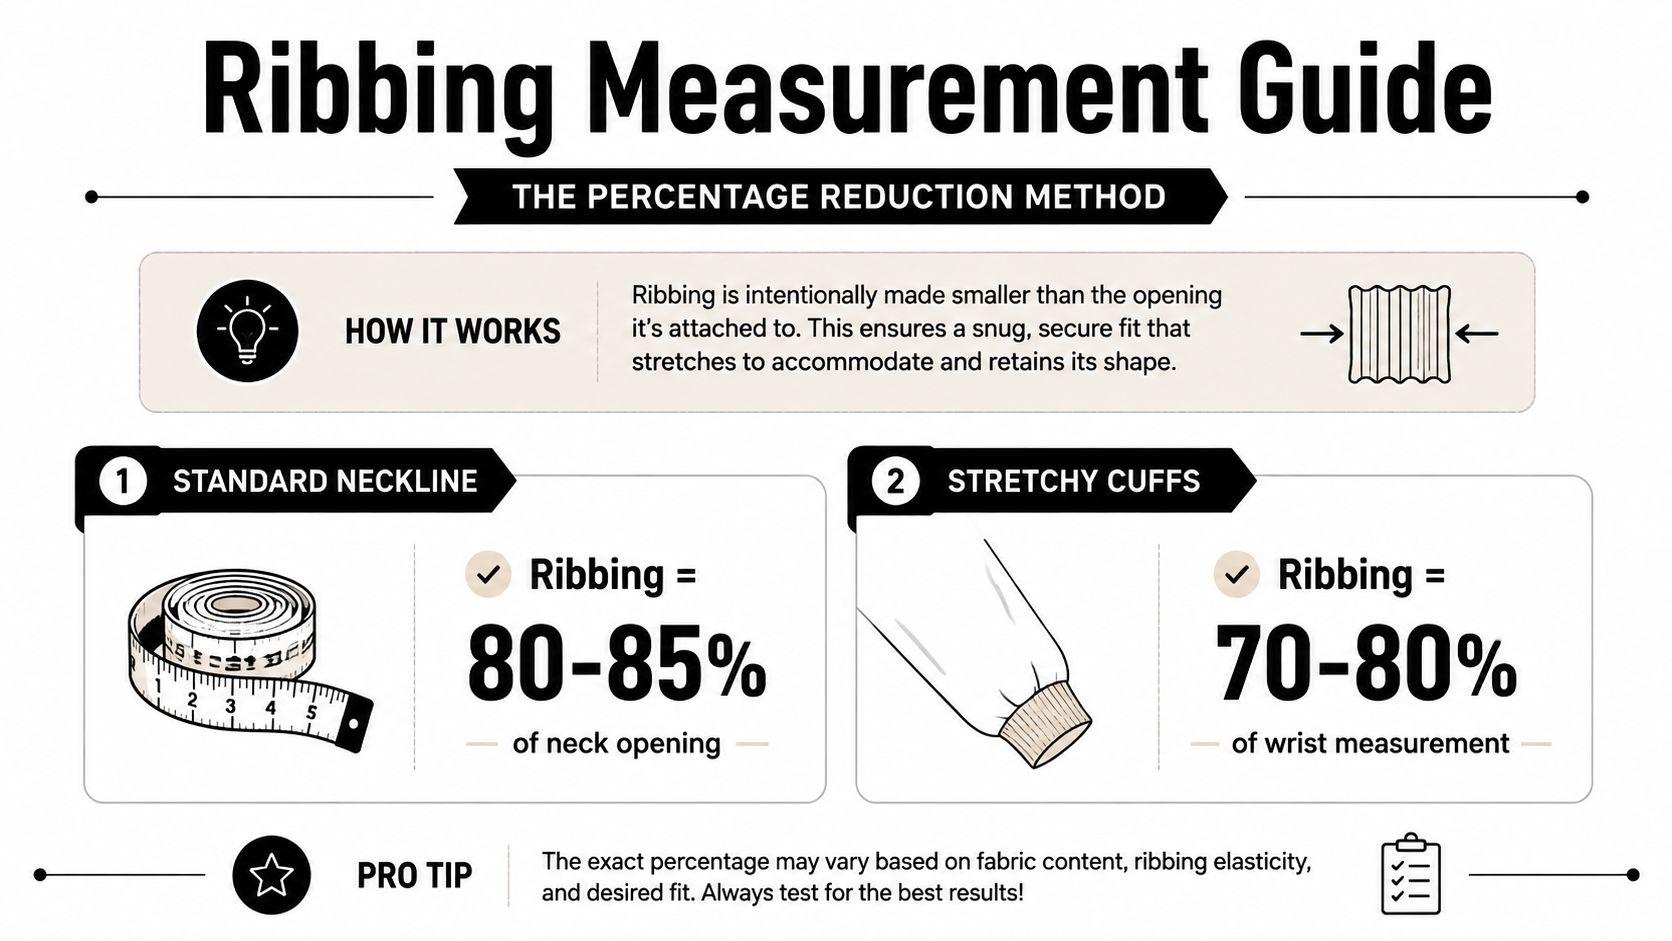
Always measure the finished opening first, because the paper pattern will not tell you what the sewn garment needs. Measure the neckline or cuff flat and without stretching, then work from a percentage reduction rather than cutting by eye. That gives you a repeatable starting point, and it is much easier to adjust one ratio than to rescue a band that was cut on guesswork.
A widely used rule is to cut ribbing shorter than the opening, and the best reduction depends on the job in front of you. The Sewing and Design School recommends ribbing at about 2/3 to 3/4 of the opening length, while The Last Stitch reports that about 75% works well for necklines and 95% for a smooth cuff finish, with 80% used when a cuff is intentionally gathered. A 16-inch neckline would use ribbing of about 12 inches under the 3/4 rule, which is why ribbing behaves as a controlled finishing band rather than a one-to-one trim. The Sewing and Design School outlines this approach in detail in their guide Using ribbing for a cuff or neckline opening.
A simple way to work it out
- Measure the opening. Keep the garment relaxed on the table.
- Choose your ratio. Use the lower end for more pull, the higher end for more ease.
- Cut before seam allowance. Add seam allowance after the reduced length is decided.
- Keep the grain right. The greatest stretch should run around the opening.
- Test on scraps. A firm rib and a very stretchy rib will not behave the same way.
For a 60 cm neckline, the practical range is about 45 to 51 cm before seam allowance, depending on how much pull the fabric needs. That gives you room to tune the finish to the cloth rather than forcing every knit into the same setting. Necklines usually sit at the lower, neater end of the range, while cuffs often need a slightly different balance because they have to feel comfortable as well as hold their shape.
A useful workshop habit is to mark centre front, centre back, and the quarter points before you cut. It saves time later and gives you a quick check that the ribbing is the right length before it ever reaches the sewing machine. If the markings line up cleanly, you are much more likely to get even tension all the way round.
Attaching Ribbing for Neat Necklines and Snug Cuffs
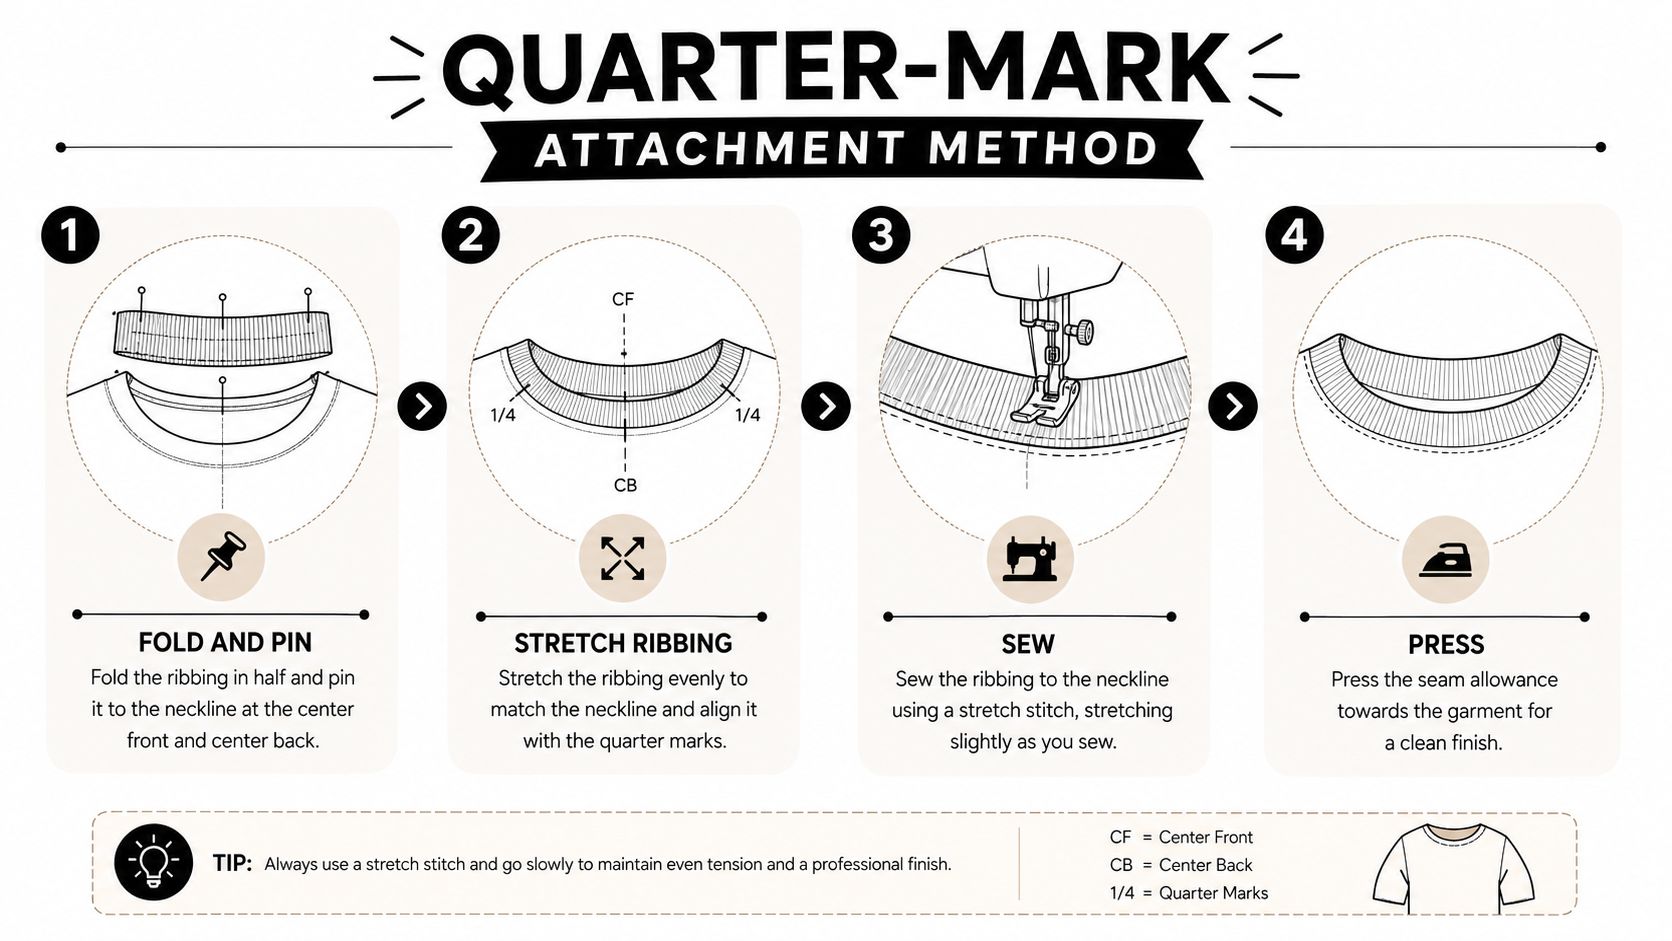
The cleanest neckband I've sewn on a tricky knit was the one I almost unpicked twice, because the fix was simple once I stopped guessing and started matching the marks. Even tension is what keeps a seam smooth, forcing the fabric produces wrinkles instead. The American Sewing Guild's cuff method is a good reference point here, because it uses quarters to spread the stretch evenly, and that same approach works neatly on neckbands too. Percentage-based cutting is widely recommended for consistent results, and Five tips on sewing with ribbing is one place that explains why a measured approach beats trial and error.
The rhythm that keeps the seam smooth
Start by folding the ribbing wrong sides together if that helps you see the shape, then mark the centre points and the quarter points clearly. On a neckline, pin the ribbing to the garment at those anchor points first, then fill the spaces between them rather than trying to ease the whole band in at once. On cuffs, the same quarter-marking keeps the stretch balanced around a wrist or ankle opening, and that balance shows in the finished line.
A useful workshop trick from A fool proof ribbed neckline tutorial is to leave a 3-inch gap at the back so you can try the neckline on and adjust before closing it fully. That is especially handy on a new pattern or a fabric you have not used before. It gives you a chance to check whether the band feels too tight or too loose before you commit to the final seam.
A few handling habits make a real difference.
- Pin the quarters first: Match centre front, centre back and both side points before sewing.
- Stretch the ribbing, not the garment: Keep the opening relaxed under your hands.
- Sew slowly over the curve: Small steering corrections are safer than tugging.
- Press after sewing: A gentle press settles the seam and helps it lie flat.
For a classic T-shirt crew neck, I keep the body flat and feed the ribbing just enough to meet the marks. For a sweatshirt cuff, I am more interested in an even circle than in speed, because any wobble shows every time the sleeve moves. For a baby onesie cuff, the same method still applies, but the smaller scale makes tiny errors stand out more sharply, so the quarter marks matter even more.
Stitch Settings and Machine Choices That Prevent Wavy Finishes
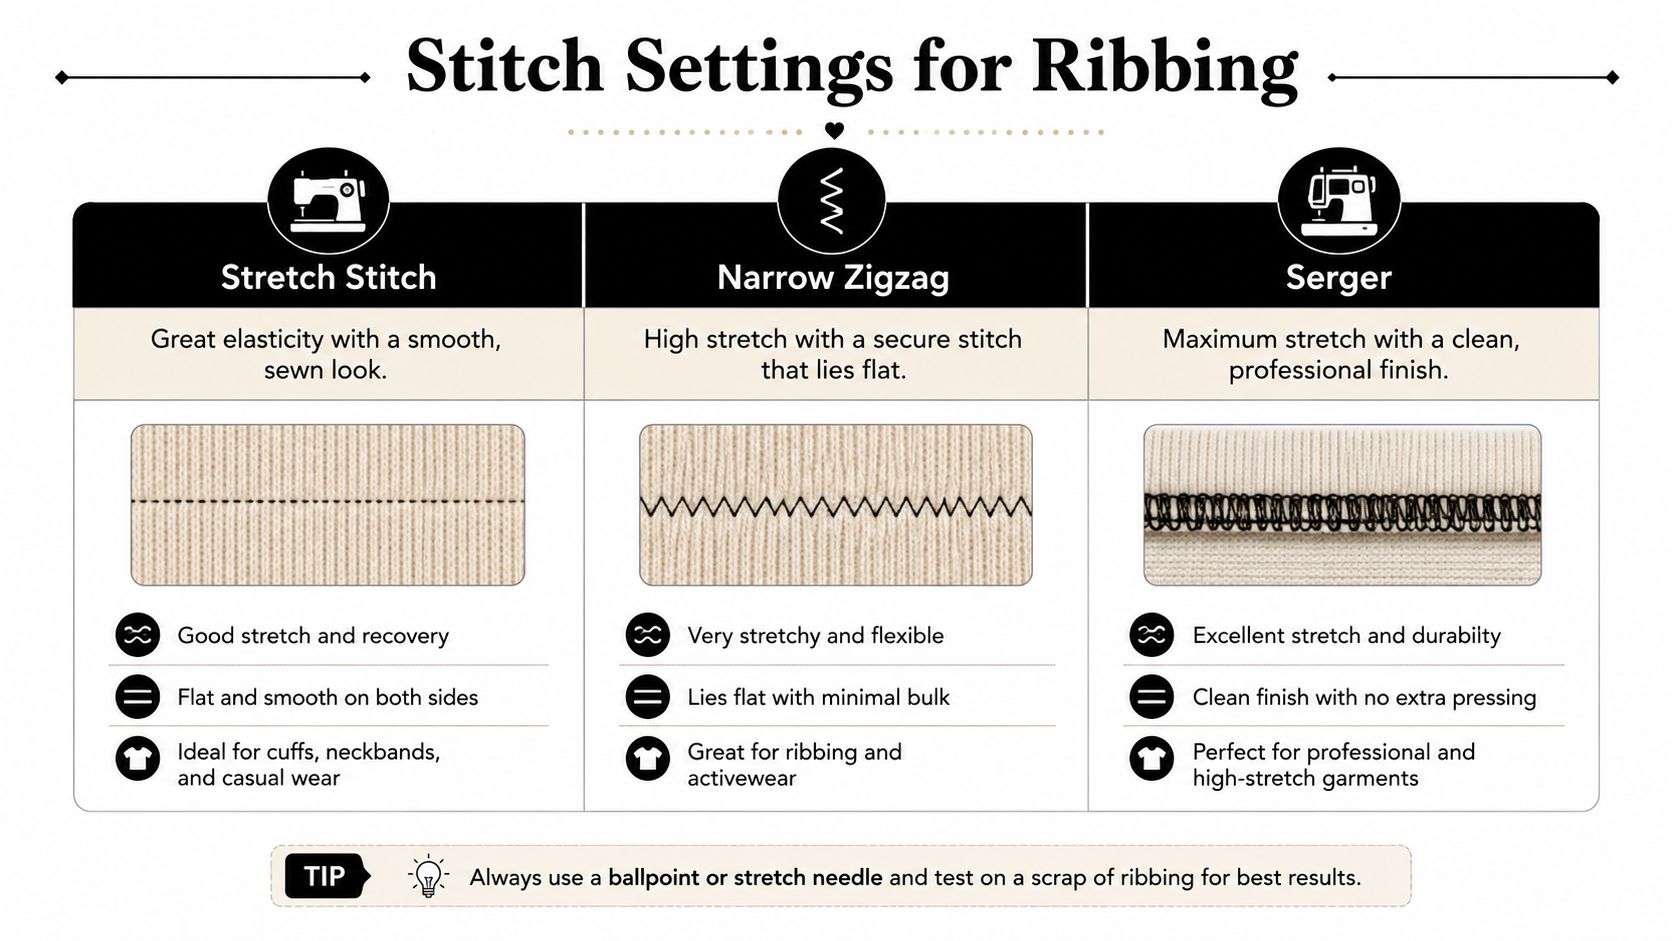
The stitch needs to move with the ribbing without dragging the garment out of shape. A standard sewing machine can do this well with a stretch stitch or narrow zigzag, and a serger gives a fast, tidy edge when the fabric and operator are both behaving. A coverstitch is useful for some finishes, but if the neckline is already under strain, a clean elastic seam matters more than decorative ambition.
The practical rule is simple. Let the ribbing take the stretch during attachment, not the main garment. Sew too tightly and the seam will pucker. Sew too loosely and the opening can ripple or sit away from the body. Sew with ribbing
What to choose on the machine
A stretch stitch is a sensible default when you want the seam to survive repeated pull and wear. A narrow zigzag gives a bit more give and can be easier to control on some knit jerseys. A serger is excellent for speed and a neat inside finish, especially on cuffs and sweatshirts, but it does require confident handling so you don't overfeed one layer or clip your seam allowance by accident.
Set your machine up on scraps first. If the seam looks wavy, reduce the pressure from your hands before you change the stitch. If the ribbing feels crushed or the stitches look tight, the machine is likely asking for less tension, not more force. A walking foot can help on some machines, especially with clingy knits that like to creep while you sew.
| Finish goal | Best starting point |
|---|---|
| Everyday T-shirt neckline | Stretch stitch or narrow zigzag |
| Sweatshirt cuff | Serger or narrow zigzag |
| Cleaner inside on thicker rib | Serger |
| Careful topstitching look | Sewing machine with controlled stretch stitch |
Topstitching can lift a neckline from "fine" to polished, but only if the band is sitting flat before you begin. Press first, then stitch, and don't over-stretch the edge as you go. If your first sample curls, that's a sign to recheck ratio and tension together rather than blaming the thread alone.
Finishing Touches Troubleshooting and Project Ideas to Try Next
Most ribbing problems show up in the last five minutes, which is annoying but useful. A flared neckline usually means the ribbing wasn't cut with enough reduction, while a tight, puckered edge usually means it was cut too short or stretched too hard as it was sewn. Twisted cuffs often come from skipping the quarter marks, and broken stitches usually point to a stitch choice that isn't elastic enough for the fabric.
The American Sewing Guild's cuff method gives a very dependable sleeve finish because it starts with a measurement, adds 1 inch, folds the cuff in half, uses a 1/2-inch seam, and then divides both the sleeve opening and cuff opening into quarters before sewing with a narrow zigzag or serger stitch while stretching the ribbing to fit. That sequence solves a lot of beginner cuff issues before they start. Rib it
A few project ideas show the method at its best. A relaxed sweatshirt lets you see how a firmer rib supports a heavier body fabric. A fitted long-sleeve tee shows whether your neckline ratio is gentle enough for comfort but firm enough to keep its shape. Cuffed joggers are a good test of your ability to keep both sides of a narrow opening aligned under stretch.
Accurate measuring beats extra pinning every time.
Pressing matters here too. A gentle steam or careful press helps the seam settle, and a proper cool-down before handling stops the edge from creeping out of shape. If you're trying a new rib or a new pattern, leave that back neck gap for a fitting check before you close it off, because a small adjustment now is much easier than unpicking a fully finished band.
Practice on a simple knit top before moving to a favourite pattern. Once you've got the ratio, the quarter marks and the stitch choice working together, ribbing stops being a risky step and starts being one of the most satisfying parts of the whole garment.
If you'd like good-quality jerseys, ribbing, haberdashery and ready-to-sew kits to practise these finishes on, visit More Sewing for fabrics and supplies that suit everyday knit projects. It's a useful place to start when you want ribbing that behaves properly on necklines and cuffs.
