
Fabric
How to Sew and Care for Flannel Fabric: Expert Guide 2026
You've probably done it already. You spot a bolt of flannel in a colour or plaid you love, run your hand across that brushed surface, and immediately start planning winter pyjamas, a shirt you'll wear on repeat, or the softest baby blanket in the house.
Then the sensible part of your brain kicks in. Flannel frays. Flannel shrinks. Flannel can pucker, shift, and come out of the wash looking nothing like the neat garment you imagined at the cutting table.
That nervousness is justified, but it shouldn't put you off. Flannel is one of the most rewarding fabrics to sew when you handle it on its own terms. A few habits make all the difference: proper pre-washing, careful nap management, the right stitch length, and seam finishes that can cope with a loose weave. Once you understand those, flannel stops feeling temperamental and starts feeling dependable.
This is how to sew and care for flannel fabric in a way that works in real life, not just in theory. We'll deal with the first wash, the first cut, the machine settings, and the long-term care that keeps your makes soft and wearable for years.
Embracing the Cosiness of Flannel
You bring home a length of flannel for winter pyjamas or a soft overshirt, smooth it across the table, and it already feels like a finished favourite. That immediate comfort is part of its appeal, but flannel rewards sewists who treat it as more than just a cosy surface. The brushed face, the slight loft, the soft weave, and sometimes a directional nap all affect how it should be handled from the moment it comes off the bolt.
That is why flannel suits so many useful projects. It works beautifully for pyjama bottoms, relaxed shirts, simple dresses, baby clothes, blankets, and quilt backs. If you are choosing a quality washed wood flannel fabric, you can feel the difference straight away, but its true test is how well it keeps its shape, softness, and colour after repeated washing.
Dressmakers keep coming back to flannel because it gives warmth without the rigid feel of heavier winter fabrics. It presses well, feels kind against the skin, and makes everyday garments feel more generous to wear. I also like that even a plain pattern can look finished in flannel because the brushed surface softens lines and gives the fabric quiet depth.
Flannel does ask for better judgement than many beginners expect.
A brushed cotton flannel shirt, for example, may look straightforward on the hanger, but the success of that shirt often depends on decisions made before the first seam. Bulk can build up at collars and cuffs. Plaids need patient matching. Nap can make two pieces cut from the same fabric reflect light differently. Fabric from the centre of a bulk bolt can behave slightly differently from the outer layers once washed, which is why experienced sewists do not stop at “pre-wash it” and call the job done.
That gap between basic advice and reliable results is where many flannel projects go wrong. A good outcome depends on recognising what sort of flannel you have, how loosely or firmly it is woven, whether the surface has a clear nap, and how much body it keeps after laundering. Those details determine everything that follows, from layout and cutting to seam finish and long-term care.
The common frustrations are real. Edges can fray early. Seams can pucker if the stitch is too short or the fabric is pushed through the machine. A garment that looked generous before washing can feel noticeably tighter after. None of that means flannel is fussy by nature. It means flannel responds best to steady handling, accurate preparation, and a few habits that professional sewists use without much thought.
Once we approach it that way, flannel becomes one of the most dependable fabrics in the sewing room. It is soft, practical, hard-working, and worth the extra care.
The First Steps Before You Cut
A flannel project usually succeeds or fails before the scissors touch the cloth. I have seen a shirt sew up beautifully, only to come out of the first wash with shorter sleeves, a tighter collar, and plaids that no longer meet. Good preparation prevents that, and with flannel, the details matter.
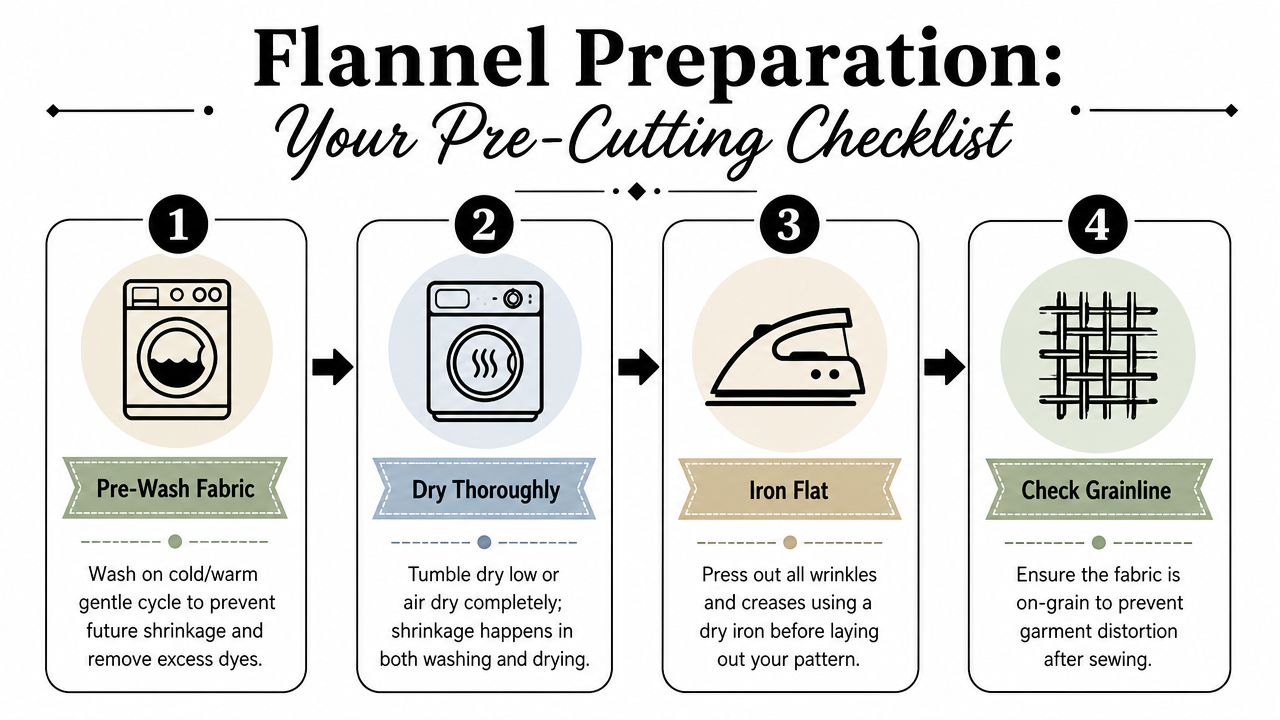
Pre-wash for the life the garment will actually have
Treat the fabric now the way the finished piece will be treated later. If the garment is going into a home washer and dryer, the yardage should go through that same routine before cutting. That is how we deal with shrinkage while the fabric is still one forgiving piece, rather than after it has become a fitted collar, cuff, or waistband.
Creative Rehab's flannel sewing guide notes that flannel can shrink noticeably on the first wash, which is why warm washing and machine drying before cutting are standard practice.
My preferred prep order
- Wash the fabric in warm water with a mild detergent.
- Dry it the way you plan to dry the finished item, ideally all the way through.
- Press it flat once dry, paying attention to fold lines, selvedges, and any twisted areas.
- Let it cool on the table before layout if it has come straight from the dryer.
That last step helps more than people expect. Warm flannel can relax and shift slightly as it cools, especially if it has come from the middle of a tightly wound bolt.
If you are choosing yardage for soft, comfort-led projects, studying a fabric such as washed wood flannel fabric can help you spot the brushed surface, drape, and thickness that affect both prep and sewing.
Large cuts need even washing, not just washing
A two-metre cut is simple to manage. A long length for matching pyjamas, quilt backing, or several shirts takes more care.
The main problem is uneven treatment. If the fabric is packed too tightly into the machine, parts of it stay compressed, some areas dry faster than others, and the whole piece can come out with a slight twist or ripple. That is enough to throw off grain and matching later.
For larger lengths, I use these habits:
- Do not overload the washer. Split the fabric into manageable lengths if needed.
- Keep the wash cycle gentle. Heavy agitation can rough up the surface and encourage twisting.
- Dry thoroughly but evenly. Stop once or twice to shake the fabric out if it has bunched.
- Press before measuring or laying out. Flannel often looks flatter than it really is until steam and pressure settle it.
This is the difference between generic pre-washing advice and professional prep. We are not just rinsing the fabric. We are trying to make the whole length behave consistently from one end to the other.
Practical rule: Pre-washing flannel is part of construction, not a separate chore.
A useful demonstration of handling and prep can help if you like seeing fabric behaviour before cutting:
Check the nap before you place a single pattern piece
Flannel often has a brushed face that reflects light differently depending on direction. Two pieces cut from the same cloth can look like slightly different colours if one runs against the nap. This shows up most clearly on shirts, robes, pyjama sets, and anything with large fronts or sleeves.
I do not rely on sight alone here. Some flannels have a subtle nap that only becomes obvious under daylight or after pressing. A quick hand test is more dependable.
Use this rub-and-roll check:
- Pinch one cut edge between finger and thumb.
- Brush the surface lightly in both directions.
- Notice which way feels smoother and which way feels a little fuller or rougher.
- Mark the nap direction with chalk or a small piece of tape before you start layout.
Keep every visible piece running the same way. That includes pockets, collars, cuffs, facings, and plackets. It uses a bit more fabric, but it prevents that patchy light-and-dark effect that makes an otherwise careful garment look off.
Cutting and Marking Flannel with Confidence
You lay out a shirt front, cut carefully, and still end up with a pocket that looks a shade different from the body or two pieces that refuse to match at the notches. That usually starts at the cutting table, not at the machine. Flannel rewards a slower, flatter, more deliberate approach.
I cut flannel as if it wants to wander, because it often does. The brushed surface creates drag, the layers can creep against each other, and a piece that looks square on the table can shift just enough to cause trouble later.
Rotary cutter or shears
For most flannel, a rotary cutter, self-healing mat, and pattern weights give the cleanest result. Keeping the fabric flat matters. The less we lift and reposition it, the less chance we give it to stretch out of shape or slide off grain.
Dressmaking shears still earn their place on the table. I use them for enclosed corners, small trimming jobs, and any area where I want to feel the cut inch by inch. For long outer edges such as trouser legs, robe fronts, facings, or straight quilt pieces, rotary cutting is usually more accurate.
A few workroom habits make a real difference:
- Use more weights than you think you need. Flannel often shifts first at the edges and corners.
- Cut in a single layer when nap, plaid matching, print placement, or garment symmetry matters.
- Pin inside the seam allowance only if you need pins at all, so any distortion stays off the finished garment.
- Let the fabric rest flat before cutting if you have just unfolded it from the bolt or the wash. That helps the cloth settle before you commit.
Cut for accuracy, not speed
Flannel can grow slightly under your hands during layout, especially on longer pieces. Sleeves, pyjama legs, and robe fronts are common trouble spots. If one layer is even a little off, the mismatch shows up later at the side seam, cuff, or hem.
This is also where nap discipline pays off. A careful layout is not just about getting the right shape. It is how we keep the garment looking even in colour and texture once it is sewn. I would rather spend an extra few minutes checking grain, pairings, and piece direction than try to force a stubborn seam to match after the fact.
If an edge is rippling on the cutting table, it will usually behave worse once it reaches the machine.
For bulky flannel from a fresh bolt, I often cut the largest pieces first and leave collars, cuffs, waistbands, and pocket pieces until last. That keeps small sections from being buried under shifting yardage, and it lets me adjust placement if the fabric relaxes a little while I work.
Mark with tools that suit the surface
Some marking tools sit nicely on flannel. Others drag in the nap or disappear into the brushed face. The best choices are usually the low-tech ones that leave a clear mark without pressing too hard into the cloth.
| Tool | Best use | Why it suits flannel |
|---|---|---|
| Chalk liner | Dart legs, placement marks, fold lines | Slides over the surface without pulling fibres |
| Tailor's tacks | Precise transfer points | Stays accurate even when the nap hides surface marks |
| Dressmaker's chalk | Hem guides, notches, large marks | Visible, gentle on the fabric, and easy to refresh |
I avoid aggressive tracing wheels on soft flannel, especially lightweight shirting flannels and finer brushed cottons. They can catch in the surface and leave marks that are less exact than they first appear.
For notches, make a tiny clip inside the seam allowance only if the allowance is wide enough to spare it. Keep those snips shallow. Flannel can fray along cut edges, so deep clips create weakness we do not need. On finer projects, tailor's tacks are slower but often worth it.
One last habit helps more than many sewists expect. After marking, stack matching pieces together and confirm they still mirror each other before anything leaves the table. That simple check catches a surprising number of cutting mistakes while they are still easy to fix.
Your Machine Settings for Sewing Flannel
You sit down to sew a soft flannel shirt, the first few stitches look tidy, and then the seam starts to ripple. The fabric is not misbehaving for no reason. Flannel has loft, a brushed surface, and a bit more drag under the presser foot than plain cotton, so the machine needs a slightly calmer setup from the start.
I usually begin with a longer stitch length, around 2.8 to 3.0 mm. That gives the fibres room to settle instead of packing them into a tight, puckered line. On many flannels, a Universal 80/12 or 90/14 needle works well. I choose 80/12 for lighter shirting flannel and 90/14 once the fabric feels denser, layered, or heavily brushed. Pair that with all-purpose polyester thread for a dependable seam that can handle regular wear and washing.
Feed matters as much as the needle.
If the layers creep apart, fit a walking foot. I reach for one early on collars, cuffs, button bands, and blanket hems because it keeps the top layer from arriving at the end longer than the bottom. On a standard presser foot, reduce pressure slightly if your machine allows it. Too much pressure can flatten the nap and push the fabric ahead of the needle.
Recommended flannel sewing settings
| Item | Recommendation | Why It Works |
|---|---|---|
| Needle | Universal 80/12 to 90/14 | Matches most flannel weights without punching an oversized hole |
| Thread | All-purpose polyester | Holds up well and keeps tension balanced on everyday projects |
| Stitch length | Approximately 2.8 to 3.0 mm | Helps the seam lie flat instead of drawing up |
| Presser foot | Walking foot if available | Keeps brushed layers feeding together more evenly |
| Presser foot pressure | Slightly reduced, if adjustable | Prevents drag and compression on lofty surfaces |
| Seam allowance | At least 1cm (3/8") where the pattern allows | Gives fray-prone edges enough fabric to stay stable |
A quick test saves more frustration than any gadget. Stitch on two layers first, then fold the same scrap into four layers and sew again. That second test tells you whether your machine will still behave at a cuff seam, pocket edge, or waistband join.
Watch for these signs while testing:
- Puckering means the stitch is often too short, the tension is a little tight, or the presser foot pressure is too high.
- Skipped stitches usually point to the wrong needle size, a slightly damaged needle, or a nap-heavy surface that needs a sharper fresh point.
- Layer shifting means the feed needs help, either from a walking foot, hand basting, or slower stitching.
- Tunnelling on topstitching usually improves with a longer stitch and gentler handling at the iron later.
I do not sew flannel fast unless the seam is long and simple. A steady pace gives the feed dogs time to move both layers together, and it lets you correct drift before it becomes visible. Support the weight of the fabric on the table as it enters and leaves the machine. If the yardage hangs off the edge, gravity can stretch the seam line slightly while you sew.
For pyjama bottoms, I keep the stitch length near 3.0 mm and support the inseam well so the leg does not twist while stitching. For a classic flannel shirt, I often baste collar pieces, pocket placement, and plackets before machine sewing because brushed fabric can shift a fraction and still throw off the finish. For a receiving blanket, I use the same slightly longer stitch for edge stitching so the border stays soft rather than tightening into a ropey edge.
Good machine settings help, but they cannot correct fabric that was not prepared properly or seams that are pulled through the machine. Care habits matter later too. If you sew custom pieces or gifts, these tips for custom apparel care are useful for handling common wear-and-laundering problems after the project is finished.
Professional Seam Finishes and Pressing Techniques
A flannel garment can look charming on the outside and still wear out early if the inside is neglected. Raw edges matter more with this fabric because the weave is loose and the cut edges can start shedding quickly.
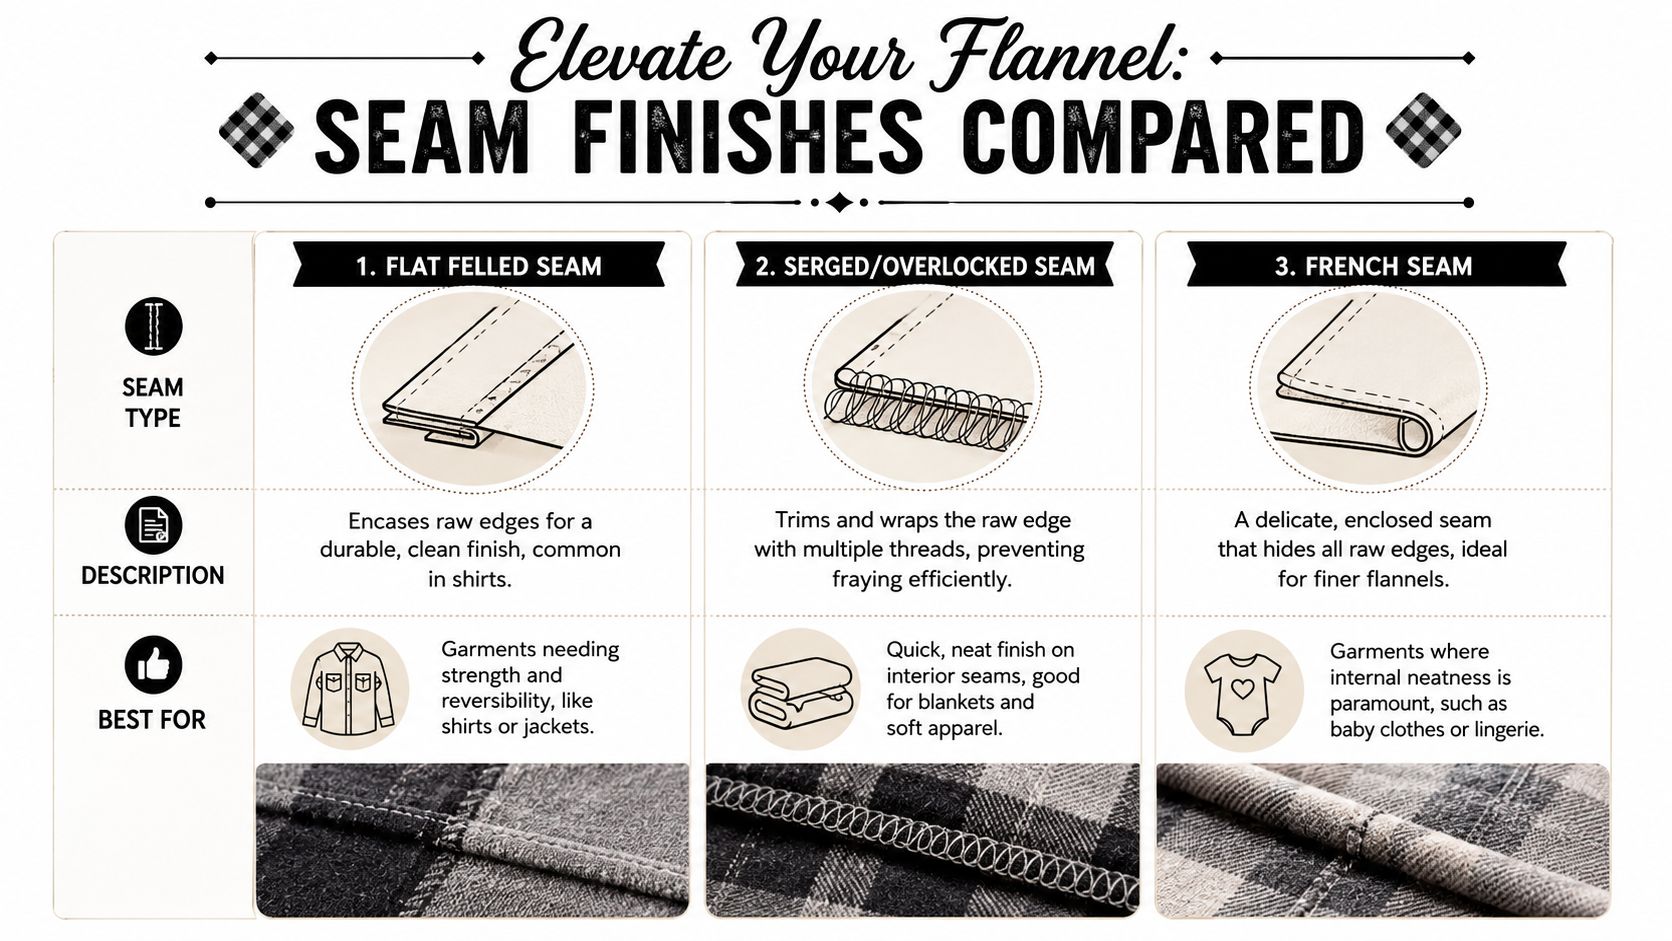
Choose a finish that suits the garment
Not every project needs the same interior finish. A baby blanket and a workshirt don't ask the same things of a seam.
- Overlocked seams work well for speed and neatness. They're practical for loungewear, casual separates, and many everyday projects.
- Zig-zag finishes are perfectly respectable on a standard machine if you want to stabilise raw edges without extra equipment.
- Flat-felled seams are excellent for shirts, overshirts, and pieces that need strength and a tidy inside.
- French seams suit finer flannels and garments where you want enclosed edges without an overlocker.
If I'm sewing a shirt that will be washed often, I lean towards flat-felled seams. If I'm making pyjama bottoms, I'm happy with overlocked or zig-zagged allowances pressed to one side.
Good seam finishes don't just make flannel look nicer. They stop the inside of the garment slowly unravelling in the wash.
Press for shape, not for shine
Flannel doesn't want the same hard, sharp press you might use on shirting cotton. Too much pressure or heat can flatten the brushed surface and leave it looking tired.
I press seams in stages:
- Press the seam flat first to set the stitching.
- Then press open or to one side, depending on the seam finish.
- Use a pressing cloth if the flannel feels delicate or if the colour is deep enough to show pressure marks.
Steam can help, but don't swamp the fabric. A gentler approach preserves the nap better. If you've ever scorched or over-pressed a garment and want broader tips for custom apparel care, that guide is useful for avoiding marks that can spoil finished pieces.
Seam direction choices
For bulky intersections, pressing one seam open can reduce thickness. For side seams and trouser seams, pressing to one side often gives more structure. For curves and enclosed details, trimming and grading become more important because flannel can build bulk quickly.
A handmade flannel garment looks polished when the inside supports the outside. That's the difference between something that feels homemade in the best sense, and something that looks hurried.
Keeping Your Flannel Garments Soft and Cosy
The true test of a flannel garment comes after the first wash. You pull out a shirt or pair of pyjama bottoms you spent time fitting and sewing, and the fabric tells you straight away whether the care routine suits it. Good flannel should relax, soften, and keep its brushed character. Poor washing habits flatten the nap, encourage pilling, and can leave the cloth feeling dry.
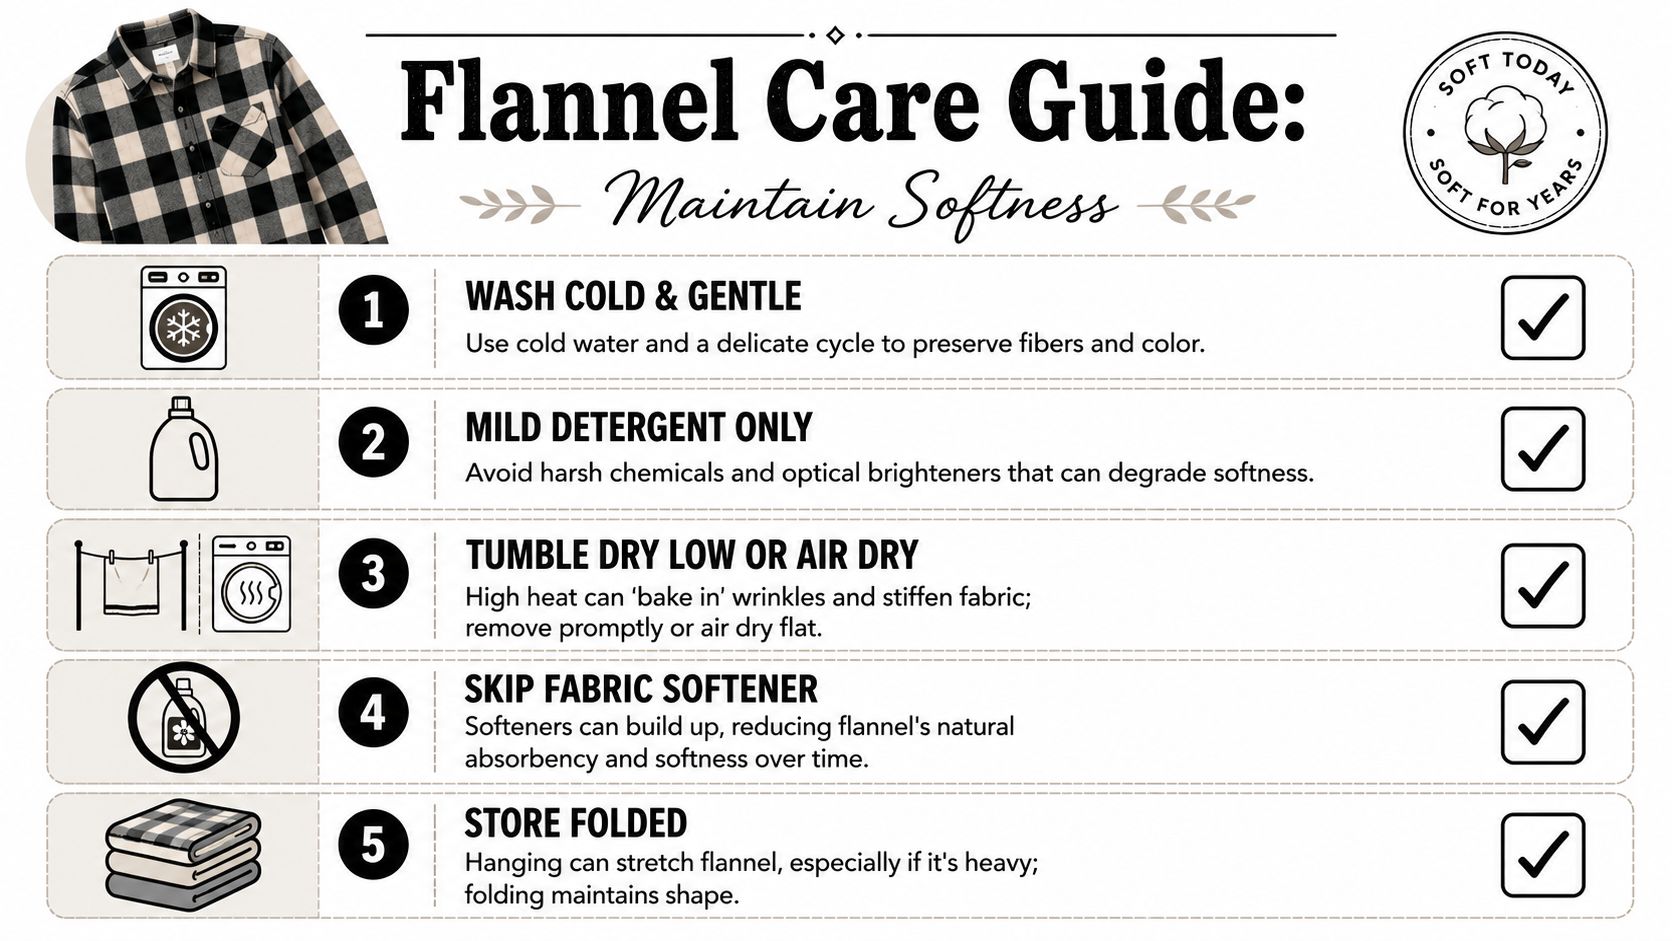
Wash with the fabric's finish in mind
Flannel often does get softer with use and washing, but only if we avoid stripping or crushing the brushed surface. That is the difference between routine care and professional care. The goal is not only to get it clean. The goal is to keep the hand soft, the colour steady, and the nap intact.
For most cotton flannel garments, that means a calm wash routine:
- Turn the garment inside out to protect the face fabric from abrasion.
- Wash in cool or cold water to reduce shrinkage and fibre stress.
- Use a mild detergent that rinses clean.
- Keep the load light so the fabric is not scrubbed hard against zips, towels, or heavy seams.
- Skip bleach and fabric softener because both can leave flannel feeling harsher over time.
I often recommend a small amount of white vinegar in the rinse cycle if a garment starts to feel stiff from detergent residue. It helps clear the fibres without coating them, which is exactly what flannel responds to well.
The biggest wear problems usually start in the machine
Pilling is rarely a mystery. It usually comes from friction, crowding, and heat.
Lower-grade flannel pills faster because the fibre ends work loose more easily, but even beautiful flannel will look tired if it is spun hard in an overfilled washer. If you have gone to the trouble of preshrinking yardage properly before cutting, it makes sense to carry that same discipline into garment care. Bulk shrinkage, surface abrasion, and nap wear all continue after the sewing is done.
That long-term view matters. A garment that survives fifty washes well was usually cared for gently from wash one.
Drying is where many flannel garments lose their best qualities
Air-drying keeps the fabric loftier and softer for longer. I prefer to reshape shirts, gowns, and children's clothes while damp, smooth the seams with my hands, and let them finish drying naturally. That simple step reduces twisting and helps the garment settle back into shape without another heavy press.
If a dryer is necessary, use the lowest heat you can and take the garment out while it is still slightly damp. Then hang or lay it flat to finish drying.
| Care step | Best practice | Why |
|---|---|---|
| Washing | Cool or cold, gentle cycle | Reduces shrinkage, fading, and surface wear |
| Detergent | Mild, low-residue formula | Keeps the brushed finish from feeling coated or dry |
| Rinse aid | Small amount of white vinegar | Helps remove soap buildup |
| Drying | Air-dry when possible | Preserves softness and the raised nap |
| If using dryer | Low heat, remove while damp | Limits pilling and hardening |
Cotton and wool flannel do not want the same routine
Cotton flannel is usually straightforward to wash at home, though it still benefits from restraint. Wool flannel needs more caution. Some wool flannels are washable, but many are better refreshed between wears and cleaned less often. Always check the fibre content and care label before you assume one rule fits every flannel in the cupboard.
Storage matters too. Heavy flannel can grow on the hanger, especially in dresses, lined overshirts, and anything cut on a long vertical line. Fold shirts, pyjamas, and lighter pieces if you want to avoid shoulder bumps and stretching.
A well-made flannel garment should become more comfortable with wear, not less. Good sewing gets it started. Good care is what keeps that cosy, brushed finish alive.
If you're ready for your next cosy project, More Sewing is a reliable place to browse quality dressmaking fabrics, haberdashery, swatches, and beginner-friendly kits. It's especially useful when you want to compare textures, choose better-quality cloth, and start with supplies that make flannel easier to sew well.
