
Dressmaking, Guides
How to Sew Buttons by Hand That Stay Put
A button never falls off at a convenient time. It goes just as you're leaving the house, or after a wash, or when you've already told yourself the shirt or coat is still fine for one more wear. The repair looks tiny, but the difference between a button that stays put and one that returns to the work basket is usually hidden in the thread path, the shank, and the finish on the wrong side.
Why Hand-Sewn Buttons Fail and How to Make Them Last
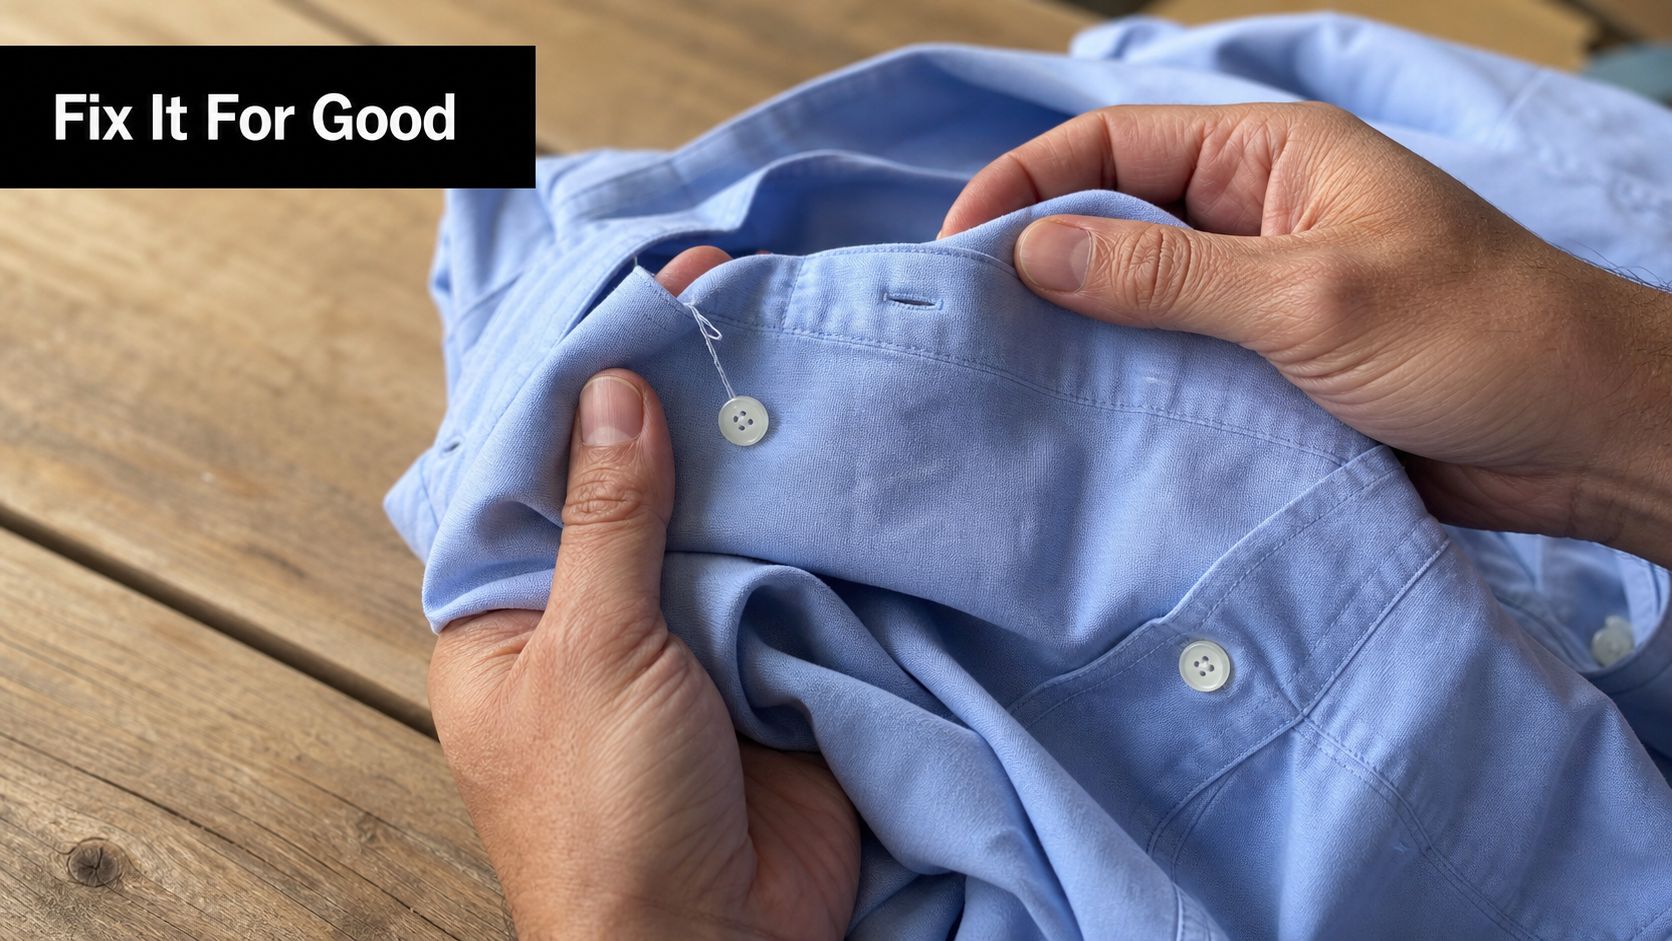
A loose button is usually a repair problem, not a mystery. On a shirt, the thread can wear through from repeated fastening. On a coat, the cloth around the button site may be the weak point, especially if the button has been pulled flat and no longer has room to move. That is why how to sew buttons by hand should start with judging the garment, the fabric, and the load on the button, not just copying a stitch.
The three failure points that matter
A button fails where the force gathers. If the thread bed is too short, the thread rubs through sooner. If the button sits tight against the cloth, every fastening motion strains the stitches as the garment bends. If the fabric is already tired, even careful stitching will not last long.
The fix has to match the weak point. A button on a crisp shirt needs neat stitching and a low profile so it does not show through the front. A button on a coat needs more clearance, because layered fabric makes a flush button harder to use and harder to keep secure. For some repairs, the surrounding cloth needs support before the button goes back on.
A raised thread shank gives the button room to move instead of cutting into the fabric. Practical hand-sewing guidance usually calls for several passes through the holes, then wraps around the shank before tying off, and that method is common for good reason. It leaves the stitch bed flexible enough for wear while still holding the button close enough to close cleanly.
Practical rule: if the button sits flat, it works against the cloth every time you fasten it.
A repair that matches the garment
A school shirt button and a wool coat button do not need the same treatment. A shirt usually needs a neat, low-profile repair that stays tidy on the outside. A coat needs more clearance, because heavy layers make a flush button awkward to use and more likely to fail again.
I check the fabric before I start, not after the button has come loose a second time. If the surrounding cloth is sound, the right thread path and a secure finish are usually enough. If the fabric is thinning, stretched, or fuzzy, the repair needs support as well as stitching. A backing patch, or at least a careful plan for the wrong side, can keep the repair from tearing out around the stitches. That is the same practical judgment that guides other repair work, including Packaging Panda's industrial guide, where the load has to match the structure that carries it.
Tools, Thread, and Prep Before You Start
Start with the right thread and the right needle, not whatever is nearest. For a standard two-hole or four-hole button, UK-relevant guidance recommends a double thread, about 16 inches of thread, and roughly 4 to 6 passes through the holes before you build the shank (UF 4H414). That combination gives enough strength without making the stitch bed bulky and rough.
A sharps needle works well for most shirt and blouse repairs, while a slightly sturdier needle is often easier on coats, denim, and canvas. Beeswax helps the thread behave, especially if you're working with cotton thread that wants to fray. A thimble saves your fingertip when you're pushing through dense fabric, and a small pair of snips keeps the finish clean.
Mark before you stitch
The button should sit directly opposite the buttonhole, not just roughly in place. Mark the spot with tailor's chalk, a fabric pencil, or a pin, then check that the buttonhole and button line up before you knot the thread. If the placement is off by even a little, the garment pulls differently every time it closes.
For repairs on a school blazer or work shirt, I'd also check the back of the area before I start. If the cloth is thin, fuzzy, or already stretched, a small stabiliser patch on the wrong side may save the repair. The same logic shows up in other fabrication and support tasks too, including Packaging Panda's industrial guide, where load and support matter more than the visible finish alone.
Keep the prep practical
- Choose thread by fabric: finer thread for light shirts and blouses, stronger thread for coats, denim, and workwear.
- Match the button type first: flat sew-through buttons and shank buttons need different handling.
- Knot on the wrong side: that keeps the front tidy and makes the finish stronger.
- Check for weak cloth: if the fabric is thin around the old button site, reinforcement matters before anything else.
A neat repair begins with placement, not stitching.
Sewing Two-Hole and Four-Hole Buttons Step by Step
A sew-through button can look sound and still fail if the thread is crowded, the shank is too tight, or the stitch pattern puts all the strain in one spot. A repair lasts longer when the thread sits evenly through the holes, the button has a little lift from the cloth, and the back is tied off cleanly. If the fabric around the old spot is thin or stretched, that weak cloth may be the primary problem, and a stronger backing or a cleaner edge finish can help. For a clean edge on heavier garments, consider a professional garment tag finish before final assembly.
Two-hole buttons
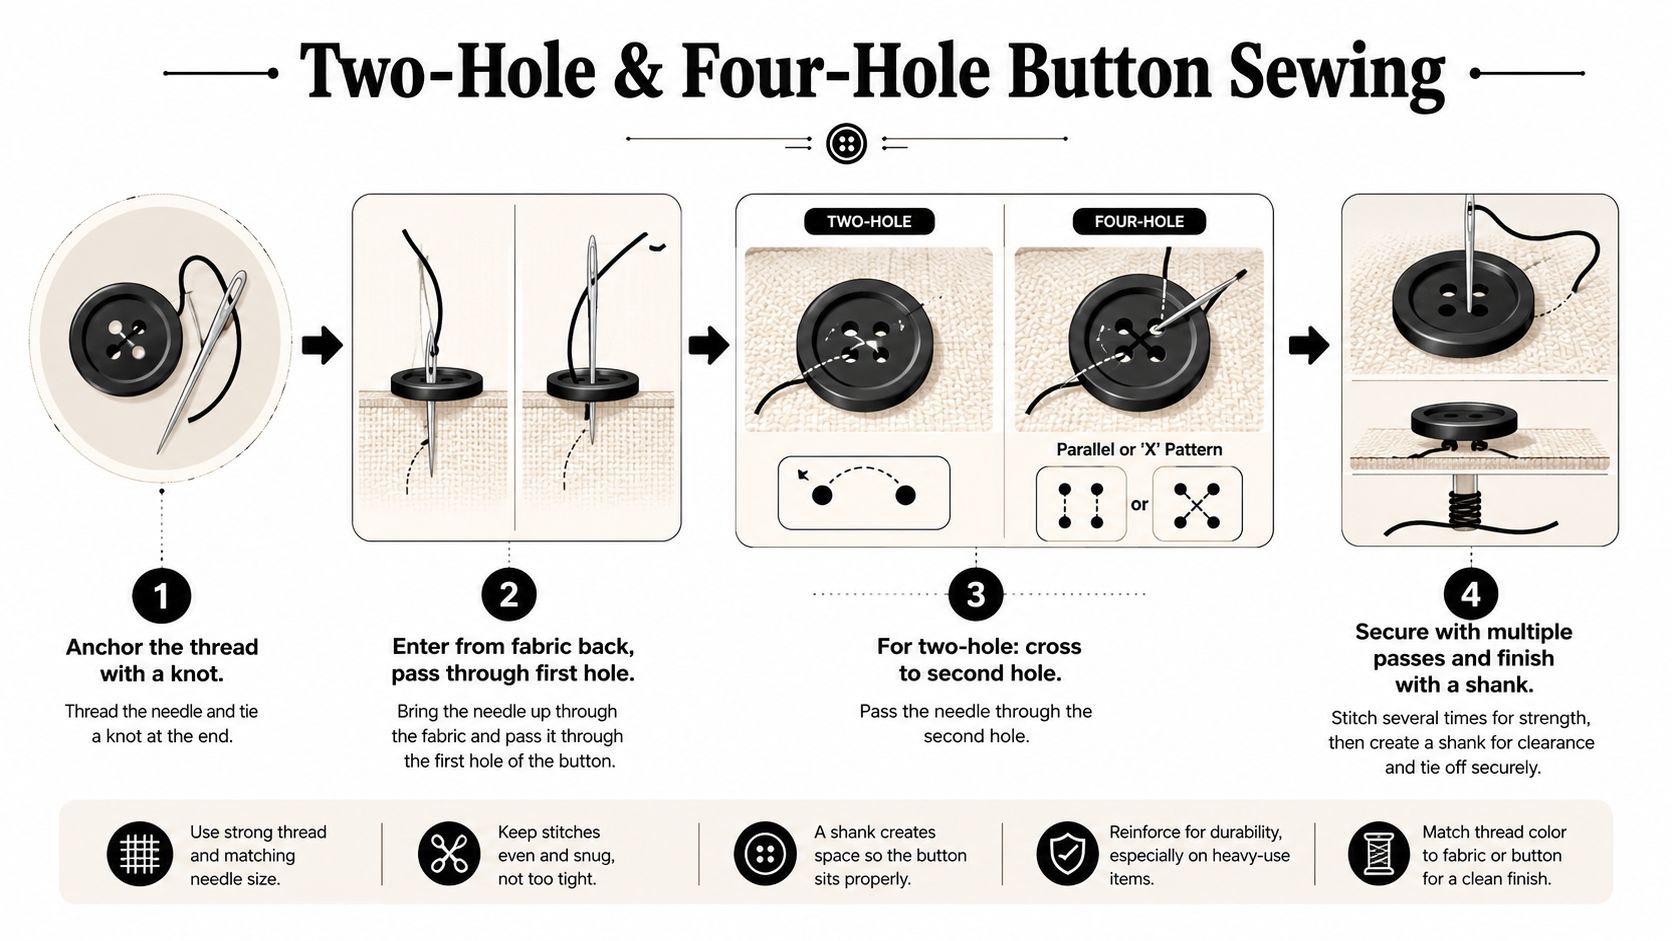
Bring the needle up from the wrong side of the fabric and through one hole. Send it back down through the other hole, then repeat that path until the button sits securely. Keep the stitches even and avoid cinching the thread so hard that the button bites into the cloth.
Before you pull the last pass snug, slip a pin, toothpick, or needle spacer under the button. That leaves room for a small shank, which helps the button move without rubbing flat against the fabric. On a shirt front, the lift should feel tidy and easy to fasten. On a coat front, the button usually needs a little more room because the layers are thicker and the strain is heavier.
Once the stitches are in place, wrap the thread around the bridge under the button several times, then remove the spacer. Finish on the wrong side with two knots, pulled firm but not so hard that the cloth puckers.
Four-hole buttons
Four-hole buttons give you room to choose the stitch layout. You can run the thread straight and parallel, or cross it into an X. The crossed pattern spreads strain well on cuffs and shirt fronts that get constant use, while the parallel pattern gives a cleaner look on plainer garments and lighter repairs.
A good four-hole repair still needs the same shank control as a two-hole button. Leave a little lift. Do not pull it flat against the cloth. If the button sits too tight, the thread wears faster and the garment closes badly.
The thread should hold the button, not trap it against the garment.
A careful hand finish matters more than speed here. If the button is going on a garment you wear often, check the hole alignment before you knot off. That small pause usually saves the next repair.
How to Attach Shank Buttons Correctly
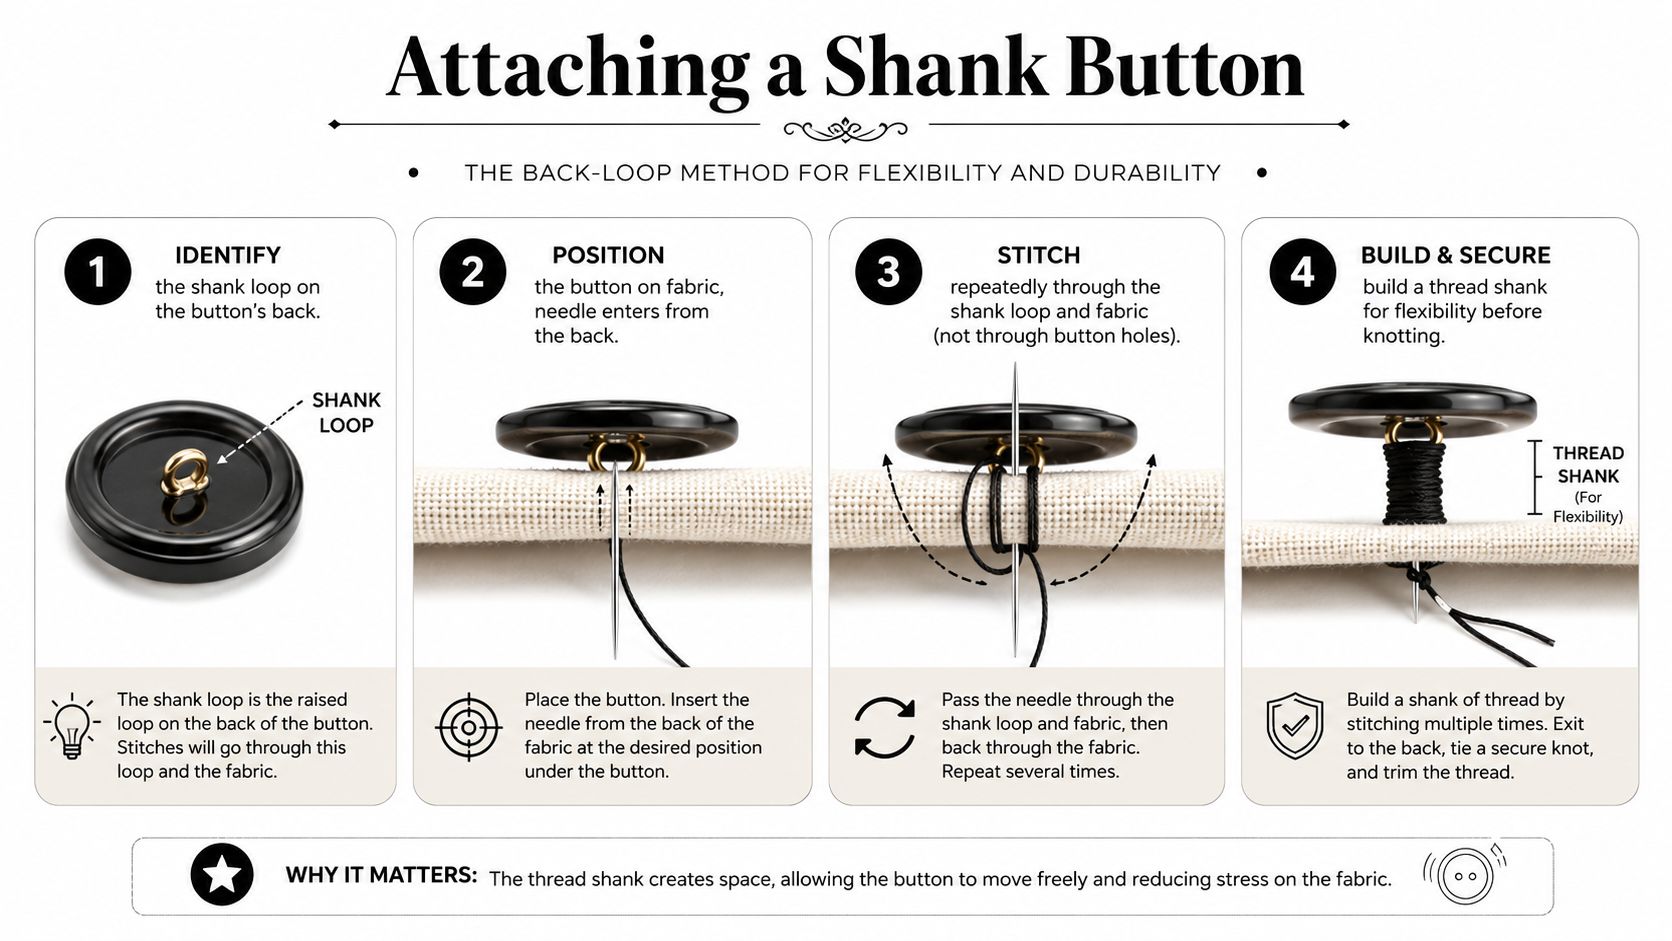
Shank buttons fail in home repairs when the stitch work treats them like flat buttons. A shank button does not use holes through the face. The thread passes through the loop or shank on the back, which lets the button stand off the fabric and move as the garment closes. That shape is common on structured jackets, coats, hand-knits, and decorative garments, because those pieces need the button to sit clear of the cloth instead of pressing into it.
Use the back of the fabric as your reference
Mark the button position from the back if you can, especially on a blazer or coat where the front surface should stay clean. Patagonia's repair guide uses tailor's chalk or a fabric pencil on the back, then sends the needle up through that point and through the shank loop until the button feels secure (Patagonia repair guide).
That back reference matters because a shank button has to land in the right place to pivot. If the placement is off, the button sits crooked and the pull lands unevenly every time the garment closes. On a fitted front, that small error shows quickly.
Stitch the loop, not the face
Pass the needle through the shank loop and back through the same fabric point several times. Keep the thread gathered in one spot under the button so the loop stays supported without being crushed flat. The support comes from repeated passes in the same place, then a wrap around the thread bridge before you secure the finish on the wrong side.
A duffle coat toggle, a blazer button, and a thick wool cardigan all benefit from that approach. The difference is how much room the button needs to stand off the fabric. A dense knit needs more clearance than a crisp woven front, because the button has to clear the thickness and still close without strain.
Finish with a double knot on the wrong side and trim cleanly. If the shank is too short, the button will bind when you fasten it. If it is too long, the button will wobble and catch on wear. The right length lets the fabric move and keeps the button steady.
Matching Technique to Fabric and Garment Type
A button on silk, a button on jersey, and a button on denim behave differently the moment tension hits them. The repair has to suit the fabric, or the fabric wins. That's why the same hand-sewn technique can look neat on one garment and fail on another.
Heavy wool and melton
Coats need a longer shank because the front layers are thick. If the button sits too close to the surface, the fabric bunches when you fasten it and the thread takes the strain. A thicker outer layer also benefits from a slightly stronger thread and a careful finish on the back, because coat buttons get tugged hard in daily use.
Light silk and viscose
Fine fabrics need a lighter touch. Use a finer needle, keep the thread neat, and avoid oversizing the stitch holes. The habit that matters most here is placement accuracy, because every extra puncture shows more clearly on a delicate surface.
Jersey and knit
Stretch fabrics need help. A small stabilising patch on the wrong side gives the button something steadier to grip, especially if the original fabric has already thinned around the old stitching. Without that support, the thread can pull through even if the stitching itself is tidy.
Denim and canvas
Workwear fabrics need strength more than finesse. A doubled thread, firm passes, and a cross-stitch layout on a four-hole button suit the load better than a decorative straight run. These fabrics can take a stronger repair, but they still need a real shank rather than a button pinned flat to the surface.
Coated and leather-look fabrics
These are the least forgiving. Needle marks may stay visible, so placement has to be exact before the first stitch goes in. If the fabric is coated, every hole matters, and a sloppy reposition can't be hidden. The repair that lasts here is the one that gets marked carefully and stitched once.
The garment tells you what kind of repair it can accept.
A handmade wool cardigan, an ex-designer deadstock jacket, and a school blazer all ask for different judgement. The craft is the same, but the support is not.
Troubleshooting Repairs That Do Not Hold
When a button comes loose again, the problem is usually visible if you know where to look. A repair that failed fast is telling you something about the fabric, the thread, or the finish. The right fix depends on the symptom, not just the lost button.
| Symptom | Likely Cause | Fix |
|---|---|---|
| Button feels stiff or won't fasten easily | Sewn too tight, no real shank | Reseed the button with a spacer and leave clearance |
| Thread snaps after a few uses | Button sits flat, strain is concentrated | Build a proper shank and wrap the thread under the button |
| Button hole area looks stretched or thin | Fabric is weakened, not just the stitching | Add a small patch on the wrong side or move the button |
| Button keeps coming loose on heavy fabric | Thread weight is too light for the garment | Use stronger thread and more secure passes |
| Knots show on the right side | Finish pulled through or thread was not anchored properly | Restart and knot on the wrong side, then lock the finish cleanly |
A children's school coat often fails because the cloth around the buttonhole has taken the abuse. A vintage wool cardi may need reinforcement even if the button itself is sound. A workwear jacket sometimes needs the button replaced rather than re-sewn if the shank or holes are worn smooth.
If the fabric around the site is already too weak, don't keep sewing the same spot and hoping for the best. Either reinforce the area, move the button, or close the damaged buttonhole and place the button where the cloth can carry the load. A repair is only good if the garment can still use it.
Finishing Strong and Notions Worth Keeping Handy
The best hand-sewn buttons are boring in the right way. They sit flat where they should, they pivot where they must, and they don't call attention to themselves after washing, drying, or daily wear. The method is simple enough to remember, prep well, match the thread to the fabric, build a real shank, reinforce the back when needed, and finish with knots that stay hidden.
A small kit keeps that standard easy to repeat. Keep a sharps needle set, polyester and cotton thread in neutral shades, a tailor's chalk pencil, a small thimble, and a notions tin close to the machine or hand-sewing basket. Waxing thread and checking the buttonhole before you mark are tiny habits, but they save more repairs than any fancy trick.
A button sewn by hand with a proper shank and a doubled thread will outlast the garment it sits on.
If you want better fabric, dependable haberdashery, and the right notions for repairs that last, visit More Sewing. Their range makes it easier to keep a button kit ready before the next loose stitch turns into a missing button.
