
Blog, Dressmaking
How to Sew Cuffs: A Complete Guide for Every Fabric
You've sewn the bodice, eased the sleeve head, and pressed the seams beautifully. Then the cuff goes on, and suddenly one sleeve looks longer, the opening twists, or a bulky ridge catches against the wrist. That small finishing detail can make a carefully made shirt look homemade for the wrong reasons.
Learning how to sew cuffs properly is less about rushing through the final seam and more about matching construction to fabric. A crisp cotton shirt needs reinforcement and exact alignment. A jersey sleeve needs stretch and recovery. Viscose, Tencel blends and deadstock cloth often need a lighter finish that respects drape rather than fighting it.
Why Cuffs Make or Break Your Garment
A cuff is one of the first details noticed at the wrist. It frames the hand, controls the sleeve opening and takes repeated handling, so an uneven edge or weak stitching shows quickly. It also influences how the whole sleeve hangs. If the cuff twists, the fabric above it can look twisted too, even when the sleeve pattern and setting are accurate.
The construction method matters even more with fabrics now common in UK dressmaking. A crisp woven can support a firm, defined cuff, while jersey needs recovery and stretch at the opening. Viscose, Tencel blends and deadstock fabrics may need a lighter finish that follows their drape instead of forcing them into a rigid shape.
Many home dressmakers can sew a straight seam yet lose confidence when layers, notches, interfacing and a sleeve placket meet in a small space. Cuffs work best as a controlled sequence: cut accurately, stabilise where needed, sew right sides together, turn, press and topstitch. Each operation affects the next.
Structure with a purpose
Traditional cuffs use paired, reinforced components. A common construction begins with four cuff fabric pieces and two interfacing pieces, so the cuff keeps its shape while the outer and inner layers share wear. On contemporary garments, the interfacing must suit the cloth. Too much makes viscose stiff and lifeless; too little lets a cotton cuff collapse at the fold.
Cuffs also have a practical British tailoring history. The late 19th-century rise of working cuffs on Savile Row connected buttoned cuffs with doctors and surgeons who needed greater sleeve mobility, as described in The Gentleman's Gazette's history of surgeon's cuffs. Their lasting design combines appearance, movement and serviceability in a compact finish.
Practical rule: Treat the cuff as a fit and engineering component, not as an afterthought.
Press before turning. A pressed seam settles more cleanly, while careful trimming keeps corners from becoming hard lumps. On a slippery viscose or fine deadstock fabric, use a press cloth and let the piece cool before moving it. The cuff is small, but its finish signals how carefully the garment was made.
Choosing the Right Cuff Type for Your Fabric
Start with the fabric, not the cuff style. A firm woven can support a shaped shirt cuff, whereas a loose viscose or soft Tencel blend may need a faced edge that preserves movement. Jersey requires a construction that stretches with the sleeve opening and returns to shape instead of relying on rigid interfacing.
| Cuff Type | Best Fabrics | Difficulty | Bulk Level | Stretch Recovery |
|---|---|---|---|---|
| Shirt cuff | Crisp cotton, cotton lawn and stable woven deadstock | Higher | Medium to high | Low unless adapted |
| Knit cuff | Jersey and other stretchy knits | Moderate | Low to medium | High when cut and stitched correctly |
| Faced cuff | Lightweight, non-fraying or lightly fraying fabrics | Moderate | Low | Low to moderate |
| Bound cuff | Delicate fabrics and fine woven cloth | Moderate | Low | Low unless the fabric itself stretches |
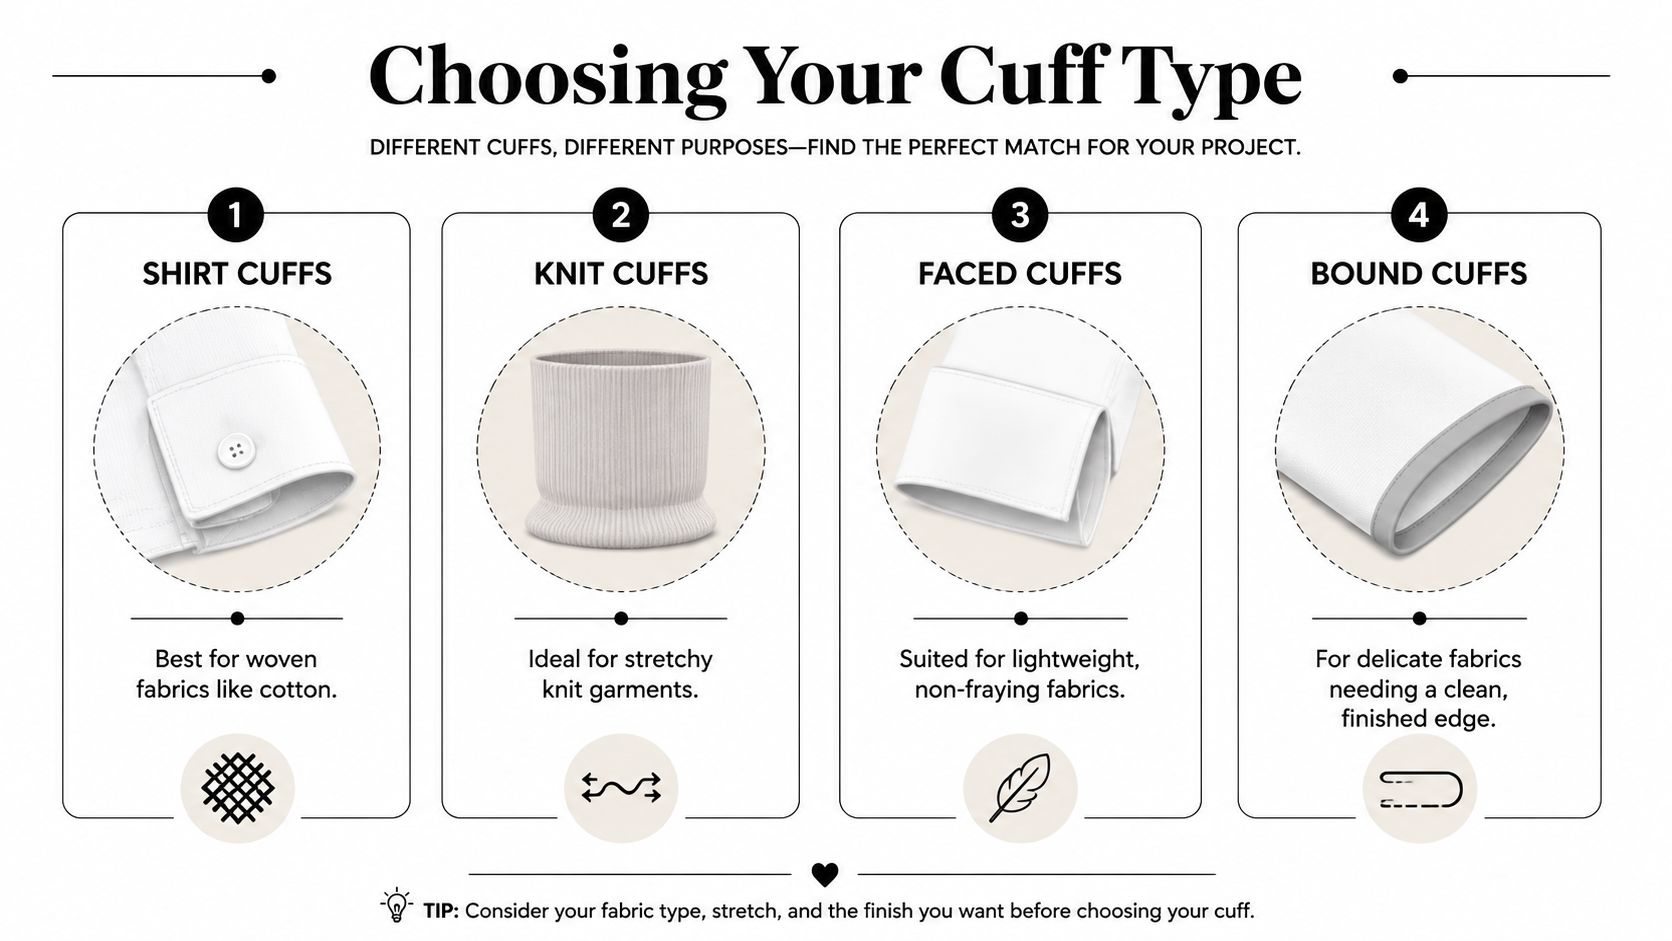
Match the finish to fabric behaviour
Shirt cuffs suit cotton poplin, lawn and stable deadstock shirtings. They give the sharpest result, but they also expose inaccurate cutting and uneven seam allowances. Use them when you want a defined fold, buttoned opening or polished appearance.
Knit cuffs are the natural choice for jersey tops, sweatshirt-weight sleeves and other fabrics that need recovery. A folded tube keeps the finish soft and avoids forcing a stretchy sleeve into a rigid opening. Test the cuff against the sleeve before sewing, because the right tension depends on the fabric's recovery and the intended ease.
Faced cuffs work well on fluid viscose and Tencel blends when you want a clean edge without a padded, shirt-like shape. They're particularly useful for a softly gathered sleeve or a blouse where the cuff should remain visually quiet.
Bound cuffs make sense when the raw edge needs protection but extra layers would spoil the drape. Fine viscose, lightweight deadstock and delicate woven cloth can benefit from narrow self-fabric or contrasting binding. Binding also gives a restrained decorative detail, although it demands consistent width.
A crisp cotton lawn may tolerate a lightly interfaced shirt cuff, while the same construction in fluid viscose can look overworked. A deadstock fabric deserves a small sample first, because fibre content, weave and previous handling can vary considerably even when the cloth looks similar.
Sewing Classic Shirt Cuffs
Traditional shirt cuffs suit stable woven fabrics, including cotton poplin, lawn and crisp shirting deadstock. They also work in a firm viscose or Tencel blend, provided the cloth can hold a fold. For softer or more elastic fabrics, this construction can feel rigid and may pull at the sleeve opening.
Cut four cuff fabric pieces and two interfacing pieces. This creates separate outer and inner layers, giving the cuff enough body without relying on one folded piece. Transfer every notch, keep the grainline consistent and fuse the interfacing to the wrong side without stretching the fabric.
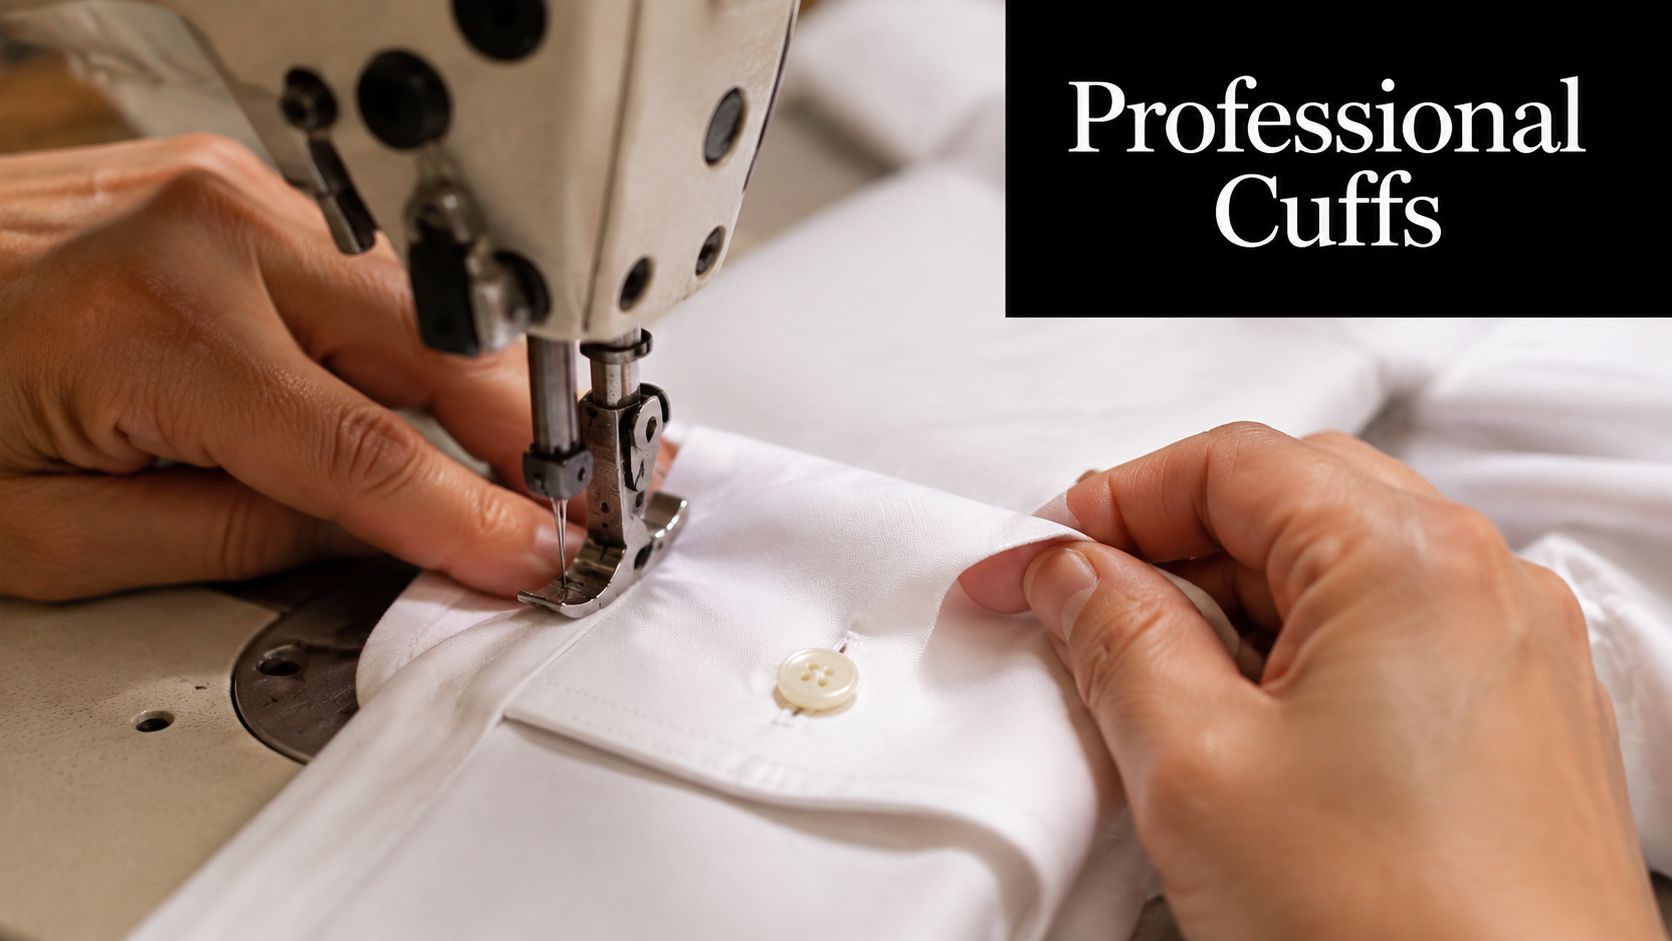
Build the cuff before joining the sleeve
Place the cuff pieces right sides together and stitch along the fitting lines. On a shaped or open cuff, trim the seam allowance to 0.6 cm, clip carefully around curves, turn the piece and understitch towards the fold. Fashion Capital's cuff construction method uses pressing, trimming and understitching to keep the facing inside rather than letting it roll towards the outer edge.
A squared cuff needs graded seam allowances at the corners, otherwise the layers form a hard lump. Cut close to, but never through, the stitching. Turn each corner with a blunt point turner, ease the fabric into position and press from the inside first. A narrow card strip under the seam can keep the edge flat while pressing.
Attach it to the sleeve opening
Treat the sleeve placket and cuff as one alignment task. Match the square end of the cuff to the back edge of the sleeve opening, align the notches and keep the seam allowances facing consistently. Fashion Capital's method uses a 2.5 cm crossway strip cut to the cuff length plus 1.25 cm, with the raw edges positioned 0.5 cm above the fitting line. Use your pattern's allowances where they differ, while maintaining accurate matching.
A practical UK method sets the fold line about half an inch below the sleeve end, stitches close to the sleeve edge, then folds the cuff over and secures it with a second row, as described in Start Sewing's cuff guide. Baste first when the placket is bulky, the fabric is fluid or a deadstock cloth shifts under the presser foot.
Press the finished cuff towards the sleeve opening. Check both sides before topstitching, because uneven pressing will show immediately on a crisp fabric. The cuff should lie flat, leave the placket opening clear and avoid a concentrated lump at the underarm seam.
Mastering Knit and Stretch Sleeve Cuffs
A stretchy cuff demands recovery as much as appearance. For jersey, rib knit and suitable Tencel blends, a fabric tube gives a clean finish while retaining enough stretch for dressing. Cut the tube at least six inches long, stitch the short ends, turn it and fold it back on itself so the finished cuff is half as long. Treat that measurement as a starting point, then adjust it to suit the fabric's recovery and the intended fit.
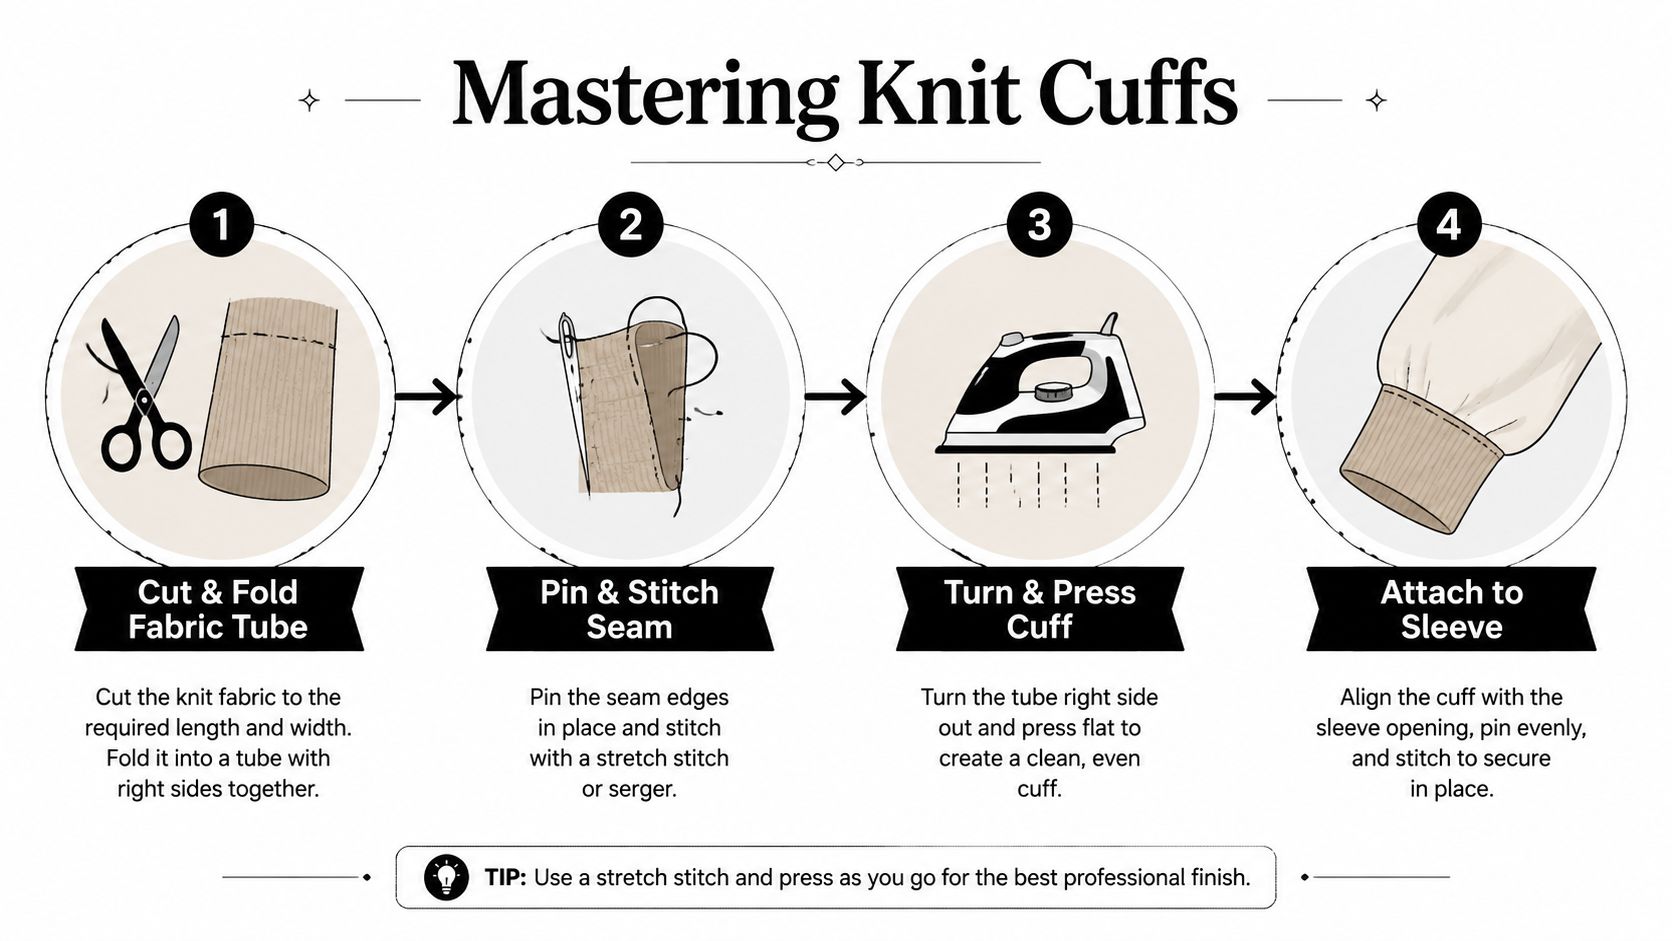
Cut for recovery, not appearance alone
Measure the sleeve opening against the cuff loop at rest. It should hold the wrist without forming a tight ridge, yet stretch over the hand when the garment requires it. Jersey, viscose knits, Tencel blends and deadstock fabrics can differ sharply in recovery, weight and stretch direction, so test a strip before cutting the final cuff.
Place the greatest stretch around the wrist. Join the short ends with a narrow zigzag, stretch stitch or overlocker seam, then press the seam to one side. Fold the tube wrong sides together, match the raw edges and mark quarters. Keep the seam at the sleeve underarm unless the pattern specifies another position.
Keep the seam elastic
A straight stitch may snap under repeated stretching. Test a narrow zigzag, lightning stitch or overlocked seam on a fabric offcut before sewing the garment. On a compatible machine, a twin needle creates a flexible twin-line finish. A coverstitch produces a more production-style result, but careful zigzag stitching can work well on a domestic machine.
Attach the cuff at the quarter marks, stretching the cuff evenly between them while leaving the sleeve fabric relaxed. A walking foot helps control fine jersey and slippery viscose. If the seam ripples, reduce pressure on the fabric, support it on the machine bed and check that differential feed or stitch settings are not stretching the edge excessively.
For a gathered knit cuff, differential feed on an overlocker can create controlled fullness, as shown in BERNINA's gathered cuff sleeve tutorial. Keep gathering away from the joining allowance when the attachment area needs to remain smooth. Excessive thread tension can remove the stretch you need, so adjust gradually and test before committing to a deadstock or difficult fabric.
Creating Faced and Bound Cuffs for Delicate Fabrics
A traditional interfaced cuff can overwhelm fine viscose, silk-like deadstock or a lightweight Tencel blend. If the fabric drapes beautifully from the sleeve, preserve that movement at the wrist with a faced or bound finish instead of adding a stiff block of layers.
Use a faced cuff for a quiet finish
Cut the facing from the same pattern shape, then stabilise only where the fabric needs support. Sew the facing to the cuff edge with right sides together, keeping the seam allowance narrow and consistent. Clip or notch curved sections without cutting the stitching, trim the corners and understitch the allowance towards the facing.
Press the facing to the inside with the seam rolling slightly away from the garment's right side. That small roll hides the facing and gives the edge a deliberate finish. Use a pressing cloth and moderate heat on viscose or Tencel blends, since aggressive pressing can flatten the surface or distort the grain.
Choose binding when the edge needs light protection
Bias binding encases the raw edge and adds less visual weight than a fully faced cuff. Cut a narrow strip on the bias from self-fabric or use a contrasting binding if the detail suits the garment. Sew one edge to the cuff, trim the seam, press the binding away and fold it over to enclose the raw edge before stitching it down.
Work on a stable surface and avoid stretching the bias around the opening. Hand-baste the binding on fluid fabric if machine stitching makes the edge creep. A bound cuff is especially effective on a softly gathered sleeve, where the binding provides definition without turning the end into a rigid band.
Faced and bound cuffs won't provide the same structure as a shirt cuff. That's an advantage when the garment needs drape, but it's a poor choice for a fitted sleeve that depends on a firm, buttoned opening.
Troubleshooting Common Cuff Sewing Problems
Cuff problems usually come from one of three sources: inaccurate pieces, uncontrolled fabric movement or poor alignment. Diagnose the cause before unpicking. A crooked topstitch line won't be fixed by adding more pressing, and a twisting cuff won't be corrected by trimming the visible edge.
Uneven width and distorted edges
If one side is wider, compare the pattern pieces first. Inaccurate cutting, inconsistent seam allowances or stretching the cuff while sewing can all change the finished width. For a woven cuff, mark the stitching line rather than relying only on the machine guide. For jersey, support the fabric and let the feed dogs move it without pulling.
Stay-stitch a fragile sleeve opening where the pattern permits, especially in fluid viscose. If the edge has already stretched, steam it lightly, allow it to cool flat and then reassess before trimming. Don't force it back to size with a hot iron, as that can create a permanent shine or ripple.
Bulky corners and seam intersections
Grade the layers, trim corners diagonally and remove only enough allowance to reduce the lump. At a sleeve placket, stagger seam allowances instead of allowing every layer to finish at the same point. Press each seam before closing the cuff, then use a point turner and a firm, protected pressing surface.
If the cuff feels thick before it's attached, it won't become thinner through optimism. Reduce layers, grade allowances and test the fold.
Twisting and mismatched openings
A cuff twists when the notches, sleeve seam or placket ends don't correspond. Lay the sleeve flat with the placket visible, mark front and back positions clearly and match the square end to the back edge where the pattern requires it. Pin the quarter points first, then fill in the spaces.
If the cuff is already sewn and twists, unpick the attachment seam rather than trying to rotate the cuff from the outer edge. Recheck whether the sleeve was turned during cutting or whether the cuff was matched to the wrong side of the placket.
Interfacing showing or failing
Interfacing that shows through usually means it's too heavy, too large or too close to the finished edge. Trim it back slightly within the seam allowance and test a lighter product on a scrap. If a heavy fabric cuff collapses, use more appropriate support rather than compensating with extra topstitching.
A sample cuff is the fastest diagnostic tool. Sew the complete sequence on an offcut, including pressing and turning. You'll see whether the fabric needs a shirt cuff, a soft facing, a bound edge or a stretchy tube before the final garment is at risk.
For fabric, interfacing and haberdashery suited to your next cuff project, visit More Sewing, where you can explore cottons, viscose and Tencel blends, jerseys, and ex-designer deadstock alongside practical sewing supplies. Choose a fabric sample or sewing kit before cutting, then use the shop's lessons and equipment support if you want help turning basic stitching confidence into a clean garment finish.
