
Dressmaking, Guides
Learn to Sew Kits That Actually Build Real Skills
You've bought a sewing machine, opened the box, and laid everything on the kitchen table. The fabric looks inviting, the pattern seems manageable, and yet the scissors, bobbin, needles and mysterious little unpicker are staring back at you. You're not sure what to use first, or whether the kit contains everything needed to finish the project.
That uncertainty is common, and it's exactly where well-designed learn to sew kits can help. A good kit isn't a shortcut around learning. It's a confidence-builder that reduces unnecessary decisions, gives you suitable materials to practise with, and guides you towards a finished item while you develop real skills.
Why a Kit Is Often the Smartest Way to Start
A beginner usually doesn't need more choice. They need a sensible first task and tools that won't make the task harder.
The UK already has a substantial audience for structured craft learning. The Crafts Council's UK craft market research reports that 73% of UK adults bought craft in 2019, purchasing almost 25 million handcrafted objects, while craft sales exceeded £3 billion. The same evidence found that 10.3 million people in Britain were buying craft online, more than triple the figure from a decade earlier. For a new sewist, that means buying a carefully assembled kit online is now a familiar route into a practical hobby.
A bundle removes the first barrier
I've watched beginners spend an evening comparing fabric weights, thread brands, needle sizes and scissors, only to abandon the project before sewing a seam. They weren't lacking enthusiasm. They were trying to make several technical decisions without knowing which decisions mattered.
A curated kit narrows those choices. The fabric, pattern, thread and haberdashery can be selected for one project, so you're not left wondering whether a heavy denim needle belongs with lightweight cotton or whether a general-purpose thread will suit the fabric. The instructions can also introduce techniques in an order that makes sense.
A useful first kit should answer one question clearly: what do I do next?
The educational value of this format has deep roots in the UK. Historical evidence from Elmbridge Museum's account of schooling and needlework describes samplers as practice pieces and teaching aids. Needlework was taught through hands-on repetition, particularly to girls and young women, and structured activity packs continue that tradition in a modern, portable form.
Confidence matters more than speed
A kit won't make you an experienced dressmaker overnight. It can, however, give you a manageable first success. Completing a cushion, tote or hand-sewn sampler teaches you how fabric behaves, how markings transfer, how seams are secured and how to correct a mistake.
That first finished object changes your relationship with the machine. You stop seeing it as an expensive appliance and start seeing it as a tool you can operate. The kit has done its job when you feel ready to make the next decision yourself.
What a Quality Beginner Kit Actually Contains
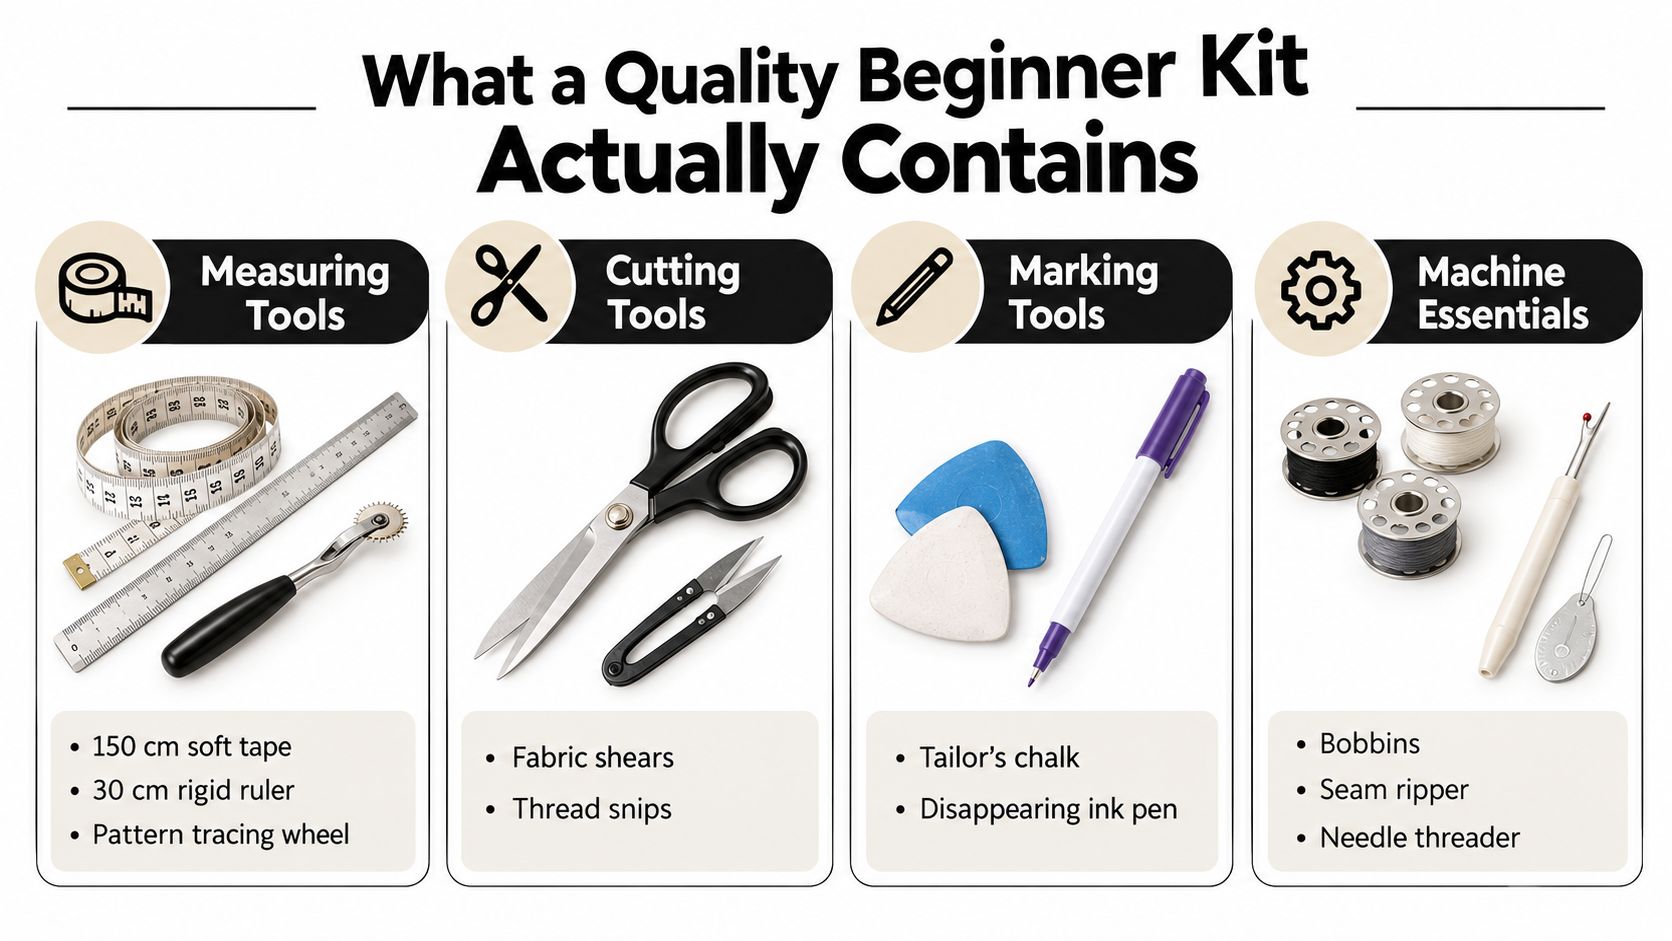
A useful kit should be organised by function, not by how many small items can be squeezed into a tin. The four groups that matter most are measuring, cutting, marking and seam removal, supported by suitable machine essentials.
The Stoke-on-Trent sewing basics equipment guidance reflects the practical contents expected in beginner learning. Fabric scissors, pins, a soft tape measure, needles, thread and an unpicker appear as separate tools because each solves a different problem.
Measuring and marking
A soft tape measure follows the body and handles curved edges. A rigid ruler helps with straight lines, seam checks and small pattern adjustments. Pattern tracing paper or a tracing wheel lets you copy markings without cutting into the original pattern.
Marking tools deserve more attention than they often receive. Tailor's chalk can transfer dart lines and other pattern information to fabric, as shown in The Sewing Directory's beginner sewing kit guidance. A disappearing or washable fabric pen can be useful, but test it on a fabric offcut first. Some marks behave differently on pale cotton, textured cloth and synthetic fibres.
Pins hold layers together before the machine reaches them. Place them perpendicular to the seam line, with the heads positioned so you can remove them comfortably as you sew.
Cutting and correcting
Fabric shears should be reserved for fabric. Paper dulls their edges, and blunt shears can push or distort fabric instead of cutting cleanly. Small thread snips make trimming faster and reduce the temptation to use large scissors near a finished seam.
The seam ripper, often called an unpicker, is not evidence that you've failed. It's a normal construction tool. Use it to lift individual stitches, especially when correcting a line of stitching, rather than pulling at the fabric and stretching the seam.
For learners comparing different curated options, the Kimskreations product collection is one place to examine how ready-to-make craft products are presented before choosing a format.
Machine essentials
A machine-based kit should include compatible thread, appropriate needles, bobbins or clear guidance on which bobbins to use, and instructions covering threading, stitch length, tension and needle changes. The Health and Safety Executive's sewing-machine guidance emphasises guarded moving parts, adequate lighting, stable seating, inspection of guards and work areas, and switching power off before adjustments.
A kit that includes only attractive fabric and a pattern may look generous while leaving you without the tools needed to sew accurately. Check the contents list before buying, and look for separate functions rather than vague promises such as “complete accessories”.
Matching Kit Types to Your Skill Level
The right kit should stretch you slightly, not drop you into a project that assumes skills you haven't built. A hand-sewing sampler and a dressmaking project may both be labelled beginner-friendly, but they ask very different questions of the learner.
| Kit Type | Typical Contents | Time Needed | Best For |
|---|---|---|---|
| Starter kit | Felt, hand needles, thread, a small hoop and a printed sampler | A short practice session or several small sessions | Someone who has never threaded a needle |
| First-project kit | Pre-cut fabric, a basic pattern, thread and a step-by-step booklet | A focused afternoon or several shorter sessions | A learner ready to make a cushion or tote |
| Dressmaking kit | Paper pattern, woven fabric, interfacing, zip, bias binding and instructions | Several sessions, depending on the garment | Someone who has completed a simple project or class |
Start with the smallest useful challenge
Choose a starter kit if you've never threaded a needle, can't yet identify the right and wrong side of fabric, or feel unsure about making a knot and securing a seam. Hand sewing teaches control without adding the complication of a motor, presser foot and bobbin.
A first-project kit suits someone who can run a straight machine seam and understands the basic purpose of a seam allowance. A cushion cover is a helpful example because it has simple shapes, visible edges and a clear result. A tote can introduce handles, turning corners and reinforcing stress points.
Dressmaking needs more patience
Dressmaking kits become appropriate when you're comfortable following a multi-step pattern and correcting an error without losing your place. You may need to cut several pieces accurately, transfer markings, apply interfacing, insert a zip and finish raw edges.
A simple decision aid works well:
- Choose starter if threading a needle is new to you.
- Choose first-project if you can sew a straight machine seam.
- Choose dressmaking if you've finished a simple garment or attended a multi-part class.
The label matters less than the assumptions inside the instructions. Read the skill description, check whether fabric is pre-cut, and find out whether the kit includes the items needed for fastening and finishing.
The Hidden Extras Most Beginners Forget to Budget
The most misleading phrase in sewing is “everything included”. It may mean everything needed for the featured project, not everything needed to begin sewing comfortably at home.
UK adult-learning supply lists often expect learners to bring fabric, thread, scissors, pins, tape measures, seam rippers, bobbins, interfacing and pattern paper. Southwark Council's adult-learning fashion and textiles information shows why a boxed kit can still leave gaps. Courses may provide machines and classroom equipment, while a home learner has to supply those basics independently.
The practical add-ons
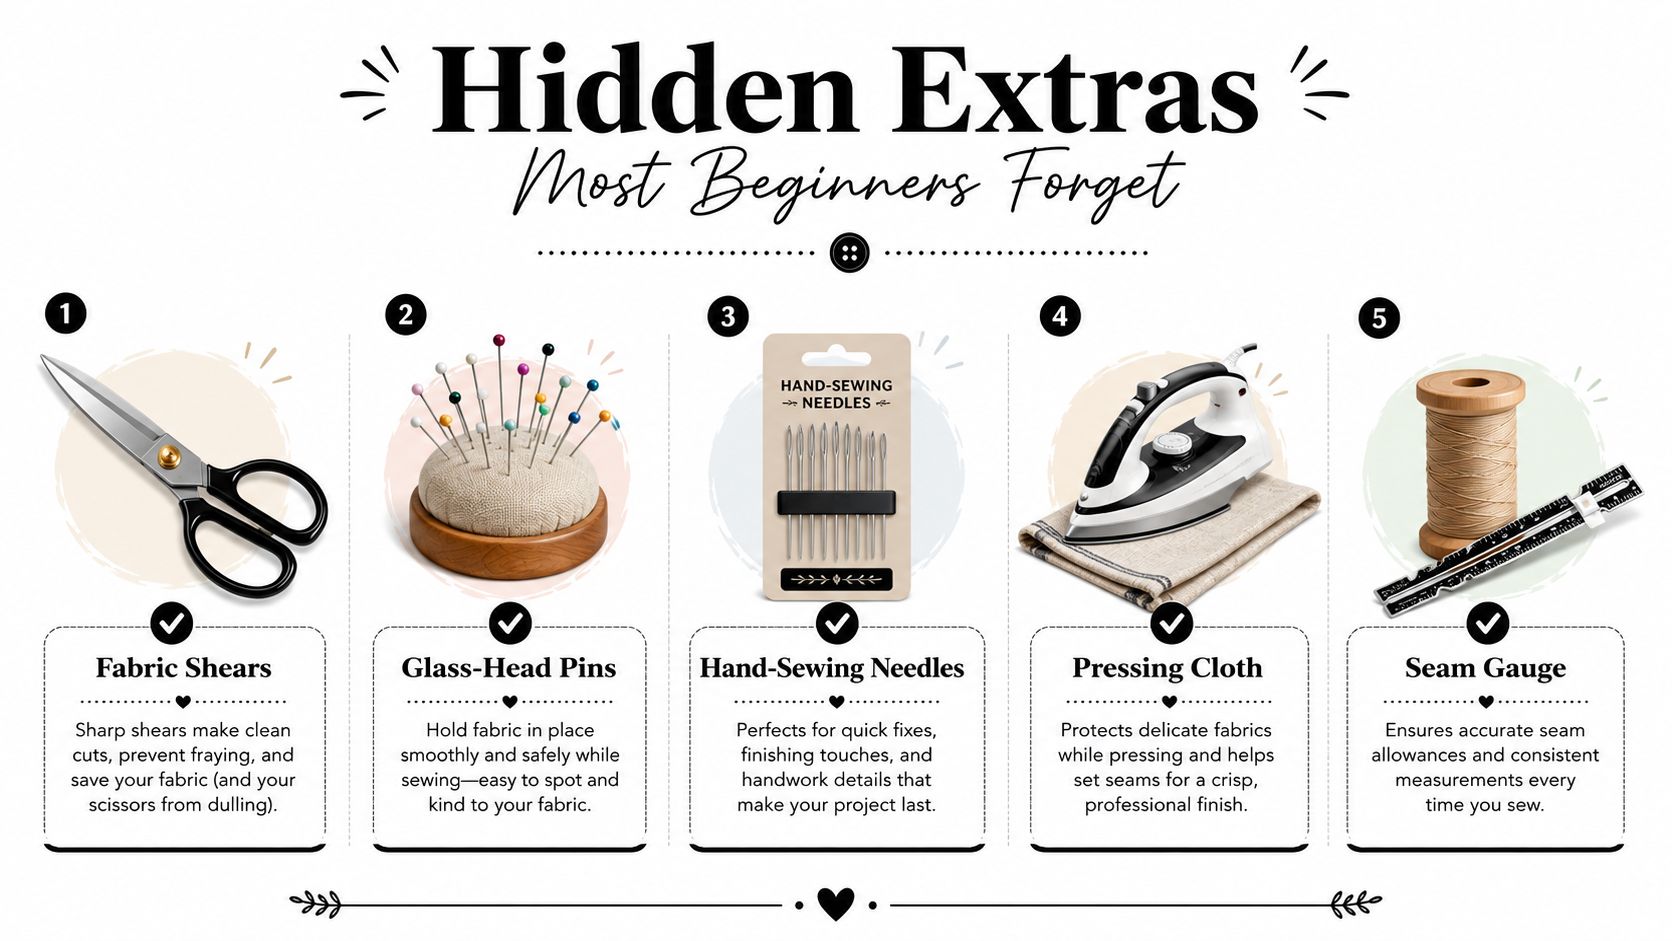
Before checkout, check whether you already own:
- Fabric shears: Keep these separate from paper scissors, and use them only on fabric.
- Glass-head pins: They hold layers securely and are less likely to cause confusion when pressing.
- A seam ripper: Choose one with a comfortable handle and a sharp point for lifting individual stitches.
- Marking tools: Tailor's chalk and washable pens help transfer darts, notches and fold lines.
- Pattern paper: You may need it to preserve the original pattern or trace another size.
- Interfacing: Many garments need structure in collars, waistbands, facings or button areas.
- Extra fabric: Calico or muslin gives you a way to test construction before cutting the final cloth.
- Matching thread and bobbins: A project can stop abruptly if the supplied spool is too small or the bobbin is empty.
Rotary cutters and self-healing mats can make repeated cutting efficient, but they're not compulsory for a first project. Pressing equipment is more important than many beginners expect. A pressing cloth, a stable ironing surface and a steam iron used at the correct temperature can improve seams, corners and curves. A sleeve board and tailor's ham become particularly useful as garments gain shaped sections.
Look beyond the sticker price
Don't treat the cheapest kit as the cheapest route until you've checked the add-ons. A lower-priced bundle may require extra scissors, thread, bobbins, marking tools, interfacing and pressing equipment, while a slightly more complete kit may reduce the number of separate purchases.
That isn't an argument for buying every specialist tool at once. It's a reason to write a realistic checklist before you pay. Add only what the first project requires, then expand your sewing box as new techniques demand it.
A Realistic First Session With Your New Kit
A successful first session doesn't begin with cutting the expensive fabric. It begins with understanding the machine and creating a safe, low-pressure practice area.
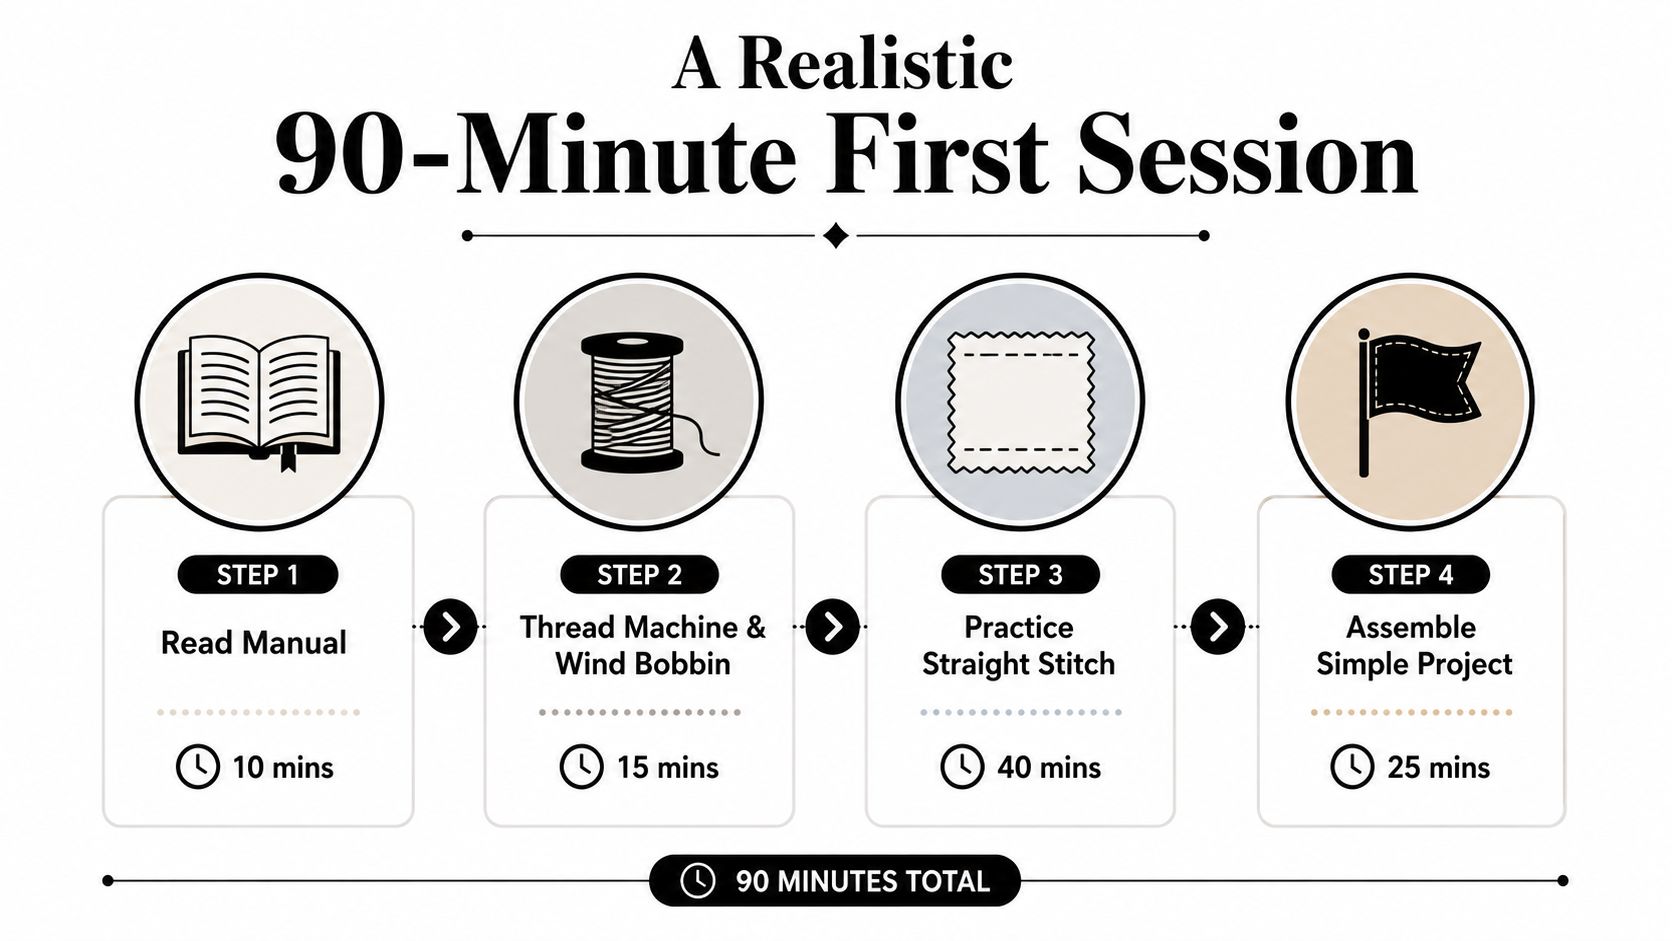
Set aside a manageable block of time and work in this order:
- Read the manual first. Read the threading diagram and the safety instructions before switching on. Name every item in the kit aloud, including the bobbin, presser foot, needle, thread and unpicker.
- Prepare the machine. Check the power cord, fit the needle correctly and wind or insert the bobbin according to the manual. Keep loose hair, jewellery and clothing away from moving parts.
- Use scrap fabric. Practise on a square of similar weight to the project fabric. This lets you test the thread, needle, stitch and tension without risking the main pieces.
- Make a simple sample. Sew straight lines, turn corners and test how the seam behaves after pressing.
- Finish a small project. Use the remaining time to make two fabric squares into a cushion cover or another simple item.
Five techniques to practise
A UK beginner sewing guide recommends practising five core machine techniques before starting a project, including threading, bobbin handling, straight stitching at 2.5mm stitch length, backstitching for 3–4 stitches, and maintaining a 1.5cm seam allowance. You can follow the full sequence in this UK beginner sewing guide.
Practise each technique with a clear purpose:
- Threading the machine: Follow the diagram rather than relying on memory.
- Winding and inserting the bobbin: Confirm that the thread unwinds in the correct direction.
- Straight stitching: Keep the fabric edge aligned with the seam guide.
- Backstitching: Secure the start and finish so the seam doesn't unravel.
- Seam allowance control: Use the machine markings, a seam gauge or removable tape to maintain the required width.
Press each sample seam flat, then open it if the instructions call for an open seam. If you need to undo stitches, snip them individually with the unpicker instead of yanking the thread.
Watch the following video for a visual introduction before you begin:
Finish by writing down three questions for your next session. Perhaps the bobbin thread looped, the fabric shifted while pinning or the corner didn't turn neatly. That small reflection turns a kit into an ongoing learning process.
Common Beginner Mistakes and How to Fix Them
Most first projects go wrong in predictable ways. That's useful because predictable problems have practical fixes.
Construction mistakes
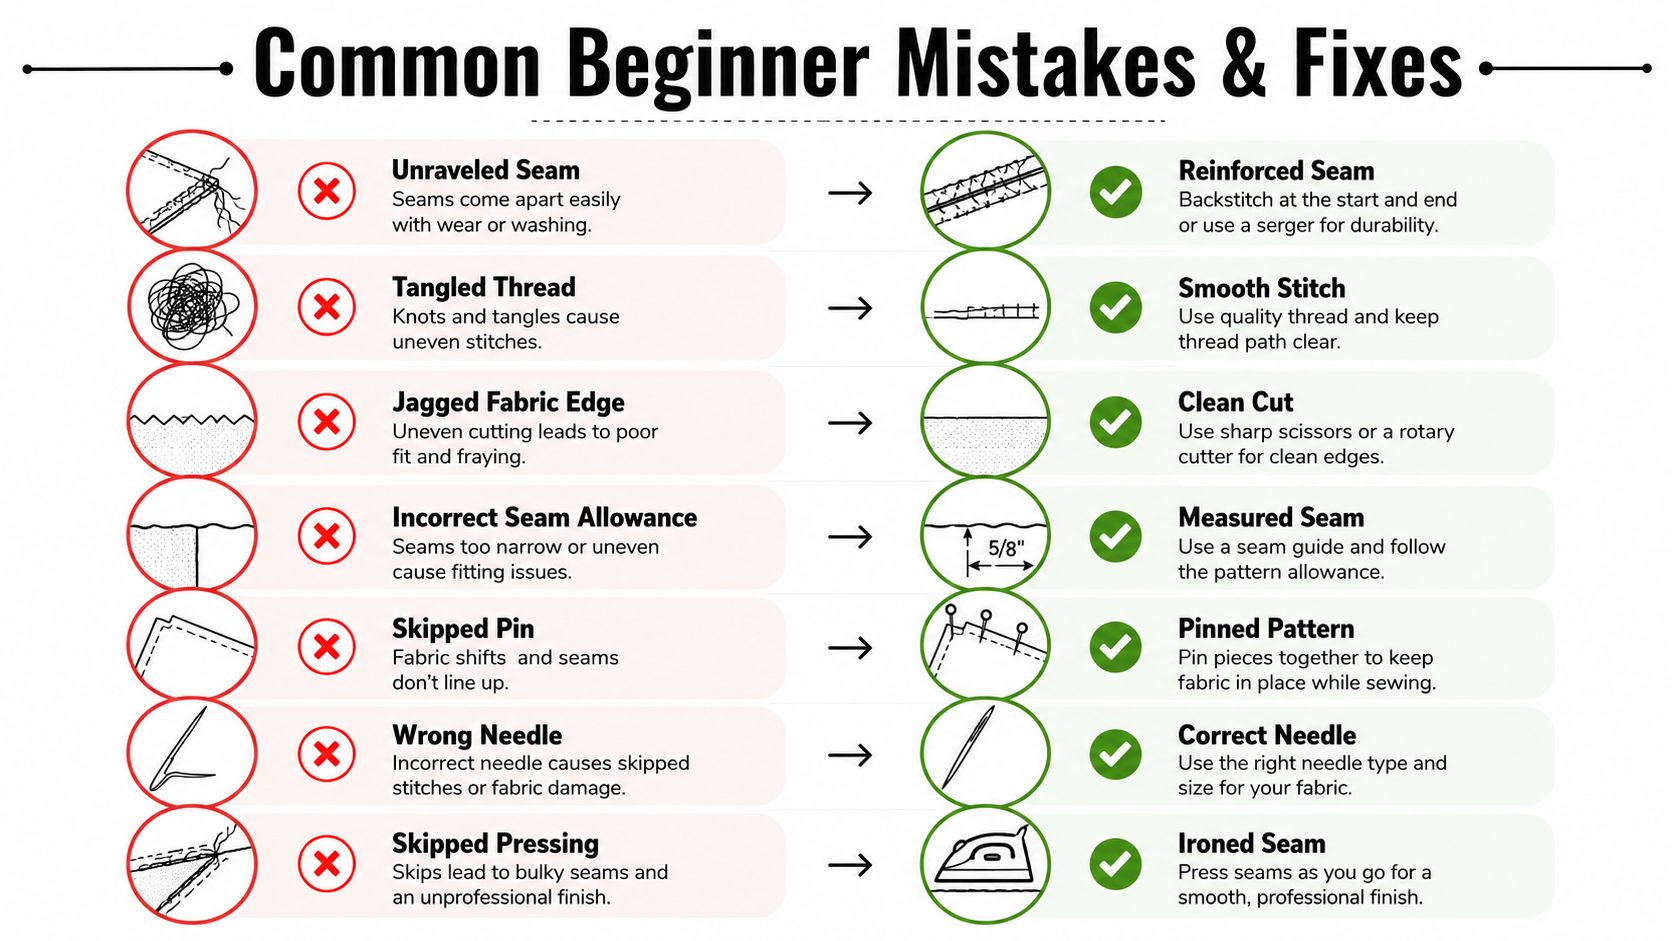
The seam unravels. Beginners often forget to backstitch at the beginning and end. Reverse over 3–4 stitches, or secure the thread by another method specified in the pattern.
The thread loops or snaps. Re-thread both the upper path and the bobbin, check the needle and adjust tension gradually rather than turning the dial repeatedly. A single change makes the result easier to diagnose.
The fabric edge looks jagged. Paper scissors crush or pull fabric, particularly on lightweight lawn. Use sharp fabric shears and support the fabric on a flat surface.
The seam allowance wanders. Markings on a pattern are instructions, not decoration. Use the machine seam guide, a seam gauge or a strip of removable tape to maintain the required width.
The pattern piece is cut incorrectly. Check fold lines, grainlines and the right side of the fabric before cutting. Cutting a piece on the fold when it should be cut as a pair can leave you without a usable counterpart.
The fabric scorches. Cotton settings can be too hot for synthetic fabric. Test the iron on a scrap, use a pressing cloth and follow the fabric or pattern guidance.
The project skips pressing. Pressing isn't the same as ironing clothes. It shapes each seam and helps corners, hems and curves sit correctly. Press as you go instead of waiting until the garment is finished.
Safety isn't optional
Read the manual even if the machine appears obvious. Electrical Safety First's sewing-machine guidance recommends reading the full manual, checking the cord, tying back long hair and loose clothing, turning the machine off when threading, and switching it off or unplugging it if you notice burning smells, sparks, cracks, damage or unusual noises.
Keep fingers away from the needle path and presser foot. Switch off and unplug before changing the needle, clearing a jam or making an adjustment. These habits protect your hands, your machine and the project in front of you.
Keep a mistake notebook. Record the fabric, needle, thread, stitch setting and what went wrong. Your notes will save more fabric than trying to remember what happened last time.
From First Stitches to Your First Garment
Skill grows more reliably when each project adds one or two new techniques. After a cushion cover, don't jump straight to a fitted shirt because the fabric is attractive. Choose a project that lets you repeat familiar actions while introducing a manageable challenge.
A practical progression
Stage one is control. Sew lines on scraps, practise corners, maintain seam allowances and learn to unpick without damaging the cloth. Make small samples of hems, gathers, a facing or a simple seam finish.
Stage two adds structure. A lined tote or simple top introduces turning, pressing, matching and possibly a facing. This is a good moment to add a seam gauge, better marking tools or a small pressing aid if those omissions slowed you down.
Stage three introduces fit. A darted bodice or pyjama set asks you to transfer markings carefully, work with more pieces and consider how fabric sits on the body. Make a toile from inexpensive fabric before cutting your chosen cloth when the fit matters.
Stage four involves several interacting techniques. A fitted dress or shirt may combine collars, sleeves, buttonholes, zips, interfacing and more detailed finishing. Take the pattern one instruction at a time, and don't be embarrassed to seek a class or refresher session.
Independent UK pattern houses such as Sew Over It, Tilly and the Buttons and The Maker's Atelier offer different drafting styles and instruction approaches. Compare the photographs, finished measurements, fabric suggestions and stated skill level before buying.
Build support into the route
Evening and weekend courses, online workshops and City and Guilds qualifications can provide structured feedback when a kit no longer answers every question. Public and sector provision also includes funded routes into sewing skills and machinist training, so a kit isn't the only starting point for learners considering sewing as a wider skill.
Downloadable worksheets from More Sewing can provide small practice projects between larger makes, while sample garments in a shop or showroom can show finishing details that photographs sometimes hide. Look closely at hems, inside seams, facings and zip finishes. Those details reveal how a garment was constructed.
Why More Sewing Is a Strong Place to Buy
A beginner often needs more than fabric and a pattern. They need a route to answers when the thread tangles, the instructions become unclear or the machine behaves differently from the diagram.
More Sewing offers dressmaking kits containing fabric, a dress pattern and the haberdashery needed to start. Its beginner provision also includes a “Getting Started With Your Sewing Machine” class, with fabric, thread and machines available during lessons. That combination matters because a learner can choose between independent practice and guided support.
Support beyond the box
More Sewing's working shop and showroom give beginners a chance to see sample garments and examine construction details before committing to a project. Fabric samples can help you compare colour, weight and texture, while staff can answer questions about thread, notions and suitability.
Machine servicing, cleaning and repairs also matter once you've invested in equipment. A kit should lead to regular use, not leave you stranded when the machine needs attention. For Worthing-area sewists, local access can reduce the friction of arranging repairs or asking a practical question in person.
The store also provides written instructions and downloadable PDF patterns for continued practice. Those resources help you move from a one-off kit towards a repeatable sewing routine.
| Service | What it gives a beginner |
|---|---|
| Curated dressmaking kits | Fabric, a pattern and relevant haberdashery in one starting point |
| Sewing-machine lessons | Guided practice with machines, fabric and thread available |
| Sample garments | Visible examples of seams, hems and finishing |
| Fabric swatches | A way to assess colour, handle and weight before ordering |
| Machine servicing and repairs | Practical support for maintaining equipment |
| Written instructions and PDF patterns | Further projects after the first kit |
The value of a sewing shop isn't only the product in the parcel. It's the confidence that you can ask what a bobbin does, check whether a fabric needs interfacing, or find out why a seam has puckered before wasting the rest of your cloth. That makes the first kit a starting point for skill-building rather than a one-off purchase.
Visit More Sewing to explore ready-to-sew dressmaking kits, haberdashery, fabric samples and beginner lessons. Choose a project that matches your current ability, check the hidden extras before ordering, and use the shop's practical support to turn your first stitches into a lasting sewing habit.
