
Dressmaking, Guides
Asymmetrical Dress Hem: How to Draft and Sew It
You've cut a beautiful uneven line, stitched the dress together, and tried it on expecting movement. Instead, the longer section droops, the side seam twists, and the front hem sits at a different level from the one you marked. An asymmetrical dress hem can look effortless when it's finished, but the pattern, grain, fabric and sewing order all have to work together.
The practical difference is simple. A straight hem can tolerate a little inconsistency because the eye reads an even line. An uneven hem exposes every change in tension, from a stretched bias edge to a poorly matched seam. The techniques below focus on what makes the garment hang cleanly on a real body, not merely look convincing on a pattern table.
Why Asymmetrical Hems Need a Different Approach
A maker can spend hours drafting a diagonal hem, only to discover that the longer side pulls the dress off balance. The problem usually isn't one bad stitch. It comes from the way an uneven edge distributes weight across the garment, particularly when part of the hem crosses the bias.
On a level hem, gravity acts in broadly similar ways around the skirt. With a high-low or diagonal shape, the longer section has more fabric hanging from it, while the shorter section may sit closer to a seam, fold or area of increased tension. As the wearer walks, sits and turns, those differences can make the longer sweep stretch or twist.
Workshop observation: If the hem looks uneven on the table but correct on the body, trust the body test. If it looks correct on the table and wrong when worn, check the grain, side-seam balance and fabric relaxation before altering the pattern.
Fabric choice makes the effect more obvious. Fluid viscose, charmeuse and other draping cloths can lengthen where the hem travels diagonally across the grain. A stable woven or structured knit may hold the drafted line more faithfully, but it can also produce a stiff, abrupt transition if the curve isn't shaped well. Bias-cut sections are especially unforgiving because the fibres can settle at different rates across the front and back.
Grainline deserves more attention than it receives in trend-led styling advice. A dramatic hem shouldn't be created by drawing an angle across an otherwise unchanged block. The pattern needs a deliberate length differential, and the finished garment must be checked for balance after assembly. British fashion has used uneven hemlines for generations, from Victorian formal gowns with back-emphasised “fishtail” hems to later eveningwear revivals. The silhouette also became particularly visible again in the late 1920s and early 1930s, when shorter front hems supported movement and altered the proportions of the dress, as documented in the history of the high-low skirt.
Pressing order matters too. Pressing a raw hem into a fixed fold before the side seams and main sections have settled can lock distortion into the garment. Treat the hem as the final expression of the dress's balance, not as an independent line that can be folded up at any point.
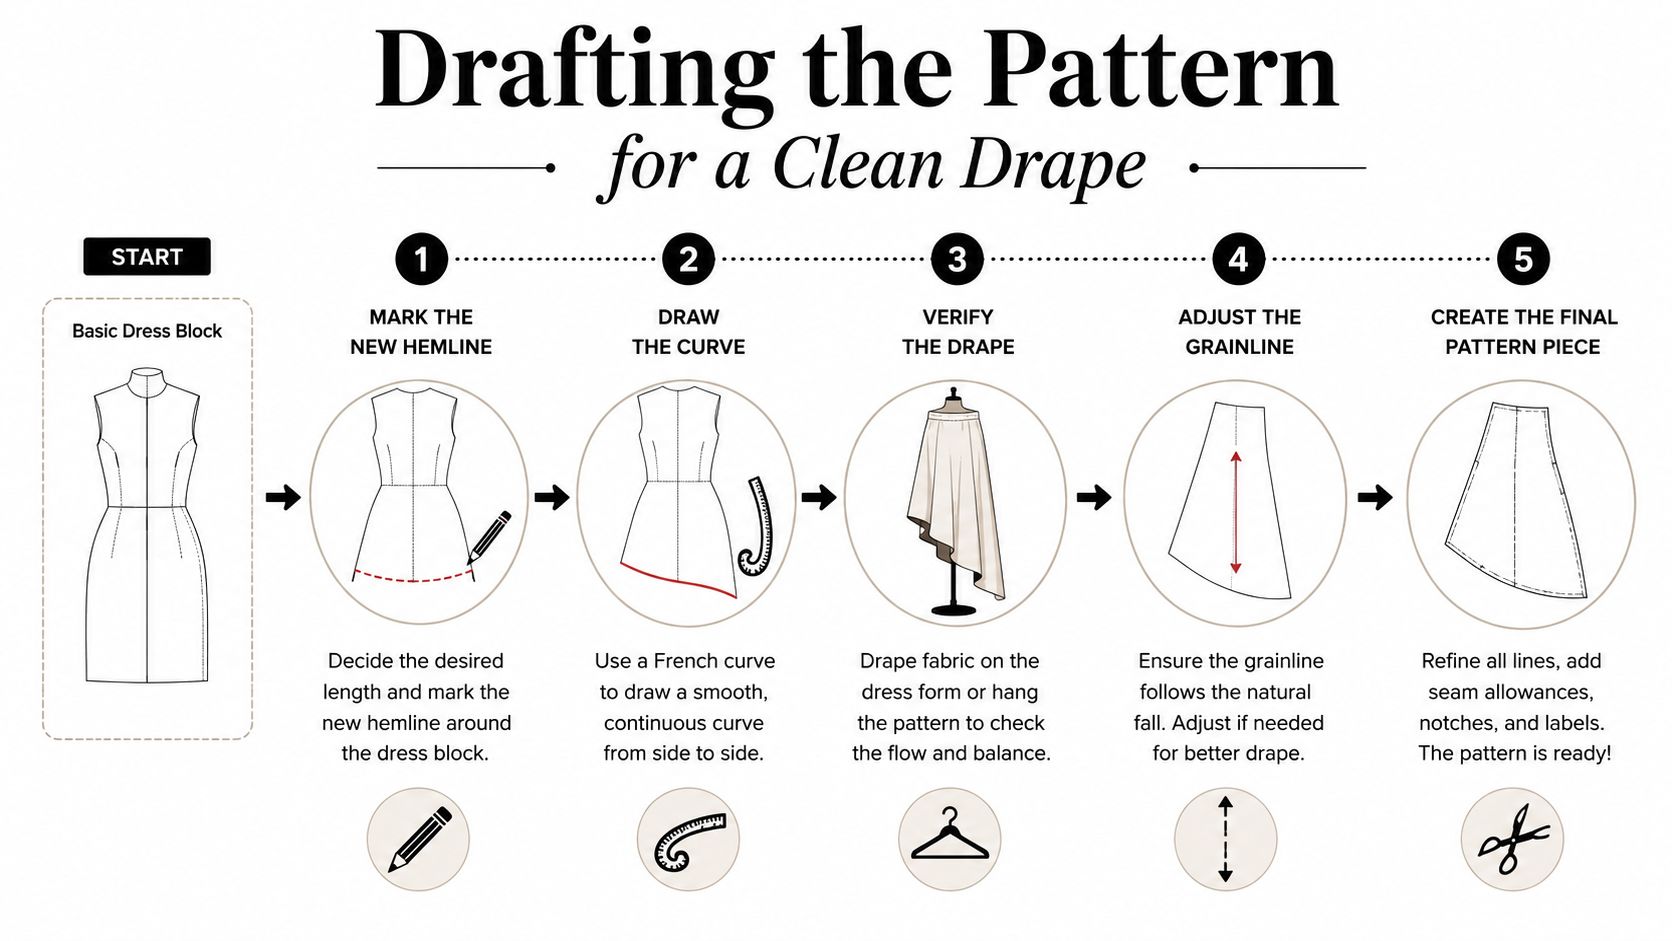
Drafting the Pattern for a Clean Drape
Begin with a basic dress block laid flat on a large pattern surface. The safest method is to redraw the hemline on the flat pattern before cutting, then check the completed shape on the body. An expert asymmetrical hem drafting guide recommends shortening the front by at least 20 cm and lengthening the back by about 20 to 25 cm for a knee-length dress. That gives a useful starting benchmark for a visible high-low silhouette without upsetting side-seam balance.
Establish the new line
Mark the intended finished length at the centre front, centre back and side seams. For a moderate diagonal example, you might shorten the centre-front line by 12 cm and raise the side seam by 8 cm, then allow the back to remain longer. Those measurements are a drafting example, not a universal fit rule. The correct result depends on the original skirt length, the fabric and the proportion you want.
Join the marked points with a smooth line. Use a French curve or hip ruler rather than a ruler held from point to point, because a sharp change at the side seam will create a corner that can pucker when turned. Walk the curve with your finger and remove any sudden change of direction.
Build in balance
If the front or back has been slashed and spread to create a high-low effect, true every seam junction after spreading. Place the side-front against the side-back pattern and walk the seams together. Any step at the hem will appear as a visible point once the garment is sewn.
Add balance notches at the centre front, centre back, side seams and any major transition in the curve. These marks help you match the hem sections accurately, especially when the longer sweep has stretched slightly during handling.
The hem allowance should follow the new line rather than being added as a straight strip parallel to the floor. A shaped hem facing is often more reliable for a strongly curved or angled edge. Draft the facing from the finished hemline, copy the asymmetry exactly, and mark the seam line so the facing doesn't distort the outer skirt.
Keep seam allowances consistent, then recheck the hem curve after joining the pieces. An asymmetrical dress hem is less forgiving than a straight edge, and small drafting errors become most visible at the longest back sweep. Before cutting expensive fabric, make a toile or test the revised line in inexpensive cloth with a similar weight and drape.
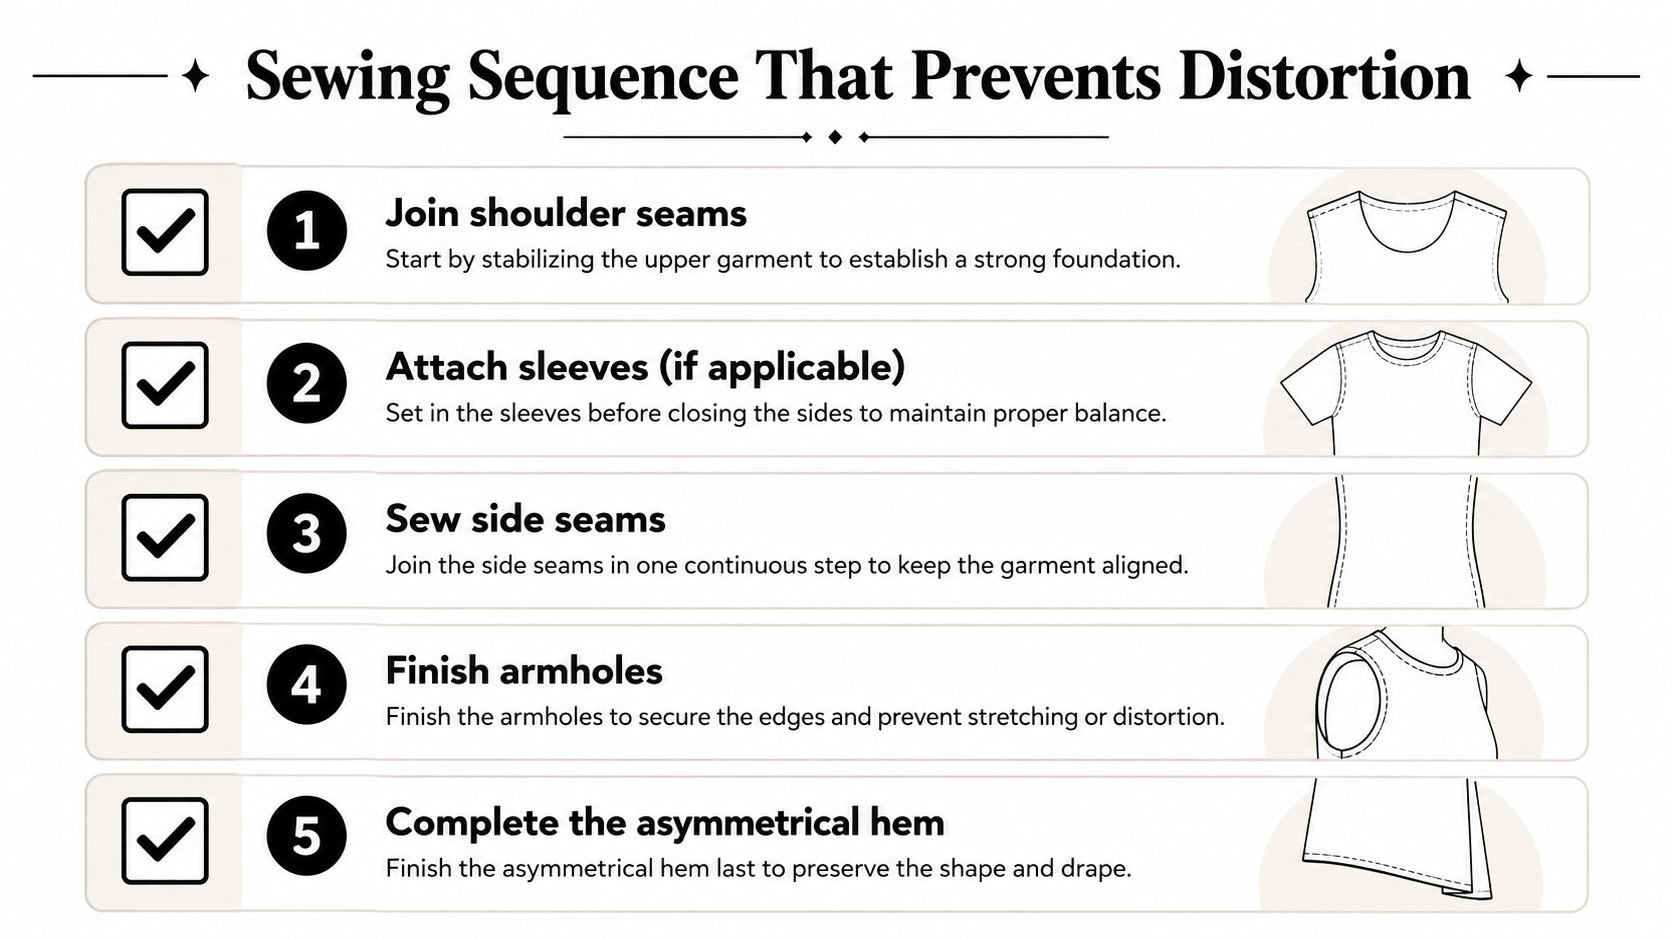
Sewing Sequence That Prevents Distortion
Construction order determines whether the hem hangs naturally or develops a twist. A second UK sewing source specifies narrow finishing values for an asymmetrical dress, including a 1 cm finished neckline width, 3 cm binding strips and a hem facing with a 1 inch, or 2.5 cm, hem allowance. These values aren't mandatory for every pattern, but they demonstrate how controlled finishing widths help curved and angled sections remain stable. The construction sequence is outlined in this asymmetrical dress sewing instruction.
Join the main dress sections before committing to the hem. Stabilise the neckline and armholes with the pattern's recommended binding, stay stitching or stretch control, then close the side seams and inspect the overall hang. Match shoulder and side-seam points carefully before topstitching. If those intersections are misaligned, the error travels into the skirt and becomes particularly obvious where the hem changes direction.
Stabilise before folding
For a knit or a fluid woven, lightweight knit interfacing or stay tape along a vulnerable hem section can prevent the edge from growing during handling. Stay stitch curved raw edges close to the raw edge, using a short distance such as 3 mm, then clip into the hem allowance at the tightest curves. The clips should stop short of the stitching line. Without them, the allowance resists the curve and creates ridges when pressed.
Don't stretch the longer side while feeding it through the machine. A walking foot can help when the upper and lower layers move at different rates, but it won't correct a stretched edge. Support the fabric on the table, use fine pins or hand basting where needed, and let the feed dogs move the work.
Charmeuse deserves particular care. Sew with the least handling possible, avoid pulling the back sweep towards you, and press with a cloth and gentle heat appropriate to the fibre. Press seams open or towards the direction specified by the pattern, but don't force the hem into its final shape until the whole dress has settled.
Allow the fabric to settle
Hang the assembled dress on a padded hanger for 24 hours before marking the final hem. This is especially useful where the skirt includes bias sections or a fluid cloth that changes length under its own weight. After hanging, put on the intended shoes, mark the finished line on the body, and only then trim and finish.
The final hem should be completed last. Overcasting or overlocking the raw edge before turning it helps control fraying, while a hand blind hem or locking stitch gives a discreet finish on many woven fabrics. This professional clothing alterations guidance recommends preparing raw edges, pressing the allowance with a sewing gauge, and completing the hem with a suitable hand stitch.
Finishing Techniques for Different Fabrics
The fabric determines how an asymmetrical hem should be finished. Crepe-back satin can lengthen on a diagonal and reveal every ripple, while scuba holds a sculpted edge but becomes bulky with a deep allowance. Choose the finish for the cloth's movement, then test it on the actual curve, rather than following the pattern shape alone.
| Fabric Type | Recommended Finish | Key Consideration |
|---|---|---|
| Lightweight silk or viscose | Narrow rolled hem or hand-rolled edge | Keep the edge light so it doesn't pull the longer sweep down |
| Crisp cotton or linen | Baby hem on a standard machine | Press accurately and avoid forcing a curve into a straight fold |
| Medium-weight jersey | Twin needle or coverstitch | The finish needs to stretch with the knit |
| Drapey woven with a pronounced flare | Shaped hem facing | Copy the exact asymmetrical curve and control the facing edge |
| Structured knit such as scuba | Narrow turned hem or shaped facing | Test bulk before choosing a deep allowance |
A narrow rolled hem suits fluid fabric because it contributes little weight. An overlocker gives a consistent edge, but check differential feed and thread tension on a scrap before sewing the garment. A hand-rolled hem takes longer, yet gives better control around a sweeping curve. Keep the stitching even, particularly where the hem changes direction.
Use a baby hem on crisp cotton or linen when the curve is moderate. Fold once, press, fold again, then stitch close to the inner fold. A tight curve may resist both turns and develop small pleats. A shaped facing usually lies flatter in that situation, provided its outer edge follows the asymmetrical hem exactly.
Jersey needs a finish that stretches with the knit. A twin needle produces parallel stitching on a domestic machine, while a coverstitch gives a more specialised finish. Stabiliser helps when the hem stretches under the presser foot. Place it where needed, then remove or trim it according to the product instructions. Avoid pulling the knit through the machine, because that can create a wavy edge that pressing will not fully correct.
Bias binding supports a curved edge and adds a defined border. It can suit a sharp diagonal, but may make a soft tulip hem look outlined rather than fluid. Horsehair braid adds body to a dramatic sweep and helps a formal high-low skirt hold its shape. It does not suit a quiet, flowing finish. A blind hem keeps a woven dress understated when the allowance has been shaped and pressed before hand stitching.
A fabric supplier such as More Sewing offers dressmaking fabrics including viscose and Tencel blends, so swatches can be useful when comparing drape before cutting. For a knit version, follow the stabiliser manufacturer's instructions and test the finished edge for recovery before committing to the full hem.
Common Mistakes and How to Fix Them
An asymmetrical hem can look accurate on the pattern yet hang unevenly on the body. Usually, the problem starts with an unbalanced junction, unsuitable allowance, or marking performed in the wrong shoes. Correct the construction before trying to rescue the finished edge with pressing.
Mistake one leaves the hemline untrued
Slashing and spreading can create small step-offs where pattern pieces join. They may seem minor on paper, but the sewn hem will show an abrupt point or dip at every junction.
Correction: Place adjoining pieces together and redraw the edge with a French curve. Walk the side seams, then transfer balance notches before cutting. If the garment is already cut, mark a new finished line directly on it and use the same curve to smooth each transition. Check the line from several angles while the garment hangs on the intended form.
Mistake two uses one narrow allowance throughout
A narrow allowance may suit a gentle curve, but a steep diagonal or bias section can curl and resist turning. The longer edge may then look stretched even when the outer line was drafted correctly.
Correction: Widen the allowance to at least 3 cm on bias sections when the fabric and design permit. The extra cloth gives room to shape the fold, clip the curve, and support the edge. Before trimming, assess the back sweep. Excess fabric there can add weight and pull the hem out of position.
Mistake three marks the hem without the intended shoes
Footwear changes posture, so it changes the apparent hem position. Marking barefoot or in another pair can leave the shortest point too high and make the longer section look disproportionate.
Correction: Wear the proper shoes while marking. Use a hem marker around the full circumference, measuring from the floor rather than judging the line by eye. Press the allowance on the marked line before trimming. The dress and skirt hem alteration guide recommends establishing the finished line first, then trimming consistently from the fold back to the original depth.
Pressing will not correct a side seam that is pulling. Unpick the distorted section, ease it back to the intended line with hand basting, and re-hang the garment for 24 hours before re-stitching. If the new length is close to the old hem, remove the original crease and press it flat before marking again. A UK hemming tutorial advises folding once, pinning or tacking, then sewing with a straight stitch while removing pins to prevent needle damage.
A straight-grain facing can also cause ridges because it cannot always accommodate a curved asymmetrical edge. Cut a shaped facing that mirrors the hem, or choose a bias-cut facing when the fabric and design allow it. Its outer edge must match the finished hem precisely, otherwise the facing introduces a second distortion.
Styling Variations and Fit Tips
Once the hem hangs correctly, choose the variation according to the fabric, body and occasion. A high-low shape exposes the front of the leg while giving the back enough length to move. A handkerchief hem releases at several points, so it suits fluid cloth that can carry the extra movement. A diagonal hem usually works best with a simple A-line or shift, where the dress does not compete with its direction.
Uneven hems have a long place in British fashion. Mary Quant's mid-1960s miniskirt, launched in Chelsea with the hem sitting six inches above the knee, helped normalise dramatic changes in length. British Vogue later highlighted renewed hanky-hem and asymmetric styles in 2017, as discussed in this British fashion history coverage. The history explains the appeal, but it does not replace a toile or a sound fitting method.
Choose the variation around the body
A high-low hem needs enough front length for a natural stride. Walk, sit and turn in the toile before cutting satin or heavily draped fabric. A pronounced diagonal can draw the eye across the hip. Move the line on the toile if it crosses an area the wearer would rather not emphasise.
A tulip hem needs a secure inner anchor, not overlapping front panels. Baste the overlap, then check it while standing and sitting. If it opens during walking, shorten the release or reinforce the anchor before finishing the edge. For layered asymmetry, finish each tier separately. Keep the underlayer 1 to 2 cm shorter than the visible layer where that relationship suits the design, preventing the edges from colliding or forming a bulky line.
Uneven hem weight can pull the waistline towards the longer side. Fit the bodice and skirt together on the body, then inspect the waist seam from the front and side. Smooth undergarments help under sheer or fluid fabric. A stable lining can reduce cling, but a heavy lining may pull the longer section down and alter the intended proportion.
Shoes need choosing before final marking. The shorter front section puts them on display, so a polished sandal, pump or ankle-strap shoe should support the proportion without competing with it. Recent interest in the style is reflected in this UK coverage of asymmetric hem styling, but the sewing table still determines whether the finished dress hangs cleanly.
A successful asymmetrical hem is drafted on paper, tested on the body, allowed to settle, and finished only after the fabric has shown you where it wants to fall.
For a knit version, More Sewing's guidance on hemming stretchy fabric can help with stabiliser choice, controlled stitching and pressing. Use a fabric sample to test the stabiliser and stitch before applying the method to the finished dress.
