
Dressmaking
Puffy Sleeves Pattern Guide That Actually Works
You've cut a beautiful blouse, gathered the sleeve cap, and tried it on in front of the mirror. Instead of sitting neatly over the shoulder, the puff has dropped towards the armhole, or it's ballooning at the crown while the cuff pulls uncomfortably at the forearm. The fabric may be lovely, but the pattern is directing the volume to the wrong place.
A successful puffy sleeves pattern isn't a plain sleeve made wider. It's a balance between the sleeve cap, bicep, forearm and cuff, with fabric choice and construction doing just as much work as the paper draft. Once you understand where fullness is created and how it's supported, dramatic sleeves become much easier to make wearable.
Why Puff Sleeves Behave Differently From Plain Sleeves
A plain sleeve is mainly concerned with arm movement and a clean relationship between the sleeve head and the bodice armhole. A puff sleeve has another job. It must create volume without allowing that volume to drag the sleeve down, crowd the shoulder, or collapse into an untidy fold.
Consider a small cotton blouse with a gathered cap. If most of the extra fabric is added close to the armhole, the sleeve may feel tight even though the pattern looks generous. If the fullness is spread evenly from cap to cuff, the result can look more like a wide sleeve than a deliberate puff. The design only works when the extra fabric is placed where you want the eye to see it.
Practical rule: Draft the volume first, then choose the fabric that can hold or soften that shape. Don't ask fabric to repair an unbalanced pattern.
Volume has a history
The silhouette has been revised repeatedly in British dress. Fashion historians trace huge puff-and-pane sleeves to England's Tudor period, from 1485 to 1603, when the style was associated with royalty and elite court dress, as described in this history of the puffy sleeve. The sleeve family returned in the late 1820s and early 1830s, when oversized gigot sleeves could be stiffened with feathers or horsehair and supported by internal structures.
The shape shifted during that period, with the puff moving down from the shoulder towards the elbow. UK museum interpretation captures the competitive scale of the fashion with the phrase “the bigger your sleeves the better”. The style faded by the middle of the century, then returned in the 1890s, which makes the modern puff sleeve part of a long cycle of revival rather than a single historical costume detail.
A later account of leg-of-mutton sleeve history describes the 1890 to 1899 cycle as a progression from fitted sleeves to ballooning upper-arm shapes. It also records a 1930s revival after a gap of roughly 40 years from the 1890s peak. The construction problem remained familiar across the eras: balance shoulder volume, control the bicep, and keep the lower sleeve practical.
Directing fullness is the real skill
A gathered cap puff concentrates fullness at the sleeve head. A short puff usually distributes some volume through the upper arm before narrowing above the elbow. A bishop sleeve allows the lower section to fall softly, then gathers or bands it at the wrist.
That difference matters more than the word “puff”. When drafting, ask where the sleeve should stand, where it should soften, and where the wearer needs movement. Adding fabric is easy. Directing it is the part that makes the sleeve sit right.
Tracing and Drafting a Base Puffy Sleeves Pattern
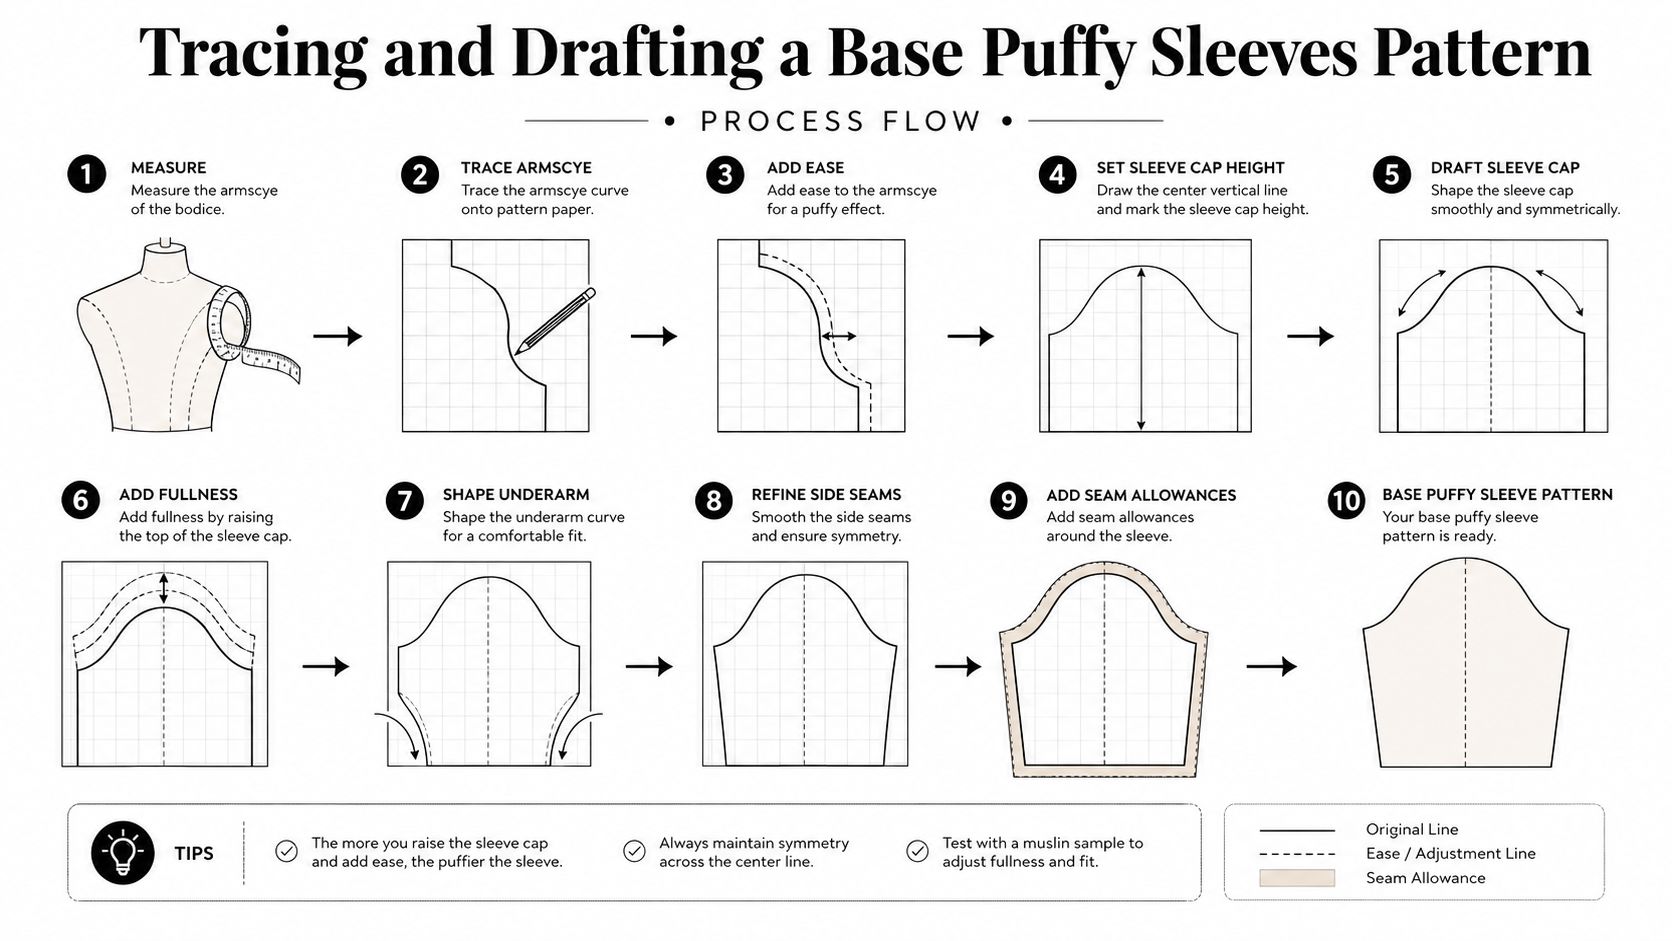
Begin with a straight sleeve block that already fits the bodice you plan to use. A fuller sleeve cap will not correct a poor armhole match, so record the armhole circumference, bicep circumference and sleeve length before you draw. This puff-sleeve drafting demonstration shows how those measurements establish the base before fullness is added.
Trace the block onto fresh pattern paper. Mark the centre line, front and back balance points, bicep line, hem and grainline. Keep the original sleeve-cap curve, rather than drawing one by eye. It must still correspond with the bodice armhole, otherwise the finished sleeve may drag, twist or collect unwanted ease at the shoulder.
Mark the draft before you slash
Draw several vertical lines from the hem towards the sleeve cap. Include the centre line, plus lines towards the front and back. The straight-sleeve puff pattern tutorial demonstrates this approach, using vertical slash lines and controlled spreading to build the required shape.
Stop each cut short of the cap so the sections retain a hinge, or cut them apart while keeping the original cap reference beneath the new draft. Lines placed close together distribute fullness more evenly. Wider gaps create stronger, more localised volume, which can be useful when you want emphasis at the shoulder rather than across the whole upper sleeve.
- Record the measurements. Write the armhole, bicep and sleeve-length measurements on the block.
- Mark the landmarks. Add the centre, front and back balance notches, bicep line, hem and grainline.
- Add slash lines. Draw parallel lines from the hem towards the cap, keeping their direction clear.
- Spread the sections. Pivot or separate the pieces on fresh paper until the sleeve has the fullness you want.
- Redraw the outline. Smooth the cap and hem, then check the shape for symmetry where needed.
- Check the bodice. Walk the sleeve cap against the armhole and true the seam before cutting fabric.
Directing fullness is the skill that makes the sleeve sit right
Keep approximately 1 cm, or 3/8 in, seam allowance around the sleeve when following the puff-sleeve drafting guide. If the block includes seam allowance, trace the stitching line first and add the allowance afterwards. This keeps the slash-and-spread measurement separate from the finished seam measurement.
A clear grainline helps prevent twisting, while balance notches show where the cap meets the front and back armholes. The number of slash lines can change with the fabric and the effect you want. The same guide uses 5 slash lines, while noting that 3 can work when broader sections of fullness suit the design.
Choose the spread with wearability in mind. Concentrated cap volume gives a sharper shoulder, while a broader spread through the upper sleeve produces a softer puff that is easier to move in and less costume-like. Draft the outline, then walk the cap once more before cutting into good fabric.
Three Puffy Sleeve Variations With Worked Examples
The same sleeve block can produce a restrained blouse sleeve, a playful short puff or a theatrical wrist-length shape. The difference comes from where you slash, how far you spread, and whether the lower sleeve stays narrow or receives additional width.
| Style | Slash lines | Best for | Volume sits at |
|---|---|---|---|
| Small gathered cap puff | Centre, front and back cap lines | Blouses and lighter dresses | The sleeve head |
| Short upper-arm puff | Several vertical lines through the upper sleeve | Summer tops and everyday dresses | The shoulder and upper arm |
| Bishop or leg-of-mutton sleeve | Longer lines through the sleeve, with extra upper-arm spread | Statement dresses and dramatic blouses | Upper arm, then softly towards the wrist |
Small gathered cap puff
For a soft blouse sleeve, keep the lower sleeve close to the original block and add modest spread near the cap. As a worked example, spreading a 30 cm sleeve by 4 cm creates a gentle increase in cap fullness, provided the extra width is distributed across the marked sections rather than placed in one large wedge.
Gather between the balance notches, then leave the lower section comparatively smooth. Cotton lawn or a fine viscose will give a softer result, but the cap may need more fullness than a crisp poplin because the fabric collapses rather than standing away from the shoulder.
Short puff above the elbow
For a short sleeve ending above the elbow, slash through the upper section and spread the pieces more noticeably. Keep the cuff line wide enough for comfortable movement, then gather the lower edge into a narrow band, elastic casing or facing.
This version suits cotton poplin, lighter linen and stable deadstock. It gives a visible puff without requiring internal support, especially when the sleeve cap remains proportionate to the bodice armhole.
Bishop or leg-of-mutton sleeve
A bishop sleeve needs a longer draft, while a leg-of-mutton shape concentrates more height and width at the upper arm. Use longer slash lines and pivot the sections apart, increasing the spread through the upper sleeve while allowing the lower portion to fall towards the wrist.
An explicit older drafting method measures 2 inches up from the cap and 2 inches down from the hem before moving the sections to increase fullness, as shown in this archived puff-sleeve drafting method. Treat that as a drafting reference rather than a universal formula. A dramatic sleeve may need a sleeve head, while a bishop in soft viscose may need width lower down so it gathers attractively into the cuff.
Best Fabrics and Notions for Puff Sleeves
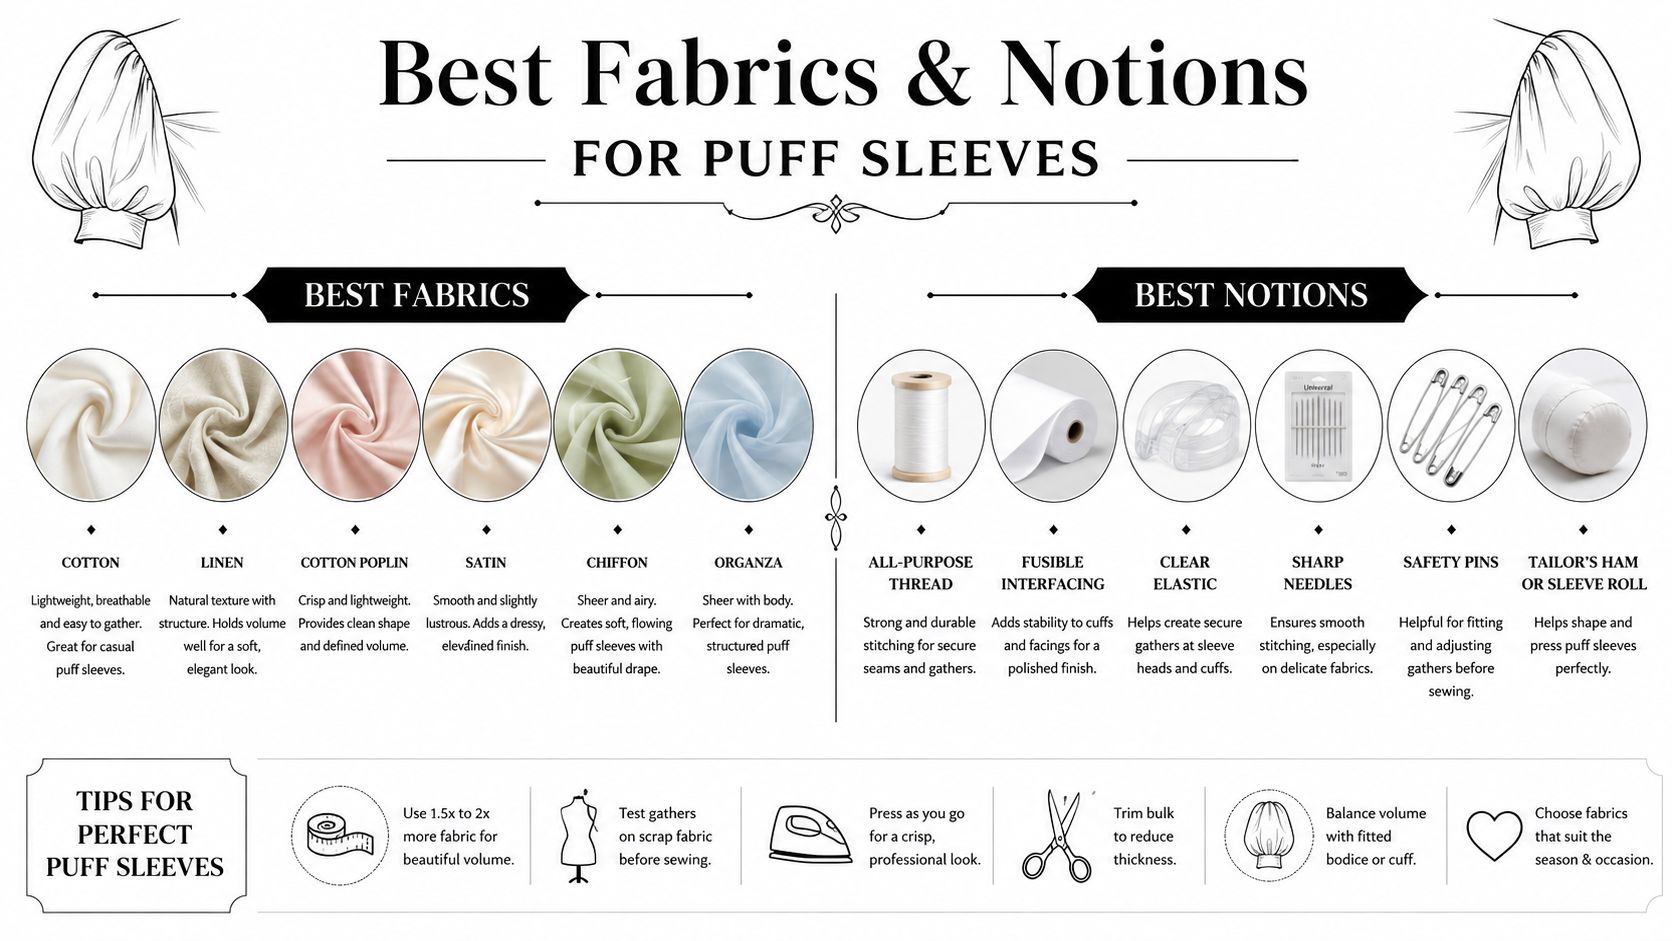
Fabric decides whether the same pattern looks sculptural, romantic or relaxed. Crisp cotton poplin supports a high cap and clean gathers. Cotton lawn produces a lighter, softer puff and may need extra fullness or a sleeve head to stop the shape looking flat. Linen gives texture and breathability, but its natural body can create angular folds if the cap is over-gathered.
Viscose and Tencel blends are useful for bishop sleeves because they fall into fluid folds. They're less suitable for a sharply raised cap unless you add support. Structured denim or a firm ex-designer deadstock can carry a short puff beautifully, but it may become bulky at the armhole if the pattern is spread too aggressively.
| Fabric | Suitable sleeve | What to expect |
|---|---|---|
| Cotton poplin | Cap puff or short puff | Crisp shape and controlled gathers |
| Cotton lawn | Small cap puff | Soft drape, often needs more fullness or support |
| Linen | Short puff or relaxed bishop | Breathable body with visible texture |
| Viscose | Bishop sleeve | Fluid folds and a softer silhouette |
| Structured denim or deadstock | Short statement puff | Strong shape, but watch armhole bulk |
Notions that make the finish behave
Use good-quality polyester thread and a sharp universal needle suited to the fabric. A lightweight iron-on interfacing works well inside cuffs made from lawn or viscose, where the band needs enough stability to enclose gathers without collapsing.
For a casual blouse, 5 mm elastic can replace a row of traditional gathering at the sleeve opening. Elastic creates an easy, forgiving finish, though it changes the character of the garment. It works best where comfort matters more than a precisely shaped cuff.
A sleeve head, stay tape or a strip of twill tape can support a soft cap. Don't add structure automatically. A firm poplin may already have enough body, while lawn benefits from a little help. Pre-wash the fabric before cutting, especially linen, cotton and viscose, because the final drape matters more than the fabric's behaviour straight from the roll.
More Sewing carries curated cottons, viscose and Tencel blends, linens, denims, haberdashery and ex-designer deadstock, with fabric sample swatches available for checking handle before committing to a sleeve.
Cutting, Sewing, and Finishing the Puff Sleeve
Place the pattern grainline parallel to the selvedge, then transfer every notch, especially the front, back and centre cap points. Cut a single layer when the fabric is slippery, directional or expensive. It takes longer, but it reduces the chance of the two sleeves becoming subtly different.
The cap deserves gentle handling. A stay stitch just inside the seam line can prevent a soft fabric from stretching, while twill tape can stabilise a shoulder that needs more definition. Keep the support narrow and light. Too much reinforcement makes the sleeve stand stiffly instead of forming a controlled puff.
Two ways to gather
The classic method uses two rows of long gathering stitches between the marked points. Keep the rows parallel and pull the bobbin threads gradually, spreading the gathers rather than creating one dense ridge at the centre. Stop when the sleeve cap matches the bodice armhole, not when the fabric looks gathered enough on the table.
Clear elastic gives a different result. Enclose the elastic in a casing or attach it according to the pattern instructions, then stretch it evenly while stitching. This suits casual blouses and soft fabrics, but it won't provide the crisp, structured distribution that two rows of gathers can achieve.
Set the sleeve into the bodice with the right sides together. Match the front and back balance notches first, then distribute the remaining ease across the cap. Pinning the centre cap to the shoulder seam helps you see whether the puff is centred before you stitch.
Test the shape on the garment before finishing the seam. If the cap is soft, a narrow bias-bound seam can keep the inside tidy without adding much weight. An overlocked edge is faster and practical for stable fabrics, though it can look bulky if the sleeve has heavy gathering.
A short demonstration of setting and shaping a gathered sleeve can be viewed in this puff-sleeve sewing video.
Finishing a bishop cuff
For a bishop sleeve, measure the wearer's wrist with enough ease for the hand to pass through comfortably. Gather the sleeve opening to the cuff or band, then choose one of three finishes:
- Elasticated opening. Form a casing and thread elastic through it for a relaxed blouse.
- Narrow hem. Use this when the sleeve is already wide and you want a loose, flowing wrist.
- Cuff band. Interface one side of the band, sew it to the gathered sleeve, and close the remaining edge neatly by hand or with accurate topstitching.
The cuff must balance the volume above it. If the lower sleeve is crowded into a very narrow band, the forearm can feel trapped even when the upper sleeve looks generous.
Fitting and Troubleshooting Common Puff Sleeve Problems
A puff sleeve can look charming in a photograph and become exhausting after an hour of wear. Test movement before judging the appearance. Lift the arms, bend the elbows, reach forward and sit down. If the sleeve restricts the arm or the cuff presses into the wrist, the pattern needs attention, not a more dramatic pressing job.
Read the drag lines
Use the fitting checklist below to identify the likely cause before changing the whole draft.
- Front drag lines: If the sleeve pulls towards the front when the arm hangs naturally, compare the front balance notch with the bodice. A small easing adjustment at the back of the cap can restore the sleeve's balance.
- Back tugging: If diagonal folds pull towards the back armhole, check whether the back cap has enough room and whether the sleeve has twisted on the grainline. Correct the grainline first, then add a little room where the drag begins.
- Rolls at the shoulder: If the cap forms repeated rolls, the gathers may be concentrated too tightly at the crown. Redistribute them between the balance points instead of pulling the threads harder.
- Excess crown bulk: If the sleeve looks crowded at the shoulder, test the garment with the cap lightly pinned. Taking 5 mm out of the sleeve head can reduce the ridge, but only do this after confirming that the armhole seam still matches.
- A tight cuff: If the upper sleeve is comfortable but the forearm feels restricted, the gathered volume is being forced into too little space. Widen the cuff, add opening ease, or move some fullness higher into the sleeve.
Rescue a flat or floppy shape
A soft sleeve that has lost its intended height may need a sleeve head, a narrow stay or very soft wadding. Use the lightest support that produces the shape you want. Heavy padding can turn a blouse into costume, while a small sleeve head can keep a cap from collapsing into the armhole.
Drafting guidance repeatedly stresses checking the sleeve cap against the bodice armhole before finalising the pattern, because an untrue cap can cause dragging, twisting and unwanted ease. Make that check on paper and again in the toile.
Wearability test: If you can't move, reach and sit comfortably in the sample, the sleeve isn't finished, however good it looks on the hanger.
Sew a small muslin before cutting precious linen, deadstock or printed viscose. A quick toile reveals where the puff lives, whether the cuff is practical and whether the fabric pairing supports the design. That small habit turns a one-off puffy sleeves pattern into a dependable block you can adapt again.
Choose your next sleeve project from More Sewing's curated fabrics, haberdashery, patterns and ready-to-sew kits, then order a sample swatch to check the drape before cutting. Visit More Sewing to find the fabric and notions that will help your puff sit neatly, move comfortably and look intentional.
