
Guides
Sewing Repair Kits: A Practical Guide for Every Home
You're halfway out of the door when a shirt button gives up, a school blazer hem starts unravelling, or a coat zip separates just as the rain arrives. Without a sewing repair kit, that small fault can become a rushed trip to the shops or a reason to abandon an otherwise wearable garment. With the right needles, thread, fastenings and a few clear instructions, many everyday problems become manageable at the kitchen table.
The useful distinction is that a repair kit isn't only a bundle of notions. It's a small skills-and-confidence system. The contents need to match the fabrics and repairs you meet, while the instructions need to make the first stitch feel possible. The guide below is practical shop-floor advice for UK homes, from a student bedroom to a busy family utility cupboard.
Why a Sewing Repair Kit Belongs in Every UK Home
A loose button rarely fails at a convenient moment. It happens while you're dressing for work, while a child is waiting for the school run, or when a blazer needs to look respectable before assembly. A compact kit turns that scramble into a controlled repair: find the matching button, choose a suitable needle, anchor the thread and secure it properly rather than reaching for a temporary safety pin.
The same kit can deal with a split trouser seam, a dropped curtain hem, a pet-clawed cushion cover or a small tear in a school uniform. These repairs are ordinary, but they're exactly the jobs people postpone when the necessary tools are scattered through drawers. Keeping everything together means the repair starts when you notice it, not when you finally remember to buy a needle.
Repair culture needs practical support
UK repair habits have clear commercial relevance. In January 2023, John Lewis Partnership reported that sales of craft and repair products, including patches and repair tape, were up 61% year on year, while safety pins rose 21% and tape measures 14% in its reported retail update. Those figures relate to small repair-oriented supplies rather than sewing repair kits alone, but the overlap is direct. Needles, thread, fasteners, tape measures and patch materials are the same core notions found in a useful home kit.
That demand sits within a long British “make do and mend” tradition. The Woolworths Museum's history of haberdashery records “penny notions” at British Woolworths in Liverpool when it opened on 5 November 1909, followed by post-war departments selling needles, thread, elastic, wool, yarn, buttons, fasteners and zips. It also describes a tights and stockings repair kit containing threads in several common shades. Compact sewing kits weren't a modern novelty. The terms “housewife” and “hussif” for portable sewing kits have UK usage dating back to the 18th century.
Practical rule: If a repair is likely to take less time than a trip to buy replacement clothing, keep the tools within reach.
A modest kit can prevent a large nuisance
Repairing a garment won't always be the right choice. A badly damaged zip may need a specialist, and a worn fabric panel can fail again if it's only covered cosmetically. But for buttons, hems, seams and small tears, replacement often creates more cost and inconvenience than the fault deserves.
WRAP found that nearly one-third of people would bring more clothes back into use if they had the skills or time to repair or alter them, while 19% said they could use over half of their unworn clothes again if repaired in its textile research. A ready-to-grab kit can't supply time by itself, but it removes one barrier and gives a beginner somewhere sensible to start.
That makes sewing repair kits useful gifts for new homeowners, students heading to university and travellers who want a compact emergency pouch. The aim isn't to own every sewing tool. It's to have the right handful of tools, know what they do and feel confident enough to use them before a small fault becomes a discarded garment.
What Goes Inside a Sewing Repair Kit
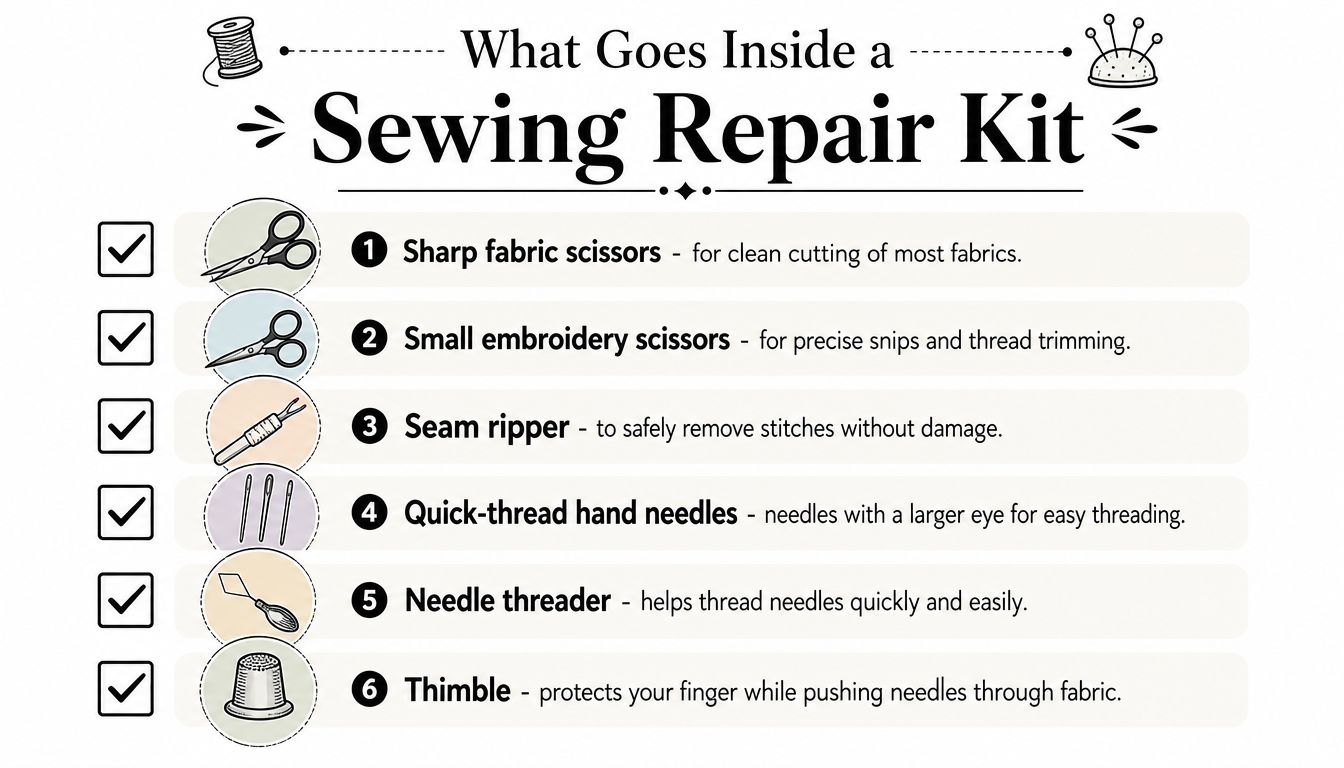
Start with cutting, removing and measuring tools. Sharp fabric scissors should cut cleanly through cloth without chewing the edge, while small embroidery scissors are better for trimming thread close to a seam. A seam ripper, sometimes called an unpicker, removes an unwanted stitch without forcing a blade through the fabric. A soft measuring tape helps with hems, elastic and checking whether a replacement fastening is positioned correctly.
The hand-sewing core
Choose assorted hand needles rather than one supposedly universal needle. A quick-thread needle can help someone who struggles with a small eye, but it shouldn't replace ordinary needles for every job. Include:
- Sharps: Useful for woven shirts, cottons and trouser hems.
- Darning or tapestry needles: Helpful for knitwear and yarn-based repairs, where passing between loops is preferable to cutting through them.
- A stronger needle: Chenille or mattress styles are useful for thicker materials and bulky seams.
- A needle threader: A small addition that makes starting less frustrating.
- A thimble: Protects your finger when pushing through denim, several layers or firm coat cloth.
- Pins and a pincushion: Hold a patch, folded hem or seam alignment in place while you work.
The UK Repair Café guide to common clothing repairs recommends needles, threads in various colours, scissors, pins and a thimble. It also advises practising hand stitching, backstitching and hemming on fabric scraps before working on a favourite garment. That rehearsal matters. A piece of old cotton lets you test tension and stitch size without turning a school shirt into your practice sample.
Thread and fastenings
Keep general-purpose polyester thread for most household repairs. Add a fine thread for lightweight blouses and a heavier option for coats, denim and firm work trousers. A few spare shirt buttons on a card, neutral plain buttons, hook-and-eye closures, snap fasteners and safety pins cover the failures that arrive most often.
Bias binding can neaten a raw edge, fusible webbing can hold a folded hem temporarily before stitching, and iron-on patches offer a quick answer for worn knees or small holes. Use a branded, dependable reel, such as a Gutermann-style general-purpose thread, rather than filling the case with brittle thread that snaps as you pull it through the fabric.
For school blazers, add a dark thread, a suitable needle, spare buttons and a patch option. For curtains, prioritise scissors, pins, measuring tape and thread that matches the face fabric. A kit earns its space when every item has a likely job.
Types of Sewing Repair Kits and When to Use Them
The biggest kit isn't automatically the most useful one. A traveller needs compact essentials, while a household dealing with curtains, bedding and uniform repairs needs more space and a wider colour selection. Dressmakers have a different problem again, because repairs sit alongside fitting, construction and pattern work.
| Kit Type | Typical Contents | Best For | Ideal User |
|---|---|---|---|
| Travel or on-the-go | Needles, thread, small scissors, safety pins, spare buttons and a thimble | Popped buttons, loose hems and small emergencies away from home | Travellers, commuters and students |
| Household | Assorted needles and threads, fabric scissors, seam ripper, pins, tape measure, patches and fastenings | Curtains, cushion covers, bedding, uniform and everyday clothing | Families and new homeowners |
| Dressmaker-focused | Larger needle selection, tailor's shears, twin needles, tracing wheel, pattern paper and measuring tools | Alterations, garment construction and repeated fitting work | Home dressmakers and textiles students |
Choose the format around your routine
A travel tin or zipped pouch belongs in a handbag, glove box or holiday case. It should handle a loose button or a quick hem, not pretend to replace a full sewing room. Tiny scissors are convenient, but test them before travelling. Some novelty versions are too blunt to cut thread cleanly.
A household box works harder. Keep it in a kitchen drawer, utility cupboard or labelled craft basket where every member of the household can find it. This is the practical middle ground for a child's torn school trousers, a curtain drop or a cushion seam that has opened.
A dressmaker-focused case makes sense once you're altering garments or sewing regularly. Extra hand needles, tailor's shears, a tracing wheel, pattern paper and accurate measuring tools support work that goes beyond emergency mending. There's no benefit in carrying all of that to the beach for a lost button.
More Sewing's range covers the travel, household and dressmaking tiers, so shoppers can choose a format around actual use rather than buying the largest case by default. The sensible test is simple: where will the kit live, and what repair will it need to handle first?
Matching Needles and Threads to the Repair
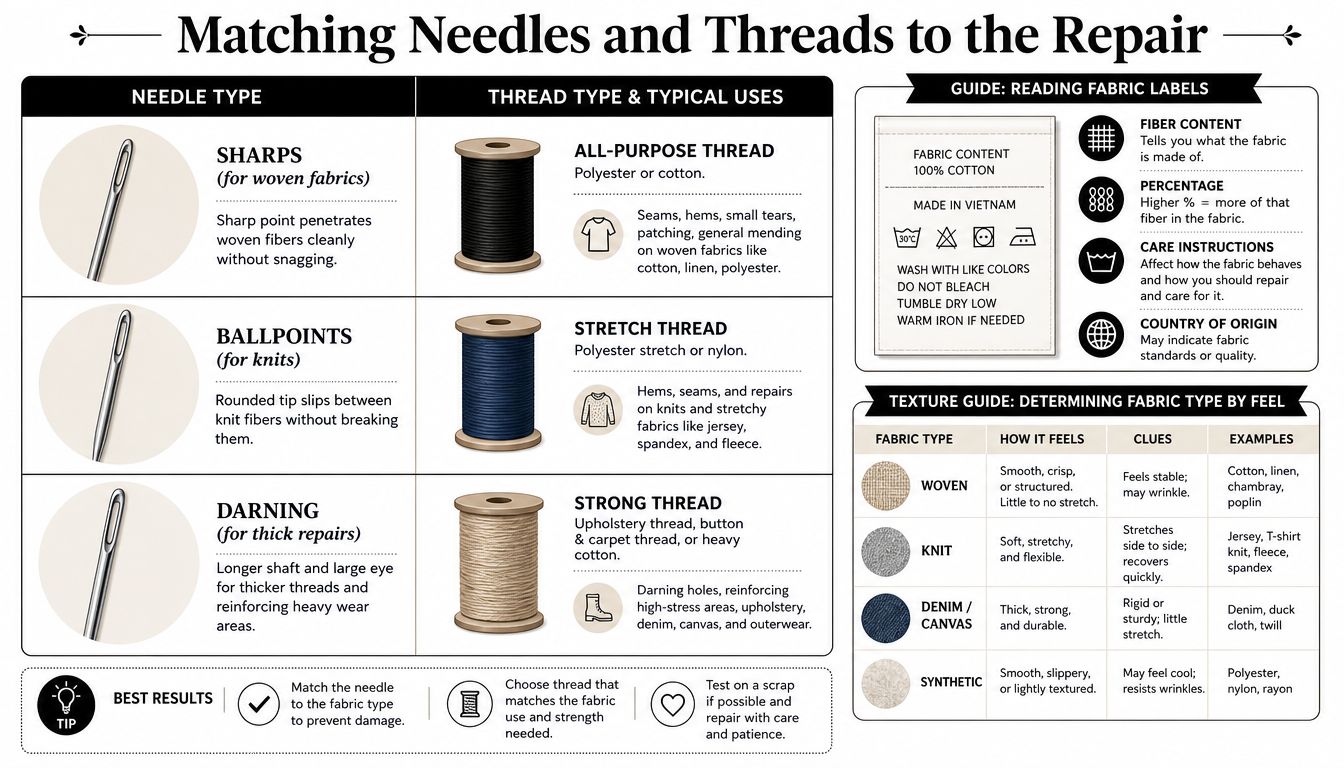
Needle choice depends on the damaged area and the fabric structure. The SQA textile repair unit specifies selecting hand stitches, thread and tools according to the repair and fabric type. That's why a useful kit contains several needle classes instead of one all-purpose needle.
Begin by checking the care label. If the label isn't clear, feel the fabric and look at its surface. A crisp, stable woven shirt fabric behaves differently from a looped jersey, a fluffy knit or dense denim.
Let the textile choose the needle
- Sharps for woven cloth: Use a sharp point for cotton shirts, woven trousers and neat hems. It pierces the compact weave cleanly.
- Ballpoint-style needles for knits: A rounded point can pass between loops instead of cutting them. Use care with stretch jerseys and ribbed cuffs.
- Darning or tapestry needles for knit repairs: Their larger eyes carry thicker thread or yarn, while the blunter point helps you work between loops.
- Chenille or mattress needles for heavy fabric: Choose a stronger option when repairing thick coats, upholstery-like cloth or multiple folded layers.
- Embroidery needles for decorative reinforcement: Their larger eyes suit embroidery floss and visible mending, but they're not the first choice for a hidden trouser seam.
Match thread weight to the job
General-purpose polyester is a reliable starting point for mixed wardrobes because it has useful strength and a little give. Cotton thread can suit natural fibres and visible traditional repairs, while buttonhole twist creates a more substantial finish around a button. Heavy-duty thread belongs on sturdy coats and denim, but don't force it through a tiny needle eye. If the thread catches, frays or bunches, the combination is wrong.
Use a single thread for fine cloth and delicate seams. Double it for a button or a stress point when the fabric can support the extra thickness. Knot the ends securely, but keep the knot small so it doesn't create a lump against the skin.
For colour, compare the thread against the fabric in daylight and look at the weave rather than only the surface. A slightly darker shade often disappears more effectively than a bright, exact-looking match. If stitches skip, the needle may be wrong for the textile. If the seam feels weak, use a stronger thread, shorter stitches or a suitable reinforcement rather than just pulling harder.
Three Quick Repairs You Can Learn This Week
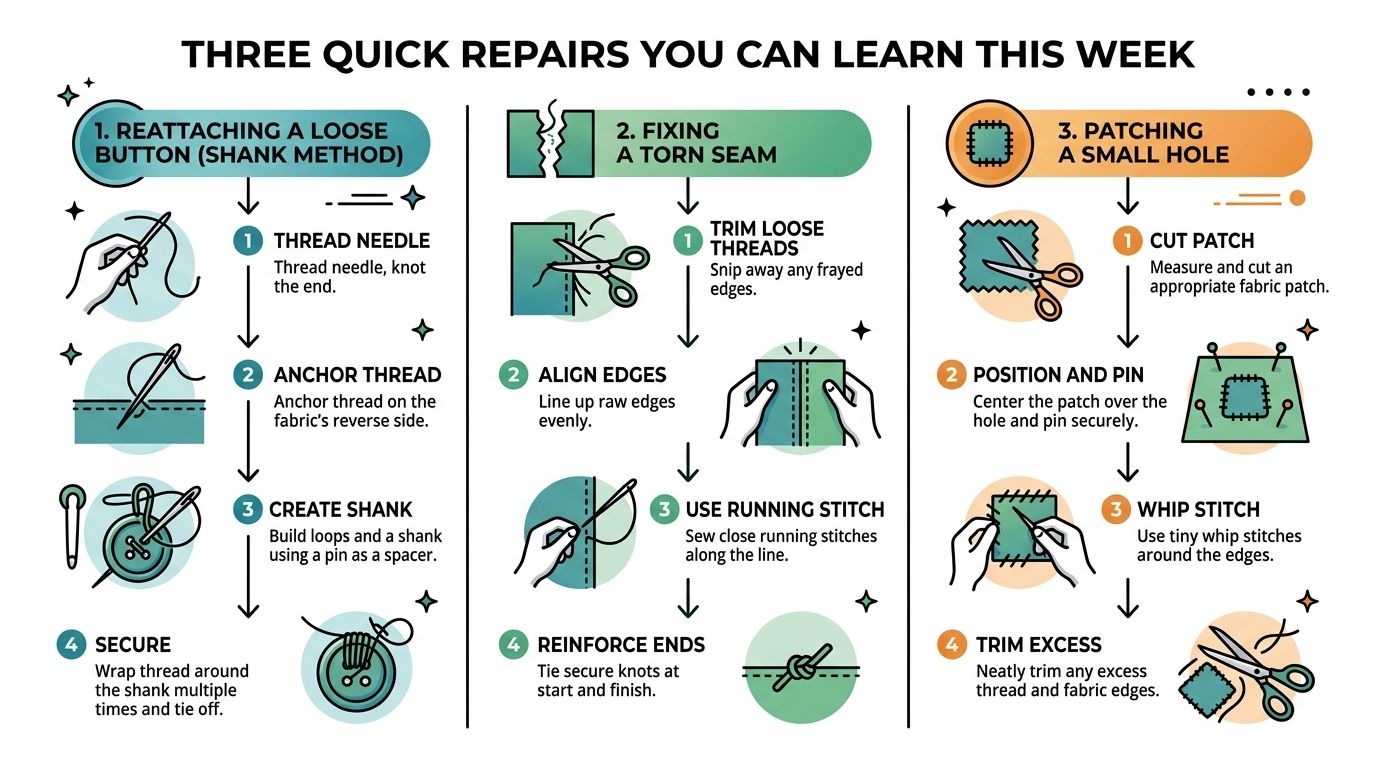
Confidence comes from fixing an actual problem without making it worse. Start with scrap fabric, then choose a less important garment before handling a favourite coat or occasion outfit. Practise hand stitching, backstitching and hemming until the thread tension feels natural. A repair kit earns its place when it turns hesitation into a manageable first attempt.
Reattach a loose button
Tools: Matching button, sharp needle, polyester or buttonhole thread, scissors, thimble and a small scrap of fabric.
For a flat shirt button, double a manageable length of thread, knot the ends and bring the needle from the inside of the garment. Pass the needle through each button hole several times, keeping the stitches firm without pulling the fabric into a pucker. Leave a little space beneath the button. Bring the needle up beside the threads and wrap around them several times to create a small shank.
Take the needle back through to the wrong side, secure the thread with firm knots and trim it. A coat button needs a longer shank because it must clear thicker fabric and the buttonhole facing. The aim is a secure, tidy fastening that lets the cloth sit naturally. Tight, hurried stitches can leave the button flat against the garment and put strain on the surrounding fabric.
Patch a small tear or worn knee
Tools: Fabric patch, pins, sharp scissors, matching thread, needle, tailor's chalk and an iron if the patch is fusible.
Trim loose fibres without enlarging the hole. Cut a patch with rounded corners, slightly larger than the damaged area. Place it on the wrong side for a discreet repair, or on the outside when a visible patch suits the garment. Pin it, or hold it with a few temporary stitches, then use running stitch around the edge on light fabric. A small whip stitch helps contain an edge that is likely to fray.
Use backstitching at the corners and along sections exposed to strain, such as a trouser knee. If the patch is iron-on, follow the product instructions and stitch around its edge when the garment will be washed often or used for work. More Sewing's crossbody tote bag pattern guide offers a useful practice project for controlled seams, neat edge handling and patch-style reinforcement, without the pressure of repairing a treasured garment.
Make a quick zip correction
Tools: Seam ripper, replacement slider if available, small pliers, needle and strong thread.
A slider that has come off can sometimes be refitted if the teeth and tape remain sound. Inspect the top end first. Remove only the stitches hiding the zip, guide both sides of the tape into the slider and move it gently until the teeth engage evenly. Forcing it can bend the slider or distort the tape, so stop if the teeth do not meet cleanly.
If the slider feels loose, use pliers for a very slight crimp, then test it. Repeat small adjustments rather than squeezing hard. When a top stop has failed, replace it or make a secure stitched barrier to keep the slider in place. A damaged coil, missing teeth or badly torn tape usually calls for a replacement zip. Hand stitching will not restore the missing structure.
These repairs work well as first projects because each one teaches a different judgement. A button tests tension and spacing, a patch tests placement and edge control, and a zip tests patience and inspection. The finished repair should be sound and tidy, even if it is not couture-perfect.
Here's a short visual demonstration to support those first attempts:
Building a Custom Kit from Individual Notions
Pre-packed sewing repair kits are useful when you're starting out, but experienced sewists often outgrow them. A custom kit avoids duplicate colours, weak tools and notions you never touch. It also makes room for the fabrics your wardrobe contains, whether that's mostly denim, jerseys, school uniform or lightweight cotton.
Begin with the container. A zipped pouch suits travel, a tin protects small notions in a handbag and a divided box prevents needles, buttons and fasteners from becoming one tangled handful. Then audit the repairs you've done recently. If every repair involved a dark button, a hem or a split seam, those items deserve priority over decorative trims.
Select the essentials deliberately
A practical custom kit might contain:
| Notion | Role in Your Repair Kit |
|---|---|
| Sharps and ballpoint needles | Covers woven garments and knitted fabrics |
| Darning or tapestry needles | Carries thicker thread through knit repairs |
| Two or three thread colours | Handles the shades you wear and repair most |
| Strong polyester thread | Supports buttons, denim and stressed seams |
| Tailor's chalk or washable marker | Marks hems, patch placement and stitch lines |
| Pins and a pincushion | Holds layers in position before stitching |
| Seam ripper | Removes inaccurate stitches cleanly |
| Small fabric scissors | Cuts cloth and trims thread accurately |
| Measuring tape | Checks hems, patch size and fastening position |
| Spare neutral buttons | Replaces common shirt and trouser buttons |
| Press fasteners and hook-and-eye closures | Restores simple garment fastenings |
Build two versions if your life demands it
A travel version should contain only the tools you'd use away from home: a few needles, neutral thread, small scissors, safety pins, a button and a thimble. The household version can add fabric scissors, patches, a seam ripper, several thread weights and a measuring tape.
This approach also makes sense for specific projects. Repairing jeans calls for strong thread, a denim needle, a patch and a thimble. Altering a flowing blouse needs fine needles, lightweight thread and accurate marking tools. There's no reason to burden both kits with every notion in the shop.
More Sewing's individual notions range lets you assemble a kit piece by piece, which is useful when you know a pre-packed selection doesn't match your sewing habits. The saving is not only space. It's attention. When the repair starts, you can see the correct tool immediately.
Buying Tips and Keeping Your Kit Ready
Choose a case that lets you see its contents quickly. A deep box filled with loose needles may hold plenty, but it creates friction at the exact moment you're trying to make a repair. Transparent pockets, compartments or a shallow tin make it easier to spot a thread colour, a thimble or the seam ripper.
Check that the needle sizes and thread colours can be replaced from the same retailer. A kit becomes frustrating when its useful black thread runs out and the exact weight can't be found. Test scissors on fabric rather than paper, and reject novelty kits if the blades are blunt or the included needles are too few for ordinary work.
Keep the contents dependable
- Prepare on first use: Thread the needles you use most often and store them safely so the next repair starts quickly.
- Remove damaged pins: Bent or rusty pins can snag fabric and shouldn't remain in the pincushion.
- Protect core colours: Keep spare black and white thread available for quick decisions.
- Check the fastenings: Replace missing buttons, used safety pins and empty reels before putting the kit away.
- Inspect regularly: Refresh the contents every twelve months, or sooner if your household repairs frequently.
If a sewing machine is part of your repair setup, start with the simple checks before assuming it needs a major service. Singer's sewing-machine FAQ and maintenance guidance recommends resetting hook-to-needle timing as an early check, selecting straight stitch, using a long stitch length for certain repair checks and fitting a brand-new size 90 needle. Its maintenance advice also specifies sewing-machine oil only, never household oil, with one drop applied to the moving parts named in the manual.
A sewing repair kit pays back through repeated use, but its real value is capability. Once you've repaired a button, stabilised a tear and corrected a hem, the next fault no longer feels like an emergency. You've built a small, practical skill that stays available in the drawer.
More Sewing offers individual haberdashery, quality fabrics and ready-to-sew kits, making it possible to assemble sewing repair kits around your actual wardrobe and skill level. Visit More Sewing to choose the needles, threads, patches and tools you'll need for your next dependable repair.
