
Bias tape is a narrow strip of fabric cut at a 45-degree angle to the grain, and that diagonal cut gives it the stretch it needs to finish curved edges neatly. If you want a smooth neckline, armhole or rounded quilt edge without puckering, bias tape is the tool that makes that happen.
You've probably seen the problem already. The garment is nearly done, the seams look good, the pressing is careful, and then the neckline spoils the whole thing. It ripples, feels bulky, or refuses to sit flat no matter how much steam you apply.
That's usually the moment sewists ask, what is Bias tape, and why does everyone keep recommending it?
The short answer is that bias tape solves a very specific sewing problem. Curves need flexibility. Woven fabric usually resists that. A strip cut on the bias behaves differently, so it can wrap, turn and settle around a shaped edge in a way a straight strip cannot.
Once you understand the reason behind that little strip, the rest gets much easier. You start choosing it with more confidence, making your own when the shop colour isn't right, and applying it without that nervous feeling that often comes with finishing edges. If you'd like another practical walkthrough on how to use bias tape for sewing, that guide pairs nicely with the techniques below.
Your Secret to Professional-Looking Garments
A lot of sewing frustration comes at the finishing stage. You can sew a lovely dress, top or child's pinafore, but if the neckline edge looks wavy, people notice the edge first. Bias tape helps tidy that final detail so the project looks deliberate and polished.
Think of it as a flexible frame around the edge of fabric. Instead of forcing a stiff strip to travel around a curve, you use a strip that naturally wants to bend. That's why it appears so often on armholes, necklines, curved hems, apron edges, quilt bindings and even some seam finishes.
Why beginners often find it confusing
The confusion usually comes from three things:
- The word “bias” sounds technical. It's really just about the direction the strip is cut.
- There are different types. Single-fold and double-fold look similar at first glance, but they do different jobs.
- It can be bought or made. That gives you options, but it also creates decision fatigue.
Bias tape isn't fussy because sewing people like tradition. It exists because curved edges behave differently from straight ones.
When home sewists first learn what bias tape is, they often assume it's mainly decorative. It can be decorative, especially in a contrast print, but its real value is functional. It controls raw edges, helps curved areas lie flatter, and can replace a separate facing in some garments.
Where you'll use it most
A few common examples make the idea clearer:
- On a summer dress neckline: single-fold tape can be sewn on and turned inside for a clean finish that doesn't add much bulk.
- On an armhole in a sleeveless blouse: bias tape can help the edge curve neatly around the body.
- On a quilt or pot holder edge: double-fold tape wraps over the raw edge and encloses it.
- On an apron tie or decorative trim: it can become both a finish and a design detail.
If your sewing often looks “nearly right” but not quite shop-finished, the edge treatment is often the missing piece. Bias tape is one of those small skills that changes how all your projects look.
The Magic of the 45-Degree Bias Cut
The reason bias tape works so well isn't luck. It comes from geometry.
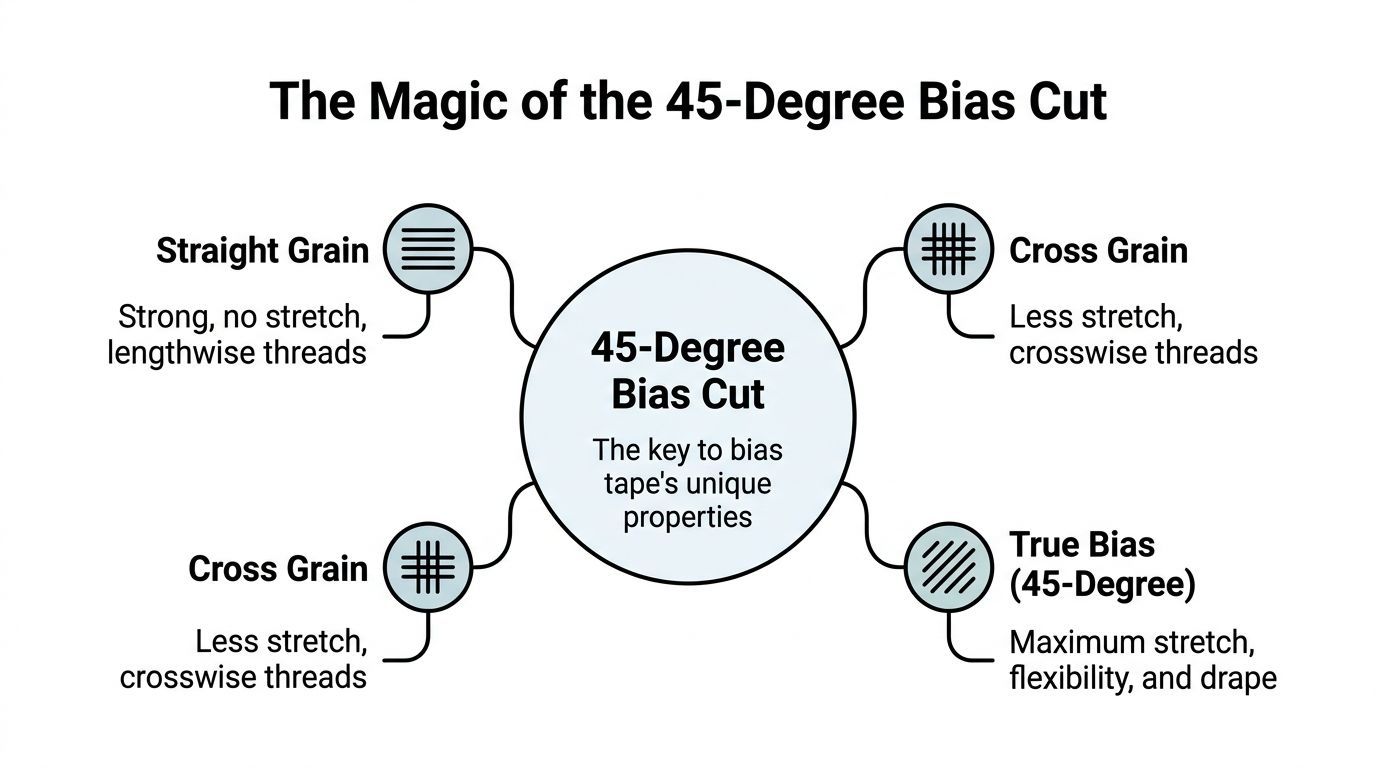
According to Wikipedia's explanation of bias tape, bias tape is defined by its geometric construction: it's a narrow strip of fabric cut at a precise 45° angle to the grain, and that angle gives it maximum bi-stretch elasticity. That diagonal orientation is what lets it wrap around curves like necklines without the ridges and puckering you get from straight-grain strips.
Fabric has directions
Woven fabric isn't the same in every direction. If you've ever tugged a square of cotton in different ways, you've felt this already.
A simple way to understand this is:
| Grain direction | How it behaves | Best use |
|---|---|---|
| Straight grain | Strong and stable | Seams and pieces that need structure |
| Cross grain | A bit more give | Some width movement, but still fairly stable |
| True bias | Most flexible and drapey | Curves, bindings, shaped edges |
A paper analogy helps. If you try to curve a strip of card around a bowl, it fights you. If you switch to something that can flex on the diagonal, it settles much more easily. Bias-cut fabric does that diagonal flexing.
Why straight strips fail on curves
A straight-grain strip wants to stay straight. When you force it around a curve, one edge has to travel farther than the other. The fabric resists, so you get tiny tugs along the edge. Those tugs show up as ripples, twists or little pleats that don't belong there.
That's why a neckline can look odd even when your stitching line is accurate. The issue isn't always your sewing. Sometimes the strip itself is wrong for the shape.
Practical rule: If the edge curves, the binding needs flexibility. That's what the 45-degree cut gives you.
The “magic” is really controlled stretch
Many people overthink it. Bias tape is not stretchy like jersey. It doesn't bounce back like rib knit. It has just enough give to travel around a curve without distorting the edge.
That controlled flexibility matters on:
- Necklines that need to sit close to the body
- Armholes that curve sharply at the underarm
- Rounded quilt corners where a rigid strip would wrinkle
- Diagonal edges where the fabric naturally shifts more
If you remember one thing, remember this: bias tape works because it's cut on the true bias, not because it's folded into a neat little strip.
Choosing Your Bias Tape Single vs Double Fold
Once you know what makes bias tape flexible, the next question is practical. Which kind should you use?
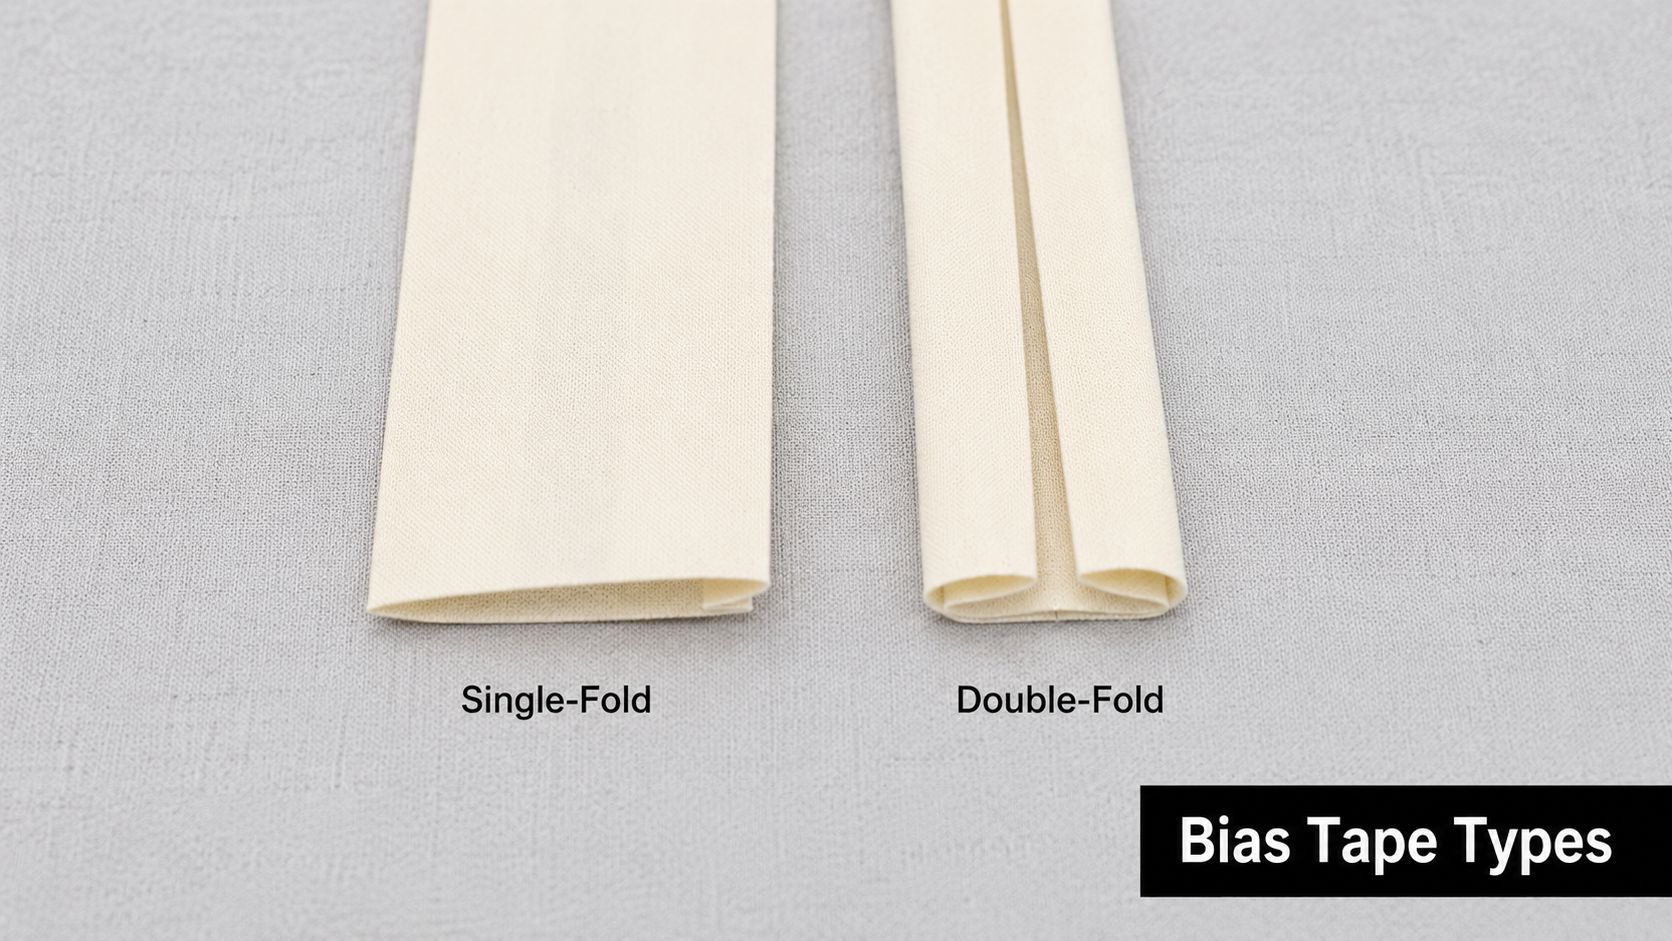
WAWAK's overview of bias tape sizes and types notes two main configurations: single-fold tape, where the edges are folded once towards the centre, and double-fold tape, which is folded again at the centre to create a clamshell shape. That extra fold lets double-fold tape encase seam allowances internally, helping prevent fraying while giving a cleaner finished edge.
Single-fold bias tape
Single-fold bias tape is usually the quieter option. It's often used when you want the finish to be discreet.
You might choose it when:
- The binding will sit inside the garment. A blouse neckline is a classic example.
- You want less bulk. Lightweight cotton lawn, viscose and similar fabrics often benefit from a finer finish.
- You're using it like a facing. It can replace a shaped facing when you want something simpler.
A common use is an invisible neckline finish. You stitch the tape to the edge, turn it to the inside, press it well, and topstitch or understitch depending on the look you want.
Double-fold bias tape
Double-fold tape is built to wrap the edge fully. That makes it better when the binding stays visible or when the edge needs more protection.
Use it for things like:
- Quilt binding
- Apron edges
- Children's bibs
- Pot holders
- Decorative finishes on casual garments
It's a bit like comparing a lining with a bound edge on household fabric choices. If you've ever read about understanding different sheet types, you'll know that construction affects both feel and function. Bias tape works the same way. The fold type changes what the finish can do.
A quick comparison
| Type | Best for | Look |
|---|---|---|
| Single-fold | Internal finishes, facings, delicate necklines | Subtle |
| Double-fold | Visible edges, protective binding, sturdier projects | More defined |
If you can see the edge and want it enclosed, double-fold is usually the safer choice. If you want the finish mostly hidden, start with single-fold.
When in doubt, hold the tape against the project edge and ask one question: do I want this tape to wrap over the edge, or disappear inside it?
How to Make Your Own Bias Tape
Making your own bias tape sounds advanced until you do it once. Then it feels like one of the most useful little sewing jobs you can learn.
The biggest advantage is control. You can match the exact fabric of your garment, cut a contrast binding from a print, or choose a softer cloth than many shop-bought tapes. For dressmaking, that can make a big difference.
Start with the width calculation
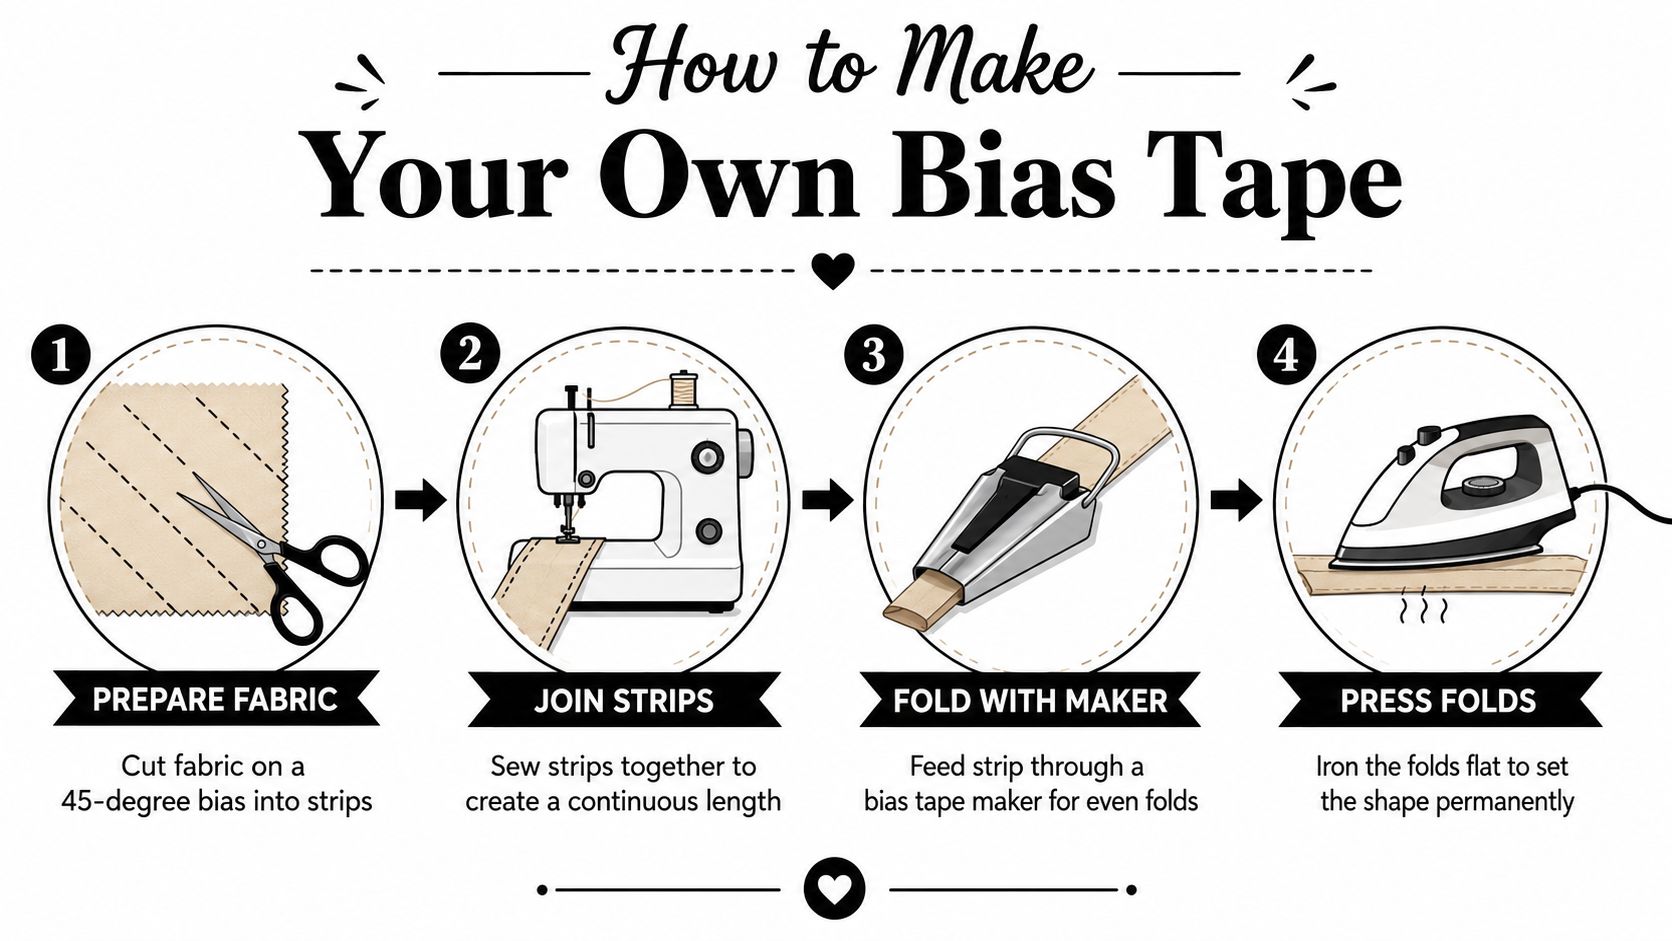
The width rule is straightforward. To get a finished visible edge of 1 cm, the strip should be cut 4 cm wide because the tape is folded in half twice. That 1:4 ratio is the standard preparation rule for this type of binding, as explained by The Sewing Directory's guide to bias binding.
That means you don't have to guess. Decide the final visible width, then multiply by four.
Examples of when this helps:
- A neat neckline binding where you want a fine edge
- A bolder decorative trim on an apron
- A custom finish on a Tencel or viscose blend where ready-made tape might feel too crisp
How to cut and join the strips
For most home projects, light to medium woven fabrics are easiest to handle. Cotton poplin, lawn and similar fabrics press well and feed nicely through the machine.
A simple method looks like this:
- Mark the bias direction. Find the diagonal line that sits at 45 degrees to the selvage.
- Cut strips to your chosen width. Keep them as even as you can.
- Join them diagonally. This reduces bulk and helps the strip flow smoothly.
- Press the seams flat. Flat seams make the finished tape behave better.
The Sewing Directory's applique techniques page describes the standard join: overlap two strips right sides together at a 45-degree angle, sew a 1/4-inch seam, trim the excess, and press flat to create a long continuous strip.
Diagonal joins matter more than people think. Straight joins can create a lump that shows right where you least want it.
A visual demo can make the folding stage much easier to grasp.
Folding and pressing
Once you have a long strip, you can fold it by hand or use a bias tape maker tool. Clover bias tape makers are popular because they help produce even folds, but a good iron and careful fingers work too.
Try this routine:
- Press the strip wrong side up first. A light press settles the seams.
- Fold the long edges inward. Press a little at a time rather than wrestling the whole strip.
- Fold again if you want double-fold tape. Press thoroughly so the shape holds.
If your fabric keeps shifting, starch can help a crisp cotton. If your fabric is soft and slinky, press gently and avoid stretching it while ironing. The iron should set the fold, not drag the strip out of shape.
Applying Bias Tape for a Perfect Finish
This is the point where bias tape becomes less mysterious and more useful. The method changes depending on whether you want a visible binding or a finish turned to the inside.
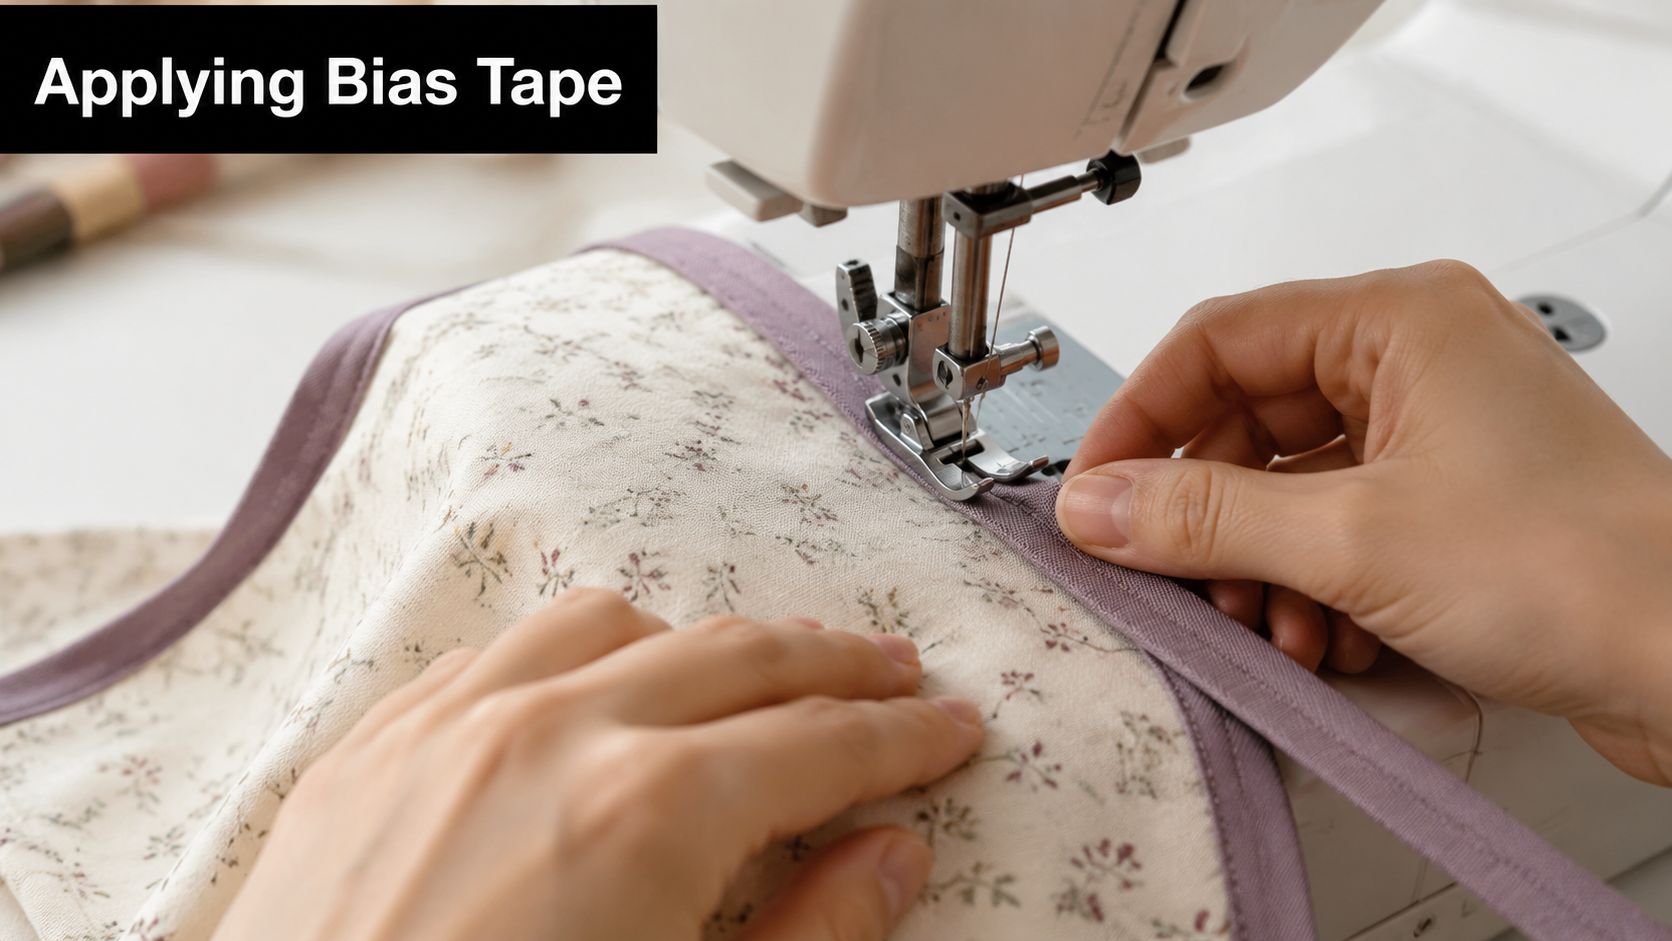
This sewing demonstration on YouTube gives a precise benchmark for application: stitch 1 to 2 millimeters away from the first seam line on the right side of the tape, then fold the tape over and edge stitch close to the inner folded edge so the binding catches securely on both sides.
Method one for visible edge binding
This is the method many people use on quilts, craft projects and some casual garments.
Try it in this order:
- Open one folded edge of the double-fold tape.
- Match raw edges of tape and project.
- Sew along the crease line on the first side.
- Wrap the tape over the edge to the other side.
- Edge stitch close to the folded inner edge so both sides are caught neatly.
For corners, slow down. Fold carefully at the corner to create a mitred finish, then secure it before sewing. If your project is cotton and keeps slipping at the fold, a tiny dab of fabric glue such as Gutermann HT2 can help hold a pleat in place before pinning, especially on a fiddly corner.
Method two for an inside neckline finish
Single-fold tape is excellent here because it keeps the edge neat without shouting for attention.
A gentle approach works best:
- Pin without stretching the neckline.
- Let the tape shape itself around the curve.
- Clip seam allowances if the curve is tight.
- Press before final stitching.
After sewing the tape to the neckline, turn it fully to the inside. Understitching helps the tape stay hidden and stops it rolling outward. If you want a very clean finish, stitch from the right side in the seam line area so the visible stitching almost disappears.
Sew the curve in stages. Stitch a little, smooth the next section, then continue. Bias tape rewards patience.
Small adjustments that make a big difference
Curves don't all behave the same way.
| Edge type | What to do |
|---|---|
| Outer curve | Allow the tape to stretch gently as it travels |
| Inner curve | Ease the tape in so it doesn't gape |
| Sharp corner | Fold accurately and secure before stitching |
If the edge puckers, don't assume you've failed. Check whether the tape was pulled too tightly, whether the curve needed clipping, or whether pressing was rushed. Most bias tape problems come from tension and handling, not from the concept itself.
Buying and Matching Bias Tape for Your Projects
When you're choosing bias tape in a shop, the smartest question isn't “What colour matches?” It's “What finish does this project need?”
Fabric type matters. A crisp cotton bias tape often suits cotton dresses, aprons and quilted items. A softer tape made from a fluid woven fabric can be a better match for viscose or Tencel blends. If the tape feels much heavier or stiffer than the garment fabric, the edge may look forced.
What to look for when shopping
A quick checklist helps:
- Match the fibre feel. Cotton with cotton is usually easier than mixing a soft drapey fabric with a rigid binding.
- Check the fold type. Single-fold for inside finishes, double-fold for wrapped edges.
- Think about visibility. A contrast binding can look intentional. A near-match can disappear nicely.
- Unfold a small section if possible. You want clean pressing and even edges.
If you're shopping for a special project, bring a swatch from the garment fabric. Under shop lighting, two colours can look identical on the roll and completely different once stitched to your project.
Choosing width without overthinking it
Narrower tape often suits delicate areas like baby clothing, lightweight tops and finer necklines. Wider tape can be more practical on quilt edges, home dec pieces and projects where you want the binding to show.
One useful reference point comes from Crafty Sewing Sew's bias binding techniques, which notes that a 3-inch raw strip folds to roughly 3/4-inch finished binding when used to encase a 1/4-inch seam in double-fold binding. You don't need that exact size for every job, but it shows how raw strip width and finished binding width relate.
The goal isn't perfection on the first try. It's choosing a tape that fits the scale of the project and the hand of the fabric. Once you've used bias tape on a few garments and a couple of household makes, you'll start spotting the right choice almost by instinct.
If you're ready to put these ideas into practice, More Sewing is a useful place to find quality fabrics, haberdashery, dressmaking kits and practical sewing supplies. Whether you need cottons for homemade bias tape, ready-to-use notions, or inspiration for your next garment, it's a solid UK resource for beginners and experienced sewists alike.
