
You've sewn the cover, pressed the seams, turned it right side out, and then the trouble starts. One corner kicks up, the zip bows across the edge, and the pad either won't go in cleanly or it strains the closure the moment you plump the cushion. Most of the time, that isn't a stitching problem. It started earlier, when the zip choice was made on autopilot.
That's why zips for cushions deserve more thought than they usually get. The zip length, the zip weight, and the way the zip is inserted all affect whether the finished cover looks crisp or fights you at every step. A decorative linen scatter cushion doesn't want the same closure as a sofa back cushion that gets opened for washing, and neither behaves like a boxed cushion with piping.
A lot of sewing guides show how to sew the zip in. Fewer deal with the decision that comes first, which is whether that zip is right for the pad fullness, the cloth, and the job the cushion has to do.
Why the Right Zip Changes the Whole Cushion
A cushion can be cut accurately, sewn square, and pressed properly, yet still look off once the pad goes in. The usual culprit is the zip choice. On a bottom-edge closure, the wrong zip shows up fast. The edge ripples, the corners pull inward, or the opening fights the pad on the way in.
The sizing decision causes more trouble than the insertion itself. Many sewists focus on how to fit the zip neatly, but the cover's behaviour is set earlier, when you decide how much opening the pad needs. A flat polyester insert will tolerate a shorter zip than a full feather pad. Thick woven upholstery fabric needs more room than a soft cotton lawn because the seam allowance and zip tape add bulk at the opening.
Zip tape width matters here too. On a cushion with a 1.5 cm seam allowance, a narrow tape is easier to control and less likely to print through on light fabric. On heavier cloth, a slightly sturdier tape can sit better in the seam and resist twisting, but it also takes up more space at the edge. That trade-off is small on the cutting table and obvious in the finished cushion.
Three mismatches turn up again and again:
- The opening is too short for the pad fullness. The cover may close empty, then strain once the insert is inside.
- The zip is too light for the cloth and the job. Fine coil suits a decorative cushion better than a cover that gets removed and washed often.
- The zip style fights the construction. A hidden closure works for some scatter cushions, while a boxed or piped cushion often benefits from a more stable approach.
In practice, the seam line gives the honest answer. If the bottom edge bends or puckers after fitting the pad, the problem is usually not your pressing or topstitching. It is the relationship between zip length, pad bulk, fabric thickness, and how often that cushion will be opened.
That is why I choose the zip in this order. First, how bulky is the pad. Second, how much body does the fabric have. Third, how hard will the cover be used. Get those three right, and the insertion method becomes much easier to sew cleanly.
Understanding Zip Types and Weights for Cushions
You don't need every zip on the wall. For cushions, four constructions do most of the work: invisible, lapped, centred, and exposed. The smart choice comes from the fabric and the use, not habit.
The four types that matter
Invisible zips are for covers where you want the closure to disappear into the seam. They suit decorative scatter cushions, lighter cottons, and soft linens. On the outside, they keep the line clean. On the inside, they ask for careful sewing close to the coil.
Lapped zips hide under a fold of fabric. They're forgiving, practical, and often a better choice when the cloth has body. If I'm teaching someone who wants a neat cushion fast, I'd usually start with a lapped zip before an invisible one.
Centred zips sit evenly in the seam, with both sides visible in a balanced way. They're useful on box cushions and piped seams where symmetry matters.
Exposed zips are visible by design. These belong on modern cushions, denim covers, utility styles, or upholstery looks where the hardware adds to the finish rather than pretending not to exist.
Weight matters more than beginners expect
A UK zip FAQ notes that number 3 zips suit most dressmaking and medium-weight cotton cushions, while heavier zips are recommended for thick coats, canvas bags, or sofa cushions (UK zip FAQ). That's a useful dividing line for cushion work.
A finer zip usually behaves better in:
- Cotton poplin
- Light linen
- Medium-weight printed furnishing cotton
- Decorative cushions that won't be opened often
A heavier zip makes more sense in:
- Velvet
- Denim
- Canvas
- Sofa cushions and covers opened regularly for washing
What doesn't work well is mixing extremes. A chunky zip under thin fabric can leave a ridge you see from the front. A very fine zip in a thick, overfilled cover can strain at the seam and feel temporary from day one.
| Zip weight | Tooth type | Best fabrics | Typical cushion use |
|---|---|---|---|
| Number 3 | Fine nylon coil | Cotton, light linen, medium-weight furnishing cotton | Decorative scatter cushions, occasional-use covers |
| Heavier zip | Chunkier coil or moulded tooth | Velvet, denim, canvas, upholstery cloth | Sofa cushions, frequently washed covers, sturdier home-use cushions |
Metal or plastic
This choice is less about rules and more about behaviour.
- Metal teeth can look excellent on exposed zips and feel solid, but they're less subtle.
- Plastic or nylon coil is often easier for hidden applications and tends to sit more in the seam.
- Frequent laundering usually pushes me toward practical, smooth-running closures rather than decorative hardware.
A cushion zip should match the life of the cushion, not just the look of the cover on sewing day.
There's also a broader market reason to be practical. UK consumption in the furnishing articles, furniture, and cushion covers category was 18 thousand tons in 2024, with market value at $222 million, while imports were estimated at 12 thousand tons (UK market overview for furnishing articles and cushion covers). Cushion components are ordinary workhorses in a large furnishing market, so reliability matters more than novelty.
Choosing the Right Zip Size for Your Cushion
A cushion can be beautifully sewn and still fight you every time the pad goes in. In practice, that usually comes back to zip length, not insertion.
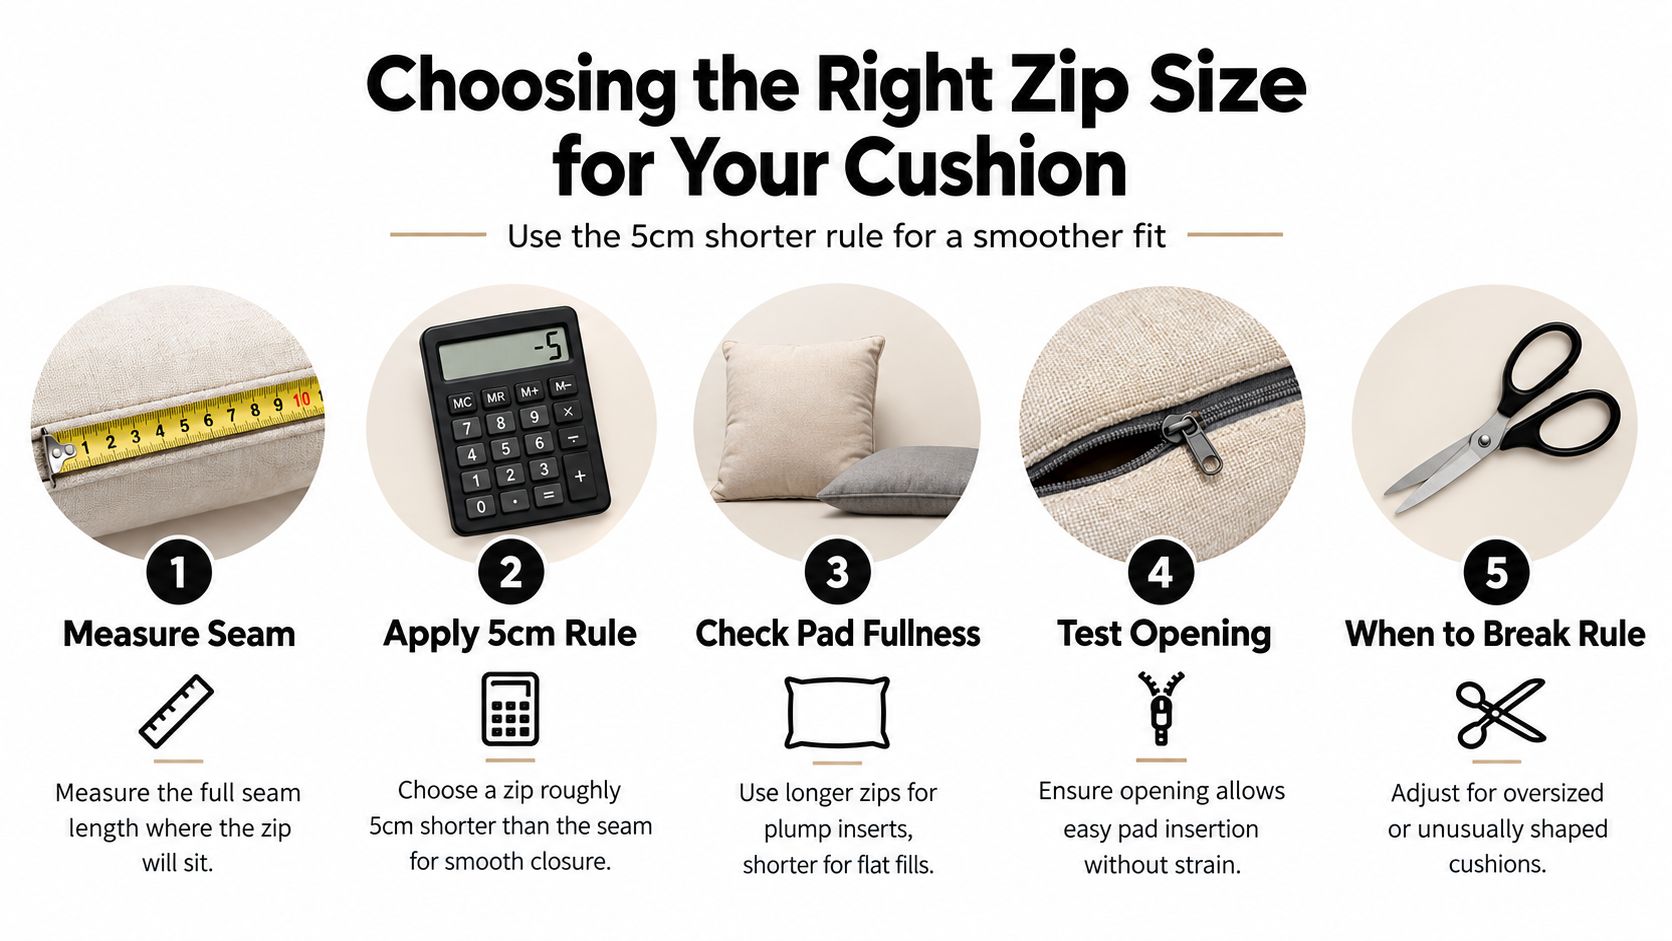
The common starting point is a zip about 5 cm shorter than the finished edge where it will sit, as noted earlier. That works often enough that people treat it as a rule. I treat it as a baseline. The choice depends on three things that decide how much opening you need: pad fullness, fabric bulk, and how hard the cover will be used.
When the standard rule works
For a light to medium scatter cushion in cotton or linen, a slightly shorter zip usually gives the neatest result. You avoid dragging zip ends into the corner seams, the cover keeps a clean outline, and the opening is still large enough for an ordinary pad.
That is why the rule survives.
Retail size charts add to the confusion. Sellers list standard cover sizes such as 45 x 45 cm, 50 x 50 cm, and 60 x 60 cm, but those charts rarely explain what happens when the pad is deliberately oversized for a plumper finish (UK cushion cover size chart). Two covers can be the same measured size and need different zip lengths because one is made for a flat polyester pad and the other for a packed feather insert.
When to go longer
Short zips become a nuisance on full pads and heavy fabrics. The cover may fit once the pad is inside, but getting it in and out turns into a wrestling job. That puts strain on the seam beside the zip and on the zip stop itself.
Use a longer zip than the standard starting point if the cushion has any of these features:
- Very full feather pads that need to be compressed hard to pass through the opening
- Velvet, denim, canvas, or upholstery cloth that reduces the usable opening because of bulk
- Piped edges or box corners that stiffen the cover and limit how far it can spread
- Frequently washed covers where easy pad removal matters just as much as appearance
A decorative bedroom cushion can tolerate a smaller opening. A sofa cushion that gets washed, sat on, and re-stuffed benefits from more access.
A practical way to choose the length
Use the seam measurement first, then adjust for the job the cushion has to do.
- Measure the finished seam where the zip will be inserted.
- Subtract 5 cm for a sensible starting point.
- Add length back if the pad is overfilled, the fabric is bulky, or the cushion has piping.
- Keep enough plain seam at each end that the corners stay firm and the zip ends are not caught in the turn.
- Check the opening. If the pad will need folding, rolling, or force, the zip is probably too short.
I also avoid placing the slider right into a stressed corner. A UK sewing guide recommends marking the opening so the slider sits at least 5 cm from the edge, which helps keep the pull clear of the seam and gives a cleaner finish (Prima zip cushion cover guide).
If you want one rule to remember, use this one: choose the shortest zip that still lets the actual pad go in without a struggle. That is the point where the cover looks tidy and behaves properly in use.
How to Insert an Invisible or Lapped Zip
A cushion cover can be cut perfectly and still fight you at the zip. The usual culprit is not the stitching itself. It is a zip opening that was marked casually, pressed poorly, or forced into fabric that needed more control.
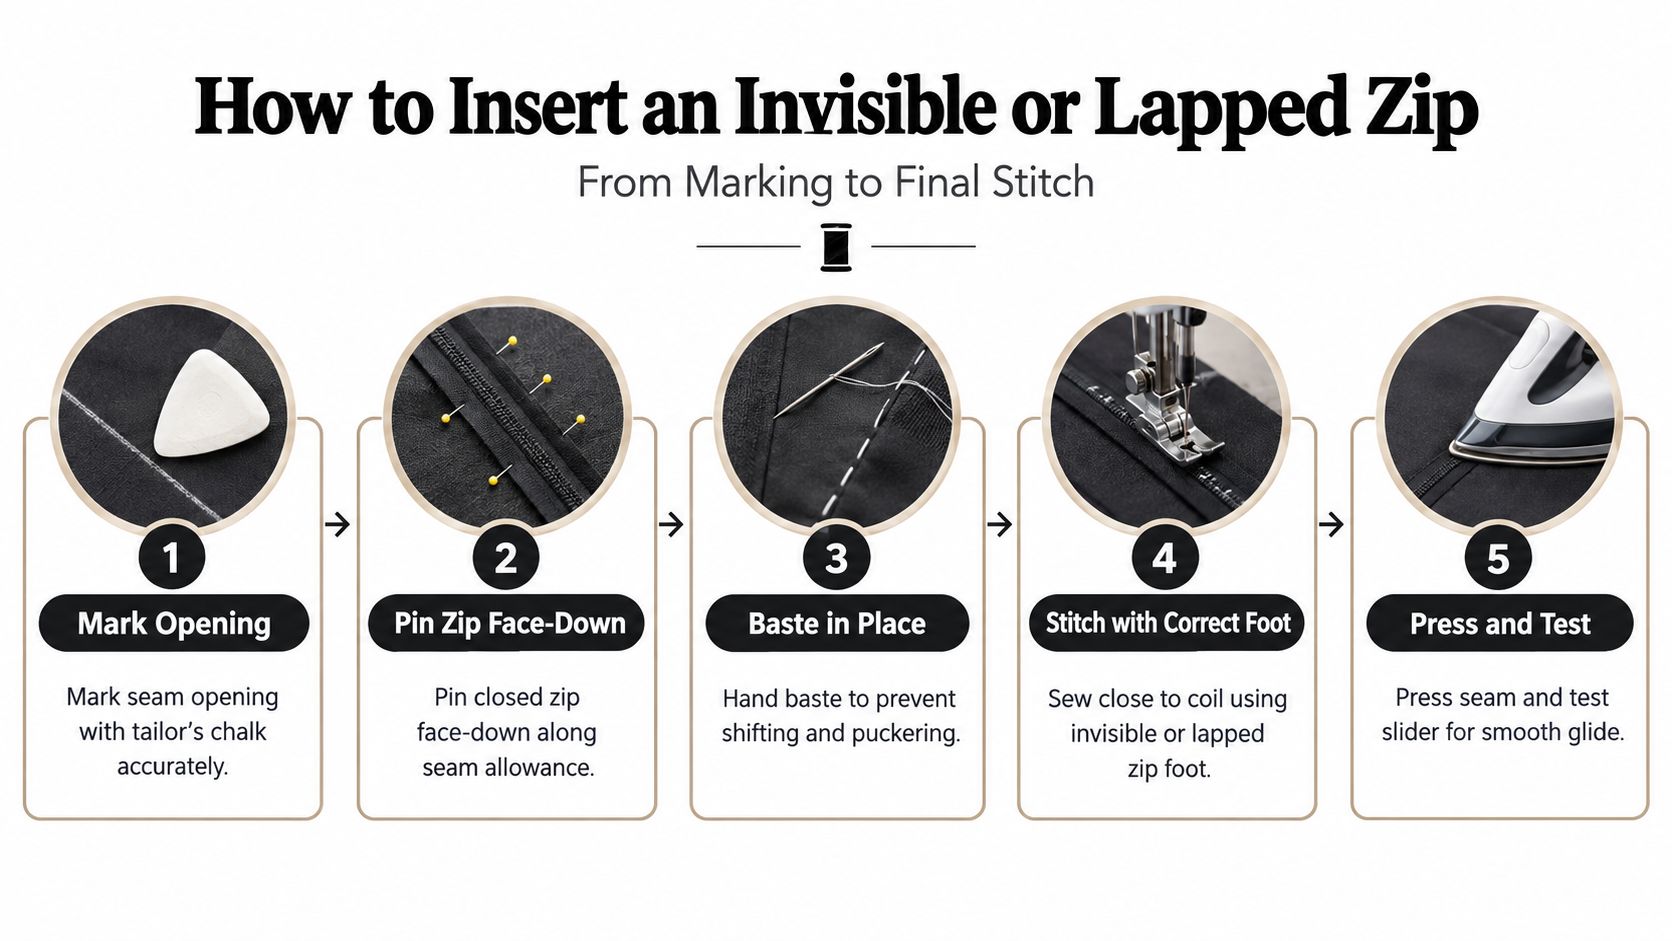
Invisible and lapped zips share the same preparation. The difference comes in how the zip sits against the seam. Invisible zips disappear into the join and suit lighter, flatter cushion backs. Lapped zips hide under an overlap and usually behave better in thicker furnishing fabrics, stripes, and covers that will be washed often. If the pad is full and the fabric has body, I usually favour a lapped zip because it forgives bulk better.
Mark and prepare the opening
Accurate prep does most of the work. Mark the zip start and finish on the wrong side, stitch the seam closed beyond those points, and baste the section where the zip will sit. A clear step-by-step version appears in this lapped zip tutorial.
Pressing matters just as much as stitching. Sew the fixed sections first, then press the seam properly before the zip goes in. A flat, settled seam gives you a true line to follow. On upholstery-weight cloth, I also grade any bulky seam allowance if the fold feels thick under the fingers, because that extra bulk can push the zip off line.
For an invisible zip, keep both sides even and stable. For a lapped zip, decide which side will overlap before you pin anything. On patterned fabric, choose the side that lets the motif read cleanly across the seam.
Sew close to the coil, with control
The stitch line needs to be close enough to support the seam without crowding the teeth. UK vocational guidance for cushion production advises aligning the zip with the seam line, sewing with a zipper foot at roughly 3 mm from the coil, and securing the ends with backstitching (UK vocational guidance for cushion production).
That distance is a useful guide, not a law. On a fine invisible zip in linen, you can sew slightly closer with the correct foot. On a heavier coil zip in thick cotton or velvet, forcing the needle too near the teeth often makes the seam ripple or throws the two sides out of balance.
If you want to compare hand position and coil handling, these sewing hidden zipper tips are worth watching against your own method.
Keep the slider below the presser foot path before you start. If it sits directly under the foot, the stitch line will jog around it and show on the finished cover.
A workflow that avoids the usual mistakes
Use this order:
- Mark the opening clearly on the wrong side.
- Sew the seam outside the zip area and baste the opening section.
- Press the seam before attaching the zip.
- Pin or tack the closed zip in place.
- Sew the first side.
- Open the zip partway before sewing the second side, so the slider does not get trapped.
- Remove the basting and test the opening before closing the rest of the cover.
That halfway-open step saves a lot of unpicking. It also matters more on cushion covers than on skirts or dresses, because the pad puts immediate strain on the opening when you turn the cover through and fit it.
A neat finish at the ends helps the cover last longer. One practical method uses small fabric tabs to cover the raw zip ends, especially on casual boxy cushions or reading cushions where the inside gets handled often (reading cushion zipper tab method).
A short visual walk-through helps if you want to see the sequence in motion.
If you're buying notions for this kind of work, More Sewing carries zips within its haberdashery range, which makes it one practical option when you're matching closure colour and fabric in the same order.
Centred and Exposed Zips as a Design Choice
A centred zip is for control. An exposed zip is for character. Both are valid. They solve different problems.
When a centred zip earns its place
Choose a centred zip when you want the closure contained within the seam, but you also want the seam itself to read cleanly and evenly. That's useful on box cushions, piped cushions, and covers where the back panel needs visual balance.
The insertion is more deliberate than invisible zip work. Both seam allowances need to match, the fabric wants careful pressing, and the topstitching must look intentionally parallel. If one side drifts, the whole back looks off.
| Factor | Centred Zip | Exposed Zip |
|---|---|---|
| Visual effect | Neat, balanced seam line | Zip becomes part of the design |
| Best for | Box cushions, piped edges, tailored backs | Denim, canvas, contemporary styles |
| Fabric behaviour | Works well in stable furnishing fabrics | Best when the fabric can support visible topstitching |
| Sewing priority | Accuracy and symmetry | Placement and design confidence |
| Common mistake | Uneven spacing beside the seam | Choosing a zip too bulky for the fabric |
When to let the zip show
An exposed zip works best when it looks intentional from the start. Think chunkier coil, moulded plastic, or metal teeth that pick up other details in the room such as hardware, trims, or piping.
This style suits cushions that lean modern, practical, or slightly industrial. It doesn't need to hide. It needs to sit flat and feel integrated with the cloth. On thin fabric, though, an exposed chunky zip can dominate too much and drag the edge.
If the closure is visible, treat it like trim. Match it, contrast it, or repeat it elsewhere. Don't let it look accidental.
Troubleshooting Common Cushion Zip Mistakes
People often assume a bad cushion zip means they're poor at sewing zips. Usually, the fault is narrower than that. One small technical miss creates the whole problem.
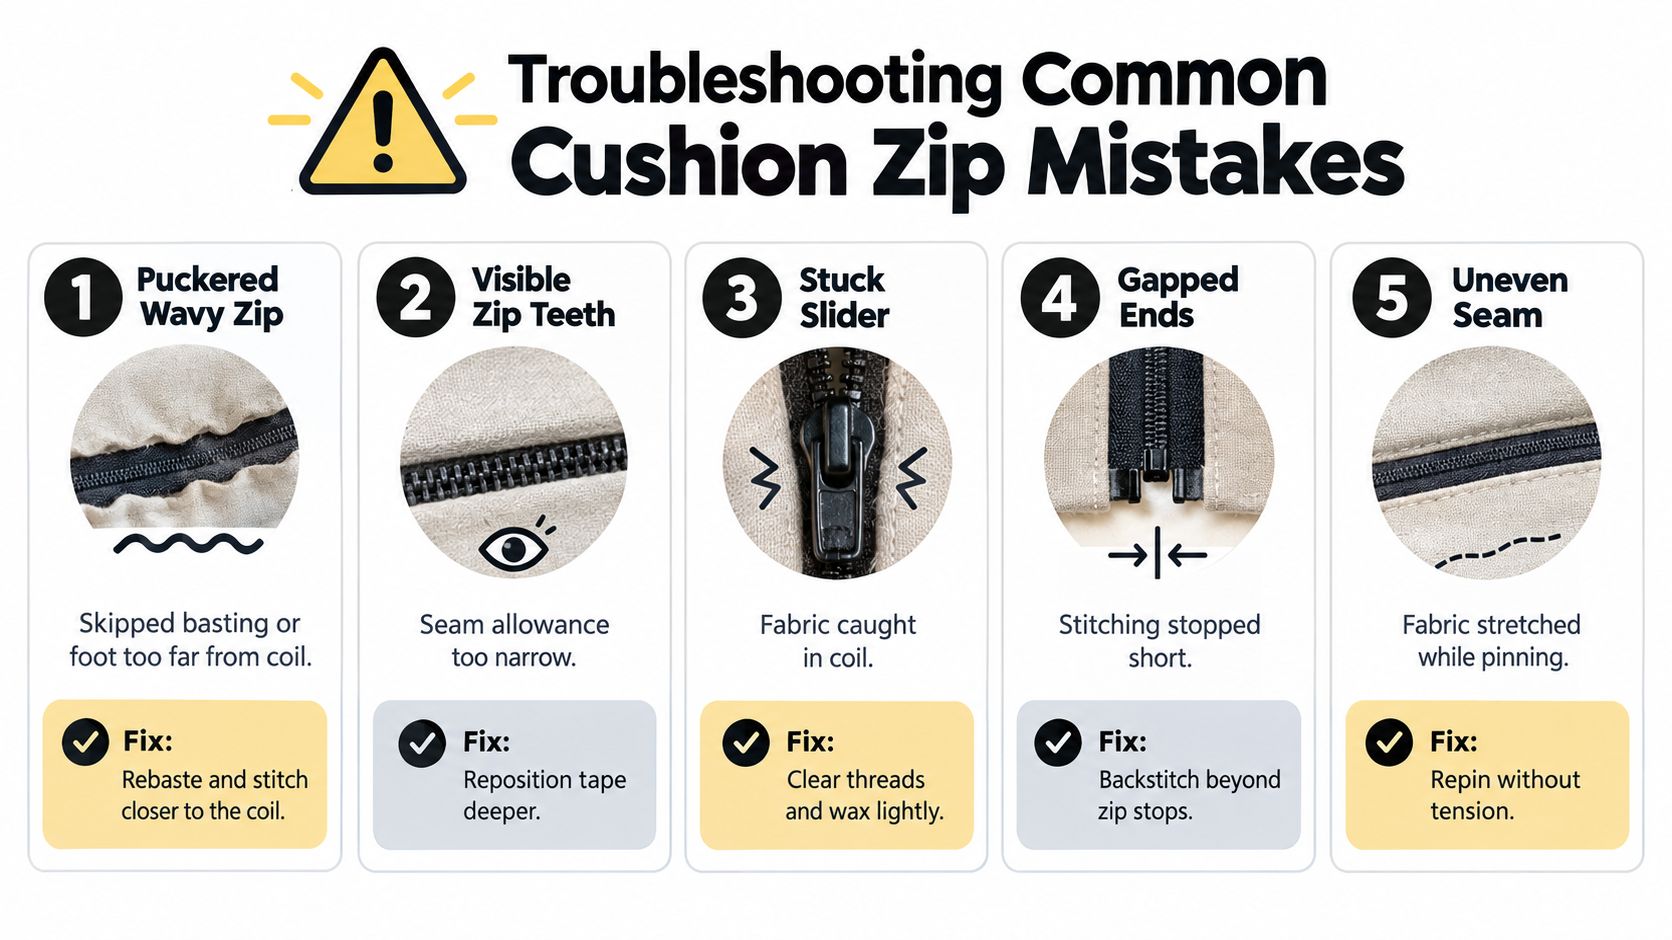
Five failures and the fix for each
- Puckered or wavy zip: This usually means the opening wasn't stabilised well enough, or the stitching sat too far from the coil. Unpick it, rebaste, press the seam back into shape, and resew with the zipper foot set closer.
- Visible teeth on a hidden zip: The tape is sitting too shallow in the seam. Reposition the zip deeper so the fold covers it properly.
- Trapped or awkward slider: The pull was left in the sewing path. Move it out of the way before each pass, and lift the foot to slide past when needed.
- Gaping ends: The stitching stopped short or the ends weren't reinforced. Sew beyond the stress points and secure the closure ends properly.
- Uneven topstitching: The fabric was pushed or stretched rather than guided. Let the machine feed the layers and keep your hands steady on both sides.
The cushion-fit mistake people miss
The sneakiest fault isn't always in the sewing. Sometimes the zip behaves badly because the cover is trying to do a job the opening won't allow. If the cushion has gone flat, misshapen, or awkward to insert, the cover and pad may be fighting each other as much as the zip is.
For readers dealing with worn seat cushions as well as removable covers, this overview of Central Florida couch repair is worth a look because zip strain is often worse when the insert has sagged or shifted shape.
One habit that prevents most repairs
Test the zip before you close the final seam. Not just whether it opens and shuts, but whether it does so with the fabric under slight cushion-like tension. A zip can behave perfectly on a flat worktable and fail the moment the cover is filled.
That small pause saves a lot of seam-ripper work.
Quick Reference and Frequently Asked Questions
A 50 cm cushion can need three different zip lengths, depending on what is going inside it. That is the sizing call many guides skip, and it is usually the reason a cover feels easy on the table but awkward once the pad goes in.
Use this as a workshop shorthand instead of a generic rule.
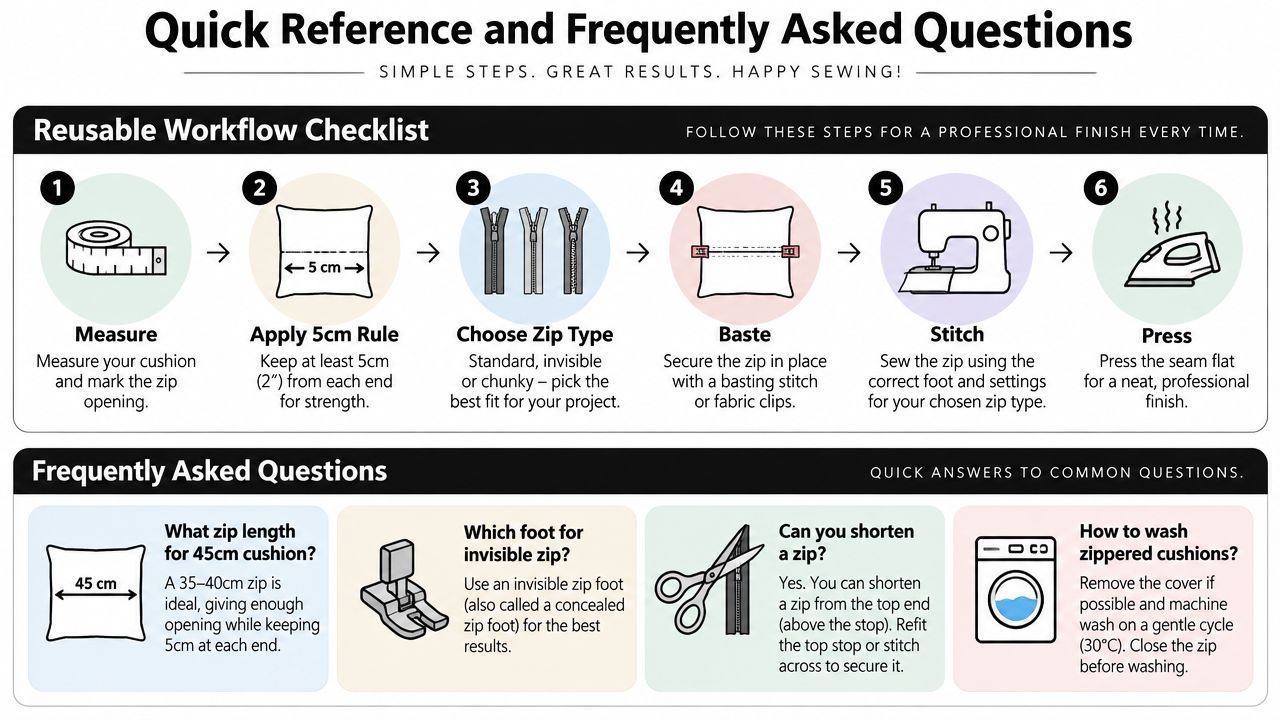
Quick cut guide by cushion fill
| Cover size | Soft polyester pad | Full feather pad | Firm foam pad |
|---|---|---|---|
| 45 cm | 30 to 35 cm zip | 35 to 40 cm zip | 40 cm zip |
| 50 cm | 35 to 40 cm zip | 40 to 45 cm zip | 45 cm zip |
| 60 cm | 45 cm zip | 50 to 55 cm zip | 55 cm zip |
These are cut guides, not rigid rules. Feather and foam inserts usually need a longer opening because they resist being folded into the cover. Polyester pads compress more willingly, so you can often get away with less opening without straining the seam allowances.
Short answers to common questions
Can I use a shorter zip on a loose cover?
Yes, if the insert compresses easily and the cover is not tightly boxed or piped. I avoid pushing this on foam pads, where a too-short opening turns a simple refill into a wrestling match.
What if the zip length I need is not sold in the exact size?
Go slightly longer rather than slightly shorter if the cushion is firm or bulky. A longer zip is usually easier to place than repairing a seam that gets forced every time the pad goes in.
How do I tell invisible and lapped zips apart in practice?
Invisible describes the zip itself. Lapped describes how the fabric covers the zip during insertion.
What works best on piped cushions?
A lapped or centred zip is often easier to control because the piping already creates bulk at the seam. Invisible zips can work, but the corners need cleaner handling.
Does a centred zip hold up on everyday cushions?
Yes, if the ends are secured properly and the opening is long enough for the pad. Daily strain usually comes from a cover being overfilled for the opening, not from the centred style itself.
How do I deal with a stuck slider?
Check for loose threads, frayed tape, or fabric caught near the coil first. Clear the snag and test it gently. If the slider still drags, the zip may be bent or distorted and is usually quicker to replace than to coax back into shape.
More Sewing offers fabric, haberdashery, and zip-related sewing support for projects like this, whether you're making a lightweight scatter cushion or a sturdier washable cover. If you want materials and notions in one place, have a look at More Sewing.
