
You're standing at the fabric counter with a half-metre of broderie anglaise in one hand and a child's summer dress in the other. The border looks perfect on the roll, but you're wondering whether the scalloped edge will sit flat around the curved hem or whether it really belongs on a straight seam. That hesitation is sensible. Broderie anglaise trimmings can look interchangeable in the bolt, yet behave very differently once they're cut, joined, stitched and washed.
The useful question isn't only whether a trim is pretty. You need to know how its repeat runs, whether its edge is already finished, how much the cutwork will show over the underlying fabric and whether the construction suits the garment. Treat the trim as part of the pattern rather than a last-minute decoration, and you'll avoid the most common problems: distorted scallops, mismatched motifs, bulky seams and eyelets that lose their shape.
Why Broderie Anglaise Trimmings Deserve a Second Look
Broderie anglaise rewards a slower buying decision. Before choosing a border for a dress, lay it against the actual garment fabric and follow the embroidered repeat from one end to the other. Some patterns have a clear top and bottom, while others can be turned either way. A border with one dominant scalloped edge may work beautifully along a hem, but look awkward if you try to fold it around a neckline without planning how the ends will meet.
The trim's edge matters just as much. A pre-finished scallop can usually be applied directly to a hem or sleeve edge, while a straight-cut piece may need binding, a facing or careful concealment inside a seam. If you're working with a curved edge, bend the swatch around the same curve before buying. Watch for the ground fabric pulling between the eyelets. A trim that lies neatly on a flat table may need small clips in its seam allowance to turn smoothly.
Read the border before cutting
Look for three things:
- The repeat: Identify where the floral or geometric motif begins and ends. Mark a full repeat on the swatch so you can calculate where joins will fall.
- The finished edge: Check whether the scallop is stable and overcast, or whether the apparent edge is only an embroidered line that still needs finishing.
- The seam relationship: Hold the trim over the garment and consider whether the eyelets will sit above the seam, across it or beneath it. The position changes how much of the underlying fabric shows through.
The eyelet pattern can also frame a seam. On a yoke, for example, a line of small perforations may soften the transition between the yoke and the bodice. On a hem, larger floral cutwork creates a stronger border and needs enough fabric beneath it to remain legible.
Practical rule: Buy broderie anglaise trimmings for the job they must perform, not just for the appearance they have on the reel.
The fabric's history supports that broader view. Broderie anglaise was repeatedly adopted in British dressmaking, rather than appearing as a single short-lived fashion, and its uses have ranged from underwear and children's clothes to dresses and trimmings. That history is useful at the counter because it reminds you that the material can be structural, delicate, practical or decorative depending on the construction.
What Makes Broderie Anglaise a Cutwork Trim
Broderie anglaise is a cutwork and whitework construction, not just embroidered fabric with holes added for decoration. Round or oval openings are deliberately pierced and cut into a woven ground, then the exposed edges are secured with overcast or buttonhole stitches. The result is an open pattern that still has a stable embroidered boundary. The Selfmade guide to broderie anglaise fabric describes the material as a woven cloth commonly made from cotton or polyester-cotton, with uses that include garments, soft furnishings and nursery items.
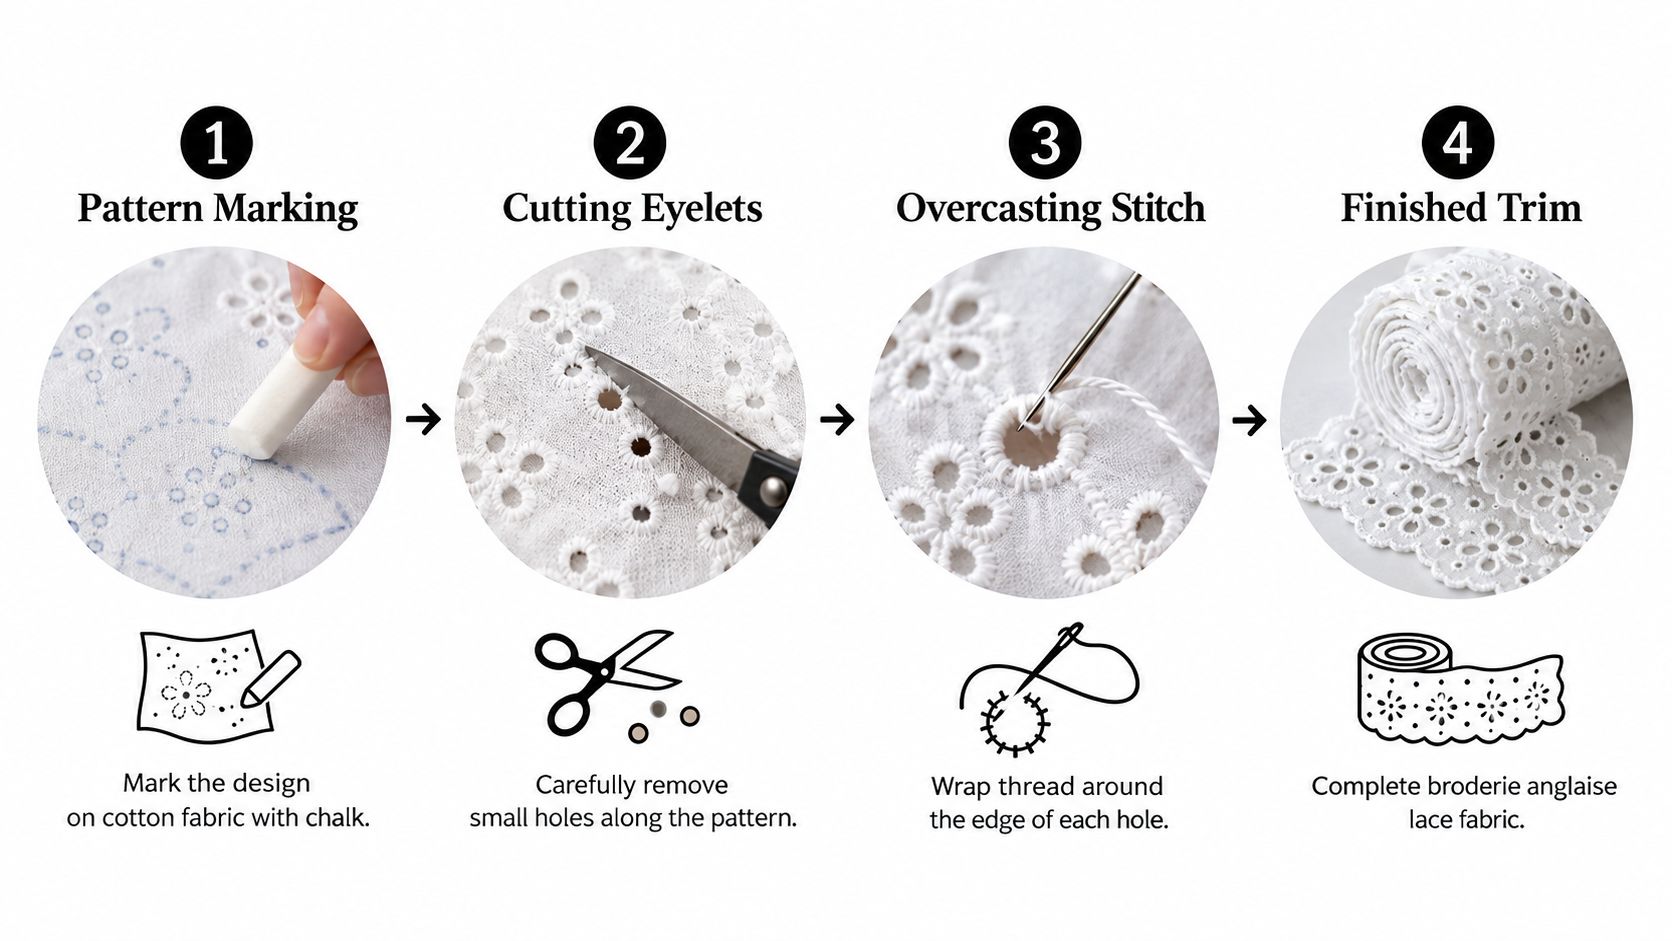
How the eyelet is built
On traditionally worked fabric, the design is marked onto a plain woven ground. Each eyelet is pierced, the centre is removed, and the raw edge is enclosed with close stitching. Industrial production performs the same essential job mechanically, with greater consistency across a length.
The sequence matters:
- Mark the design. Floral outlines, dots or geometric shapes establish where the openings will sit.
- Pierce and cut the eyelet. The hole must be clean rather than torn. Ragged cuts create weak points that are difficult to disguise.
- Secure the edge. Overcast or buttonhole stitches wrap the cut edge and prevent the woven ground from unravelling.
- Finish the border. A scalloped or straight edge is stabilised so the trim can be sewn to another fabric.
The Lace Company's technical description of broderie anglaise also identifies the characteristic sequence of piercing, cutting and edge-finishing. That construction distinguishes genuine cutwork from an embroidered imitation made on a temporary or soluble support. An imitation may resemble broderie anglaise at first glance, but its open areas and edge structure can respond differently to laundering and abrasion.
A useful inspection takes only a moment. Hold the trim up to the light and check that each eyelet has a complete, even stitched boundary. Run your finger gently along the outer edge. It should feel secure rather than hairy or loose. Then fold the trim along its length and see whether the repeat stays square to the selvedge. If the motif drifts, matching it across a placket or yoke will become frustrating.
Here is a short visual demonstration of the construction and handling involved:
The distinction between fabric and trim is practical. Full broderie anglaise yardage can be cut into panels or shaped pieces, while broderie anglaise trimmings are usually sold as prepared borders, insertions or narrow bands. A prepared edge saves time, but it also limits how you can turn corners and place joins. Always understand which part of the construction has already been done before you plan the seam.
A Short British History of the Trim
The name suggests an English origin, but the technique has deeper roots. Broderie anglaise became strongly associated with England during the nineteenth century, while reference histories trace earlier roots to Eastern Europe. Its strong English association reflects where it became established in dressmaking and textile production, rather than where the underlying technique first appeared.
The period from 1840 to 1880 saw particularly strong English popularity, with the material used for women's underclothing, children's wear and trimmings before appearing again in later dress styles. The historical overview of broderie anglaise records this broad use and the later move towards machine production. In Britain, Bedfordshire became an important regional centre for the cottage industry, giving the trim a tangible production geography rather than leaving it as a purely romantic fashion label.
From handwork to accessible dressmaking
Hand-cut eyelets demanded time and skill. Mechanisation changed the price and availability of the material. By the 1870s, machine production had begun to lower prices significantly, and by the end of the nineteenth century broderie anglaise was being produced on embroidery machines including the Leaver machine.
That shift explains why the trim could move between social settings. It retained the visual language of fine whitework, but machine production made it more practical for dressmaking, underwear, children's clothing and household textiles. A modern sewist can still see the difference between a dense, carefully finished older piece and a lighter machine-made border, but the two belong to the same continuing tradition.
The history of broderie anglaise in British interiors and textiles records another cycle of adoption in the 1950s, when the material returned to dresses and underwear, followed by a further revival by the early 1960s. Those repeated appearances matter when you're assessing deadstock. Older stock may have a firmer ground, a more compact stitched edge or a colour that has mellowed from bright white to cream. Modern stock may offer cleaner repeats, more consistent widths and blends chosen for easier care.
Older deadstock isn't automatically superior. It's simply a different material, and it needs a sample test before you commit it to a curved or high-wear garment.
For sourcing, the history gives you useful questions to ask. Is the piece a stable woven fabric or a fragile remnant? Is the scallop part of the original construction or has it been cut away? Does the fibre content suit the way you intend to wash the finished garment? Cultural familiarity can make a trim feel safe, but the actual stitching and ground fabric still decide whether it will work.
Trim Types and Fabric Blends Available Today
The UK market offers much more than a single white cotton border. You'll find full-width embroidered fabric, narrow eyelet bands, gathered versions, ribbon-slot designs, coloured pieces and deadstock. The right choice depends on what you're constructing and whether the trim must finish an edge, sit inside a seam or become part of a larger panel.
A single-edge scallop is the straightforward choice for a hem, sleeve opening or neckline. One side is intended to remain visible, while the straight side is sewn into the garment. A double-edge trim can work as a floating insert or a decorative band between two panels, but it often needs more precise placement because both edges remain visible.
An eyelet ribbon or narrow insertion is useful when you want a restrained line of texture. It can sit between two pieces of cotton lawn, form a vertical detail on a blouse or break up a plain panel. Gathered broderie anglaise creates more volume and movement, but it also consumes more length and can become bulky at a seam.
Choose by construction first
| Trim type | Typical width | Fibre | Best use | Price band |
|---|---|---|---|---|
| Scalloped edging | Varies by listing | Cotton or cotton blend | Hems, sleeves and necklines | From accessible haberdashery to specialist stock |
| Straight insertion band | Varies by listing | Cotton or polyester-cotton | Joining panels and yokes | Accessible to mid-range |
| Ribbon-slot eyelet trim | Narrow to medium | Usually woven cotton or blend | Drawstrings, cuffs and decorative channels | Accessible to specialist |
| Gathered broderie anglaise | Varies by listing | Cotton, blend or other fashion fibre | Flounces, babywear and soft details | Mid-range depending on finish |
| Full broderie anglaise fabric | Published fabric widths can range from 112 to 150 cm | Often cotton or polyester-cotton | Dresses, blouses, panels and nursery items | From under £4 per metre in some UK listings to specialist prices |
The UK technical listing for broderie anglaise fabric gives a useful example of a 65% polyester and 35% cotton blend, with a published mass of around 123 gsm. That type of cloth behaves differently from all-cotton lawn. It tends to hold its dimensions more reliably and resist wrinkling, while retaining the ventilation created by the openwork. For a dress or blouse, that can be helpful. For a soft vintage-style bonnet or heirloom piece, you may prefer the hand of cotton.
Colour has also widened beyond the traditional white. Ecru, pastels, stronger dyed shades, prints, double gauze, viscose and deadstock now appear in UK ranges. Viscose versions generally bring softer drape, while a polycotton ground behaves more like a stable lightweight woven. Neither is universally better. A drapey trim can suit a loose blouse but collapse on a structured yoke, while a firmer cotton blend can keep a scallop crisp but feel too formal on fluid fabric.
Price is another decision rather than a quality guarantee. Knighton Fabrics' broderie anglaise range shows entry-level listings from about £0.99 for trims and fabrics from under £4 per metre in some ranges. Specialist, vintage or deadstock pieces may cost more because of rarity, condition or a distinctive repeat. Buy the least expensive option only when its fibre, edge finish and wash behaviour suit the garment.
Sewing Techniques for Edgings, Yokes, and Panels
The cleanest result comes from deciding the attachment method before cutting the garment. Broderie anglaise can be applied on top of a finished edge, caught into a seam or inserted between two fabric pieces. Each method creates a different amount of bulk and exposes a different part of the embroidery.
Edgings on hems and necklines
For a scalloped hem, stabilise the garment edge first and press it accurately. Align the trim's straight edge with the garment's raw edge, keeping the scallops evenly spaced below the hem. Machine baste close to the seam allowance, then stitch permanently with a narrow seam. If the embroidered edge is close to the needle path, use a narrow foot and keep the stitching just clear of the overcast loops rather than sewing directly through them.
Curved edges need more care. Clip the seam allowance where necessary, but don't cut into the stitching line. Ease the trim around the curve a little at a time instead of stretching it into position. On a neckline, a bias-cut facing can absorb the raw edge and give you a cleaner finish than trying to force a straight border around a tight curve.
A clean scallop is created during placement, not rescued by pressing afterwards.
For a visible topstitched finish, use a fresh needle and test the stitch length on a scrap. A short stitch can perforate the embroidery and make the edge look crowded. A slightly longer, even line usually holds the trim securely without flattening the cutwork.
Yokes and shaped pieces
A yoke needs a different approach because the edge is often curved and the trim may sit between two layers. Cut the facing on the true bias if the edge requires flexibility. Place the broderie anglaise right sides together with the yoke edge, stitch within the seam allowance, then understitch where the construction allows. Turn the facing over and press from the reverse through a cotton cloth.
Don't try to make the trim negotiate a curve by stretching it. If the eyelet repeat is rigid, divide the ease between several small adjustments or choose a narrower insertion that can flex more naturally. On a blouse, a symmetrical motif can be mirrored across the centre front, but only if you mark the centre before cutting.
Insertion bands and panels
Insertion is made by placing the trim between two fabric sections. Mark the seam lines on the cloth, position both sides of the trim and baste before machine stitching. If the trim has two straight edges, keep the distance between the fabric panels consistent so the eyelet line doesn't wander.
For a panel assembled from separate sections, butt the trim edges rather than overlapping them. A narrow zigzag or a small bridging stitch can secure the join without creating a thick ridge. Use a fine hand needle at corners, with small stab stitches to anchor the trim where the machine can't turn neatly.
Raw ends need a deliberate finish. You can hide them in a seam, turn them under against a self-fabric facing or cover them with a small strip of the garment fabric. Fusible stay tape can help support a waist seam, but test it first because heat and adhesive can flatten the embroidery.
Troubleshooting at the machine
- Puckering: Reduce handling, support the seam with tissue or stabilising tape and check that you haven't stretched the trim while sewing.
- Missed eyelets: Move the needle path away from the openwork and use a narrower foot so you can see the edge.
- Uneven gathers: Distribute fullness by marking quarters or other logical points, then ease between the marks rather than pulling the thread in one place.
- Mismatched plackets: Mark the centre line and one complete repeat before cutting either side. Match the motif first, then adjust the seam allowance if necessary.
- Bulky joins: Grade the seam allowance and press each layer in a different direction. Don't trim so aggressively that the cutwork loses support.
Caring for Broderie Anglaise Through the Wash Cycle
Broderie anglaise lasts well when the washing method respects the cut edges. The vulnerable points are the overcast loops, the narrow bridges between eyelets and any area where the trim has been stitched under tension. A garment bag or mesh bag reduces snagging, particularly when the piece is washed with zips, hooks or heavier clothing.
Use a gentle wash programme, a mild detergent and cool water. Avoid biological detergents and chlorine bleach, especially on delicate or older stock. Strong treatment can weaken the thread that encloses the eyelets, and bleach can alter the colour of cotton or damage fibres already made fragile by age.
Vintage and deadstock care
Test a remnant before laundering the finished garment. Older pieces may have accumulated dust, storage odours or uneven colouring, and the thread can be more delicate than the ground fabric. Hand washing is the safer option when the trim has a brittle feel, loose stitches or a history you can't verify.
Don't twist the fabric to remove water. Roll it in a clean towel, press gently and reshape the scallops while damp. Dry it flat where possible, away from harsh direct heat.
Press broderie anglaise from the reverse through a cotton pressing cloth. A warm iron and a small amount of steam can restore the ground fabric without crushing the eyelet pattern. Pressing directly on the raised embroidery can flatten the stitched edge and leave shiny marks on blended fabrics.
Repairing a damaged loop
A snipped overcast loop doesn't always mean the trim is unusable. Stop the damage from spreading, then use a fine needle, such as a milliner's needle, with matching cotton thread to rebuild the edge around the eyelet. Work through the stable surrounding stitches and keep the new loops close together, copying the existing tension rather than pulling them tight.
Store unused trim flat if you have space. Folding it repeatedly along the same line can crush the scallops and leave permanent creases through the openwork. If folding is unavoidable, use soft tissue at the fold and change the position occasionally.
Choosing and Sourcing the Right Trim for Your Project
A narrow scalloped edging can finish a child's sundress neatly, while the same trim may look lost on a full skirt. Choose from the garment's scale and construction first, then settle on colour. White, ivory or a close match usually works for lightweight dresses. A blouse yoke or sleeve cuff needs a smaller motif, since a large floral repeat can overpower a shaped piece. For a dress panel, full-width broderie anglaise fabric may give a cleaner, more economical result. For a hem, a prepared edging saves cutting and finishing time.
Order a physical swatch where possible. A screen rarely shows the difference between cotton, polycotton and viscose, or how firmly the eyelets have been overcast. Hold the sample against the main fabric, bend it around the intended curve and wash a small test piece before cutting. That check reveals changes in handle, shrinkage and edge stability.
A practical buying checklist
- Match the scale: Small eyelets suit delicate blouses and children's garments. Larger cutwork can support a dress hem or statement panel.
- Check the grain: Keep the border square to the selvedge or finished edge. A drifting repeat makes joins difficult to match.
- Allow working length: Add enough for joins, pattern matching, shrinkage and the small losses from squaring the ends.
- Ask about fibre content: Fibre choice affects drape, pressing, wrinkle recovery and washing.
- Inspect the edge: Each eyelet should have a secure stitched boundary. The scallop should not release loose threads when handled.
- Consider deadstock: A short length can suit cuffs, collars or samples, provided you have enough to replace a damaged area.
UK specialist haberdashers, independent fabric shops, small online makers and remnant collections are useful sources. Sample swatches let you check the eyelet finish before committing to a length. Choose trim that suits the garment's scale and gives the openwork enough support to stay crisp.
More Sewing offers fabrics, haberdashery, ready-to-sew kits and sample swatches for projects where trim, cloth and finish need to work together. Visit More Sewing to compare materials and practical supplies for your next broderie anglaise garment.
