
You've got pattern pieces spread across the kitchen table, cotton prints beside canvas swatches and a roll of faux leather waiting for a decision. The attractive fabric is rarely the difficult choice. The difficult choice is working out whether it will carry a full tote, cope with a wet UK commute and still look tidy after months of daily handling.
The best fabric for handbags depends on the job, the machine and the construction around it. A soft fabric may feel pleasant but collapse without support, while a stiff coated cloth can hold its shape yet fight you at every seam. The practical answer comes from comparing structure, abrasion, moisture, weight and sewing behaviour, not from choosing a fibre name in isolation.
Choosing the Right Handbag Fabric for Your Project
A first handbag often starts with appearance. You fall for a bold cotton print, a beautiful denim or a coated fabric with a smart finish, then discover that the finished bag needs to do much more than look good. It must support the weight of the contents, keep the handles from stretching and cope with being placed on pavements, café floors and damp car seats.
Before cutting, make three decisions.
Start with the bag's real job
A small clutch, a crossbody sling and a work tote don't ask the same fabric to perform the same task. A tote needs a stable body and dependable handle anchors. A crossbody needs fabric that won't distort where the strap tabs attach. A structured work bag benefits from a firm base and panels that resist sagging.
The UK market makes the textile question particularly relevant. In 2024, plastic-sheeting or textile-surface handbags accounted for 112 million units, or 89% of UK handbag imports, while total imports reached 127 million units, according to UK handbag market data from IndexBox. The same source records $506 million in imports for that category. For a maker, the useful conclusion is straightforward: fabric exteriors aren't a marginal format. Woven, coated and reinforced textiles sit at the centre of the commercial bag supply chain.
Match the cloth to your machine
A domestic machine can sew canvas, denim and moderate layers, but it has limits. A fabric that feels manageable as a single layer can become difficult once you add interfacing, lining, webbing and folded seams. Test the complete stack on a scrap before cutting the bag.
Mid-weight cotton canvas is my preferred starting point because it cuts cleanly, presses predictably and gives useful body without behaving like card. Denim is also approachable, but its twill can shift under the presser foot. Slick coated cotton needs a different approach, especially if the surface drags against the machine bed or presser foot.
Practical rule: Choose the most forgiving fabric that still suits the finished bag. A reliable first project teaches construction more effectively than a beautiful fabric that creates problems at every stage.
Decide how the stress points will finish
Look at the pattern before buying cloth. Where will the straps join? Does the base need a stiffener? Will the top edge carry a zip or magnetic snap? A novelty print with a loose weave may be attractive, but it can stretch at a strap anchor unless you reinforce it. A tightly woven canvas may be less dramatic, yet it gives a cleaner foundation for topstitching and hardware.
UK textile production has a long mechanised history. Inventions including the flying shuttle, water frame, spinning jenny and power loom helped move production from cottage craft towards factories centred on Manchester and South Lancashire, as described in this study of the UK textile and clothing industry%20THE%20UK%20TEXTILE%20INDUSTRY%20AND%20CLOTHING%20INDUSTRY.pdf). Today's cotton canvas, technical synthetics and blended bag cloths reflect that history, but finished textile supply also depends heavily on global sourcing.
The next decision is therefore comparative. Handle each candidate, sew a folded edge, press a test seam and check what happens when the fabric meets rain and reinforcement.
Comparing Canvas, Denim, Faux Leather and Coated Cotton
Four materials cover a large proportion of home-sewn handbag projects: cotton canvas, denim, faux leather and coated cotton. Each can work brilliantly, but none behaves like the others under the needle or in use.
A practical comparison
| Fabric | Handle & Body | Typical Weight | Weather Behaviour | Best For |
|---|---|---|---|---|
| Cotton canvas | Stable, firm and easy to shape with interfacing | 10 to 12 oz | Absorbs water unless treated or protected | Everyday totes and utility bags |
| Denim | Flexible at first, softens with use and develops character | 10 to 14 oz | Handles light moisture but isn't inherently waterproof | Casual totes and crossbody bags |
| Coated cotton | Smooth, moderately structured and resistant to surface moisture | Choose by project and coating | Shower-proof finishes are practical in rain | Commuter bags and wipe-clean projects |
| Faux leather or vinyl | Crisp, structured and polished | Choose by thickness and backing | Surface is easy to wipe, but seams and punctures need care | Structured handbags and sleek accessories |
Canvas is the easiest all-rounder for a home sewing room. It doesn't slide much, accepts ordinary pressing and works well with cotton linings. The drawback is bulk. Folded handles and boxed corners can quickly create a stack that needs clips, a stronger needle and slower sewing.
Denim is a good choice for a relaxed bag. It often softens as it is used, which gives a casual appearance rather than a rigid silhouette. That softness can become sagging if the pattern expects structure, so add interfacing to the body, base or strap tabs rather than assuming the denim will support itself.
Coated cotton, including oilskin-style cloth, is useful when rain is part of everyday life. It can be water-resistant without being fully waterproof, and waxed cotton may crease, mark and need re-waxing every 6 to 12 months, according to this guide to handbag fabrics and finishes. Don't iron waxed cotton directly. Use a pressing cloth, or avoid heat where the finish may melt or transfer.
Faux leather and vinyl create a sharper outline and are easy to wipe clean. They also punish inaccurate stitching. Pin holes remain visible, clipped curves can show damage and repeated flexing can crack a weak surface. Use clips, a suitable needle and a test scrap before committing to the bag.
For a first everyday project, I favour mid-weight cotton canvas with a cotton lining. It offers enough body to reveal good construction, but it won't make every seam a wrestling match. Upholstery fabric can also be useful, particularly when it has a published abrasion result above 20,000 Martindale rubs, but treat that figure as one part of the decision. The ECOS durability standards report explains why abrasion testing doesn't predict resistance to cuts from keys, buckles or studs.
Linings, Interfacings and Hidden Structure
Six months of daily use will expose weak structure long before the outer fabric looks worn. A handbag may have attractive canvas or denim on the outside, yet sag at the base, buckle at the corners or lose its shape around the zip. The lining, interfacing and concealed inserts decide how the bag behaves under the needle, when it carries weight and after repeated handling.
Build support in layers
Begin with medium-weight fusible woven interfacing for cotton, canvas, denim, pockets, linings and zip panels. It stabilises woven cloth while keeping enough flexibility for turning and stitching. Fabricland's UK bag-making guidance recommends testing the adhesive side on a scrap and pressing rather than sliding the iron. That matters because a shifted interfacing layer can distort the fabric or leave adhesive on the soleplate.
Use a muslin or fabric offcut for a proper test. Fuse it, bend it, sew a seam and turn a corner. Check how it feels beneath the presser foot and whether the finished layers can still pass through your machine. If one layer remains too soft, doubling the interfacing in a base, pocket or zip panel usually gives better control than making the whole bag stiff.
- Woven fusible interfacing: A reliable starting point for woven cotton, canvas and denim.
- Knit fusible interfacing: Suitable for drapey fabric that needs gentle stability without becoming board-like.
- Sew-in Vilene: Useful for heat-sensitive coated cotton or faux leather, where direct fusing could mark the surface.
- Foam stabiliser or Decovil: Helpful for base panels, flaps and bags that need a more defined silhouette.
A firm interfacing suits a structured handbag. Softer support works better for frame purses and wallets that need controlled flexibility. For straps and handles, the outer fabric can work if it receives additional iron-on support. This UK bag-making guide also describes medium or firm iron-on interfacing for pockets, straps, handles and lightweight reinforcement.
Treat the lining as a working component
A lightweight cotton lining keeps an everyday bag breathable and straightforward to sew. For gym bags, lunch carriers or nappy bags, a waterproof lining makes more sense because spills matter more than softness. Choose a pale or contrasting lining if you want to find keys quickly inside a dark navy or black bag.
Sew lining pockets before joining the lining to the outer bag. A divided slip pocket separates a phone from keys, while a zipped pocket contains smaller items. Stabilise the pocket's top edge because that narrow seam receives repeated pulling. Pocket fabric also needs enough support to avoid stretching out of shape after months of use.
Give the base its own support. An interfaced body can still slump if the base has no insert. Add a separate stiffener beneath it, cover the insert with the lining or a removable fabric sleeve, and make it slightly smaller than the finished base. That clearance lets the side seams sit naturally instead of forcing them apart.
Construction principle: A handbag should become firmer where it carries weight, not equally rigid everywhere. Concentrate support at the base, flap, zip panel, strap tabs and pocket openings.
Before fusing, inspect the pattern's turning points and seam allowances. Thick stabiliser in a narrow allowance creates hard lumps, while insufficient support at a corner lets the bag buckle. More Sewing offers Vilene S320 flexi firm interfacing, described for adding stiffness to bag bases and sides, alongside fabrics and haberdashery for sewing projects.
Hardware, Straps and Stress-Point Reinforcement
Handles are where attractive bags fail first. The fabric may still look perfect, but the strap anchor stretches, the stitching tears through the outer layer or a rivet pulls out with a small piece of cloth attached.
Anchor the load, don't just decorate it
Rivets can add a convincing finish, but rivets alone are rarely enough on woven fabric. Place a small rectangle of sewn webbing, leather or sturdy reinforcement behind the strap end so the load spreads over a wider area. Then stitch a box, add an X through it and back-stitch at the start and finish.
A 10mm, 12mm or 15mm strap width can suit a small crossbody, everyday sling or wider tote respectively, but match the hardware opening to the actual finished strap. Lightweight canvas doesn't need oversized metal fittings. Heavy hardware can pull the bag down and make a soft strap twist.
D-rings anchor fixed straps, swivel hooks make removable straps practical and strap adjusters allow a crossbody to sit at different lengths. Check that the webbing passes cleanly through the slider before sewing the final anchor. A strap that folds back on itself should be stitched through all layers, not caught only in the seam allowance.
Choose a base insert for the silhouette
Plastic canvas is light and easy to remove, making it useful for washable everyday bags. A firm bag stiffener, such as a Pellon Peltex 72FF equivalent, creates a more solid base for a structured design. A heavyweight foam board insert offers support but needs careful covering and should remain protected from water and sharp folding.
The first hardware kit I'd buy includes a setter with caps for rivets and snaps, a mini anvil and an awl. Magnetic snaps, turn locks and bag feet can wait until the pattern benefits from them. A magnetic snap suits a relaxed tote, while a turn lock gives a structured bag a deliberate focal point. Feet make sense when the base regularly touches a surface, but they also require accurate placement and a stable foundation.
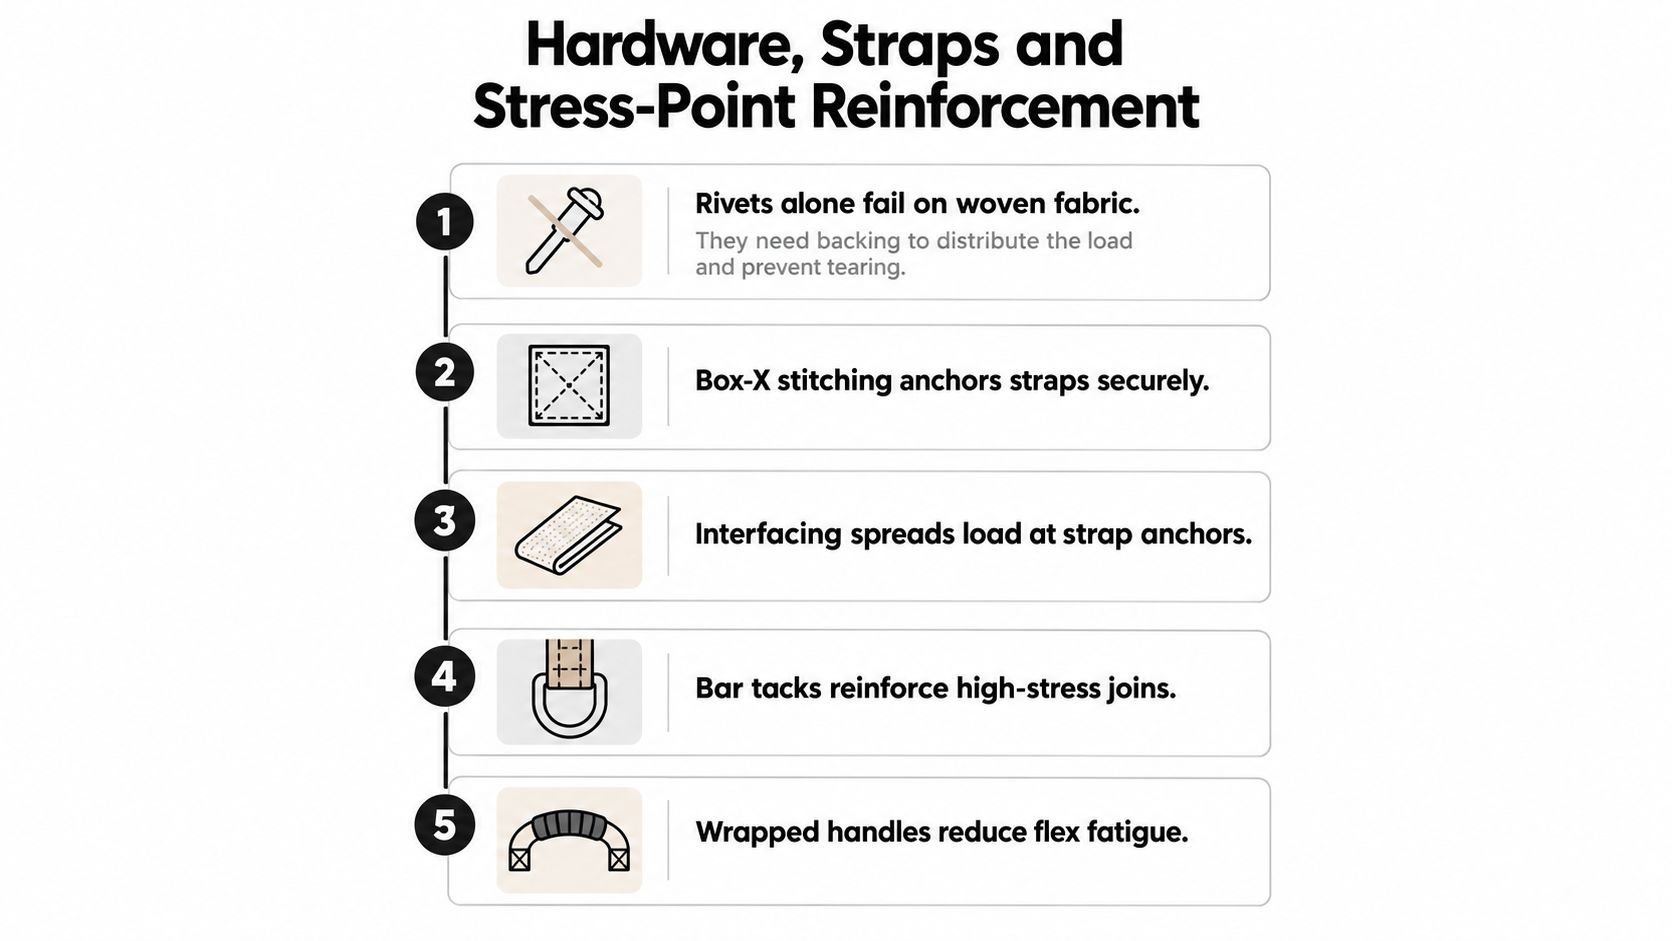
Any seam carrying weight should be back-stitched, top-stitched and, where possible, bar-tacked over a foundation square rather than secured with one line of stitching.
For dense fabrics and layered handles, use clips or weights instead of forcing pins through every layer. This UK guide to choosing interfacing recommends a stronger needle, such as 90/14 or 100/16, longer stitches and reinforcement at strap joints, bag bases and zip ends.
Cutting, Sewing and Finishing Techniques for Bag Making
Good fabric can still produce a disappointing bag if the cutting is careless. Start by pre-washing and pressing washable fabrics. Faux leather should not be pre-washed, and coated fabrics need the care instructions checked before heat or water touches the surface.
Cut for stability
Square the selvedges before laying out the pattern. On panels that carry load, keep the grainline running vertically unless the pattern specifically requires another direction. A crosswise cut can look harmless on a small piece, but it may allow a tall tote body to stretch unevenly.
Stripes and large prints deserve extra planning. Mark notches on both sides, label every piece and place the pattern on the fabric before cutting so you can check the repeat. Cutting a single-piece body on the fold saves a seam, but it also hides half the print until the piece is opened. If symmetry matters, cut separate mirrored pieces and match them deliberately.
Sew bulky layers without forcing them
A walking foot or even-feed foot helps move canvas, denim and stabiliser through the machine at the same rate. For canvas and denim, a 90/14 jeans needle is a sensible starting point. If the needle struggles, change it rather than increasing pressure and hoping the machine will power through.
Coated cotton needs a different touch. Reduce presser-foot pressure if your machine allows it, and test whether the foot leaves marks or causes feed-dog tracks. A smooth foot, tissue paper or a specialist non-stick foot can help, but the fabric test decides what works on your machine.
Use a 6mm seam allowance for neat structural seams and a 10mm allowance at stress points where the pattern permits it. Those wider allowances give reinforcement space and reduce the risk of stitching too close to an edge. Clip curves carefully, trim faux-leather seam allowances in stages and grade layered allowances so the finished turn isn't a dense ridge.
Make the finish look intentional
Topstitching is more than decoration. It flattens seam allowances, strengthens edges and gives the bag a controlled outline. Lengthen the stitch to 6 to 8mm per 2.5cm for visible topstitching, then test the tension and thread on a scrap.
For a crisp finish, topstitch approximately 3mm from each pressed-open seam edge where the construction allows it. Contrast thread highlights uneven spacing, so use matching thread while learning or mark the line with removable tape. A sharp corner should be pivoted accurately, with the needle down, rather than rounded by guesswork.
Press canvas and denim with the correct heat and a pressing cloth where necessary. Don't press faux leather directly, and don't iron waxed cotton as though it were plain cotton. Those finishing choices affect the surface long after the final thread has been trimmed.
Three Project Examples to Try First
The easiest way to understand fabric for handbags is to complete projects with different demands. Each one isolates a useful skill instead of asking a beginner to solve structure, hardware and difficult fabric at the same time.
A tote that teaches dependable structure
For a straightforward everyday carryall, choose 12oz cotton canvas, cotton lining and medium-weight interfacing. Add webbing inserts behind the handle ends and use a magnetic snap closure. The canvas gives a stable outer shell, while the lining hides reinforcement and creates a clean interior.
Sew the handle anchors as a boxed rectangle with a diagonal X. Add a base insert if the tote needs to stand rather than fold. This project teaches grainline, straight seams, strap placement and the difference between a bag that merely holds fabric and one that distributes weight properly.
A crossbody sling that teaches movement
Choose denim or coated cotton for a lighter crossbody sling. Denim creates a relaxed, lived-in finish, while coated cotton is easier to wipe and more useful when the bag may encounter showers. Use an adjustable slider strap, a zip top and reinforced strap tabs.
This is a good project for practising pattern matching on a front panel and learning how a narrow bag responds to strap tension. Keep the stabiliser targeted. A rigid whole-body construction can make a sling uncomfortable, while an unsupported zip panel may gape or lose its shape.
A structured bag that teaches restraint
Faux leather creates a polished everyday bag, but it demands accurate handling. Use clips instead of pins, a leather needle and a firm base insert. Mark every placement before sewing because unpicked holes remain visible.
The base insert supplies the shape the faux leather alone can't guarantee. Use a longer stitch for visible seams, avoid repeatedly sewing over the same line and trim bulky allowances before turning. This project rewards patience more than speed, and it teaches why a fabric choice must be matched to the right tools.
| Project | Main Fabric | Key Techniques | Skill Lesson |
|---|---|---|---|
| Everyday tote | 12oz cotton canvas | Interfacing, boxed strap anchors, magnetic snap | Building a stable woven bag |
| Crossbody sling | Denim or coated cotton | Pattern matching, zip top, adjustable strap tabs | Balancing flexibility with support |
| Structured everyday bag | Faux leather | Clips, leather needle, firm base insert | Sewing accurately without damaging the surface |
For students and independent makers, deadstock can add character, but availability is inconsistent. UK reporting records 98 kilotonnes of textiles collected for recycling, or 9%, which helps explain why reclaimed supply can vary in width, colour continuity and repeatability, as outlined in this UK textile flows report. Use deadstock confidently for one-off designs, but sample enough yardage before promising a repeatable production run.
Common Mistakes and Your Bag-Making Checklist
A bag usually fails at a stress point, not across the whole pattern. Check the strap anchors, base, curves and edge treatment before blaming the fabric.
Watch for these common problems:
- Skipping interfacing on strap tops: The straps twist and collapse under load.
- Using cotton thread on faux leather: Use bonded polyester thread, and select a needle suited to the material.
- Failing to grade seam allowances: Thick layers leave ridges visible through the finished edge.
- Trimming too close to the stitch line: The seam may weaken or fray when turned.
- Using the wrong needle for vinyl: Skipped stitches and permanent holes can result.
- Ignoring edge finishing: Raw woven edges continue to fray in daily use.
- Misaligning strap placement: The bag hangs unevenly.
- Under-clipping curves: Rounded seams pucker instead of lying flat.
- Over-hammering rivets: Too much force can crack the hardware finish.
- Skipping a test swatch: Fabric may bleed, stretch or react poorly to heat.
- Leaving the final press until later: Crisp edges make the construction look deliberate.
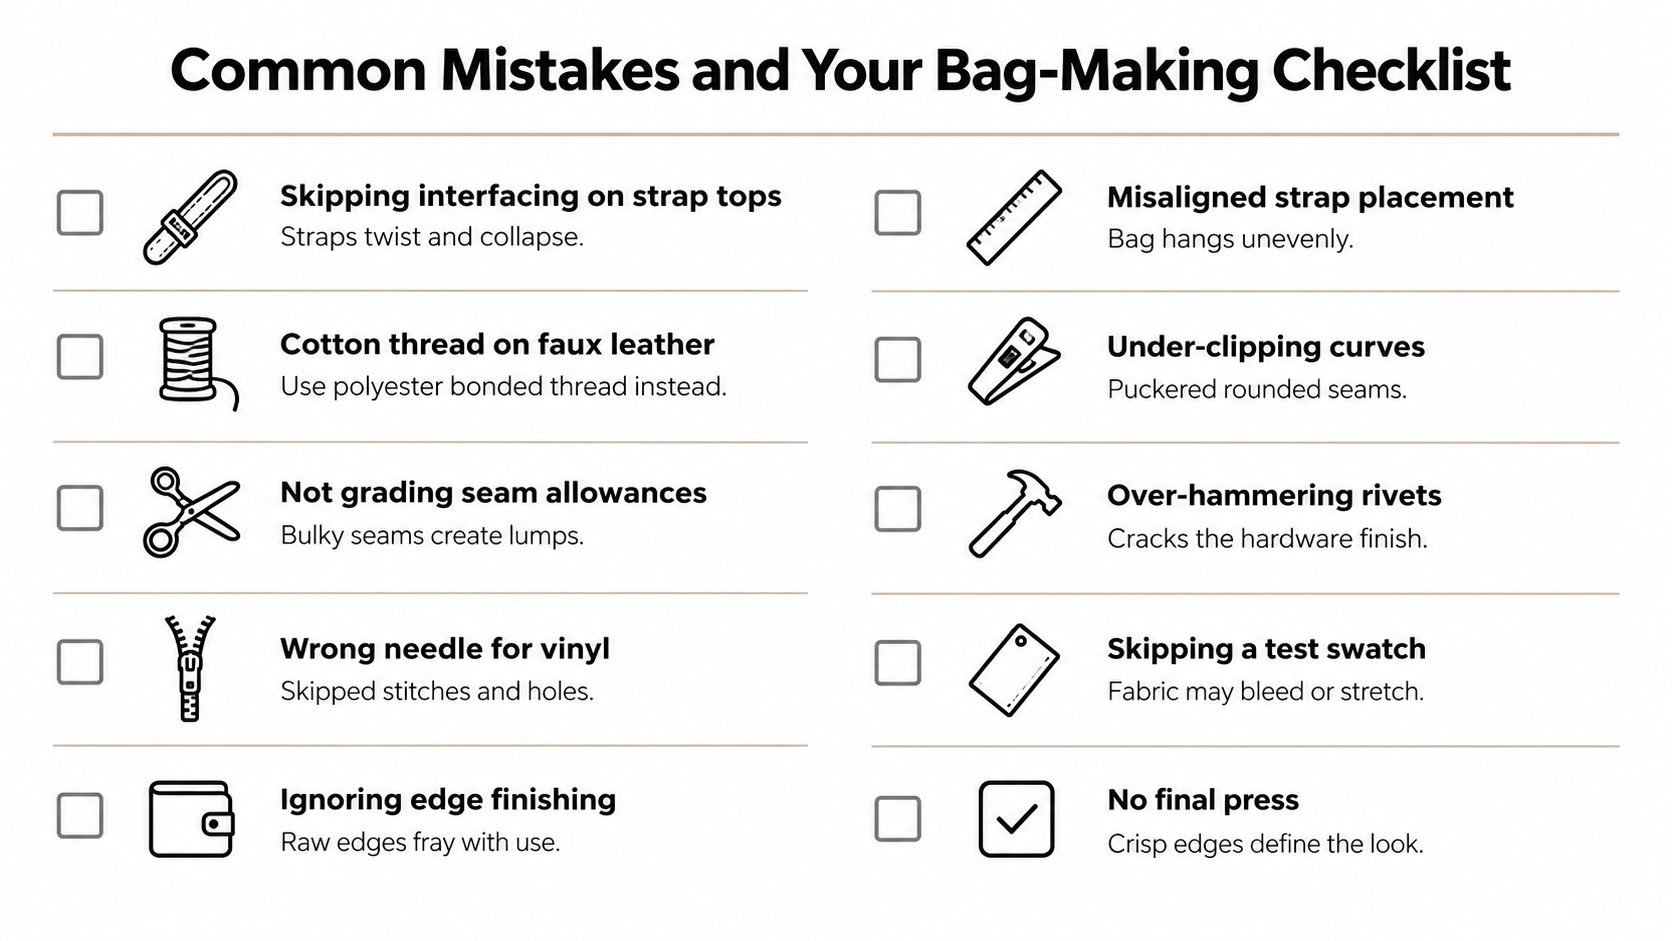
Before sewing, run through this checklist:
- Pre-wash and press: Prepare washable fabrics, while protecting coatings and finishes from unsuitable heat.
- Confirm the grainline: Keep load-bearing panels aligned with the pattern.
- Interface every stress panel: Check strap tops, zip panels, flaps and the base.
- Back-stitch seams: Secure both ends and reinforce joins carrying weight.
- Test topstitch tension: Sew through the complete fabric stack, not one layer.
- Check the hardware fit: Confirm strap width, ring opening and slider movement.
- Burnish or seal raw edges: Match the finish to the fabric instead of concealing weak edges inside the lining.
- Press the finished bag: Shape seams and edges carefully.
Record the fabric and interfacing combination that works. On the next project, make one practical upgrade, such as a reinforced base, a zipped lining pocket or a cleaner handle finish.
Choose your next handbag fabric, interfacing and haberdashery from More Sewing, where bag-suitable coated fabric, Vilene S320 and other sewing supplies are available. Order swatches before cutting, then match the needle, thread and notions to the fabric so the finished bag can handle regular use.
