
Dressmaking
How to Sew Gingham: A Practical Guide for Perfect Checks
You've got the fabric on the table, the pattern ready, and the sinking feeling that something subtle could still go wrong. That's the normal moment where gingham catches people out, because the cloth looks simple until you notice the checks are slightly off at the side seam, or the pocket sits on a different square from the bodice. Knowing how to sew gingham properly starts with respecting that the grid is part of the fabric itself, not decoration you can ignore until the end.
Gingham has a long British sewing history, and that matters because the cloth was shaped by industrial weaving as much as by fashion. The checked version most sewists recognise today developed in Manchester during the mid-18th century, and the modern check comes from pre-dyed warp and weft yarns woven together, not a printed surface (gingham history and construction). That woven structure is why cutting accuracy, grain control, and seam matching matter so much.
Why Gingham Demands a Different Sewing Approach
The first time a gingham shirt comes off the machine looking pleased with itself, the trouble usually shows up in the mirror. One placket lands on one square, the other lands on the next, and the checks stop meeting cleanly across the centre front. Gingham behaves less like an ordinary cotton print and more like a visible alignment test, so the cloth itself exposes every small mistake.
The check is built into the cloth
True gingham is woven from pre-dyed yarns, so the check lives inside the fabric structure rather than sitting on top of it. One textile source explains that the familiar design comes from using the same two colours in both warp and weft, while another describes it as a plain-woven cotton where the colour runs along the yarns and forms the check at the intersections (fabric construction and dye process). That is why the check appears on both sides, and why gingham is often treated as reversible (woven reversibility).
Practical rule: treat gingham like a woven grid, not a print. If the grid is off at the cut stage, the problem follows you to the hem.
The history matters too. Gingham moved from a striped import into the checked fabric most makers know today during Manchester's industrial textile expansion, and that shift helped establish it as a standard garment cloth in British dressmaking and tailoring (history context). For sewing, that is not just background. It explains why gingham still shows up in shirts, summer dresses, aprons, and children's clothes, where clean alignment and wearability both count.
Why normal cutting habits fail here
A floral print can hide a small cutting wobble. Gingham does not. Stretch the cloth while laying out the pattern, or cut one edge slightly off grain, and the checks drift. You see it at seams, facings, collars, and button plackets straight away. There is no room for “close enough” if the squares are meant to meet.
That hidden strain becomes obvious near the selvedge, where some ginghams pull or ripple enough to distort the grid before you even start cutting. Check size changes how much waste you need to plan for, too. Smaller checks give you more leeway, but the pattern reads more softly. Larger checks make matching easier to notice and harder to ignore, so you may need extra fabric if you want the squares to land properly at side seams, pockets, and centre fronts.
A beginner can sew gingham successfully with standard machine skills, but the cutting mindset has to change. The job is not only assembling pieces, it is protecting the grid from the first layout to the final press. If you have ever finished a garment and only then seen that the checks do not line up, the fix starts before the first snip.
Choosing the Right Gingham and Preparing Your Fabric
A bolt of gingham can look irresistible until you bring it home and notice the checks do not suit the garment you had in mind. A tiny check can vanish in gathers or pleats, while a bold one can fight with a fitted bodice or make a pocket look crowded. The first decision is not colour alone. It is whether the grid will work with the shape, scale, and handling of the project.
Match the check size to the job
Gingham behaves like a visual scale problem, and that affects both the finished look and the cutting table. Smaller checks read as neater and more restrained, larger checks read louder and make mismatch easier to spot, and medium checks usually give the most flexibility for dresses and shirts. The trade-off is simple. The more obvious the check, the less forgiving the garment becomes if your cutting is even slightly off.
Before you cut, compare the expected square size with a ruler when the fabric arrives, because the photo in a listing can be misleading once the cloth is in hand. That check saves disappointment later, especially if you are buying fabric for a shirt where the checks need to sit well across collars and plackets, or for children's clothes where a smaller check often looks more balanced. The same habit also helps you judge whether the fabric has been printed evenly or whether the grid shifts in a way that will cause trouble at matching points.
Pre-wash before you do anything else
Pre-wash the fabric before cutting, because shrinkage changes the way the grid sits. If you cut first and wash later, the checks can pull out of square and the careful alignment you set up can disappear. That matters more with gingham than with many plain cottons, because the grid makes distortion easy to see.
After washing, press the fabric and square it up before pattern placement. Squaring up means trimming so the crosswise and lengthwise edges behave as your starting reference, not the factory edge. If the cloth shifted during washing, this step gives you a clean baseline and stops you from building the pattern layout on a twisted edge.
A practical sequence works best:
- Wash and dry the fabric first. Let shrinkage happen now, not after the garment is sewn.
- Press it flat. Keep the iron controlled, not aggressive.
- Check the selvedge area. Many ginghams distort close to the edge, so do not trust the selvedge as your true grain line.
- Recut on-grain if needed. If the grid has gone out, square the cloth before pattern layout.
Gingham near the selvedge can lie to you. If the edge looks slightly warped, cut individual pieces from the more stable centre rather than trusting the fold.
That choice affects fabric waste, but it usually protects the garment better than forcing a distorted fold into service. Cutting on a fold can save cloth, yet if the fabric pulls near the edge, the fold preserves the error and makes matching harder later. Cutting pieces individually can use more fabric, but it often gives a truer result on checked cloth, especially when the checks need to meet at seams, pockets, and facings.
Buy more than you think you need
Pattern matching uses fabric, and check-size matching uses fabric too. If you want side seams, plackets, and waistlines to line up cleanly, extra yardage gives you room to shift pieces until the squares behave. If the cloth is limited or expensive, that planning becomes even more important, because the decision about where the checks must match has to happen before the first cut.
A perfectly matched gingham garment asks for planning, not optimism. Decide early which seams matter most and where a small mismatch can be accepted without spoiling the garment. That trade-off is part of sewing gingham well, and it is better to choose it on paper than discover it after the fabric has already been cut.
Layout and Cutting Techniques for Perfect Pattern Matching
Gingham rewards careful layout, but the first decision is not where to place the pattern, it is how much fabric to sacrifice before the scissors ever touch cloth. Check size changes how much shift you need between pieces, selvedge distortion can fool you into trusting a line that is already off, and both of those factors affect waste. On small checks, you can usually work with tighter placement. On larger checks, the fabric often needs more breathing room because a small misalignment shows faster and leaves less room to correct it.
Use the mirror-piece method
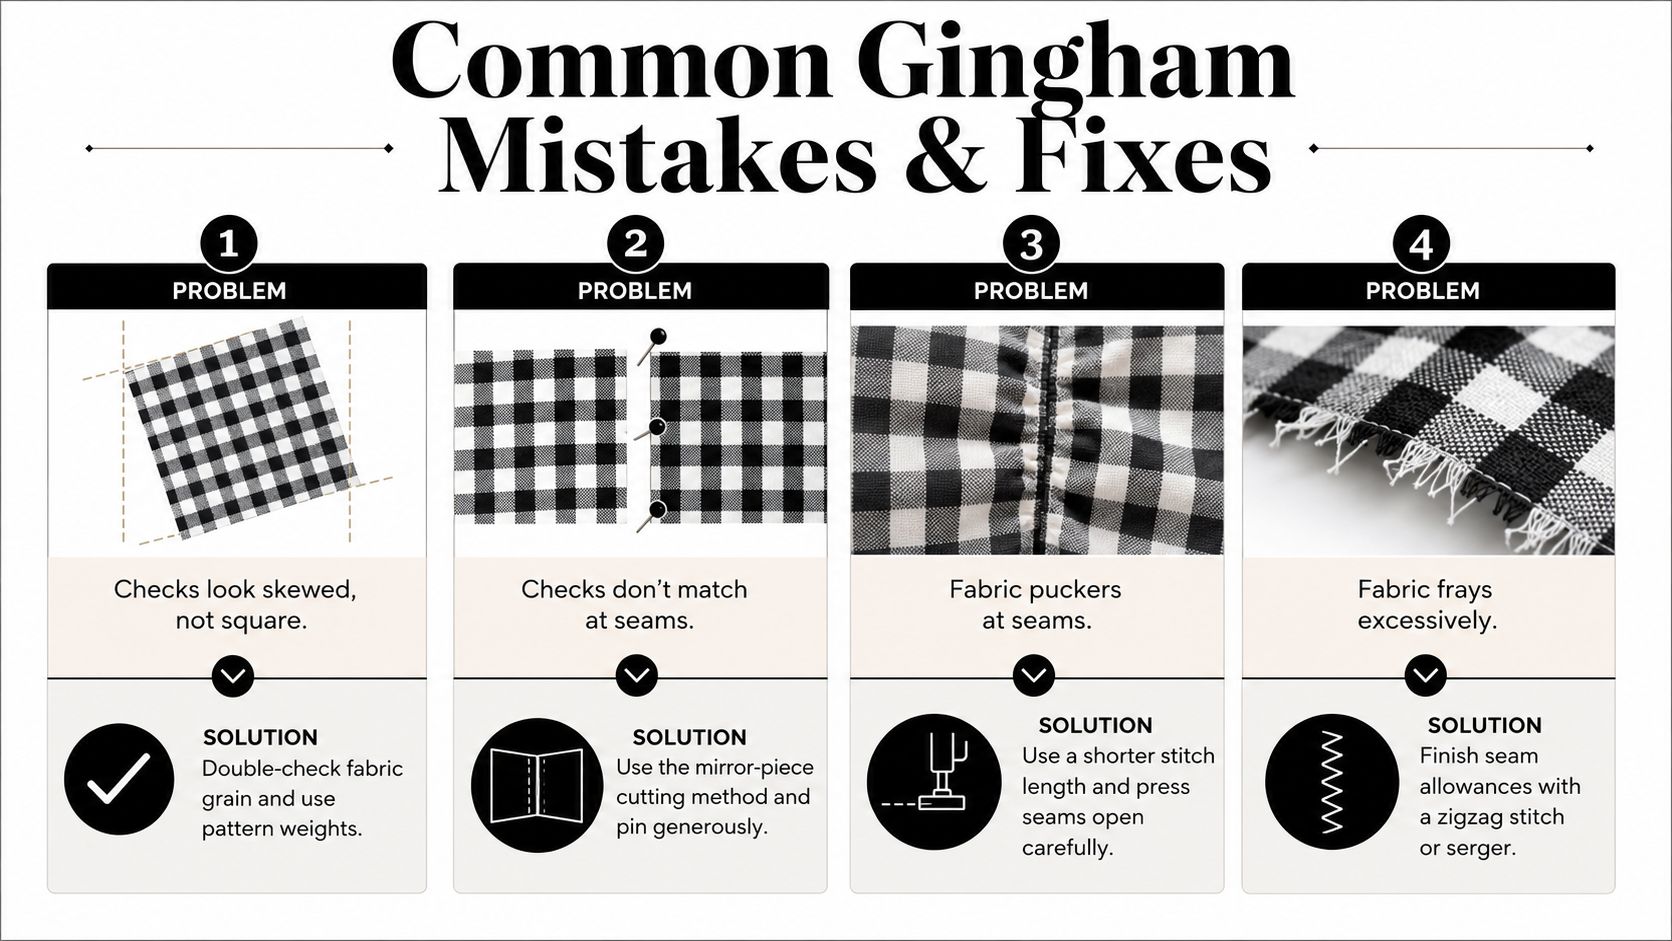
Start with one side, not a pair of pieces laid out at the same time. Place the pattern on the first layer, align the grainline with the true fabric grain, and position the horizontal check lines where they need to land on the finished garment. Cut that first piece carefully, then use it as the reference for the mirrored side. That method usually gives better control than trying to judge both sides by eye from a folded layout, because gingham shifts enough that tiny differences become visible once the garment is sewn.
Pins and pattern weights both have a place, but they do different work. Weights hold the pattern flat without punching holes through the cloth, which helps when the gingham is slippery or the checks are large enough to make small drift obvious. Pins are better for locking down key points where accuracy matters most, such as a shoulder point, side seam, or yoke line. If the checks begin to tilt, stop, lift the piece, and reset it before cutting continues.
Mark the important check intersections on the pattern pieces before you cut. Those marks give you fixed reference points later, especially at centre front, centre back, and the top edge of a patch pocket, where even a small mismatch catches the eye.
Cut for visibility, not just efficiency
Perfect matching on every seam wastes fabric and is usually not necessary. Match the lines people notice first, then make practical compromises where the seam sits lower on the body or stays hidden by the garment structure. On a shirt, that often means the centre front, collar stand, yoke seam, and pocket. On a dress, it usually means the bodice front, waist seam, and any side seam that lands in a prominent place. Less visible seams can tolerate a small offset if that keeps the yardage workable and the layout realistic.
Cutting decision: match the areas the eye lands on first, then relax your standard elsewhere. That keeps the garment looking deliberate without forcing a wasteful layout.
The checks make distortion easy to spot, which is useful only if you do not create the distortion yourself while cutting. A slight pull as you shift the pattern can tilt the grid, and once the cut edge is wrong, the error stays in the piece. Keep your hands flat, do not drag the fabric across the table, and cut with controlled strokes using sharp scissors or a rotary cutter.
For a visual example of checked-fabric layout, this video shows the matching mindset well:
The last check happens before sewing begins. Hold the cut pieces together and inspect the intersection points, especially the places that will sit on the outside of the garment. If the lines are already off at the cut edge, stitching will only preserve the mistake, not fix it.
Sewing Seams and Pressing Techniques That Preserve Alignment
Once the pieces are cut correctly, the sewing machine can still throw the checks off if you rush the assembly. Feed dogs pull, the presser foot can nudge the cloth, and the seam line can drift away from the grid before you notice it. Gingham shows every mistake, so each step has to stay controlled.
A small seam allowance helps more than beginners expect. In patchwork and other woven construction work, a 1/4 inch seam allowance is often used for strip sets and row assembly because it keeps intersections easier to line up accurately, and pressing seams in opposite directions helps the edges nest cleanly at joins (seam allowance and pressing benchmark). That same habit carries over to garments, because the check grid gives you instant feedback the moment one seam allowance runs wider than the next.
The trade-off is simple. Narrow allowances make alignment easier, but they also leave less room for correction if your cutting was sloppy. If the check repeat is large or the fabric is a little unstable, a slightly wider allowance may feel safer in the hand. The point is consistency. One uneven seam shifts the check columns, and three or four seams later the drift becomes obvious across the whole panel.
Press with control, not force
Pressing is where many gingham projects go wrong. A hot iron, too much steam, or a dragging motion can stretch the cloth on the bias and flatten the grid into something that no longer sits square. Practical guidance for gingham recommends pressing from the wrong side at low temperature and avoiding stretch while pressing (pressing guidance).
Use habits that keep the fabric stable:
- Press, don't slide. Lift the iron and set it down.
- Check each seam after pressing. Don't wait until the garment is finished.
- Alternate press directions. Nesting seams gets easier when the allowances lie in opposite directions.
- Trim and square between steps. If a piece starts to drift, correct it early.
If the strip set stops looking straight after pressing, the seam line has already wandered. Fix that before you cut the next section or join the next panel.
Cumulative drift is the core problem. One seam lands a little off, the next one gets adjusted to match, and the third seam goes in a different direction again. The checks start looking tired instead of crisp. The only reliable fix is to inspect the intersections after every seam, especially on the outside of the garment where the eye goes first.
A shirt fitting around bust, waist, and hip shape needs that same kind of control at the cutting table. A clear bust waist hip measurement guide helps you choose where the checks should sit before you start sewing, which saves you from trying to force alignment after the fabric is already stitched.
Project-Specific Guidance for Shirts, Dresses, and Pockets
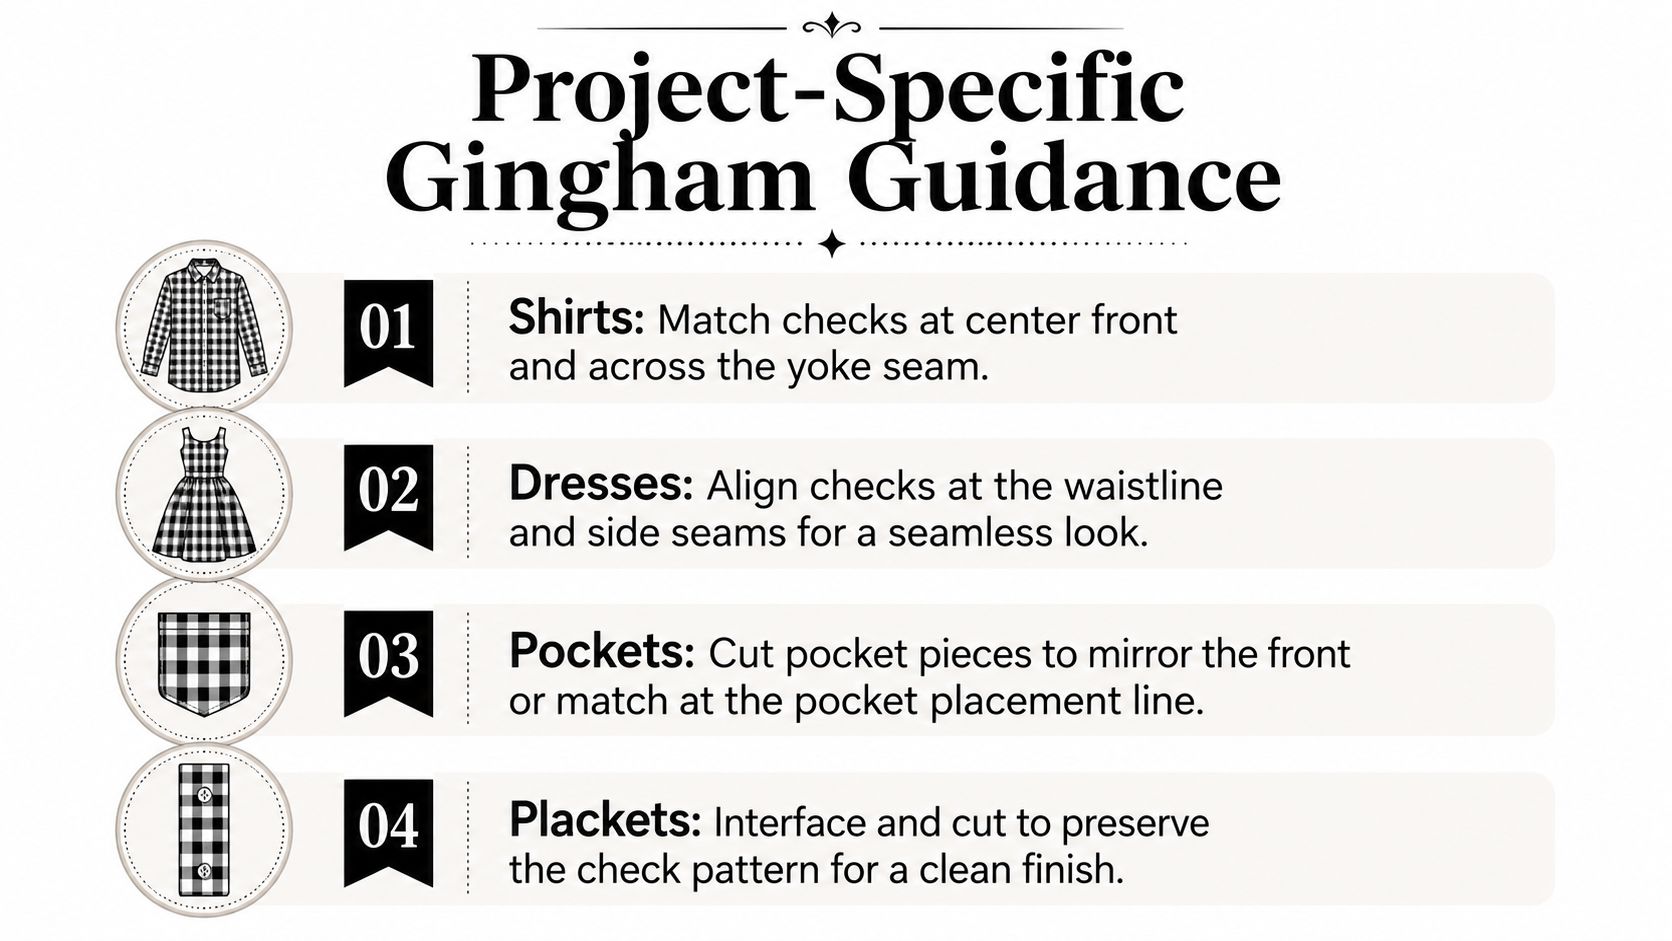
Gingham behaves differently depending on the garment, because the eye reads different areas first. A shirt asks for crispness at the placket and collar. A dress asks for balance at the waist and side seams. Pockets are their own game entirely, because they can either disappear neatly into the fabric or sit there shouting about your cutting choices.
Shirts need discipline at the centre front
On a button-front shirt, the centre front is the first place people notice. If the checks don't meet at the placket, the whole garment can look less finished even if the rest is well sewn. Collar and yoke seams deserve the same care, because they sit high on the body and frame the face.
A smart planning step is to check your measurements before cutting, especially if you're fitting a shirt around bust, waist, and hip shape. A clear bust waist hip measurement guide helps you choose where the checks should land most carefully so the garment fits as well as it matches.
Dresses reward careful waist and hem planning
With dresses, the waist seam and side seams matter most. If the bodice and skirt sections are cut without considering the check repeat, the join can look accidental instead of intentional. Gathered or pleated skirts add more movement, so you may not match every square perfectly there, but the waistline still benefits from deliberate placement.
Patch pockets should either match the body cleanly or look intentionally contrasted. If you want the pocket to blend in, cut it so the checks mirror the surrounding fabric. If you want a design feature, bias-cut pockets can break the grid on purpose and still feel controlled. The key is to make it look deliberate, not like a mistake that escaped the ironing board.
Reversible fabric can help, but only if you plan for it
Because gingham is reversible in construction, you can use either side out, which is economical when layout is tight (woven reversibility and layout). That same property also means facings and inner details need a little more thought, because the reverse won't hide much. If a collar stand or cuff edge is visible, treat it as part of the design rather than a hidden afterthought.
Common Mistakes and How to Fix Them
Gingham can look perfectly square on the table and still wander once the needle starts moving. That usually is not a fabric flaw, it is a handling problem. Feed dogs, presser foot pressure, and pulling at the seam all nudge the grid enough to show up later, especially on a check that is bold enough to make every slip obvious.
Recognise distortion early
If the checks look tilted after cutting, the fabric was probably off grain or stretched near the selvedge. If the seams do not meet after sewing, the pieces likely shifted under the machine or the seam allowance wandered. If the fabric puckers, the stitching line or pressing method may be fighting the weave rather than supporting it.
The quickest recovery is to stop, press flat, and measure again before moving on. Gingham gives you an early warning system, which is annoying at the machine but useful at the table. It shows drift before it becomes a finished-garment problem.
A small test seam helps here. Sew two scraps, press them the way you plan to press the garment, and check whether the grid stays stable. If the seam twists or the checks slide, adjust your stitch length, presser foot pressure, or pressing routine before you commit the main fabric.
Salvage work that's already cut
If the pieces are already cut and the checks do not line up, do not force a match that distorts the garment. Shift the design instead. Move the pocket placement. Turn a facing into a contrast detail. Accept a smaller mismatch in a low-visibility seam and make the visible areas look intentional.
You can also rescue a project by changing the finishing strategy. If an edge frays more than expected, finish the seam allowances with a zigzag stitch or a serger. That matters on lighter ginghams, where rough handling can open up the raw edge and make the seam look tired before the garment is even worn.
Do not chase perfect at any cost
Perfect check matching is not always the right answer. If you spend so much fabric forcing the match that the garment becomes too tight, too short, or too expensive to finish, the result has lost the plot. A thoughtful mismatch in a hidden place is better than a strained fit in a visible one.
Check size changes the trade-off. Smaller checks usually demand more exact cutting and more yardage planning, while larger checks give you a little more room to hide minor shifts but make distortion easier to see. Selvedge distortion can also eat into your usable width, so the fabric that looks generous on the bolt may not behave that way once it is squared and laid out. If you plan for a crisp match at every seam, expect more waste. If you want the garment to fit well and use the cloth wisely, choose the places where a match matters most and let the rest breathe.
The same goes for fabric behaviour after washing and pressing. Some ginghams are more cooperative than others. Before committing to a full garment, test a small seam, press it, and inspect whether the grid stays stable. If it does not, change your handling before you cut the main pieces.
Your Next Gingham Project Starts Here
Good gingham sewing comes down to a few disciplined choices. Pick a check size that suits the garment, pre-wash and square the fabric, cut with the grid protected, and keep the seam matching honest all the way through pressing. Start with a simple skirt, top, or apron if you want a clean win before tackling a fitted shirt.
The skill is judgement. You learn where the checks must match, where they can breathe, and when a bit of extra yardage is worth the reduction in stress. Once you've made one well-aligned gingham piece, the next checked fabric feels less mysterious and a lot more manageable.
If you want more practical sewing guidance like this, along with fabric choices and tools that support careful dressmaking, visit More Sewing. It's a useful place to find materials and haberdashery that make projects like gingham shirts, dresses, and skirts much easier to handle from the first cut to the final press.
