
Blog, Dressmaking, Guides
Twin Needle Machine Guide: Setup, Stitches & Projects
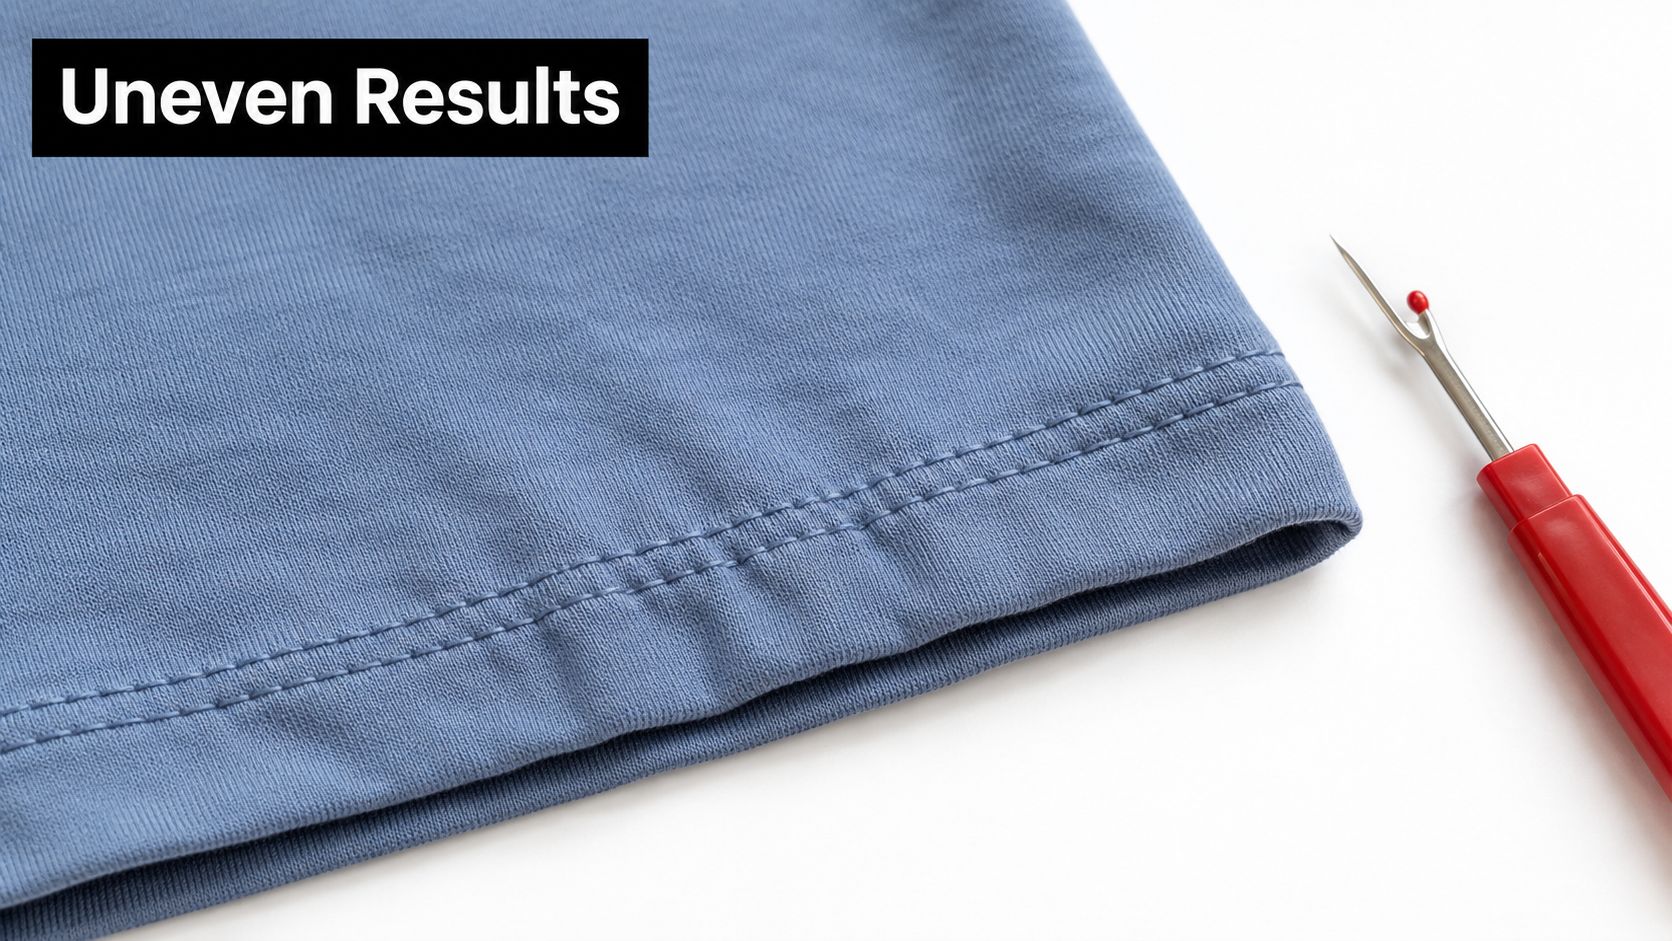
You've sewn a careful hem, turned the garment right side out, and found two rows that should look polished but instead pucker, tunnel or pull unevenly. The twin needle machine promises a professional finish, yet it can be surprisingly unforgiving when the threads enter the tension discs incorrectly or the stitch width exceeds the needle's safe range.
The solution isn't just to sew more slowly or turn the tension dial at random. Clean twin-needle work depends on correct threading, controlled stitch width, suitable fabric support and a bobbin tension that allows the underside to form a flexible zigzag. The following techniques apply to domestic machines and also explain where industrial twin-needle equipment differs.
Why Your Twin Needle Results Vary
A twin needle isn't just a wider version of a single needle. It has two needle points fixed to one shank, so the machine forms two upper rows while the bobbin thread travels between them underneath. That underside movement gives a twin-needle hem its useful flexibility, but it also creates more opportunities for uneven thread delivery.
If one upper thread passes through a tension guide while the other slips around it, the two rows won't behave alike. One line may look tight and straight while the other loops, and the bobbin thread may pull the fabric into a raised ridge known as tunnelling. A professional result starts with treating the two upper threads as separate thread systems, even though they share the machine's general path.
The old machine logic still matters
The UK has a deep historical connection with twin-needle technology. The British sewing-machine manufacturing record lists a “Twin Needle Double Shuttle” entry dated 1897, placing the technology in Britain by the late Victorian period and showing that it had already become a distinct machine category before the twentieth century. The wider British industry had been developing rapidly after practical machine patents appeared in the 1840s, with the Lancashire Sewing Machine Company formed in 1851, as recorded in this British sewing-machine manufacturing history.
That history helps explain why twin-needle machines were built around specialised work rather than casual decoration. Parallel stitching suited garment and leather manufacture, where repeatable lines, durable seams and controlled spacing mattered. A surviving Singer 105-20 twin-needle machine, dated to 1952, is held by the Museum of English Rural Life. Its industrial configuration used an electric motor and produced the bottom stitch with two needles and one looper, as documented in the Barnett collection handlist.
Practical rule: When twin-needle stitching looks wrong, diagnose the relationship between the two upper threads and the bobbin before blaming the machine.
Start by asking three questions. Did both threads pass through their intended guides? Did the needle points clear the presser foot? Is the fabric supported without being stretched as it feeds? Those checks usually reveal more than repeatedly changing the upper tension.
Installing and Threading Your Twin Needle
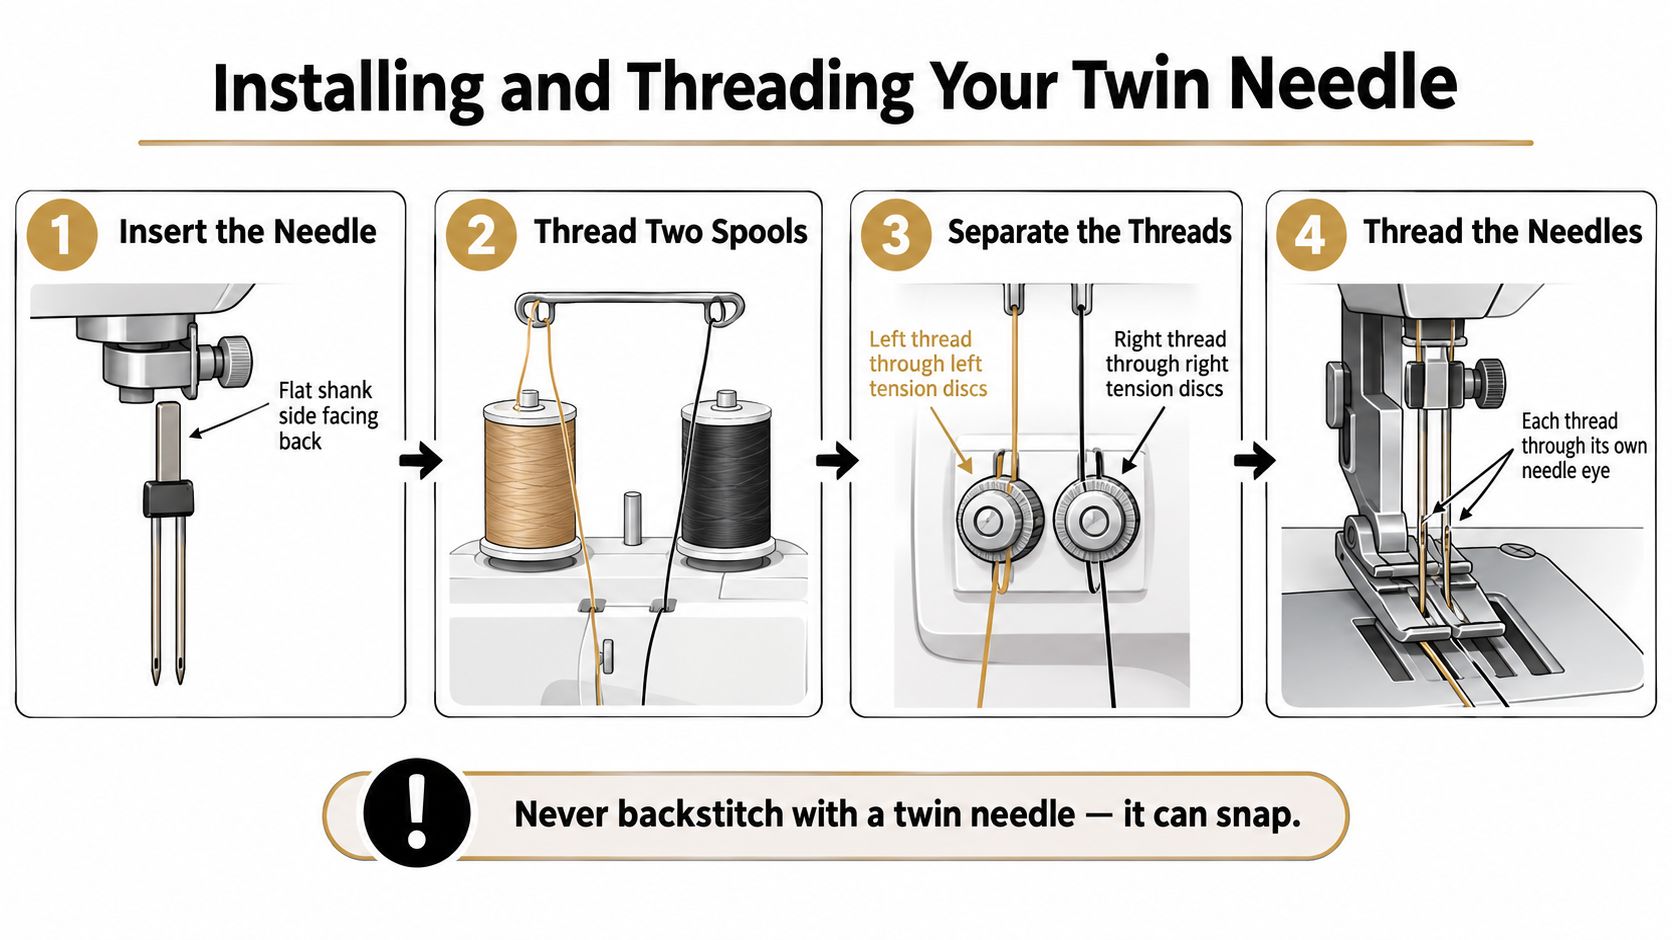
The physical installation is straightforward, but accuracy matters. A twin needle shares a single shank, so it fits into the holder in the same way as an ordinary needle. Push the flat side in the correct direction for your machine, slide the shank fully upwards, and tighten the clamp securely.
Never assume the needle is safe just because it fits. Select a twin needle setting or stitch programme if your machine provides one, then turn the handwheel slowly through a complete movement. The points must clear the presser foot, needle plate and any surrounding parts. UK machine guidance consistently requires the twin needle to be installed like a single needle, threaded with two independent upper threads and checked manually before sewing, as set out in this UK sewing-machine manual.
Keep the upper threads independent
Place two equally filled spools on the machine's spool pins, or use a second suitable thread source if your machine allows it. Matching thread helps the rows look consistent, but the important point is that each needle needs its own upper thread.
Thread the first spool through the usual guides and tension path, then take its thread to one needle eye. Route the second spool through the separate guide or the appropriate side of the thread path, keeping it from wrapping around the first thread. Each thread should pass through its own tension contact rather than lying loose on top of the machine.
Lower the presser foot only after threading if your machine's instructions require that order. Thread each needle by hand from front to back, then pull both threads beneath the presser foot and towards the rear. This gives the threads a predictable starting direction and avoids relying on an automatic needle threader that may not be designed for a twin needle.
Before placing fabric under the foot, pull both upper threads gently to confirm that they have tension. If either thread slides through without resistance, rethread with the presser foot raised so the tension discs can open properly. A slow handwheel check is essential after every change of needle width or stitch setting.
Threading check: Two spool threads should feel similar when pulled, and neither should cross over the other before it reaches the needle.
Setting Tension and Stitch Length for Success
Twin-needle tension is easiest to understand from the underside. The two upper threads form the visible rows, while the bobbin thread moves between them. If the upper tension is too tight, the bobbin thread pulls the fabric into a ridge. If it's too loose, the upper threads may sit in loose loops or fail to hold the hem securely.
Start with a folded scrap of the actual project fabric. Use the same hem depth, interfacing or stabiliser and thread type that you'll use on the garment. Sew far enough to see whether the fabric remains flat, then inspect both sides before changing anything. A tension adjustment that looks successful on a woven scrap may still fail on a springy jersey.
Use width as a safety limit
The width setting controls the distance between the needle points when the machine moves. It isn't a decorative choice that can be increased freely. UK guidance warns that twin needles wider than 3.5 mm can break on machines that don't support that setting, while Brother UK limits one supported twin-needle arrangement to 2.0/75 and specifies straight stitch in centre-needle position or zigzag at 1.5 mm, as shown in this UK twin-needle instruction guidance.
Set the stitch width at or below the marked twin-needle limit. If your machine has no dedicated twin-needle mark, treat the manual's permitted setting as the boundary, not as a suggestion. A stitch that sounds acceptable on the handwheel can still send a needle into the presser foot at sewing speed.
For most hems, a longer straight stitch gives the fabric room to move and produces a clearer pair of lines. Do not select an ordinary zigzag just because the garment is stretchy. The twin needle already creates the useful movement underneath, while the upper rows remain straight.
Adjust tension in small stages
If the fabric tunnels between the rows, try a modest reduction in upper tension and test again. Don't make a dramatic change before checking that both threads are correctly seated in the tension discs. Incorrect threading creates symptoms that resemble a tension problem.
Keep about 15 cm of thread behind the presser foot when you begin, a practical rule included in the Jaguar twin-needle manual. Hold the thread tails for the first few stitches without pulling them tightly. This prevents the needle threads from being drawn back into the needle plate and reduces the chance of a messy start.
For visual reference when choosing decorative effects, this embroidery stitch types guide is useful for distinguishing surface stitch appearances. It won't replace your sewing-machine manual, but it can help you decide whether a twin needle is the right tool for the finish you want.
Creating the Perfect Stretch Hem
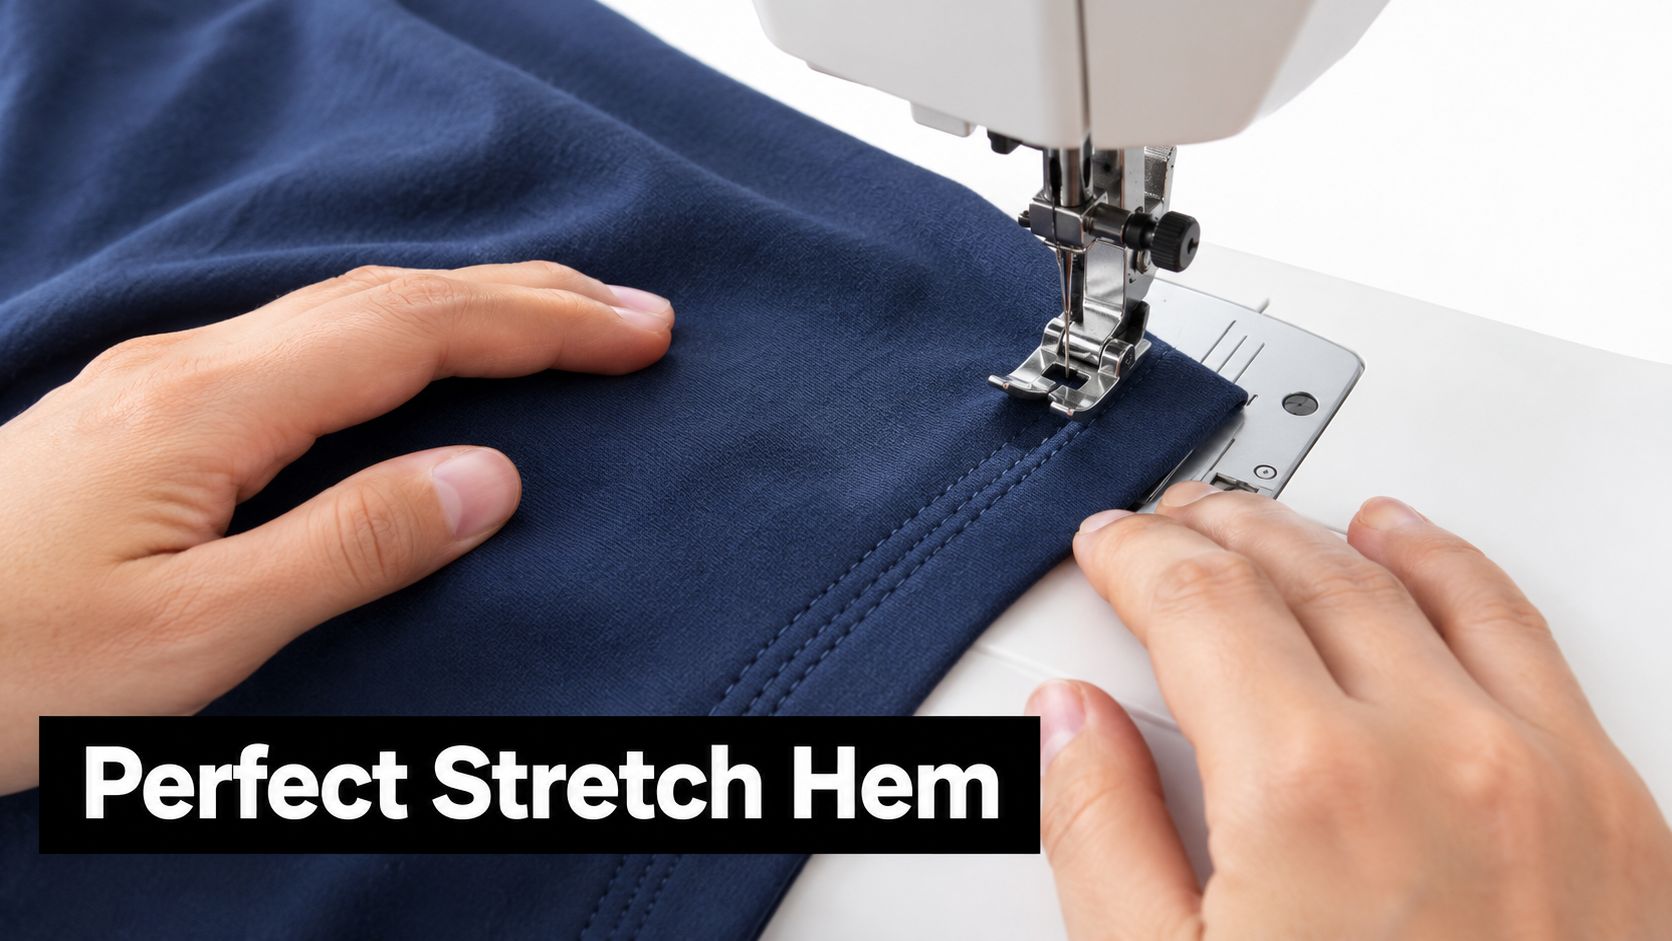
A twin needle earns its place on a domestic machine when you need a neat hem on jersey, a T-shirt or leggings without investing in a separate coverstitch machine. The finished top side shows two parallel rows in one pass, while the bobbin thread forms a zigzag underneath. That combination keeps the hem visually tidy and allows it to flex with the fabric.
Press the hem accurately before sewing. On a curved or tubular garment, mark the fold consistently and use the machine's seam guides rather than trying to watch the raw edge from the top side. The needles sew on the right side, so the fold itself may be hidden beneath the fabric.
Position the rows deliberately
Place the left needle just at the hem edge and the right needle within the folded hem. This positioning creates two parallel lines on the right side without sending one row beyond the fold. On the wrong side, the bobbin thread travels between the rows in a zigzag, providing the stretch needed for everyday movement. Sew Essential demonstrates this placement and the resulting underside in its guidance on sewing a twin-needle hem.
Test the placement on a scrap first. If the left needle misses the hem edge, the fold may open during wear. If it falls too close to the raw edge, the needle can catch an unstable section and pull it out of shape. A strip of lightweight stabiliser beneath the hem can help a very soft knit feed more evenly, but it shouldn't make the finished edge stiff.
Leave approximately 15 cm of thread behind the presser foot before the first stitch. Keep the tails out of the needle path and begin gently. Don't backstitch with a twin needle. At the end, leave tails again and secure them on the wrong side by threading them through a hand needle and tying them neatly, rather than reversing over the stitching.
The following demonstration is useful for seeing how the rows sit as the fabric passes beneath the foot.
Feed the fabric, don't stretch it
Stretching jersey as it enters the machine is one of the quickest ways to create a wavy hem. Let the feed dogs move the fabric while you guide the edge. If the garment is heavy, support its weight on the table so it doesn't pull backwards from the needle.
For a decorative hem on a stable woven, the same two-row arrangement can provide double topstitching or pin-tuck effects. The technique is less about copying a factory finish and more about matching the needle width, thread tension and fabric behaviour to the intended result.
Troubleshooting Common Twin Needle Issues
A broken thread doesn't automatically mean the twin needle is faulty. Most failures come from a mismatch between the machine setting and the thread path, or from asking a delicate hem to absorb more movement than its construction allows.
If the needle breaks
Stop immediately and remove the fabric without forcing it backwards. Check that the needle is fully inserted, the clamp is tight and the selected width is within the machine's twin-needle limit. A needle can strike the foot when the machine is set to a side-moving stitch, even if the first few stitches appeared normal.
Brother UK specifies straight stitch in the centre-needle position and zigzag at 1.5 mm for its supported twin-needle setup. It also advises raising the needle and presser foot before changing direction, as described in this Brother UK twin-needle support guide. Follow the equivalent limits for your own model rather than copying a setting from another machine.
If the top thread breaks
Rethread both spools with the presser foot raised. Check for a thread caught around a spool pin, a crossed pair of threads above the tension discs or a needle eye that is too tight for the thread. A thread may also snap when the starting tails are held too firmly.
If the break occurs only while turning, stop with the needle raised and lift the presser foot before rotating the work. Turning while the needle remains embedded places sideways pressure on the twin shank and can disturb the thread path.
If the underside loops or the fabric puckers
Inspect the bobbin first, then check that both upper threads are seated in their tension paths. Visible loops beneath the fabric can indicate insufficient upper tension, but they can also result from incomplete threading. Puckering often improves when you support the fabric, reduce upper tension slightly and test on the same material again.
Diagnostic habit: Change one variable at a time. If you alter the needle, width, tension and stitch length together, you won't know which correction solved the problem.
Domestic Twins Versus Industrial Powerhouses
A domestic twin needle is a practical attachment for hems, parallel topstitching, pin tucks and controlled decorative work. It uses the ordinary machine's motor, feed system and bobbin, so the result depends heavily on correct setup and on how steadily the fabric enters the foot.
An industrial twin-needle machine belongs to a different workflow. UK industrial listings position models for parallel stitching on medium to heavy materials, with features including needle feed, 3,000 stitches per minute and 6.4 mm gauge options, as shown in this Jack JK-58720 twin-needle machine listing. Those specifications suit repeat production, heavier materials and operators who need consistent parallel rows across substantial runs.
| Domestic twin needle | Industrial twin-needle machine |
|---|---|
| Suits home dressmaking and occasional projects | Suits repeat production and specialist workflows |
| Uses a household machine's existing feed and bobbin system | May use needle feed and a dedicated industrial configuration |
| Useful for stretch hems and decorative stitching | Designed for parallel stitching on medium to heavy materials |
| Requires careful attention to width and threading | Offers dedicated gauge and production-oriented settings |
For a T-shirt hem, leggings or a small run of garments, a properly fitted domestic twin needle is usually the sensible starting point. It keeps the equipment flexible and lets you test the finish on your actual fabric before committing to specialist machinery.
An industrial upgrade makes more sense when your work regularly involves heavier materials, repeated parallel seams or a production pace that a domestic motor and feed system can't maintain. Buying industrial equipment won't correct poor threading or unsuitable tension. It provides a different mechanical platform, so master the domestic setup before deciding that more power is the answer.
More Sewing offers fabrics, jerseys, haberdashery, dressmaking kits and sewing machine servicing for projects that depend on a reliable finish. Visit More Sewing to choose suitable fabric and supplies, or arrange help with a machine that needs attention before your next twin-needle hem.
