Guides
How to Sew a French Seam for a Professional Finish
You’ve sewn the neckline neatly, the hem hangs well, and the fit is spot on. Then you turn the garment inside out and the magic drops a bit. The seam allowances look scrappy, threads are starting to feather, and the whole thing feels more homemade than handmade.
That’s usually the moment people start caring about how to sew a french seam.
A French seam changes the inside of a garment as much as the outside. Instead of leaving raw edges exposed, it encloses them inside a second line of stitching. The result is clean, smooth against the skin, and especially good on fabrics that fray or show every little mistake. If you sew with viscose, Tencel, cotton lawn, voile, georgette, or fine deadstock shirtings, it’s one of the most useful finishes to keep in your toolkit.
It’s also not a new trick dressed up as a modern hack. The French seam developed alongside the rise of the sewing machine in the 19th century, and Butterick’s The Dressmaker’s Guide illustrated it in 1886 to help standardise finishes for ready-to-wear. By the 1890s, 65% of high-end blouses exported from Manchester used enclosed seams, and those finishes reduced returns due to fraying by 22%, according to William Gee’s history of the French seam. That tells you exactly why the technique lasted. It works.
The Secret to a Truly Handmade Look
The garments that look polished usually have one thing in common. The inside has been treated with as much care as the outside.
A French seam gives you that finish without needing an overlocker and without adding the visual fuss of a bound seam. On a sleeveless shell in soft viscose, it keeps the side seams light and tidy. On a sheer blouse, it stops seam allowances shadowing through the cloth. On pyjama trousers, it makes the inside feel comfortable instead of scratchy.
Why it looks better
Open seam allowances can be perfectly serviceable, but they often interrupt the flow of a fine fabric. On lightweight cloth, overlocking can create ridges. Zigzag finishes can look busy. Pinked edges can still shed threads after wear and washing. A French seam avoids all of that by hiding the raw edge completely.
That matters most when the fabric has one or more of these habits:
It frays quickly. Fine cottons, viscose and some deadstock shirtings can unravel while you’re still sewing.
It’s slightly transparent. Every seam finish becomes part of the design when the fabric lets light through.
It clings or drapes softly. Bulky finishing ruins the line of the garment.
It sits close to the skin. A clean enclosed seam feels nicer.
A French seam is often the difference between “I made this” and “I made this well”.
Where it earns its keep
I’d reach for a French seam first on side seams, shoulder seams, simple skirt seams and children’s wear. It’s brilliant on garments that get regular washing because there’s less chance of frayed edges creeping out over time.
It isn’t the right answer everywhere. You need to think about bulk, seam intersections, closures and curves. But when the seam is fairly straight and the fabric is cooperative, it gives a level of finish that looks far more advanced than the method is.
There’s also something satisfying about using a finish with real dressmaking heritage. It wasn’t adopted because it sounded elegant. It was adopted because it made garments neater, more durable and more saleable. That’s still the reason to use it now.
Gathering Your Essential Tools for a Flawless Finish
French seams don’t need a huge kit, but they do reward precision. The first seam has to be narrow and even. The trimming has to be clean. The pressing has to be deliberate. If one of those stages is rushed, the final seam usually tells on you.
The tools that matter most
You can sew a French seam with basic equipment, but a few tools make it much easier to get a crisp result.
Sharp fabric shears. These matter most at the trimming stage. If your scissors chew the edge instead of cutting it cleanly, little fibres can work their way out of the finished seam.
Small snips or thread clippers. Better for detail trimming than large dressmaking shears, especially on curves or fine cloth.
Pins that suit the fabric. Fine pins for delicate fabrics, sturdier pins for shirting or lightweight denim. Thick pins can leave marks or distort a slippery weave.
A measuring gauge or clear ruler. French seams are simple, but they aren’t guesswork. You need to know where that first line of stitching sits.
An iron with steam. Pressing isn’t optional here. The fold of the second seam comes from pressing as much as sewing.
A pressing cloth and tailor’s clapper. Helpful on viscose, Tencel and cotton where you want a flat seam without shine.
Needle and thread choices
The wrong needle can cause more trouble than the seam method itself. For fine woven fabrics, a sharp, fine machine needle gives better penetration and less dragging. If the cloth is tightly woven, slippery, or prone to puckering, switching to a fresh sharp needle often improves things immediately.
Thread also affects bulk. A smooth, fine thread helps the seam sit flatter, especially when you’re enclosing one seam inside another. For garments where I want a neat, unobtrusive finish, a fine cotton thread such as Aurifil Mako thread in Swallow is the sort of option worth considering because it keeps the stitching light rather than ropey.
Practical rule: If the trimmed seam allowance already looks thick in your hand, it will look thicker once enclosed. Choose the finest thread and neatest trim the fabric will allow.
Helpful extras for tricky fabrics
Some fabrics fight accuracy. That doesn’t mean you abandon French seams. It means you control the cloth.
A few extras help:
| Tool | Best use | Why it helps |
|---|---|---|
| Walking foot | Slippery viscose, Tencel, layered cloth | Keeps layers feeding more evenly |
| Spray starch or pressing spray | Soft, shifting fabric | Adds temporary body for straighter stitching |
| Tailor’s ham | Curved seams | Supports pressing on shaped areas |
| Thimble | Dense fabric or close pinning | Useful when feeding bulky edges safely |
A French seam looks refined, but the process is practical. Good tools don’t make it fancy. They make it accurate.
A Step-by-Step Guide to Sewing the Perfect French Seam
Most home dressmakers in the UK work with a standard 5/8 inch or 1.6cm seam allowance. That’s ideal for French seams because you can split that allowance neatly between the two passes. The method I come back to again and again is the one outlined by Seamwork’s French seam tutorial: sew the first pass at 3/8 inch (0.95cm) with wrong sides together, trim the seam allowance in half, then sew the second pass at 1/4 inch (0.65cm) with right sides together so the raw edge is fully enclosed.
The first pass with wrong sides together
This is the bit that feels backwards if you’ve never done it before. Put the wrong sides together, match the raw edges, and pin carefully.
Sew the first seam at 3/8 inch (0.95cm). Keep the line smooth and consistent. Don’t wobble in and out trying to correct the edge as you go. On fine fabrics, that first seam line creates the shape of the finished seam, so it needs to be calm and even.
A few things help here:
Pin on the flat rather than holding the fabric in the air.
Start with a test strip if the fabric is slippery or loosely woven.
Use a steady straight stitch rather than a tiny stitch length that can chew delicate fibres.
Hold the fabric lightly in front and behind the presser foot, but don’t pull.
The crucial trim
Once the first seam is sewn, trim the seam allowance down by about half. If you started at 3/8 inch, trim to a scant 3/16 inch or about 0.5cm.
This stage is where a lot of the final neatness is decided. Trim close enough that the raw edge won’t peek out later, but not so aggressively that the stitching line is left vulnerable. Keep the trimmed width as even as you can from top to bottom.
If the fabric frays as soon as you touch it, trim in short sections instead of trying to race through the whole seam. Accuracy beats speed every time.
If you can see uneven little hills and valleys in the trimmed allowance, you’ll usually see them again after the second pass.
Press before you fold
Take the seam to the ironing board and press it flat first. Then press the allowance to one side. This sets the stitches and makes the next fold cleaner.
Finger-pressing before using the iron helps, especially on viscose or Tencel. You can roll the seam gently between finger and thumb so the stitching line sits right on the edge. After that, fold the fabric so the right sides are together, with the trimmed raw edge enclosed inside.
Here’s a clear visual demonstration of the sequence if you like to see the movement before sewing it yourself:
The second pass that encloses everything
With the fabric now right sides together, press the fold sharply along the original stitching line. Pin again if needed, especially on slippery cloth.
Sew the second pass at 1/4 inch (0.65cm). This line of stitching encloses the trimmed raw edge inside the seam allowance. If you trimmed evenly and folded accurately, nothing should poke out.
After stitching, press the finished seam to one side. On a blouse or dress, that seam will often sit best pressed towards the back. On sleepwear or simple tops, consistency matters more than any fixed rule. Just choose a direction and keep it the same across the garment.
What to look for when it’s done
A good French seam should feel narrow, smooth and tidy. It shouldn’t twist, ripple or show whiskery threads through the fold.
Check these points:
No raw threads visible along the finished seam.
No pleats caught beside the second line of stitching.
The seam width stays even from one end to the other.
The fabric lies flat without tunnelling.
If one small section has gone wrong, unpick that section rather than tolerating it. French seams are very visible on the inside. A two-inch repair is usually worth doing.
When to use the split method instead
Some sewists prefer working from metric pattern allowances with a slightly different split, especially on 1.5cm seam allowances. In practice, a first pass around 1cm and a second around 0.5cm can be easier to visualise on some machines because the guides are clearer. The principle stays the same. The first seam is wider, then trimmed down, then enclosed by the second pass.
What matters isn’t loyalty to one exact formula. What matters is that your two lines of stitching add up to the original seam allowance and leave enough room to fully encase the trimmed edge.
Adapting French Seams for Any Fabric
A French seam is often taught as a finish for sheer fabrics and little else. That’s far too narrow. It does shine on voile, lawn and soft viscose, but fabric choice changes how you prepare, trim and press the seam.
The mistake is assuming the same narrow, delicate method works on everything. It doesn’t. A 2025 UK Sewing Guild survey found that 62% of hobbyists abandon French seams on denser fabrics like denim because of bulk and poor results from standard tutorials, many of which recommend very narrow first seams that don’t suit heavier cloth, as discussed in this article on French seam tips. That’s not a failure of the sewist. It’s usually a mismatch between method and fabric.
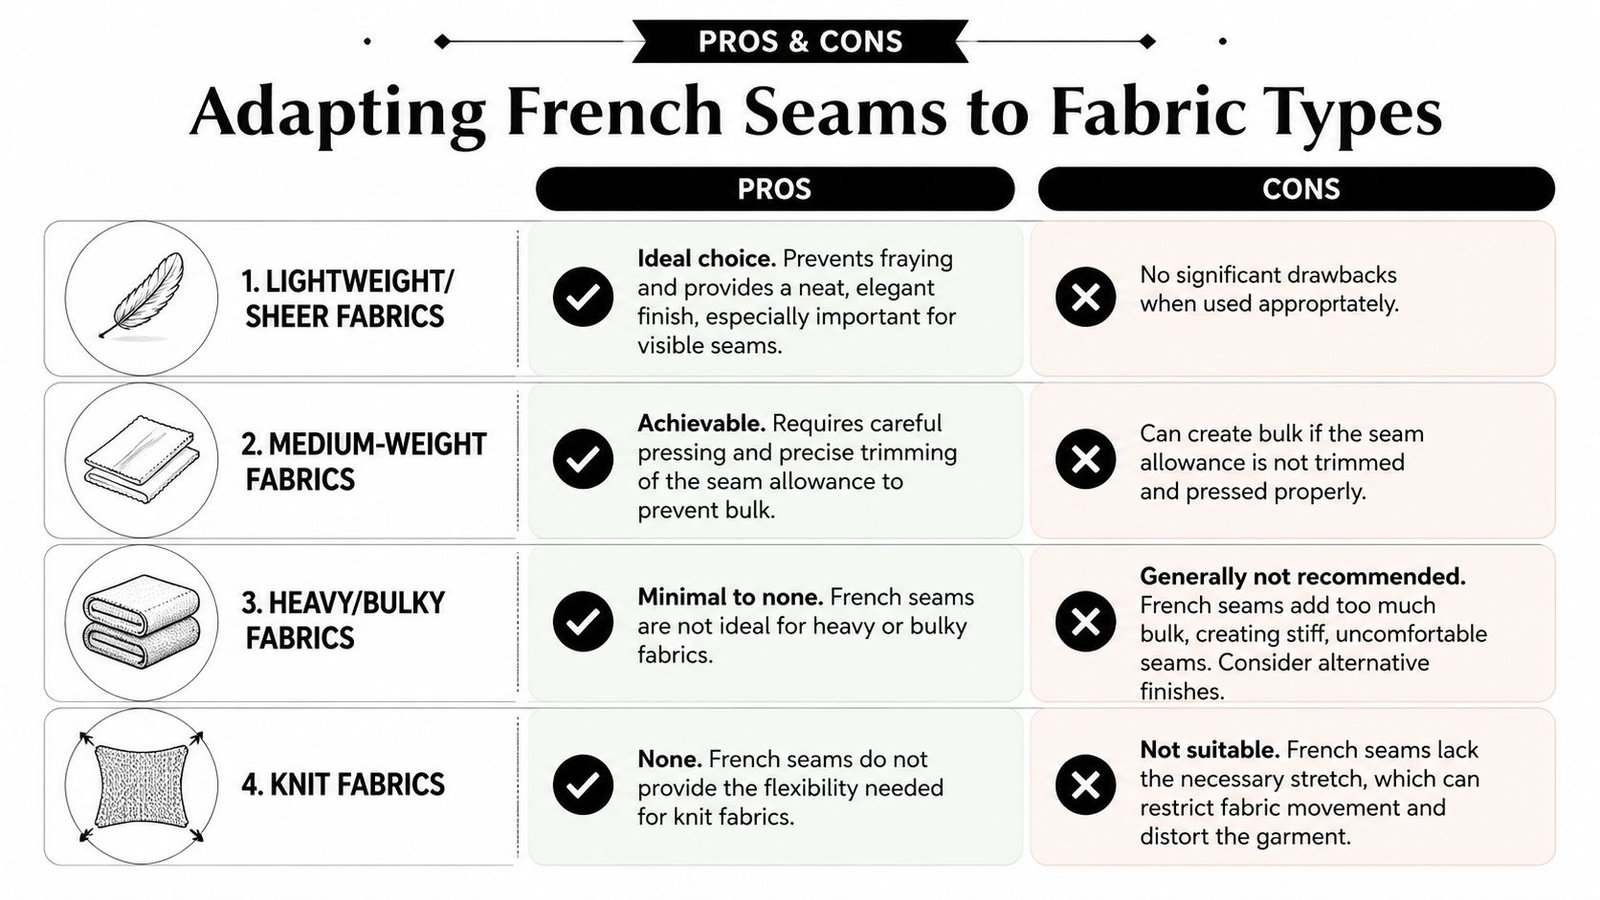
Lightweight and sheer fabrics
This is the classic home for a French seam. Chiffon, voile, cotton lawn, georgette and fine viscose all benefit from enclosed edges because open finishes can shadow through the fabric or look scratchy and untidy.
For these fabrics:
Stabilise first if needed. A light mist of starch can make a shifty fabric easier to handle.
Use more pins than usual if the layers slide.
Trim very neatly. Stray fibres are much more obvious on transparent cloth.
Press gently. Dragging the iron can stretch a bias edge.
With sheers, I also prefer to sew a sample seam before starting the garment. It tells you quickly whether the fabric likes your needle, thread and pressing temperature.
Medium-weight fabrics that still drape
This category includes many shirtings, Tencel twills, softer linens and stable deadstock cottons. French seams can work beautifully here, but they need a bit more discipline.
The main issue is bulk. You’re enclosing fabric inside fabric, so every unnecessary thread and every uneven trim matters more. Pressing becomes far more important than many beginners expect.
A useful approach on these fabrics is:
| Fabric behaviour | Adjustment |
|---|---|
| Soft but slippery | Pin closely and press between each stage |
| Crisp woven cloth | Trim accurately and use the edge of the presser foot as a guide |
| Slightly bulky at intersections | Switch to another seam finish at underarms, waist joins, or enclosed corners |
| Frays heavily | Handle gently after the first trim and avoid overworking the seam |
Medium-weight fabrics often don’t punish a French seam immediately. They punish it at the intersections.
Curves and shaped seams
Curved seams are where confident beginners often get discouraged. Armholes, princess seams and curved side seams can pucker because the enclosed allowance has to bend inside the seam.
The way through is to reduce resistance in the seam allowance without cutting so much that the seam becomes weak. On a gentle curve, trim carefully and press on a tailor’s ham if you have one. On a tighter curve, many sewists get a better result by choosing a different finish rather than forcing a French seam where it doesn’t want to go.
Here’s the trade-off in plain terms:
Gentle curves can often take a French seam if you sew slowly and trim well.
Tight curves are more likely to look strained or lumpy.
Bias-cut curves can distort if you over-handle them.
High-fray viscose curves need especially careful trimming and pressing.
If the seam starts looking ropey after the fold, stop and reassess. A clean alternative finish is better than a technically correct French seam that fights the garment.
Heavier fabrics and lightweight denim
The recommendations are often inconsistent: French seams on heavier fabrics aren’t impossible, but they’re often over-prescribed.
If I’m working with a lightweight denim or a dense cotton, I treat the French seam as an option for selected seams only. Straight side seams might cope. Seams that cross a waistband, pocket bag or yoke often won’t. The more layers gathering in one place, the less sensible the French seam becomes.
On heavier cloth, what helps is not making the first seam excessively tiny. A minuscule first pass leaves too much bulky cloth to manipulate on the second fold. Instead, work with a more practical width, trim thoroughly, and test whether the enclosed seam still feels supple enough for the garment.
Knits and stretch fabrics
A standard French seam is usually the wrong finish for knit fabrics because it lacks stretch. The seam can look neat on the table and then restrict movement once worn.
There are exceptions with very stable knits used in loose garments, but as a general rule, if the fabric needs the seam to stretch with it, choose a finish that supports that. A French seam is built for enclosed neatness, not elasticity.
The best question isn’t “Can I force a French seam onto this fabric?” It’s “Will this finish support how the garment needs to move, drape and wear?”
Solving Common French Seam Frustrations
Most French seam problems come from one of three places. The first seam was trimmed badly. The fold wasn’t pressed accurately. Or the fabric required a different approach.
According to UK Sewing Guild survey findings discussed by So What If I Sew, over-trimming can cause seam blowout in about 15% of novice attempts, and skipping pressing leads to 40% more visible lumps. That rings true at the machine. Nearly every disappointing French seam can be traced back to one of those two habits.
Poky threads showing on the right side
This is the complaint I hear most often. You’ve sewn the second pass, turned the seam, and tiny whiskers are peeking out.
The cause is usually simple. The first seam allowance wasn’t trimmed evenly enough, or the second seam wasn’t wide enough to fully enclose it.
Try this:
Unpick only the affected section rather than the whole seam.
Trim the enclosed allowance more evenly.
Refold and press sharply before resewing.
Check the second seam width against your seam guide.
Puckering and little tucks
Puckering often starts before the seam is even enclosed. The first pass may have stretched the fabric, or the fold may have shifted when pinned for the second pass.
For smoother results:
| Problem | Likely cause | Fix |
|---|---|---|
| Tiny pleats beside stitching | Fabric shifted during fold | Press the fold first, then pin again |
| Rippled seam on soft fabric | Too much handling | Support the fabric and don’t pull while sewing |
| Lumpy finish | Pressing skipped or rushed | Press flat, then to one side, then after the final seam |
Don’t sew your way out of a pressing problem. Press first, then decide if it still needs stitching.
Seam blowout after trimming
This happens when the first seam allowance has been cut too close to the stitching line. Once the seam is folded and sewn again, the weakened edge can start to split or fray away.
If the cloth is fragile, leave yourself a touch more margin on the first trim. A slightly wider enclosed seam is better than one that fails after a few wears or washes.
Too much bulk at intersections
French seams are elegant until four layers meet six more. At underarms, cuffs, waist seams or anywhere with extra construction detail, bulk builds quickly.
The practical fix is often to mix finishes within one garment. Use French seams where they stay slim and attractive. Use another neat finish where multiple layers meet. Good dressmaking is about judgement, not rigid rules.
If you need to unpick
Use a seam ripper carefully and remove the line that’s causing the issue, not every stitch in sight. Press the fabric flat before resewing so you’re not stitching over ridges and perforations.
A corrected French seam usually disappears into the garment. A rushed one tends to announce itself every time you turn the piece inside out.
Your Next Steps to a Flawless Wardrobe
A French seam gives you three things at once. It improves durability, it makes the inside of the garment look considered, and it feels better to wear. That’s a strong return for a technique that is, at heart, only a two-pass seam.
If you’re new to it, start where it’s easiest to succeed. Try side seams on pyjama bottoms, a simple shell top, or a loose skirt in a stable woven fabric. Leave tight curves, bulky intersections and stretch fabrics for later decisions. You don’t need to use French seams everywhere to use them well.
Skill is not memorising one set of steps. It’s learning when the finish suits the fabric, and when another method will serve the garment better. Once that clicks, your sewing starts to look more deliberate.
A neat inside changes how the whole piece feels in your hands. It also changes how confidently you wear it.
If you’re ready to practise on beautiful dressmaking fabrics, explore the curated range at More Sewing. It’s a great place to find viscose, Tencel, cottons, denims, haberdashery and beginner-friendly kits for your next French seam project.