Dressmaking
Pattern for Halter Top: A UK Sewing Guide
A halter top looks simple on the hanger. Then you try one on, and the usual problems show up fast. The neckline drops too low, the armhole stands away from the body, the back tie pulls awkwardly, or the whole thing only works in a very stretchy jersey.
That’s why a good pattern for halter top needs more than a pretty outline. It needs proper shaping, stable finishing, and fabric choices that suit the style you want to wear. A soft viscose halter behaves very differently from a cotton lawn version, and both behave differently again from a jersey with a lot of recovery.
Plenty of sewists can get a wearable result. The goal is a top that sits smoothly, feels secure, and still looks polished after a full day of wear. That comes from a few practical decisions made early, not from fixing everything at the end.
Your Guide to Sewing the Perfect Halter Top
A halter top is one of those garments that can look effortless and still be surprisingly technical. The front has to support, the neckline has to flatter, and the cut has to sit close without digging in. If any one of those parts is off, the whole top feels fussy.
The biggest gap in most tutorials is woven fabric. A jersey halter can forgive a lot. Cotton lawn, deadstock viscose, denim, Tencel twill, or a crisp poplin won’t. That matters because a 2025 British Sewing Awards survey reported that 68% of 1,200 hobbyists in England struggle to get a good fit from non-stretch halter patterns, even though many prefer locally sourced deadstock and premium cottons (British Sewing Awards survey summary).
That result rings true in practice. Wovens show every drafting shortcut. If the neckline angle is wrong, you see it. If the side seam shape is lazy, you feel it.
What makes a halter top work
A successful halter usually comes down to four things:
- A well-placed neckline that frames the chest without collapsing inward
- A close armhole line so the front doesn’t gape
- Enough shaping through the bust and underbust for support
- The right fabric behaviour for the style you want, whether that’s fluid, sculpted, minimal, or gathered
Practical rule: Choose the silhouette first, then choose the fabric. Don’t pick a limp fabric for a structured halter and hope interfacing will rescue it.
A custom draft is often easier than forcing a commercial pattern to behave. You only need accurate measurements, a clear idea of whether your fabric stretches, and a sensible sewing order.
Where home sewists usually struggle
The common trouble spots are predictable:
- Gaping near the armhole on both knits and wovens
- Too much length through the front so the neckline buckles
- Neckties that twist or dig in
- Insides that look unfinished because facings, linings, or seam allowances weren’t planned properly
Those are all fixable. The key is to treat the halter as a fitted bodice, not as a quick summer top that only needs two straps and a hem.
Choosing Your Fabric and Essential Haberdashery
Fabric decides almost everything about your final result. The same pattern for halter top can look crisp and structured in cotton, liquid and relaxed in viscose, or body-hugging in jersey. None of those is automatically better. They need different handling.
The halter top itself has a long fashion life. Its popularity surged in the 1940s and 1950s, championed by Hollywood stars, and it returned as a high-fashion shape in the 1970s through designers such as Halston (history of the halter top). Those eras still influence what sewists want now. Crisp glamour, fluid drape, or clean minimal lines all start with cloth.
Fabric Recommendations for Your Halter Top
| Fabric Type | Best For | Sewing Difficulty | More Sewing Suggestion |
|---|---|---|---|
| Cotton lawn | Structured summer halters, lined styles, neat gathers | Moderate | Choose it if you want a fresh, clean outline and easy pressing |
| Viscose challis or deadstock viscose | Soft drape, elegant gathers, fluid necklines | Moderate to tricky | Best for a softer halter with movement, but stabilise key edges |
| Tencel blend | Smooth drape with a slightly weightier fall | Moderate | A strong choice for a polished woven halter that doesn’t feel stiff |
| Denim or chambray | Sculpted halters, more coverage, statement tops | Moderate | Use for a modern structured version with firm seams |
| Cotton poplin | Sharper silhouette, tie-neck styles, facings | Moderate | Useful when you want shape without heavy bulk |
| Jersey or rib knit | Close fit, simple construction, stretch comfort | Easier to fit | Good for first attempts if you want the top to mould to the body |
How to choose by look, not just by fibre
If you want a halter with a smooth, almost architectural front, choose a woven with body. Cotton lawn, poplin, and lighter denims hold the neckline shape well and make self-facings behave.
If you want gathers at the neckline and a softer bust line, use a drapier woven such as viscose or Tencel. These fabrics can look beautiful, but they also reveal tension problems, stretched edges, and uneven pressing.
Knits are forgiving around fit, but they need recovery. A jersey that stretches and stays stretched will drag the neckline down over time. A jersey with decent bounce-back gives you that close fit people expect from a halter.
A halter doesn’t need expensive fabric. It needs fabric that matches the cut.
GSM and why it matters
Many sewists buy by colour and fibre content, then wonder why the top doesn’t resemble the sample. Weight matters. If you want help comparing a floaty viscose to a firmer cotton, it’s worth reading about understanding fabric GSM. It gives you a clearer sense of whether the cloth will collapse, skim, or hold shape.
A lighter fabric can still work, but it often needs a facing, lining, or edge stabilising. A heavier cloth may need reduced bulk in seams and ties.
Haberdashery that earns its place
You don’t need a huge pile of extras, but the right basics matter.
- Thread. Use a good quality polyester thread for both knits and wovens. It handles stress better than a brittle bargain thread.
- Needles. Ballpoint or stretch needles for jersey. Sharp or microtex needles for poplin, lawn, viscose, and Tencel.
- Interfacing. Lightweight fusible for facings, tie ends, button loops, and neckbands.
- Bias tape or strips. Helpful for stabilising curved edges, especially in slippery or stretchy fabric.
- Marking tools. Tailor’s chalk, washable marker, or fine pencil for paper pattern work.
- Pressing tools. A sleeve roll, pressing cloth, and point presser help far more than people expect on a halter neckline.
Measurements to take before drafting
A custom halter starts with honest measurements. Take them over the undergarments you expect to wear with the top.
Measure these:
- Full bust at the fullest point, with the tape level
- Upper bust high around the chest
- Underbust where the top needs support
- Waist at the natural waist
- Neck to waist length over the front
- Bust apex to apex for placement and shaping
- Side seam length from underarm to waist
- Desired top length from underarm or waist, depending on style
For a tie-neck halter, also note whether you want a higher, modest neckline or a lower, more open one. That single choice changes your front coverage and your armhole angle.
How to Draft a Custom Halter Top Pattern
The cleanest way to draft a halter is to begin with a fitted bodice base that already reflects your bust, waist, and side seam length. From there, you remove what you don’t need and build the halter shape you do want.
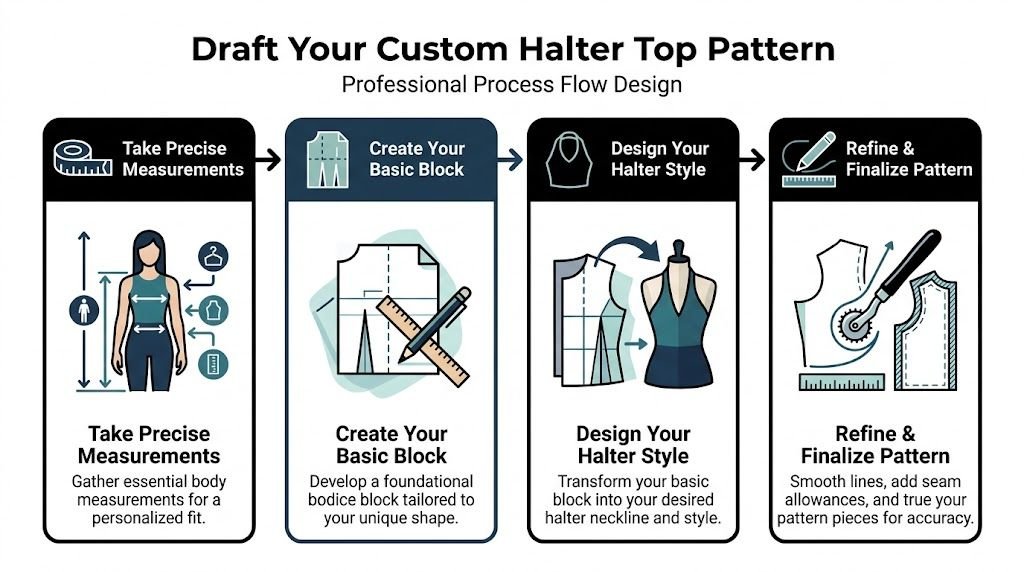
If you don’t have a bodice block, draft a simple close-fitting front and back using your own measurements on paper. Keep it plain. Bust point, waist, side seam, centre front, and centre back are enough to start.
Start with the front piece
Trace your front bodice block so you can keep the original intact. Mark the bust apex clearly. That point controls the shaping, even if the final top looks dartless.
Then decide the neckline height. A higher halter gives more coverage and usually more stability. A lower one looks softer and more open, but it needs more care to avoid collapse.
Draw the neckline from centre front up toward the neck position you want. Keep the curve smooth. Avoid a sudden scoop unless your fabric is stretchy enough to recover.
For a woven halter, draw the armhole closer than you think you need. A loose armhole on paper becomes a gaping armhole in fabric.
Building shape without bulky darts
Many sewists want a clean front without visible darts. That can work well in halters, especially in structured wovens, but the shaping still has to go somewhere.
You can move bust shaping into:
- the side seam
- the underbust seam
- neckline gathers
- a softly curved underarm and side-front line
For non-stretch fabrics, one detail is especially useful. For fabrics like denim, creating a dartless design with a 2cm underarm curve provides 91% more effective lift compared to a straight-cut armhole, according to a British Dressmaking Association report (halter dress pattern construction note).
That doesn’t mean every top needs denim. It means the underarm curve is doing real shaping work. If you leave it straight, the fabric can’t wrap the body properly.
Keep the underarm area close and curved. Most halter fit problems start there, not at the neck.
Drafting the back
Your back pattern depends on the style.
For a classic tie-neck halter with an open back, the back may be minimal. You might only need a band, casing, or narrow back extension. In that case, make sure the side seam height matches the front comfortably and doesn’t cut into the underarm.
For a fuller back halter, draft the back armhole so it supports the front visually and physically. A back that sits too low can make the front feel unstable.
You also need to choose between:
- Tie neck for adjustability
- Buttoned neckband for a cleaner finish
- Continuous neckband for knit styles
A tie neck is forgiving and beginner-friendly. A fixed neckband looks neater in structured cloth, but it needs accurate neck measurement and careful interfacing.
Add practical pattern details
Before cutting fabric, finish the paper pattern properly.
Mark these items:
- Grainline on every piece
- Centre front and centre back
- Cut on fold where needed
- Notches for side seams, neckline centre, and strap placement
- Facing or lining pieces
- Seam allowance notes
For woven halters, draft a facing rather than trying to turn and stitch every edge raw. A good facing supports the neckline and armhole and helps the inside look intentional.
For knits, you may replace a facing with a band, but test that choice against your fabric’s recovery. Some jerseys behave beautifully with bands. Others ripple and drag.
Draft a test version before committing
Even a careful draft benefits from a toile. Use a fabric with similar behaviour to the final cloth.
Check these points while fitting:
- Does the neckline sit against the body?
- Is there enough bust coverage?
- Does the underarm cut in, or does it gape?
- Does the side seam stay vertical?
- Does the front pull upward when tied?
Pin out excess rather than guessing. If fabric bags above the bust, remove length. If it opens at the armhole, pinch out a wedge and transfer that change to the paper pattern.
Keep the finished pattern reusable
Once the fit is right, trace a clean master copy. Label it clearly with fabric type and style notes. A knit halter draft and a woven halter draft are not interchangeable without changes.
That clean paper pattern becomes a useful block. You can crop it, lengthen it into a dress, add a keyhole, change the width of the neckband, or alter the back treatment without starting from scratch each time.
Cutting and Assembling Your Halter Top
A careful sewing order makes this project much easier. Most problems that look like fit issues are construction issues. A stretched neckline, a skipped pressing step, or a twisted tie can spoil a good draft.
Cutting the fabric accurately
Press the fabric before cutting. Don’t try to “smooth it out” with your hands and hope for the best. A halter neckline is shaped by curves, and inaccurate cutting on curves shows immediately.
Lay the pattern so the grainline is true. This is especially important for front pieces. If the front drifts off grain, one side may twist toward the neck after sewing.
For slippery wovens such as viscose, use plenty of weights and a sharp pair of shears or a rotary cutter. For jersey, let the fabric rest flat before cutting so you’re not stretching it while handling it.
Cut all supporting pieces at the same time:
- front
- back or back band
- facings or lining
- ties or neckband
- any waist casing or elastic channel if your design includes one
Mark notches lightly and accurately. Don’t snip too far into delicate fabrics.
First preparation steps
Before joining major seams, stabilise the areas that need it.
For woven halters, staystitch the neckline and armholes just inside the seam allowance. That keeps the curves from growing while you work.
For knit halters, edge support matters even more than many beginners expect. For stretch knit fabrics, fusing armholes with a 1cm bias tape before sewing and using a 2:1 basting ratio for neckline gathers are key techniques that contribute to a 92% first-time fit success rate among intermediate sewists (UK Sewing Guild survey summary).
That combination works because it balances flexibility with control. The knit still stretches where it should, but the armhole doesn’t sag by the second wear.
If your knit halter grows as you sew, stop and stabilise it. Don’t keep stitching and expect pressing to fix it.
Sewing sequence that keeps the top under control
A sensible order for most halter tops looks like this:
Prepare facings, bands, or ties first
Interface any parts that need firmness. Stitch ties, trim bulk, turn, and press thoroughly.Finish the top edge treatment before closing everything up
Apply the facing, band, or lined edge while the garment is still relatively flat. It’s easier to keep the neckline even this way.Sew side seams with care
Match notches and sew without dragging the fabric. Press the seams before deciding whether more shaping is needed.Attach ties or complete the neck closure
Check symmetry before final stitching. A tie placed even slightly off-centre can make the whole top hang crooked.Finish the lower edge last
Hem once the top has had a fitting try-on. Small fit changes often affect the final hemline.
Working with woven halters
Wovens reward pressing and punish haste. Press each seam as sewn, then press it open or to one side as needed.
For cotton lawn or poplin, a self-facing usually gives a clean finish. Grade the seam allowances so the edge doesn’t feel bulky. Understitch the facing wherever possible so it rolls inward instead of peeping out.
For viscose or Tencel, handle the neckline gently. These fabrics can distort while you’re trying to be precise. A fine fusible on the facing can help, but choose the lightest support that still gives control.
If your woven halter has gathers at the neckline, sew two rows of basting stitches and distribute them before attaching the neckband or facing. Uneven gathers are obvious at the centre front.
Working with knit halters
Knits need the right needle and stitch. Use a stretch stitch, narrow zigzag, or overlocker, depending on your machine and fabric.
If you’re using a neckband, quarter-mark both the garment edge and the band. That keeps the stretch even. Don’t pull the garment edge while attaching the band. Stretch the band, not the body piece.
A useful visual walkthrough can help if you want to compare handling and sequence while you sew:
Small details that improve the finish
These are the steps that make a homemade top look properly dressmade:
- Trim and grade curves so they lie flat
- Clip only where needed and never through the stitching line
- Press ties flat before topstitching
- Understitch facings to keep edges crisp
- Test the neck closure on the body before finalising the tie length
- Let the top hang briefly before hemming if the fabric is drapey
If the top includes a back elastic section or casing, test the tension while wearing it. Too tight and the side seams drag backward. Too loose and the front loses support.
Mastering the Fit and Professional Finishes
A halter top can be beautifully sewn and still feel wrong if the fit is slightly off. These challenges make the garment personal. Small adjustments matter more than elaborate design details.
That’s also where many sewists get stuck. A 2025 analysis of 300 posts on UK sewing forums found that 42% of unanswered queries about halter tops were related to fit issues, such as puckering and grading patterns for different bust sizes (UK forum analysis).
Fixing the most common fit faults
The usual problem is gaping at the armhole or upper front. This often means the edge is too long for the body in that area, not that the whole top is too big.
Try this:
- Pin out a small wedge near the gaping area while wearing the toile or garment.
- Mark the pinch.
- Transfer that wedge to the paper pattern.
- Smooth the seam or neckline line so there’s no sharp point.
If the centre front collapses or wrinkles horizontally, there may be too much length over the bust. Remove a little length above or through the bust area and test again.
If the top cuts in at the underarm, the curve is too aggressive or the side seam is too high. Release a little height and redraw the curve smoothly.
Fit the top with the actual neck tie or band in place. A halter changes shape once it’s supported at the neck.
Grading for different body shapes
One reason a custom pattern for halter top is worth the effort is that body proportions vary far more than standard sizing suggests.
A fuller bust may need more front width and length without making the waist bigger. A petite frame often needs the distance from shoulder-neck point to bust reduced, or the neckline ends up too low. A fuller upper back may need extra width at the side back so the front doesn’t get dragged outward.
The easiest way to handle this is to separate adjustments into zones:
| Area | Typical issue | Better adjustment |
|---|---|---|
| Bust | Front feels skimpy or pulls sideways | Add room to front only, then redraw neckline |
| Underarm | Gaping or digging in | Refine the curve, don’t just widen the whole side seam |
| Waist | Top rides up or blouses oddly | Adjust length and waist shaping separately |
| Neck tie | Twists, bites, or won’t support | Increase width, interface lightly, or change to a band |
Making the inside look as good as the outside
A halter top often exposes more of the inside during wear, especially when it’s tied at the neck or shifts slightly with movement. Clean finishing matters.
Three strong options are:
Self-facing
Good for cotton lawn, poplin, and stable Tencel blends. It’s neat and doesn’t require a full lining.Full lining
Best when the outer fabric is lightweight, slightly translucent, or soft enough to benefit from extra support.Bound edges
Useful on casual styles, especially if you want a visible finish as part of the design.
For hems, choose the finish that suits the fabric. A narrow turned hem works on viscose if pressed carefully. A deeper hem works well on poplin or lawn. Bulky denim might need a more considered hem allowance to avoid a ridge.
Finishing details that lift the whole garment
Use these where they suit the style:
- Topstitching on neckbands and ties for structure
- Hand tacking to hold a facing in place at the side seam
- A hook, loop, or button at the neck for a cleaner closure than a bulky knot
- Pressed tie ends shaped to a point or a neat square
- A discreet bra keeper or snap if the design needs extra security
A professional finish doesn’t mean adding every possible technique. It means choosing the ones that support the garment and leaving out the rest.
Common Halter Top Questions Answered
Can I make a halter top without stretch fabric
Yes, and a good woven halter can look far more polished than a basic jersey version. The difference is in the drafting and stabilising. Wovens need proper shaping through the bust and underarm, plus a clean finish at the neckline.
If you want your first woven attempt to be manageable, choose a stable cotton or Tencel blend before moving on to a very fluid viscose.
What’s the easiest style for a beginner
A simple tie-neck halter with a softly fitted body is usually the most forgiving. It lets you adjust the neck tension while fitting, and it avoids the precision needed for a fixed neckband or complicated back closure.
A very skimpy halter is often harder, not easier, because there’s less fabric to do the fitting work.
Why does my halter top keep gaping at the side
Usually because the armhole edge is too long, too straight, or both. It can also happen when the neckline is too low for the amount of support the top needs.
Pin out the excess where it appears. Don’t automatically take in the whole side seam from top to hem. That often creates a new problem at the waist.
Do I need a lining
Not always. A facing can be enough in stable fabrics. A lining is useful when the outer fabric is lightweight, translucent, or likely to show every ridge from seam allowances.
If the top feels flimsy in the hand, it often benefits from some internal support.
How can I adapt the pattern once it fits
A fitted halter block is versatile. You can shorten it into a cropped top, lengthen it into a dress, reshape the front into a sweetheart-inspired halter, add a keyhole, or swap a tie neck for a buttoned band.
Keep one master pattern and trace from it for each variation. That protects the version that already fits.
What if my machine struggles with the fabric
Match the needle to the cloth, clean the machine, and test stitches on scraps first. Slippery viscose, stretch jersey, and denser denim all need different tension behavior. If the stitches pucker or skip, pause and adjust before sewing the garment pieces.
If you’re ready to make your own halter top, browse the fabric, haberdashery, and ready-to-sew options at More Sewing. It’s a practical place to find premium cottons, viscose and Tencel blends, jerseys, denims, and the tools that help a handmade top look properly finished.