
Guides
How to Sew a Flat Felled Seam: A Pro Finish
You're usually ready for a flat felled seam when you've sewn the garment, turned it over, and thought: the outside looks good, but the inside still looks homemade. That's especially common with shirts, denim projects, workwear details, and any unlined piece that gets handled and washed a lot.
A flat felled seam fixes both problems at once. It gives you a clean enclosed finish and a seam that stands up well to wear. If you've ever looked inside a good pair of jeans or a classic shirt and noticed those tidy parallel rows of stitching, that's the finish you're aiming for.
Why You Should Master the Flat Felled Seam
A flat felled seam is built from a standard seam plus a second folded and topstitched pass that encloses the raw edges. One common dressmaking method uses a 5/8 inch (1.6 cm) seam allowance, trims one side to 1/4 inch (0.6 cm), then folds and topstitches the wider allowance over it, as shown in this flat felled seam tutorial from Helen's Closet.
That sounds more complicated than it feels once you've done it once or twice.
What makes it worth learning is the combination of strength, neatness, and control. Overlocking is quick. Binding can be beautiful. But a flat felled seam gives you a finish that looks intentional from both sides, which is why it suits shirts, pyjama bottoms, casual jackets, children's clothes, and sturdy trousers so well.
Where it shines
Some seams only need to stop fraying. A flat felled seam does more than that.
- On shirts and blouses: it keeps the inside tidy without extra finishing.
- On denim and workwear: it handles abrasion well and looks right stylistically.
- On unlined garments: it gives the inside the same level of care as the outside.
- On pieces you'll wash often: enclosed edges are more durable.
Practical rule: If the garment is going to be worn hard, washed often, or seen inside and out, this seam is worth the extra time.
It's also one of those techniques that changes how homemade sewing feels. A basic skirt can still be lovely with simple seam finishing. A button-up shirt or pair of utility trousers often benefits from something more deliberate. This seam gives that deliberate finish.
What it won't do
It won't suit every project. It adds labour, and it can add bulk. If your fabric is thick, spongy, or stretchy, another seam finish may behave better. That doesn't make the flat felled seam less useful. It just means the skill is knowing how to sew a flat felled seam, and knowing when not to.
Gathering Your Supplies and Preparing Your Fabric
You notice whether you prepared well the moment you try to fold that trimmed seam allowance over. If the fabric is rippling, the cut edge is uneven, or the cloth refuses to press flat, a flat felled seam gets awkward fast. Good prep does not make this technique fancy. It makes it manageable.
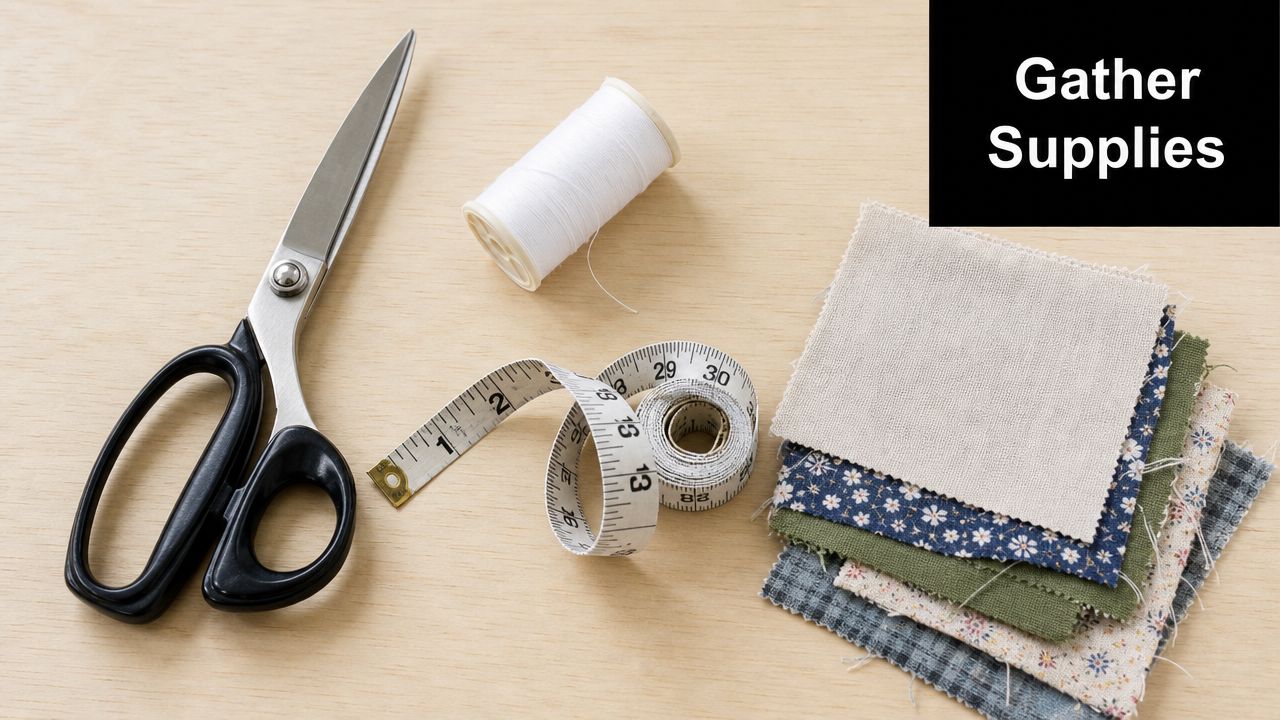
Tools that make the job easier
A standard sewing machine foot is enough to sew a flat felled seam well. The difference comes from accuracy.
- Sharp fabric scissors: clean cutting at the start saves trouble later.
- Small trimming scissors or appliqué scissors: useful for trimming one seam allowance close and evenly.
- An iron and pressing surface: pressing sets up each fold and keeps the final topstitching flatter.
- Pins or clips: use fine pins on shirting and lawn. Use clips on denim, twill, or layered areas where pins struggle.
- An edgestitch foot, if you have one: helpful for keeping the final line of stitching close to the fold.
- A seam gauge or small ruler: good for checking trimming width, especially if your pattern uses metric seam allowances.
If you sew often, keep a pair of small scissors just for seam trimming. I find they stay sharper longer, and that shows on lightweight cottons and linen where every wobble is visible.
Fabric choices that behave well
Stable wovens are the easiest place to start. Poplin, chambray, shirting cotton, light denim, cotton twill, and linen all press into a clean fold and stay where you put them. If you are buying fabric for a first practice run, a crisp cotton from More Sewing is a much friendlier choice than anything slinky or loosely woven.
Heavier fabrics can work too, but bulk is the trade-off. A flat felled seam looks right on denim and workwear cloth, yet thick intersections can become hard to fold and topstitch neatly. Very fine fabrics bring the opposite problem. They can shift while you trim, so accuracy matters more.
Some fabrics are possible, but not ideal. Stretch wovens, brushed cottons, very heavy canvas, and spongy coatings often behave better with a different seam finish. That is worth deciding before you cut, not after you have committed to every seam.
Pressing is part of the construction, not a tidy-up at the end.
Prep before you stitch
Pre-wash the fabric if the finished garment will be laundered. Then press it flat before cutting. Creases, shrinkage, and off-grain distortion all make the folded seam harder to keep straight.
Check your pattern's seam allowance before you begin. This matters more than many beginners expect. A flat felled seam is much easier with a generous allowance, and some modern patterns include narrower metric allowances that leave less room for trimming and turning. If your pattern gives you only a small allowance, test the seam on scraps first and decide whether you want to adjust the seam finish or add allowance before cutting.
It also helps to mark the wrong side of similar-looking fabrics. On chambray, linen, and some denims, the sides can look surprisingly close under indoor light. One chalk mark can save you from sewing the first pass the wrong way round.
Cut accurately, press early, and practise on a scrap from the actual project fabric. That little test tells you a lot. You will see whether the cloth presses sharply, whether it frays heavily, and whether a flat felled seam is a sensible choice for the garment at all.
Sewing Your Flat Felled Seam Step by Step
You sew the seam, trim, fold, and then realise the fold will not cover the raw edge all the way down. That usually happens because the seam allowance was too narrow, the wrong side was trimmed, or the fabric shifted before pressing. A flat felled seam is very manageable once you work in the right order.
Use two scraps first. Cut them from the same fabric as the garment if possible. A flat felled seam on poplin is forgiving. The same seam on 6oz denim, linen, or tightly woven cotton drill needs firmer pressing and more accurate trimming.
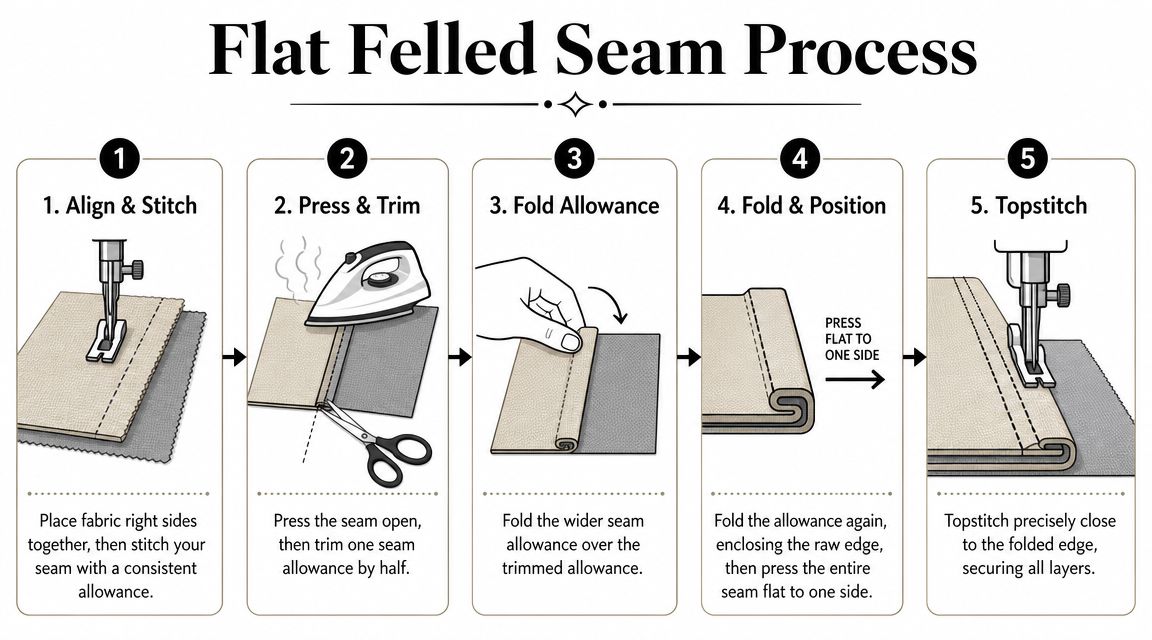
Choose your seam allowance first
A flat felled seam is easier with room to work. If your pattern uses a 1.5 cm seam allowance, you are in a good position. You can sew the first seam, trim one allowance down, and still have enough width left to wrap and topstitch without wrestling the fold.
A 1 cm allowance can work, but it leaves less margin for error, especially on home sewing machines and fraying fabrics. If your pattern uses a narrow metric allowance, test the full sequence on scraps before you commit. Sometimes the better choice is a mock flat fell or a different seam finish entirely, particularly on bulky cloth or very narrow garment areas.
Step one, sew the first seam
Place the fabric pieces as your pattern requires and sew the seam line accurately. Keep the seam allowance even from start to finish. If the first line wanders, the final topstitching usually shows it.
Go steady here. Fast stitching saves no time if you have to unpick a crooked fell in dense fabric.
A few habits make this step cleaner:
- Use a clear seam guide. The markings on the needle plate are fine, but a magnetic or removable guide often helps more on long seams.
- Test stitch length on a scrap. Mid-length stitches suit many shirting fabrics, while denim and canvas often look better with a slightly longer stitch.
- Avoid bulky backstitching where the seam will be folded. If the pattern does not need it, leave it out to keep the start of the fell flatter.
Step two, press first and trim the correct allowance
Decide which way the finished seam should lie before you cut anything. On shirts, that choice affects the look from the outside and the feel from the inside. On trousers, it also affects how much bulk sits against the body.
Press the seam flat as sewn first. Then press both seam allowances together to one side. Now trim the allowance that will sit underneath the fold, usually to about half the width of the other one.
That order matters. If you trim before deciding the seam direction, you can end up with the short side on the outside and no clean way to wrap the seam.
If you are sewing with a fabric that frays hard, such as loose linen or a softer chambray, trim neatly with sharp duckbill or appliqué scissors. Ragged trimming makes the final fold harder to cover cleanly.
A visual walkthrough can help if you'd like to see the fold happen in motion:
Step three, wrap the wider allowance over the trimmed one
Fold the wider seam allowance over the trimmed raw edge so the cut edge is fully enclosed. Press that fold into place. Then turn the whole seam allowance flat to one side again and press once more.
This is the point where many beginners try to stitch before the fold is under control. Do not. If the wider allowance is not covering the trimmed edge evenly, open it back up and adjust. One extra press is quicker than resewing topstitching.
On crisp cotton lawn or poplin, finger-pressing usually gives you a clean fold before the iron touches it. On denim or heavier linen, a clapper can help set the crease. If you are using one of our washed linens or cotton twills from More Sewing, pressing in short sections usually gives the cleanest result.
Step four, topstitch the seam down
Topstitch close to the folded edge and keep the distance consistent. On most garments, a narrow line of topstitching looks clean and professional. If you like a workwear finish, use a slightly longer stitch and a visible topstitch thread, but test it first to make sure the fabric can support it without puckering.
Slow stitching helps more than a tighter grip on the fabric. Let the feed dogs do the work and keep your eyes on the fold, not the needle.
| What to watch | What usually helps |
|---|---|
| Fold shifting as you sew | Press again, then pin or clip across the seam |
| Wobbly topstitching | Use an edgestitch foot or adjust needle position |
| Tiny pleats under the stitch line | Smooth the fabric ahead of the presser foot and reduce speed |
If the seam crosses a yoke, hem junction, or pocket area, flatten the bulk before you stitch over it. A hump jumper or folded scrap behind the presser foot can keep the topstitching level. That small trick saves a lot of skipped stitches on thicker projects.
Adapting the Seam for Different Garments and Fabrics
A flat felled seam behaves very differently on a shirt side seam than it does on a curved armhole or a heavy apron strap. The basic method stays the same, but the right version depends on the garment, the seam allowance in the pattern, and how much bulk the fabric can handle.
On linen shirts, trousers, and curved seams
Flat felled seams shine on hard-working wovens such as linen, chambray, poplin, and lighter denim. They give a clean inside finish, hold up well to washing, and suit garments where the inside may show in wear or on the line.
Curves need a more careful approach.
On a sleeve seam, armhole, or any seam that ends in a slit or notch, keep your trimming neat and stop any clipping short of the stitch line so the area stays strong. That small bit of restraint makes a big difference once you fold and topstitch. If you are sewing one of our washed linen shirtings from More Sewing, press a few centimetres at a time and let the fabric cool before you move on. Linen holds a crease well, but only if you give it time to set.
Patterns with metric seam allowances need a decision before you start. Many shirt patterns use 1 cm or 1.5 cm rather than 5/8 inch. With 1.5 cm, a true flat felled seam is usually straightforward. With 1 cm, it can still work on lighter fabrics, but there is less room to trim and wrap neatly, so accuracy matters more. On very narrow allowances, I often choose a mock felled seam instead of fighting for a finish the pattern was not drafted to support.
When a true flat felled seam is the best choice
Use the full version when you want a strong enclosed seam and the fabric folds without turning stiff or lumpy. It is a good match for:
- Classic shirts and overshirts
- Linen or cotton trousers
- Pyjama sets
- Children's clothes that need frequent washing
- Jeans-style details in lighter or midweight denim
It also makes sense on aprons, utility pieces, and workwear where you want the inside to look tidy as well as wear well. This comprehensive guide for branded aprons is useful for thinking about garment use, fabric choice, and finish together, especially when presentation matters as much as durability.
When to switch to a mock flat felled seam
A true flat felled seam is not always the smartest option. Heavy canvas, thick denim, corduroy, and seams with several layers stacked together can become bulky fast. Close-fitting garments can also feel better with less seam build-up, especially at the underarm, crotch curve, or side seam.
In those cases, a mock flat felled seam often gives the same neat topstitched look from the outside with less folding underneath. It is also easier to manage if the pattern includes yokes, pockets, or intersections that are already thick.
| Feature | True Flat Felled Seam | Mock Flat Felled Seam |
|---|---|---|
| Raw edges | Fully enclosed | Usually enclosed or controlled differently |
| Bulk | Higher | Lower |
| Strength | Excellent | Good for many garments |
| Speed | Slower | Faster |
| Best for | Shirts, linen, workwear details | Bulky denim, canvas, quick makes |
That trade-off is part of good sewing judgment. The best finish is the one that suits the fabric, the pattern, and the part of the garment you are working on.
Troubleshooting Common Flat Felled Seam Issues
Most problems show up at the topstitching stage, but the cause usually starts earlier.
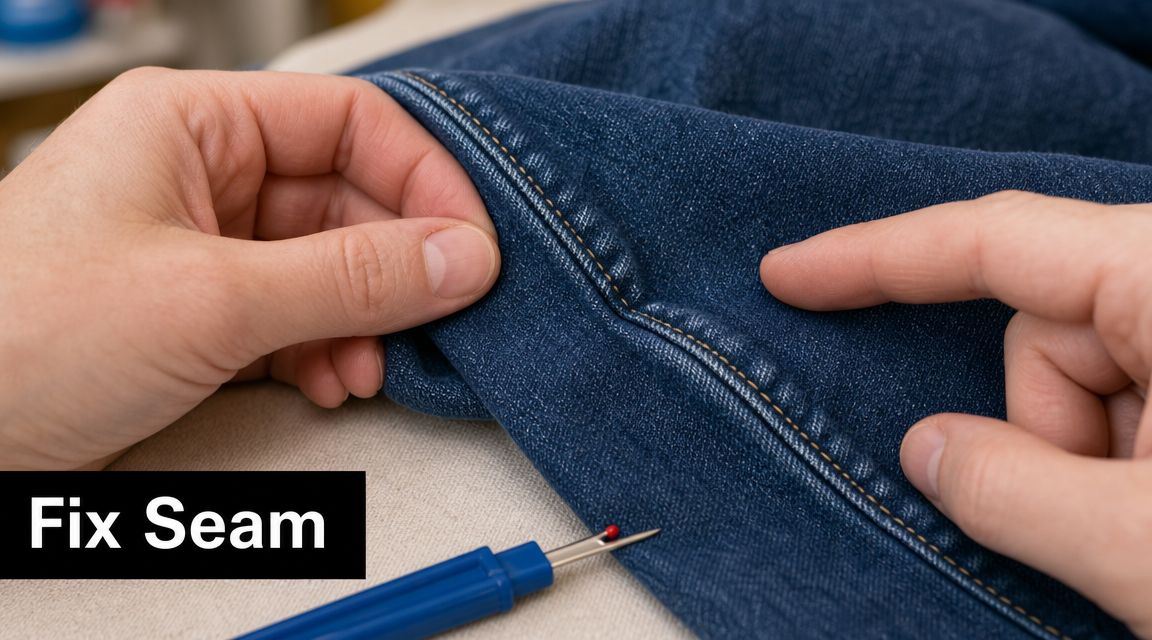
The seam looks twisted or won't fold cleanly
This usually means the seam was trimmed on the wrong side, or the pressing direction wasn't decided first. Unpick that section and reset it before you continue. Trying to force the fold nearly always gives a lumpy result.
The topstitching is wobbly
Wobbly stitching often comes from sewing too fast, not pressing enough, or trying to guide a loose fold under the foot. Press the seam again, pin or baste if needed, and use the folded edge as your visual guide rather than the cut edge underneath.
The seam is too bulky
At crossed seams, yokes, hems, and crotch seams, true felled construction can become thick fast. Grade carefully and reduce unnecessary layers where the pattern allows. If the fabric is very dense, a mock felled seam may be the better answer.
The pattern uses a narrow metric seam allowance
This catches people out all the time. Seamwork notes that many tutorials assume the usual 5/8-inch allowance and don't clearly explain what to do with a metric allowance such as 1 cm. Their practical advice is to sew the initial seam with the narrower allowance and trim very precisely, or switch to a mock felled seam if you need to preserve fit, in this guide to adapting flat felled seams for metric patterns.
That's the key decision point. If the allowance is narrow but the fabric is fine and stable, you can often make it work with careful trimming. If the fabric is bulky or the seam is under strain, don't fight the pattern. Choose a different finish.
Your Flat Felled Seam Questions Answered
Can I sew a flat felled seam by hand
Yes. Hand-felling takes longer, but it gives excellent control on curved areas, small openings, and places where visible machine topstitching would distract from the garment.
Use a fine hand needle, matching thread, and good light. Catch only a few threads of the outer fabric with each stitch so the seam stays neat from the right side. I reach for hand-felling most often on lighter shirts, children's wear, or a fiddly repair where feeding the seam back under the machine would be more trouble than it is worth. On heavy denim or workwear, machine stitching is usually the better choice because the layers fight back.
Do I need a special sewing machine foot
No. A standard presser foot is enough.
That said, the right foot can make the finish cleaner. An edgestitch foot helps keep the final row straight, especially on poplin, chambray, and shirt-weight linen where uneven topstitching shows quickly. If you are sewing with a domestic machine and finding the fold wants to drift, a stiletto or awl is often more useful than another presser foot. It lets you hold the fold in place right up to the needle.
What if I make a mistake halfway through
Stop and fix it while the seam is still short. A twisted fold or wandering topstitch line rarely improves after more sewing.
A sharp seam ripper helps you remove only the stitches you need. If yours tends to snag threads or leave marks, this guide to mastering quilting mistakes is a useful read. The advice carries over well to dressmaking. For delicate lawn or fine shirting, slide the point under every few stitches instead of ripping quickly through the whole line.
Is a flat felled seam always the best finish
No, and knowing when to skip it is part of sewing well. Flat felled seams are excellent on shirts, workwear, pyjamas, jeans details, and garments that need strength plus a clean inside finish. They are less convincing on very bulky cloth, very tight curves, and patterns with narrow seam allowances that do not leave much room for turning the layers cleanly.
If the fabric is thick or spongy, a mock felled seam often looks better and feels flatter. If the pattern gives you 1 cm seam allowances, test on scraps before committing. Fine cotton from More Sewing will usually cooperate. A dense brushed twill may not. That trade-off matters more than following the textbook method.
