Dressmaking
Sewing Pattern for a Cape: Your Complete 2026 Guide
You've probably done it already. You've seen a cape pattern online, loved the sweep of it, then clicked away because the instructions looked either theatrical, flimsy, or far too vague for something you'd wear outside in British weather.
That hesitation is sensible. A cape can be one of the easiest outerwear projects to sew, but it can also go wrong in very predictable ways. The neckline stretches. The hem drops unevenly. The fabric looks glorious on the bolt and heavy as a blanket once it's hanging from your shoulders. Worst of all, many tutorials treat every cape as if it's only meant for photos, not for a damp school run, a cold station platform, or an evening out with a jumper underneath.
A good sewing pattern for a cape solves those problems before you cut. It gives you enough shape to sit properly at the neck and shoulders, enough room to move, and enough fabric substance to feel like outerwear rather than fancy dress. Once those choices are right, the sewing itself is very manageable.
Embarking on Your Cape Sewing Adventure
A practical cape usually starts with a very ordinary need. You want something warmer than a cardigan, easier than a structured coat, and smarter than throwing on whatever's nearest the door. That's where a cape earns its place.
The reason many dressmakers enjoy sewing one is simple. You get the satisfaction of making outerwear without wrestling with sleeve heads, pad stitching, or complex fitting through the waist and hips. You're still working with real garment-making skills, but on a project that leaves room to learn.
What makes a cape worth sewing
A cape is forgiving, but it isn't shapeless if it's done well. The best ones balance three things:
- Movement: You need enough swing to walk, sit, and reach for a bag.
- Warmth: The fabric and cut need to work together, especially if you'll layer underneath.
- Hang: The neckline, shoulder area, and hem decide whether the whole garment looks polished or homemade.
A short shoulder cape can sharpen up a simple outfit and sew up quickly. A longer semi-circle style is often the most wearable for daily use because it gives coverage without too much bulk. A full sweeping cloak looks dramatic, but it uses more fabric and can feel cumbersome on crowded pavements or public transport.
Practical rule: If you want to wear your cape more than once or twice a season, choose the style for your real life first and the drama second.
A beginner-friendly outerwear project
For beginners, a cape is one of the better ways into outerwear sewing because it teaches useful habits. You'll practise accurate cutting, handling curves, managing hems, and finishing a neckline neatly. Those skills transfer straight into coats, jackets, and lined garments later.
If you're more experienced, a cape becomes a fabric-led project. It's a brilliant canvas for wool coating, boiled wool, velvet, brushed cotton, heavy twill, or deadstock fabrics that deserve a simple shape.
The trick is not to think of a cape as one single garment type. It's a category. Once you decide whether yours is for winter layering, smart everyday wear, or evening use, the right pattern becomes much easier to spot.
Choosing Your Ideal Cape Pattern and Size
The shape of the cape matters more than most beginners expect. Two patterns can look similar on the envelope and wear completely differently once sewn.
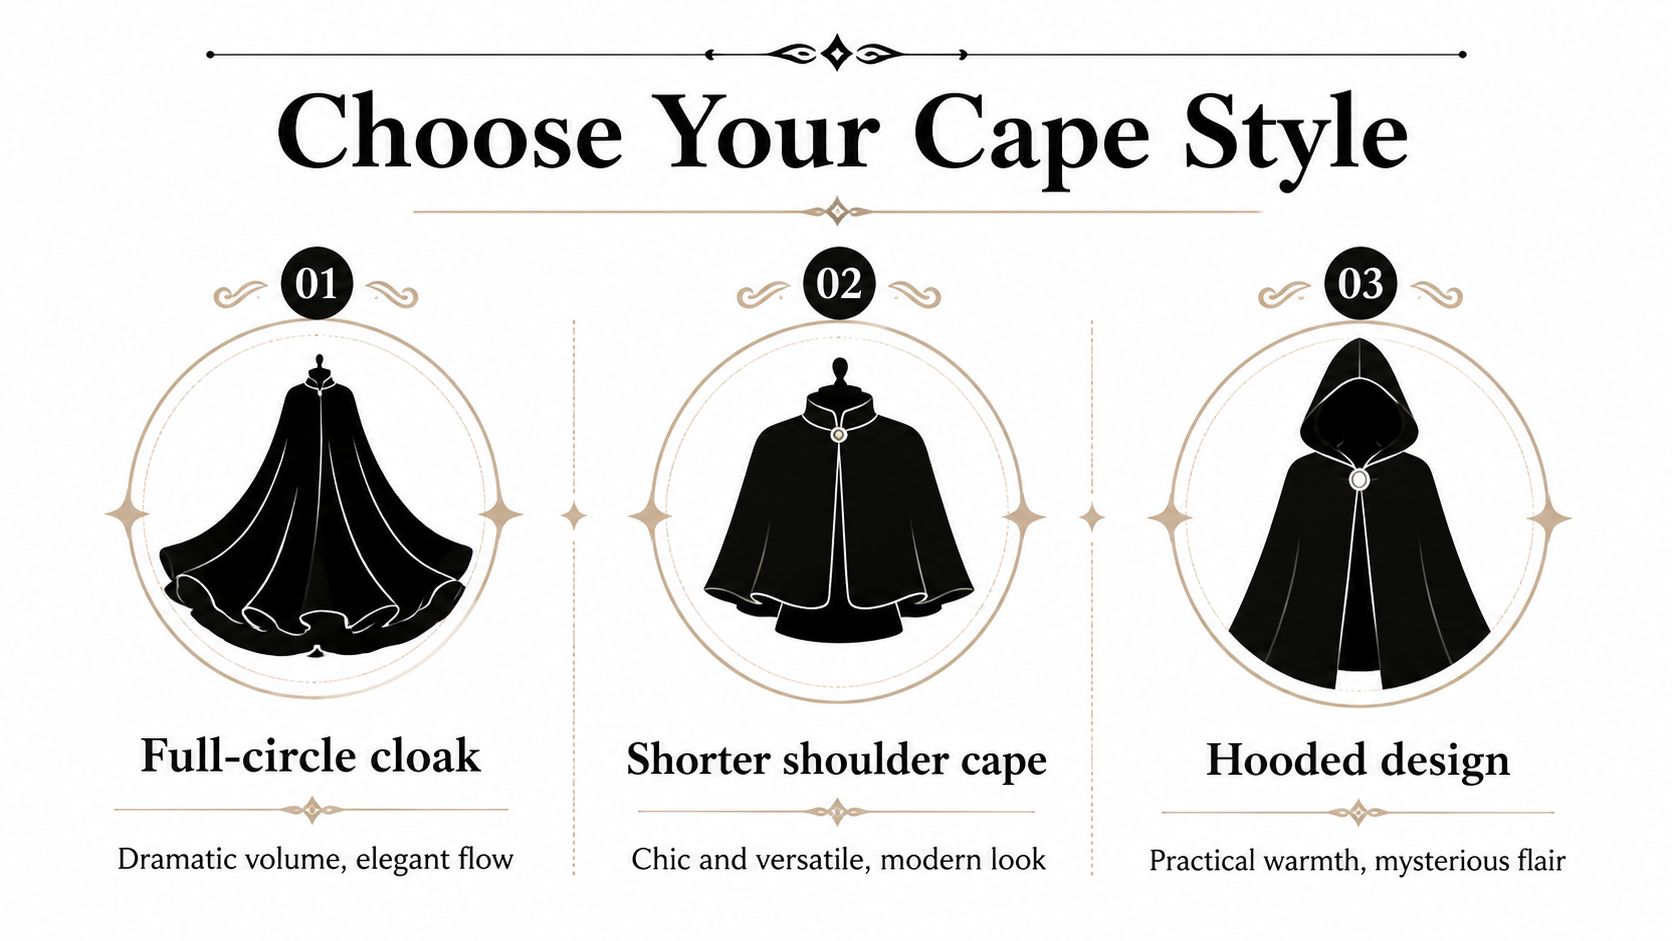
Matching style to how you'll wear it
A full-circle cloak gives maximum sweep and visual drama. It's lovely for formal wear, historical styling, or anyone who wants that classic swish. The trade-off is fabric use, weight, and a tendency to feel oversized if the cloth is too heavy.
A short shoulder cape is often the easiest to style with modern clothes. It works over knitwear, dresses, and even lighter jackets. Because it finishes higher on the body, it doesn't offer as much warmth, but it feels less fussy for everyday wear.
A hooded cape adds function quickly. The hood gives weather protection and visual interest, but it also adds weight at the neckline. If the pattern hasn't handled the neck area well, that extra pull can make the front sit awkwardly.
Reading the pattern envelope properly
When you're choosing a sewing pattern for a cape, don't stop at the line drawing. Read for these details:
- Finished length: A length that looks elegant on paper may hit at an annoying point on your calf.
- Closure type: A single clasp, buttoned front, or open front all wear differently.
- Lining or facing: Full lining gives a cleaner interior and often helps the cape slip over layers.
- Fabric recommendation: This tells you whether the pattern was drafted with drape or structure in mind.
If you like planning visually before buying, digital sketching tools can help you test proportion and trim ideas. Some makers like using design software for clothing creation to compare silhouettes before committing to fabric.
Choosing the right size without overthinking it
UK cape patterns are often more forgiving than fitted coat patterns. Threads notes that UK cape-related pattern sizing has long reflected standard grading conventions with approximate 4-inch bust-size steps between sizes such as 30, 34, 38, and 42 inches, and that cape patterns in this system tend to prioritise neck, shoulder, and length measurements more than fitted waist shaping. That's one reason beginners often find them approachable (Threads on sewing a chic cape).
That doesn't mean size doesn't matter. It means you should measure the parts that control wear.
Prioritise these measurements
- Neck circumference: Too tight here and the whole garment feels wrong.
- Shoulder width: This affects where the cape hangs and whether the front twists.
- Finished length: Especially important if you're petite, tall, or planning to wear boots regularly.
A waist measurement usually matters far less unless the pattern includes shaping, a belt, or a very close front fastening.
If you're between sizes, I'd usually rather see a cape with a little extra room at the body than one that strains at the neck or flips backwards at the shoulders.
What works for first projects
For a first attempt, choose a pattern with fewer seams and a clear neckline finish. A semi-circle or shaped A-line cape is often easier to live with than a very full dramatic design. It gives enough movement to feel elegant, without flooding you in fabric.
If you're sewing for a student wardrobe or a useful autumn-winter layer, that middle ground is often the sweet spot.
Selecting Perfect Fabrics and Notions from More Sewing
Fabric makes the cape. A simple pattern in the right cloth looks expensive. A beautiful pattern in the wrong cloth can look limp, bulky, or impossible to wear.
This matters even more in the UK, where a cape often has to function as outerwear, not just a styling piece. A common gap in cape tutorials is fit advice for real weather layering, especially how to allow room for a winter jumper and how style choices such as semi-circle versus full-circle affect warmth and mobility in cold, wet, and windy conditions (The Cottage Mama cape tutorial discussion).
Choosing fabric by use, not just appearance
If you want a winter cape, start with warmth and structure. Wool coating gives body, insulation, and that classic, structured style. Boiled wool is excellent if you want warmth with a slightly softer, more forgiving handle. It can also be easier to finish because it doesn't fray as aggressively as some woven coatings.
For something dressier, velvet and heavy crepe create beautiful movement. They suit shorter capes or evening styles particularly well. The caution is that they show pressing mistakes and can be less forgiving to sew.
For lighter wear, Tencel twill, viscose blends, or a linen blend can make a trans-seasonal cape that sits nicely over daywear. These fabrics won't give the same shelter as wool, but they're useful for layering in milder weather and they don't feel oppressive indoors.
Cape Fabric Comparison
| Fabric Type | Best For | Warmth | Drape | Sewing Difficulty |
|---|---|---|---|---|
| Wool coating | Winter outerwear, structured long cape | High | Medium | Moderate |
| Boiled wool | Everyday cold-weather cape, beginner-friendly outerwear | High | Medium-soft | Moderate |
| Heavy crepe | Smart short cape, occasion wear | Medium | High | Moderate |
| Velvet | Evening cape, statement piece | Medium | High | Tricky |
| Tencel twill | Light everyday cape, layered autumn wear | Light to medium | Soft | Easy to moderate |
| Linen blend | Spring cape, fashion layer | Light | Medium | Easy |
Layering changes the fabric choice
A cape worn over a blouse can be cut quite differently from one worn over a school jumper or thick knit. If you know you'll layer underneath, don't combine maximum fullness with very heavy fabric unless you want a lot of weight around the neck and shoulders.
These pairings usually behave well:
- Semi-circle plus wool coating: Good balance of coverage and control.
- Shoulder cape plus velvet or crepe: Better for style than deep winter warmth.
- Boiled wool plus simple silhouette: A reliable combination for everyday wear.
- Soft twill plus hood: Works for casual layering, but won't replace a proper winter coat.
A dress form can help you judge whether your chosen cloth collapses too much or stands away from the body. If you're comparing forms for fitting and display, this guide to essential fashion design mannequins is a useful overview.
The heavier the fabric, the more every extra inch of sweep matters.
Notions that make a visible difference
Cape sewing doesn't need an enormous shopping list, but the right notions save frustration.
Keep these to hand:
- Thread: A good quality polyester thread is dependable for most cape fabrics.
- Interfacing: Use it at the neckline, front edges, collar, or facing where you need crispness.
- Closures: Frog clasps, statement buttons, toggles, hooks and bars, or concealed snaps all suit different looks.
- Lining fabric: Choose one that slips over knitwear easily if the cape is for daily wear.
- Sharp tools: Tailor's shears, a rotary cutter, fine pins or clips, and a pressing cloth matter more on outerwear fabrics.
- Hem support: Bias binding, seam tape, or a stable strip for areas that want to stretch.
If you're undecided, buy your closure after you've chosen the fabric. A clasp that suits boiled wool may look lost on a dramatic velvet cape, and a neat button can feel too plain on a heritage-style cloak.
Preparing and Cutting Your Cape Pattern
Good cape sewing starts long before the machine. Preparation is where you prevent most of the usual disappointments.
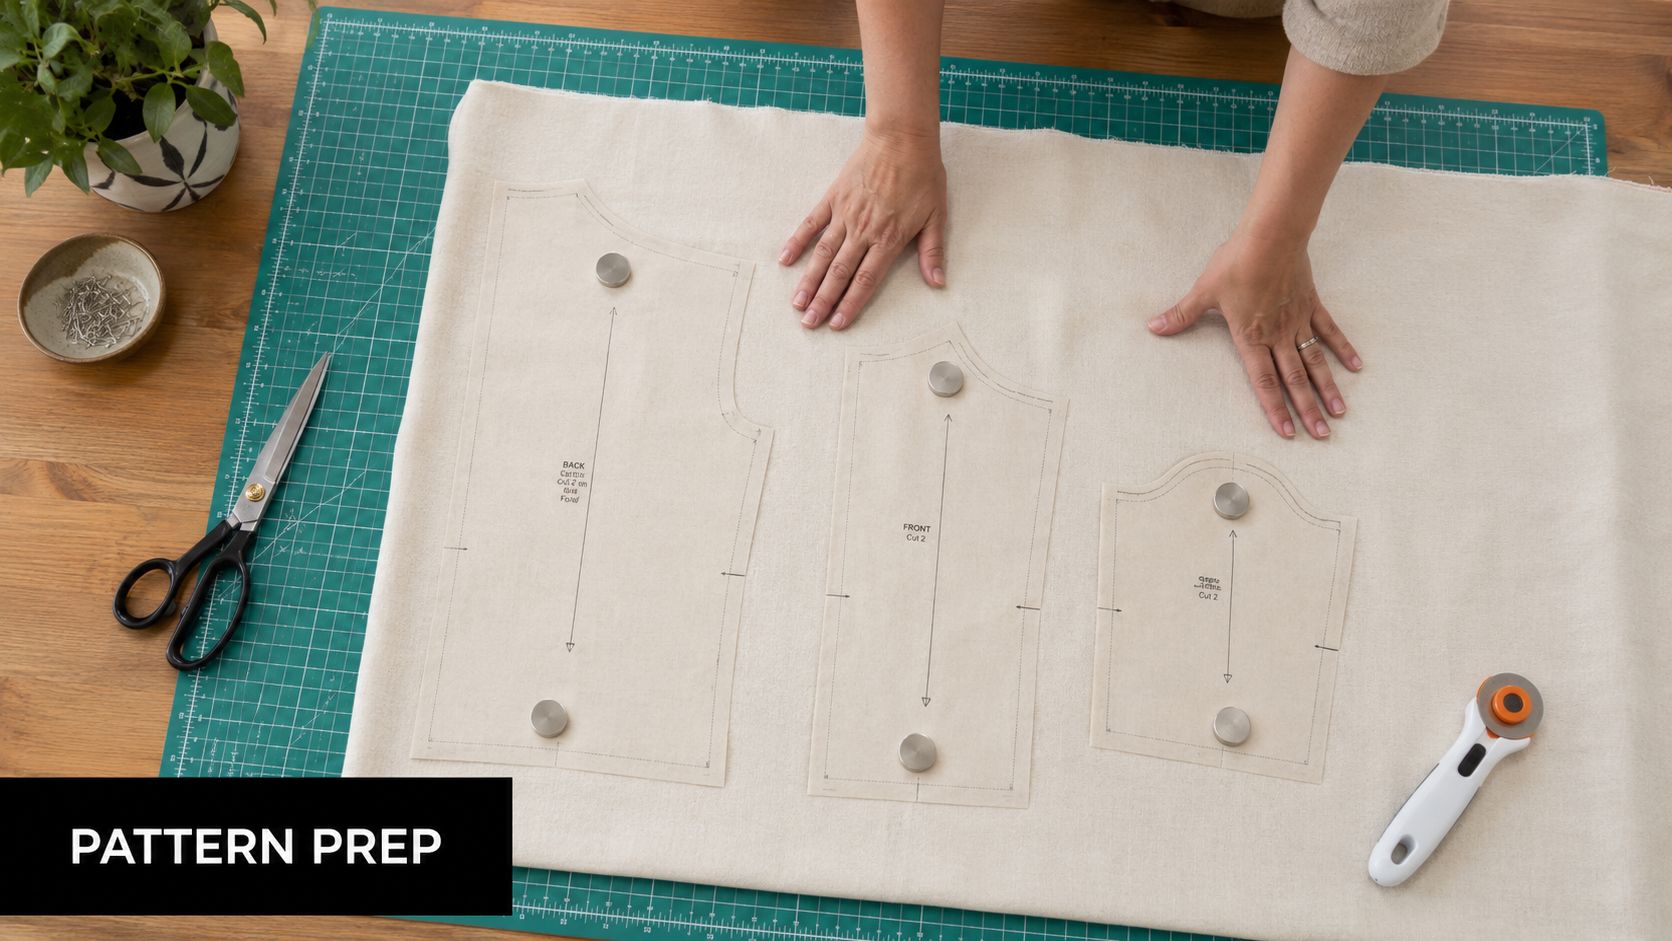
Read the pieces before you lay them out
Take the pattern tissue or printed sheets and identify each piece clearly. On many cape patterns, the main pieces are generous and simple in shape, which can make people overconfident. Don't skip the markings.
Look for:
- Grainline arrows
- Centre front and centre back
- Neckline notches
- Placement marks for closures or pockets
- Fold lines
- Facing or collar pieces
If your fabric has nap, pile, or a one-way pattern, check that all pieces are facing the correct direction before cutting. This matters hugely with velvet, brushed coatings, and directional prints.
Prepare the fabric like a garment maker
Pre-treat the fabric the way you plan to care for the finished cape. Press it before layout. A cape uses broad uninterrupted areas, so every crease and distortion shows.
For thicker cloth, I prefer a large cutting surface and pattern weights rather than too many pins. Pins can lift the fabric and create small inaccuracies along long curves. For slippery cloth, tissue paper underneath helps control drag while cutting.
Cut one layer at a time if the fabric shifts or if accuracy at the neckline matters. It takes longer, but it saves far more time later.
Drafting a simple semi-circle cape
If you don't want a commercial pattern, a basic semi-circle cape is very manageable to draft. You need two measurements: neck circumference and finished length.
To calculate the neck opening for a semi-circle, divide the neck circumference by 6.28. For example, with a 16-inch neck, the radius is about 2.5 inches. Mark that small curve first, then measure out your desired cape length from that neckline edge all the way round.
This gives you the foundation, but don't treat it as finished design. Add seam allowances, front opening if required, and any collar, hood, or facing pieces. Remember to think about wearing ease. A draft that only accounts for the bare neck measurement can feel mean once you add winter layers.
Layout choices that affect the hang
A cape's elegance comes from grain and balance. If the pattern places some sections on the straight grain and others on the bias, that mix can create beautiful drape, but it also means the hem may drop unevenly after hanging.
Use chalk or a fabric marker to note key points before cutting. On thick wool, tailor's tacks can be clearer than notching aggressively, especially if you don't want to weaken the seam edge.
Common cutting mistakes
- Ignoring the grainline: The cape twists when worn.
- Forgetting seam allowances on self-drafts: The neckline ends up too small.
- Rushing the hem edge: Small wobbles become obvious on a circular garment.
- Using blunt shears on coating: The edges chew rather than cut cleanly.
If your pattern includes a lining, cut it with the same care as the outer fabric. A lining that's even slightly distorted will pull the outer layer off balance later.
A Step-by-Step Guide to Assembling Your Cape
Construction is where a cape either starts looking well-made or starts looking homemade. The difference usually comes down to handling the neckline, curves, and hem with patience.
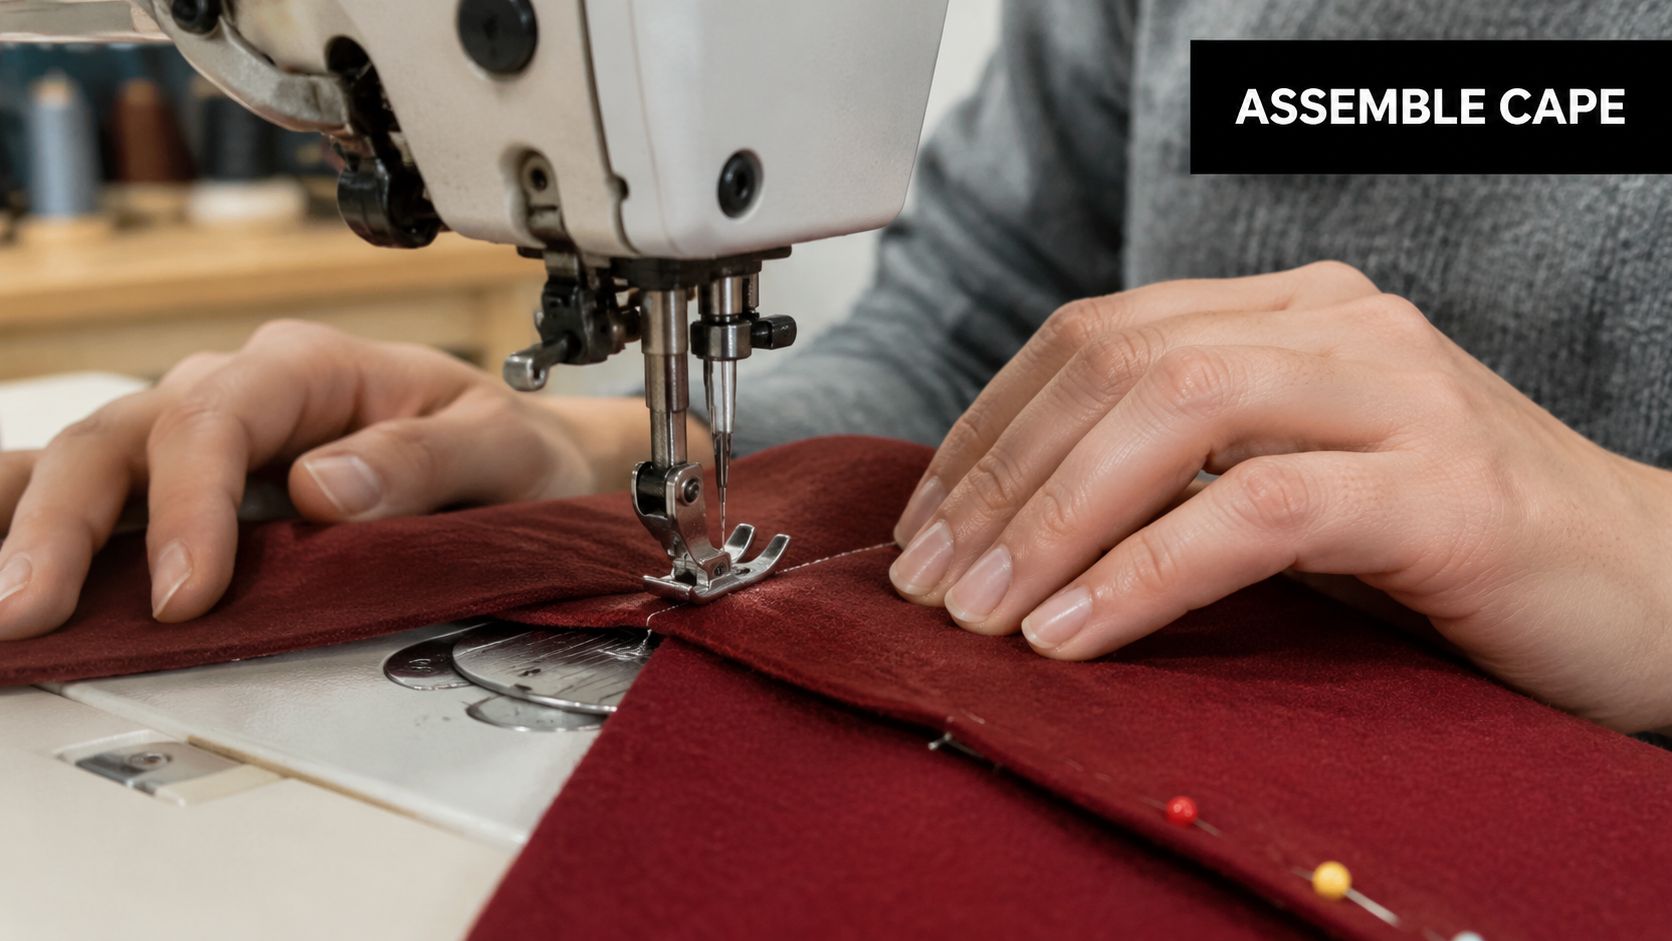
Start with the neckline
Before joining major seams, staystitch the neckline just inside the seam allowance. This matters especially on curves and on any section that includes bias. Without it, the neck edge can stretch while you're handling the pieces.
Then assemble the main body. If your cape has shoulder seams or panel seams, stitch them in the order the pattern suggests and press each one before moving on. Pressing as you sew is what keeps bulk under control.
For curved seams, shorten your stitch slightly if the fabric responds better that way. Don't yank the fabric through. Let the feed dogs do the work and guide gently from both sides of the needle.
Pressing is construction, not decoration
On coating and boiled wool, use steam carefully and always test first. A pressing cloth protects the surface and helps avoid shine. Press seams flat to set the stitching, then press them open or to one side as needed.
If the seam curves around the neck or shoulder area, grade the seam allowances so they stack less heavily. On inward curves, clipping helps the fabric spread and sit flat. On outward curves, notching removes excess bulk.
A wavy neckline usually started as a handling problem, not a sewing machine problem.
Add the facing or lining neatly
A facing is often the simpler finish. It stabilises the neckline and front edge without adding full garment complexity. Interface it if your fabric is soft or loosely woven.
A full lining gives a more polished inside and helps the cape slip over layers. Sew the outer and lining sections separately, then join them right sides together around the edges called for in the pattern. Keep the lining slightly easier through the body so it doesn't drag the outer fabric.
If you're learning visually, this sew-along video is helpful for construction flow and finishing order:
Control fullness instead of fighting it
Circular and semi-circular capes often develop tiny ripples where beginners expect everything to lie flat immediately. That isn't always a mistake. Curved edges need managing.
Try these fixes when the fabric resists:
- At the neckline: Staystitch early and don't over-handle.
- At facing joins: Clip curves accurately and understitch where possible.
- At heavy seams: Trim and grade the seam allowances before final pressing.
- At the front edge: Let the garment hang before deciding whether it's uneven.
Hem a circular garment properly
The hem is where patience pays off. A cape cut with any bias in it will often drop after cutting. Hang it up before hemming so the lower edge can settle naturally. Then level the hem and mark it from the floor or from a consistent point on the body.
For the finish itself, choose according to fabric:
Good hem options
- Double-fold hem: Best on lighter fabrics with modest curve.
- Bias-bound edge: Excellent for heavy wool or tightly curved hems.
- Faced hem: Useful when you want a crisp finish without bulky turning.
- Hand-sewn blind hem: Worth it on formal or heavier capes.
If the hem wants to ridge or ripple, it's usually because too much fabric has been forced into too small a turned edge. In that case, a bound or faced finish often behaves better than insisting on a deep turned hem.
Last checks before closures
Put the cape on before attaching clasps or buttons. Check where the front naturally wants to meet. A closure placed too high can choke the neckline. Too low, and the front flaps open in the wind.
At this point, the cape should already look complete in shape. Closures and trim should support that shape, not rescue it.
Adding Finishing Touches and Styling Your Creation
The final details decide whether your cape feels handmade in the best sense or unfinished. Closures, pressing, and styling all pull the project together.
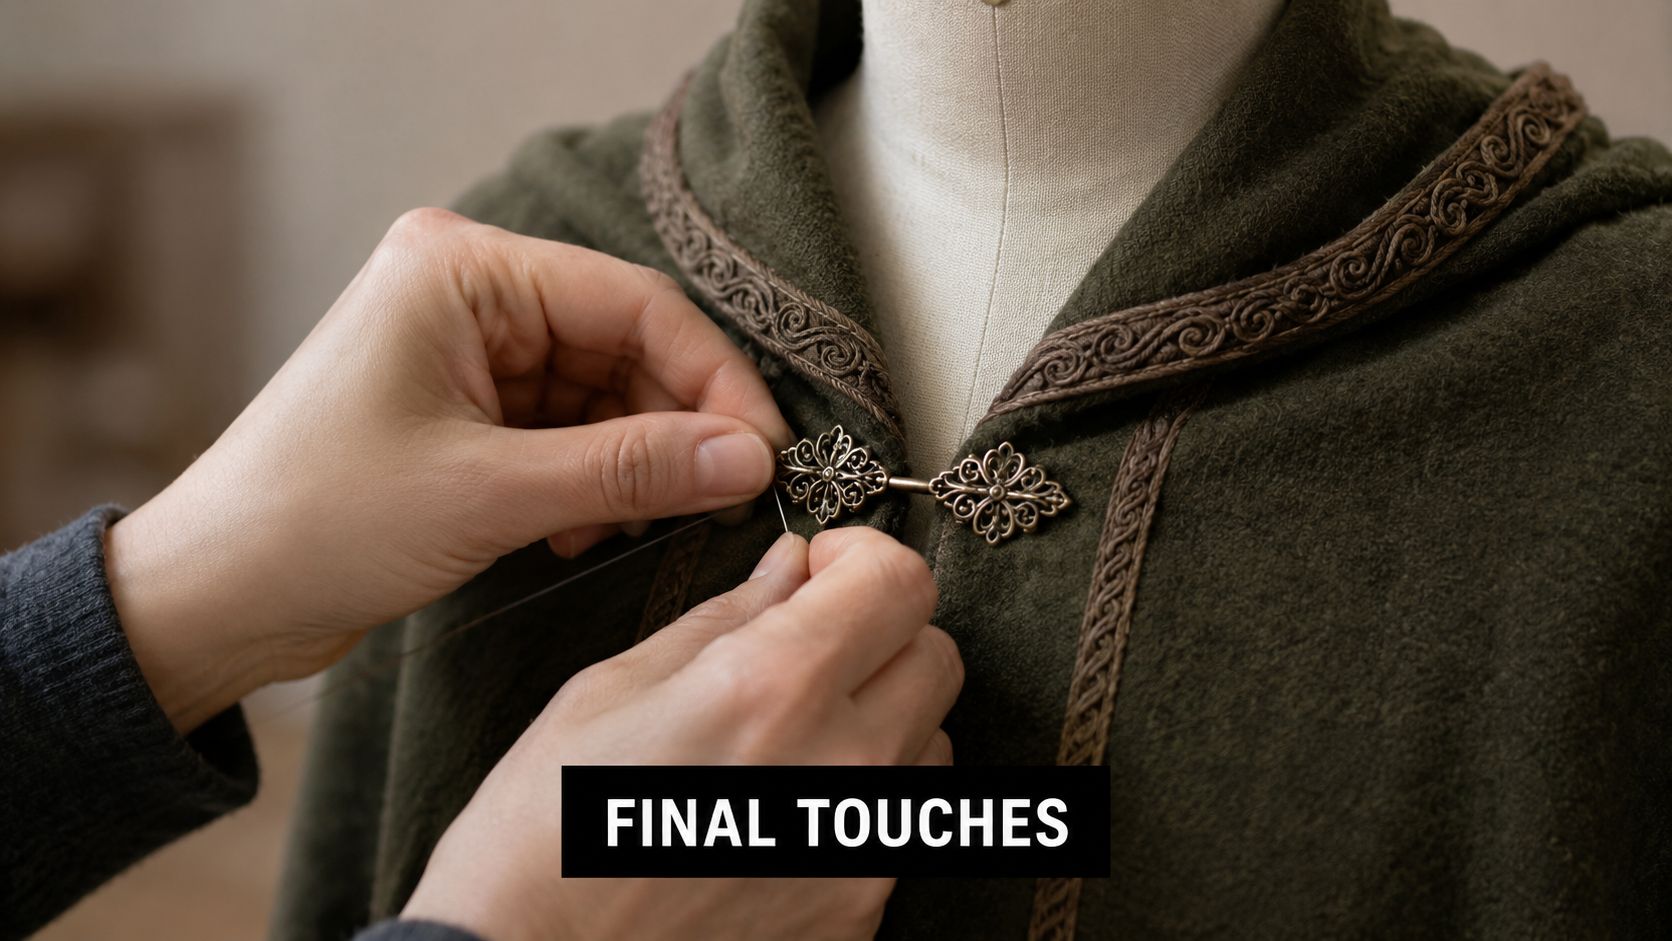
Closures that suit the garment
A neat wool day cape often looks best with a simple clasp, hooks and bars, or a single statement button. A more romantic or historical style suits frog fastenings beautifully. For a soft casual cape, even ribbon ties can work if they're anchored securely and supported with interfacing behind the attachment point.
Sew closures on only after the cape has been pressed and tried on. The front edge changes once the garment settles. A clasp that looked centred on the table can sit crooked on the body if you place it too early.
The press that makes it look finished
Give the whole garment a final press from the wrong side where possible. Use steam thoughtfully and avoid flattening texture in fabrics such as boiled wool or velvet. Let the cape cool on a hanger so the fibres set in shape.
The last press is where stitches relax, edges sharpen, and the whole project starts looking intentional.
Wearing it well
A cape becomes more versatile once you stop thinking of it as costume. Wear a shorter style over jeans, boots, and a fine knit. Belt a softer cape if you want a more defined silhouette. A longer wool version over a simple dress works beautifully for winter events.
If you're sewing with an occasion in mind, styling references can help. For formal outfits and cold-weather finishing ideas, these elegant winter wedding accessories show the sort of pieces that pair well with a refined cape.
Care depends on the fabric. Brush wool coatings, air them between wears, and clean according to fibre type. Spot-clean where possible, and always store your cape on a proper hanger so the neckline keeps its shape.
If you're ready to choose fabric, lining, closures, or a fresh project kit, More Sewing is a dependable place to start. Their range suits beginners and experienced dressmakers alike, and it's especially handy when you want quality dressmaking fabric and haberdashery in one place rather than piecing an outerwear project together from several shops.