
Guides
Best Interfacing for Bags: A Complete UK Sewist’s Guide
You're at the haberdashery counter with a bag pattern, a deadstock canvas that feels promising, and a wall of interfacings that all claim to do the job. One feels crisp, one feels spongy, and one would turn a simple tote into something closer to upholstery. Good bag making starts with choosing what sits inside the fabric, because that hidden layer decides whether the bag holds its shape, wears well, and still feels right in the hand.
The best interfacing for bags is rarely one miracle product. In practice, the cleanest results usually come from layering. One layer adds body, another controls stretch, and a third may stiffen only the base or flap. That is how bag makers get structure without making every seam thick and awkward. It is also the easiest way to handle modern fabrics, especially deadstock and eco-friendly cloth, where the fibre content or finish can be unpredictable.
Years behind a cutting table teach the same lesson. A floppy tote, a cardboard-stiff clutch, or straps that twist after a week often come back to support choice and application method. Fusing the right product badly still gives a poor result. Fusing two compatible products in the right places often gives a better bag than using one heavy stabiliser everywhere.
This guide focuses on those real choices. It covers the trade-offs between woven, non-woven, sew-in, fusible, foam, fleece, and firmer stabilisers, with practical UK options such as Vilene, and it shows how to combine them so the bag keeps its shape without losing the character of the fabric.
Choosing the Right Bag Interfacing
Bag making gets much easier once you stop asking, “What's the one best interfacing for bags?” and start asking two better questions. First, how much shape does this bag need? Second, where does it need that shape?
A bag doesn't need the same support everywhere. A base panel needs something different from a flap. A strap wants stability without becoming thick and awkward. A lining usually needs less body than an outer panel. Once you think in zones, your choices get clearer and your bags look far more polished.
Start with the finish you want
A soft, squashy project needs support that bends easily. A structured handbag needs support that holds a silhouette. Most home sewists go wrong by choosing a single interfacing and applying it to every piece. That works sometimes, but it often creates one of two problems:
- Too little support and the bag collapses, stretches, or wears badly
- Too much support and seams become bulky, corners distort, and the bag loses its fabric character
Practical rule: Match the interfacing to the job of the pattern piece, not just to the bag as a whole.
Why technique matters as much as product
Even a reliable product can disappoint if it's fused badly, cut badly, or pushed into seam allowances where it doesn't belong. Bag makers often focus on the brand name and ignore the handling. In practice, the neatest results usually come from layering one product for body and another for structure, then trimming or spacing them so the seams can still sew cleanly.
That's especially important with bags because they take strain at stress points. Openings, corners, bases, and straps all rely on stable support. If the inner layers shift, peel, or fight the seam, the outside fabric takes the punishment.
A quick way to narrow your choice
Use this short checklist before you cut anything:
- Check the outer fabric: Cotton canvas, quilting cotton, denim, corduroy, and deadstock viscose blends all behave differently.
- Decide on the hand: Crisp, lofty, padded, slouchy, or firm all point to different support materials.
- Separate the parts: Outer body, lining, pockets, flap, strap, and base rarely need identical treatment.
That's the difference between a homemade bag and one that feels considered.
Interfacing Fundamentals for Bag Making
You are standing in the haberdashery aisle with a length of canvas in one hand and three packets of interfacing in the other. One says woven, one says non-woven, one says sew-in stabiliser, and none of that tells you what the finished bag will feel like. The useful starting point is simpler than the packaging makes it sound. First choose how the support will be attached. Then choose how it will behave inside the fabric.
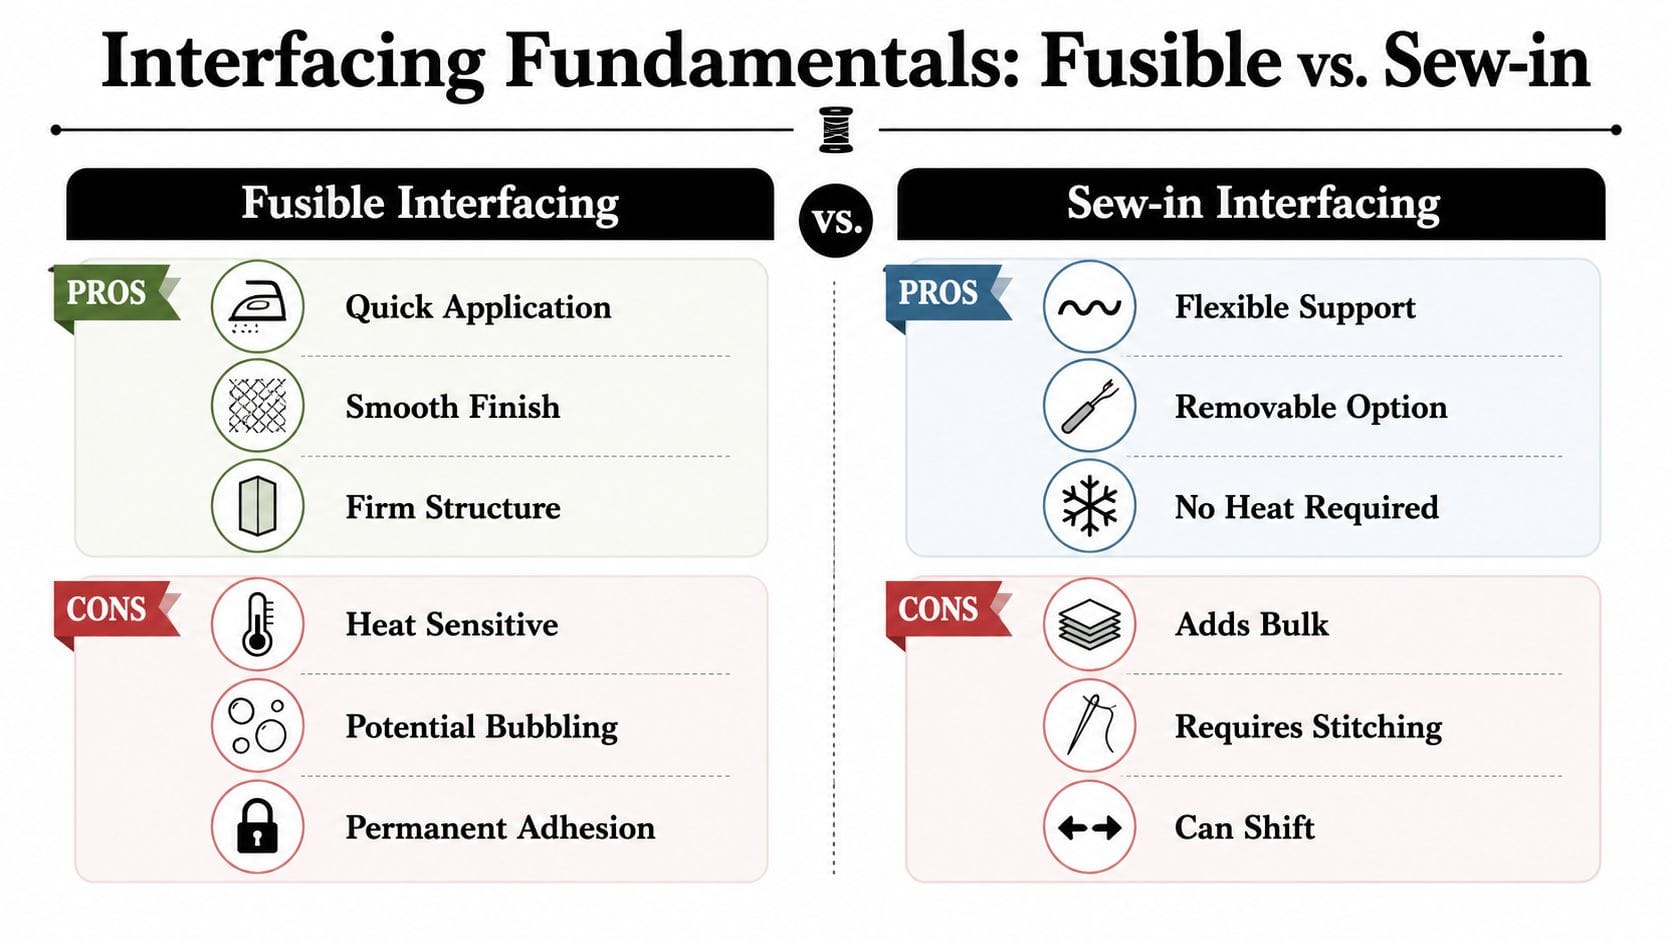
Fusible and sew-in
Fusible interfacing has glue on one side and bonds with heat. Sew-in support is held in place with stitching, basting, quilting, or by being enclosed between layers.
For many bag makers, fusible is the first workhorse. It keeps the fabric stable while you cut, mark, and sew, which is a real help on quilting cotton, lighter canvas, and lining fabrics that want to shift. A well-fused layer also gives cleaner topstitching because the fabric and interfacing are behaving as one piece.
Sew-in products solve a different problem. They add shape, loft, or firmness without depending on adhesive, which matters on fabrics that dislike heat, have a textured surface, or are made from unpredictable deadstock fibres. Foam is the obvious example, but heavy sew-in stabilisers and base inserts belong in the same camp. They are often the difference between a bag that looks flat and one that holds its shape on the shelf.
In the workroom, the best result is often a combination. A fusible layer controls the fabric. A sew-in layer builds the shape.
Woven and non-woven
Woven interfacing has a grain and behaves more like cloth. It bends, folds, and drapes in a way that usually feels more natural, so it suits linings, pockets, and bag parts where you still want some movement.
Non-woven interfacing is more uniform and less sensitive to grain direction. That makes it useful for stable cotton pieces, flaps, tabs, and other sections where clean structure matters more than drape. In UK sewing shops, Vilene H250 is a common medium option for this job because it adds body without pushing many cottons into board-stiff territory.
That said, product type is only half the decision. The same H250 that works nicely on a printed cotton flap can feel too dry on a soft viscose blend. Deadstock fabrics are especially tricky because fibre content is often mixed or partly unknown, and finishes vary from roll to roll. On those fabrics, I test heat first and keep a sew-in backup nearby.
What each type is good at
| Choice | Best for | Watch out for |
|---|---|---|
| Fusible woven | Linings, lighter exteriors, pieces that need controlled drape | Poor fusing can bubble or peel |
| Fusible non-woven | Quick structure, stable cotton pieces, smaller components | Can feel papery if too heavy |
| Sew-in foam | Padded shape, medium handbags, backpacks, pouches | Adds bulk if carried into seams |
| Heavy sew-in stabiliser | Large bags, bases, rigid sections | Can fight turning if overused |
Strong bag structure usually comes from layering. One layer supports the fabric itself. Another layer sets the finished shape.
Think piece by piece
A practical rule is to match the interfacing to the specific job of each pattern piece.
The outer body may need firmness. The flap may need a crisp fold. The lining often needs just enough support to stop sagging, while the base may need a separate stiffener altogether. Treating every piece the same usually creates extra bulk in one area and not enough support in another.
This is the shift from garment thinking to bag making. Dressmaking asks how a fabric hangs on the body. Bag making asks how it stands up, carries weight, bends at the opening, and copes with daily handling. Once you start assessing each piece for its job, layering choices become much easier and far more accurate.
A quick hand test helps before you cut anything. Scrunch the fabric, fold it sharply, and hold a panel from one corner. If it already has body, a light fusible may be enough. If it collapses, stretches on the bias, or creases and stays creased, build support in layers instead of trying to force the result with one very heavy interfacing.
A Comparative Guide to Bag Interfacings and Stabilisers
A comparison table saves a lot of guesswork, especially when two products sound similar but behave very differently once stitched into a bag. Use the table below as a practical buying guide rather than a set of rules carved in stone.
Bag Interfacing and Stabiliser Comparison
| Type | Structure Level | Common Use Case | Application |
|---|---|---|---|
| Lightweight woven fusible such as SF101 | Light | Linings, pockets, lighter fabric that needs gentle support | Fuse to fabric |
| Medium fusible such as Vilene H250 | Medium | Cotton exteriors, flaps, straps, pocket pieces | Fuse to fabric |
| Fusible fleece | Soft to medium | Casual bags needing softness and a little puff | Fuse to fabric |
| Thermolam | Soft | Soft-bodied bags, flexible outer panels, plush finish | Layer and stitch as needed |
| Sew-in foam such as Style-Vil foam | Medium with loft | Everyday handbags, pouches, children's bags, padded panels | Stitch or baste in place |
| Heavy craft-weight sew-in such as Vilene S80/240 | Firm | Large bags, structured panels, bag bases | Baste or stitch in place |
| Very rigid stabiliser such as Peltex-type products | Very firm | Highly structured details, some bases, rigid shapes | Fusible or sew-in depending on version |
| Buckram-style stiffener | Firm to rigid | Speciality shapes and sharply structured pieces | Usually sew-in or enclosed |
How to read the table
The key isn't just “more structure is better”. More structure changes the whole personality of the bag. A medium fusible like H250 gives a cotton print enough backbone to behave. A foam stabiliser adds rounded shape and presence. A heavy craft-weight sew-in creates firmness, but if you use it in every panel of a casual tote, the bag can become tiring to sew and awkward to turn.
Thermolam sits in a different category from the stiffer products. It's preferred for soft-bodied bags because it lies flat, stays thin and even, and gives a plush flexible finish, as described in this WeAllSew discussion of bag interfacing. If you want a bag to feel soft in the hand, Thermolam is often more pleasing than a rigid stabiliser.
Where makers usually misjudge things
The most common mistake is choosing by product category alone. “Foam” sounds suitable, but foam can be too much for a drapey shoulder bag and perfect for a zip pouch. “Heavy stabiliser” sounds strong, but that same firmness can create thick edges and boxy corners where you wanted elegance.
Try assessing four points instead:
- Body: Does the fabric collapse on its own?
- Recovery: After folding, does it spring back or stay creased?
- Load: Will the bag carry much weight?
- Construction: Does the pattern have tight curves, turned corners, or many layers?
A better way to combine products
The strongest results often come from pairing categories rather than relying on one. For example:
- Medium fusible plus foam: Good for a handbag that needs shape but still wants a pleasant, padded feel
- Light woven fusible plus soft fleece: Useful when a lining or pouch needs support without stiffness
- Medium fusible plus heavy sew-in: Better suited to larger bags where the outer fabric needs both surface stability and deeper structure
That layered approach is what separates a bag that merely stands up from one that also sews cleanly and wears well.
Matching Interfacing to Your Bag and Fabric
You cut a lovely outer fabric, fuse what seemed right, finish the bag, and then find the base buckles, the zip edge feels clumsy, or the whole thing collapses once you add your purse, phone, and keys. Matching interfacing is usually where that result is decided. Bag style matters, but fabric behaviour matters just as much.
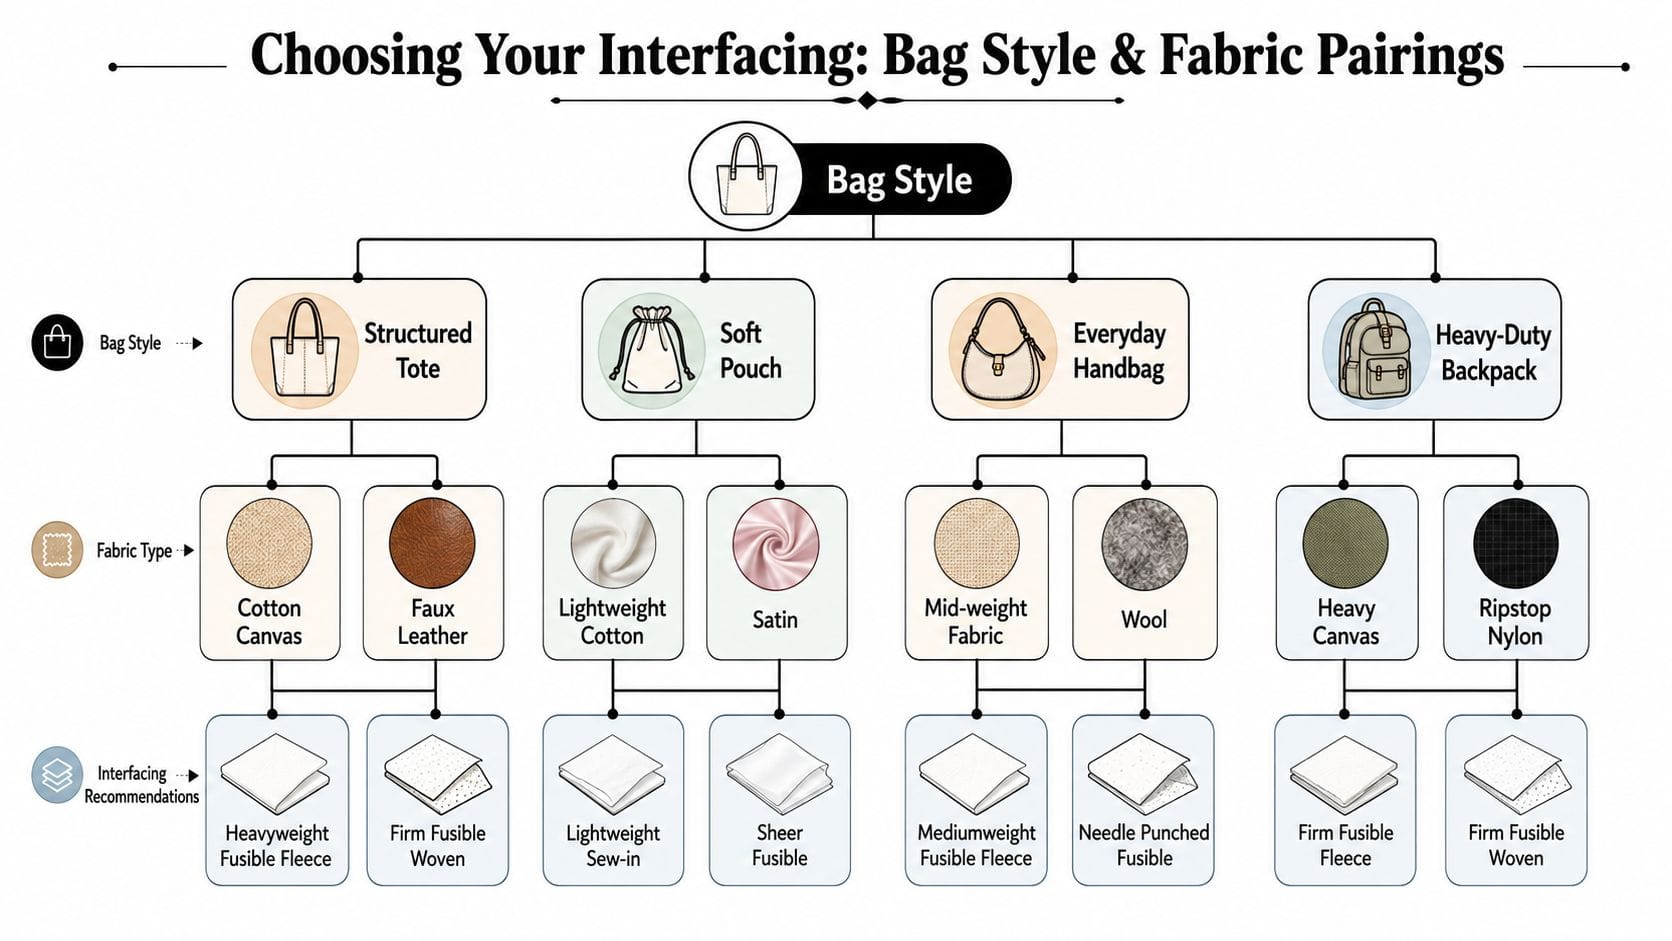
Structured tote in canvas or cotton
A canvas tote often needs less help than people expect. If the canvas already has body, Vilene G700 or another medium woven fusible may be enough on the outer panels, pockets, and top edge. If you want a cleaner upright shape, add foam to the front and back panels only, and trim it out of the seam allowances so the side seams do not become bulky.
Quilting cotton is different. It looks crisp on the bolt, but in a bag it usually needs a two-layer approach to feel convincing. A medium fusible gives the fabric surface stability, then foam adds the body that stops the bag feeling limp.
That combination gives shape without making the tote feel like storage furniture.
Soft pouch or slouchy shoulder bag
Soft bags need restraint. A pouch with a zip top still has to fold, turn, and stitch neatly around the opening, so a rigid stabiliser can make the whole job harder than it needs to be.
Thermolam works well here because it adds softness and a little cushioning without forcing a hard outline. For washed denim, needlecord, or garment-weight linen, use support that keeps the fabric moving naturally. Support it without overpowering its drape.
I treat slouchy bags in sections. The body can stay soft, while the facing, zip panel, base, or strap anchors get firmer support. That is often the difference between an intentionally relaxed bag and one that looks underbuilt.
Medium everyday handbag
This is the category where layering earns its keep. An everyday handbag has to look tidy on a chair, sit comfortably under the arm, and cope with regular use.
For medium-weight outer fabrics, start with a fusible base layer on the outer pieces. Then add foam to the main body panels if the design needs shape. Keep smaller parts under control separately. Flaps usually need only fusible interfacing so they can turn cleanly. Straps often need a woven fusible to stop stretching, while bases may need a firmer sew-in layer than the rest of the bag.
Using one product for every piece is convenient, but it rarely gives the best result.
Large bag or holdall
Large bags expose weak structure fast. Once the scale increases, the base takes more strain, side seams carry more weight, and soft fabrics start to show every compromise.
For holdalls and large shoppers, I usually separate the bag into working zones. Outer panels may need a fusible to control the fabric surface. The base often benefits from a denser sew-in stabiliser. Handles and straps need anti-stretch support more than padding. If the whole bag is made equally stiff, it becomes awkward to sew and unpleasant to carry. If the whole bag is made equally soft, it sags before it leaves the house.
Balanced structure matters more than maximum structure.
Working with eco-friendly deadstock fabrics
Deadstock is one of the trickiest categories for bag makers. It is often excellent value and full of unusual colours and fibres, but many sewists find that these eco-fabrics can lead to bag instability because the original cloth was never meant for this kind of use.
Viscose, Tencel, acetate blends, and lightweight suiting deadstock can all behave beautifully in clothing and disappoint badly in bags. They may stretch on the cross grain, crease under pressure, or drop under the weight of everyday contents. The answer is usually controlled layering, not just choosing the stiffest interfacing on the shelf.
Try these starting points:
- Deadstock viscose blend for a pouch: use a lightweight woven fusible first, then decide whether it needs a second soft layer such as Thermolam
- Tencel blend for a handbag shell: fuse a medium support to the outer fabric, then test a sew-in stabiliser or foam on the main panels only
- Printed lightweight deadstock for details: use it for flaps, pocket fronts, or accent panels, with proper support behind it, instead of asking it to hold up the whole bag
Vilene woven interfacings are often a sensible first choice with unpredictable deadstock because they add stability without the papery feel some non-wovens can create. For slippery blends, a woven fusible underlayer plus a separate structural layer on selected panels usually gives a better finish than one heavy product applied everywhere.
That is the professional habit to build. Match the support to the job each part of the bag has to do, and layer where needed.
Essential Application and Testing Techniques
Cutting into good fabric before you have tested the support is how expensive mistakes happen. A bag can look right on the ironing board and still feel wrong once the seams, folds, and topstitching go in.
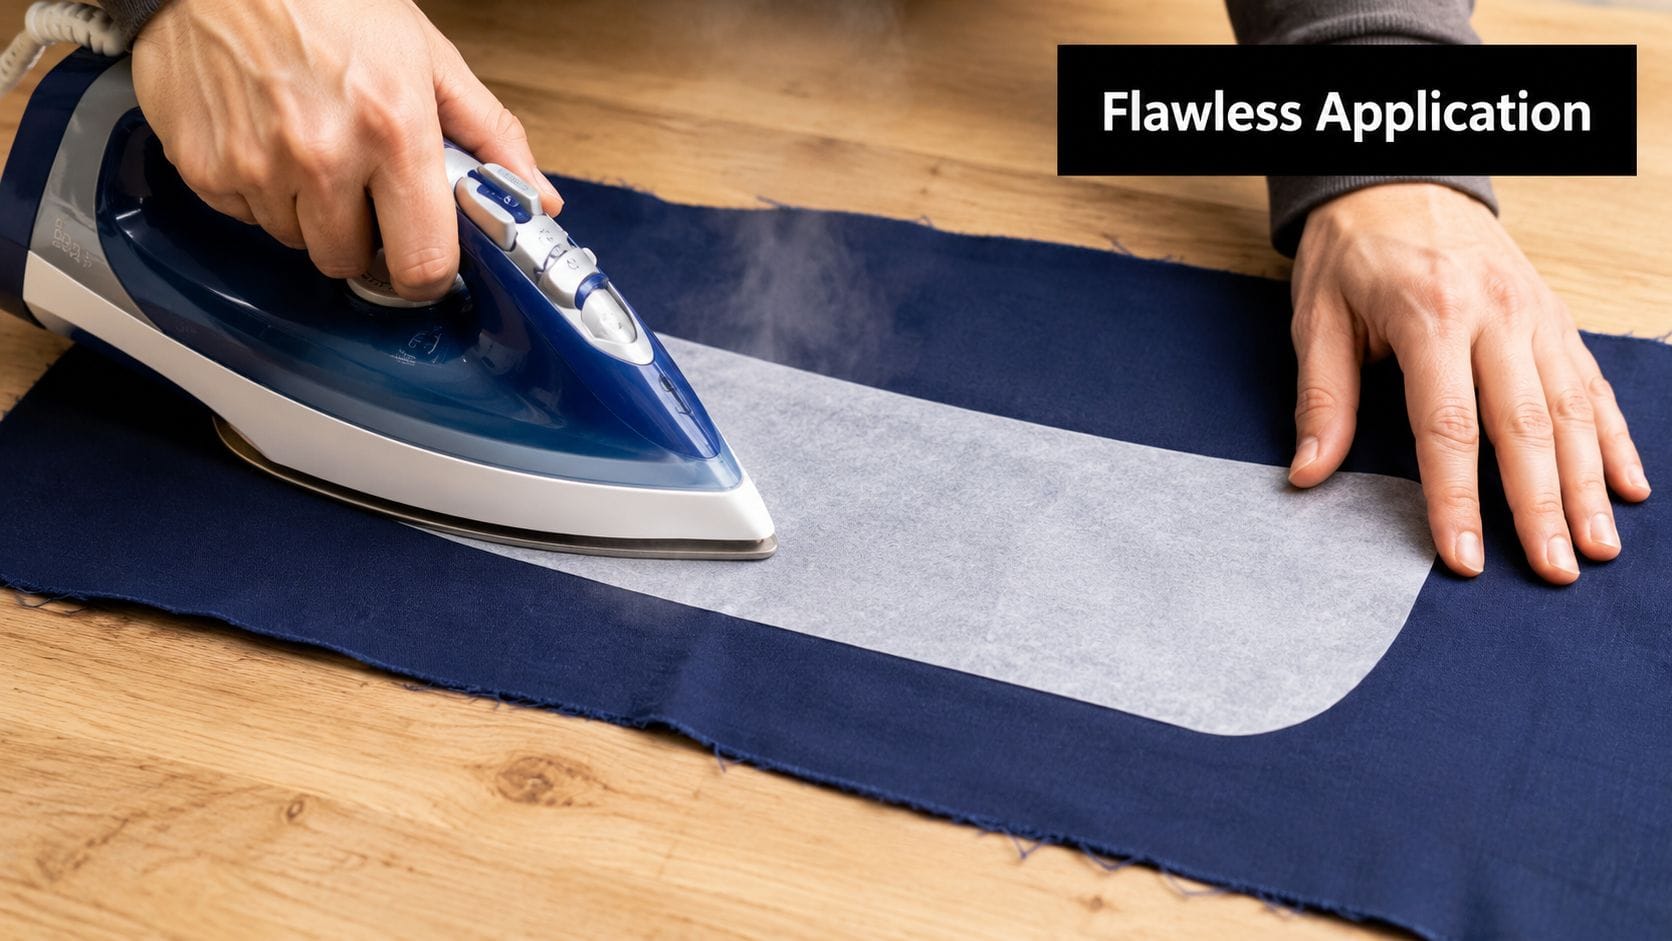
Block fusing first
Block fusing means applying the fusible to a larger piece of fabric before cutting out the pattern. In shop terms, it gives the fabric time to become one stable cloth instead of two layers forced together after the pieces are already moving about.
The difference shows up quickly on lighter cottons, linen blends, and awkward deadstock. Cut pieces can stretch, skew, or lose their shape while you handle them. A block-fused panel stays truer on grain, gives you cleaner matching pairs, and usually presses better later.
It also makes repeat parts more reliable. Straps, pocket tops, tabs, and flap pieces come out closer to identical when the support is already bonded in place.
Test before you commit
A proper test swatch saves far more time than it costs. Use the outer fabric, the interfacing you plan to use, and any second layer such as foam or stabiliser if that is part of the build.
Then treat the swatch like a bag component, not a scrap. Fuse it, let it cool flat, fold it, and stitch across it with your usual thread and needle. If the fabric will be quilted or topstitched heavily, test that too.
That single sample answers the questions that matter in practice:
- Does the fabric stay smooth after fusing, or does it ripple?
- Will the panel fold without cracking or fighting back?
- Can your machine feed and stitch the layered piece cleanly?
- Does the result suit the bag you are making, or is it too stiff or too limp?
For deadstock fabrics, I would test at least two versions. One with a woven fusible alone, and one with the same fusible plus a structural layer on top. That is often where the best answer appears.
Use layered support with intention
Professional results usually come from placing support where the bag needs it, not covering every part with the same product. A common example is fusing a woven support such as Vilene H250 to the whole piece for basic stability, then adding foam only to the main body panels that need shape.
For stitched bags, keep foam or thick stabiliser out of the seam allowance. A margin of about 12mm is usually enough to reduce bulk without leaving the panel floppy at the edge. The panel still has body, but the seam can turn, press, and topstitch properly. Charlie's Aunt shows this method clearly in her guide to interfacing a stitched bag or purse.
That layered approach is especially useful with modern eco-conscious sewing. If you are using a lovely but unstable deadstock suiting or viscose blend, a woven fusible can control the fabric while foam or sew-in support does the structural job. One heavy interfacing everywhere often gives a harsher finish than two better-chosen layers doing different jobs.
If you're new to this technique, this visual demonstration can help clarify the process:
Trim bulk where it counts
Support should serve the construction, not fight it. Thick layers in seam allowances create hard corners, uneven edges, and topstitching that wanders because the foot is climbing over ridges.
Trim back foam, heavy sew-ins, and very dense fusibles from curved flaps, boxed corners, zip ends, and strap joins. Leave enough support to hold the shape, but give the seam room to turn.
Workshop habit: Keep full support on the area that must stay crisp. Remove bulk from the area that must bend, fold, or sit inside a seam.
Large bags benefit from the same discipline. Baste the structural layer in place, assemble one test corner if the pattern is unfamiliar, then trim further if needed before committing to the full exterior. Clean bag making usually comes from control, not from adding more layers than the design can carry.
Troubleshooting Common Interfacing Problems
When interfacing goes wrong, the finished bag tells you quite clearly. The trick is learning how to read those signs.
Bubbling or peeling
If a fusible layer bubbles after pressing, the bond probably wasn't secure from the start. The usual culprits are uneven heat, not enough pressure, shifting during application, or fusing after pieces were already cut and handled too much.
The fix is to re-test on a swatch before trying to rescue the whole project. Press carefully rather than sliding the iron, use a pressing cloth if your fabric needs it, and let the piece cool flat. If bubbling keeps returning, switch to a different support method for that fabric instead of fighting it.
A bag that feels too stiff
This often happens when a rigid stabiliser is used where a softer layered method would have done a better job. The bag may stand upright beautifully but feel unpleasant in use, especially at the opening or side seams.
For the next version, reduce one layer rather than abandoning structure entirely. Swap a very firm insert for foam, or keep the heavy support only on the base and lower body. A bag needs enough architecture to function, but it still has to behave like textile work.
Wrinkles, drag lines, and odd creases
If the outer panel wrinkles strangely, the support and fabric may be shrinking or moving differently. It can also happen when the support is too heavy for the cloth, so the fabric buckles over it instead of working with it.
Try a fresh sample with a lighter support or a different pairing. If the fabric is naturally fluid, a rigid solution can create stress lines that look like bad sewing even when your stitching is fine.
Thick, clumsy seams
This one is usually a placement problem rather than a product problem. Foam, fleece, and heavy sew-ins often work well in the body of a panel and badly in the seam allowance.
Trim them back, grade the layers where possible, and reserve the heaviest support for the zones that need it most. Most bulky bags aren't over-interfaced everywhere. They're over-interfaced at the edges.
Building Your Interfacing Stash and Buying Smart
A useful bag-making stash doesn't need to be huge. It needs to be deliberate. I'd rather see a sewist keep a small group of reliable supports and understand them properly than buy ten mystery products and guess every time.
A practical capsule stash
For most home bag makers, a compact stash can cover a surprising range of projects:
- Lightweight woven fusible: For linings and pieces that need control without weight
- Medium fusible such as Vilene H250: For outer cottons, straps, flaps, and general structure
- Sew-in foam stabiliser: For body, loft, and that finished bag-maker look
- One softer support such as Thermolam: For projects that need flexibility rather than crispness
Pellon SF101 is consistently recommended by experienced makers as a versatile lightweight woven fusible for lining pieces because it adds structure without noticeable bulk or weight, according to reports gathered in this denim upcycling community post. That makes it a smart staple rather than a niche purchase.
Buy with purpose, not panic
If you mainly sew medium handbags and totes, start with the middle of the range, not the extremes. Very rigid products are useful, but many sewists buy them too early and then assume structured bags must always feel hard. They don't.
Keep labelled swatches of every interfacing you buy. Attach a small note with the product name, whether it's fusible or sew-in, and what fabric you liked it with. That habit is better than relying on memory, especially when two white interfacings look nearly identical rolled up in a drawer.
A small swatch library will teach you more than a cupboard full of unopened metres.
Think in UK terms
US product names appear constantly in patterns, but you don't need the exact same label to get a good result. What matters is understanding the function. If a pattern calls for a medium fusible body layer, look for the UK equivalent by weight and behaviour. If it calls for foam, focus on loft and sewability rather than the brand printed in the instructions.
That's how you build confidence. You stop chasing names and start choosing materials on purpose.
If you're ready to put these ideas into practice, More Sewing is a useful place to browse fabrics, haberdashery, and sewing essentials with a UK maker's needs in mind. It's especially handy if you want to test interfacing choices against cottons, denims, viscose and Tencel blends, or deadstock fabrics before starting your next bag.
