Guides
How to Fix Sewing Machine Tension Problems: Guide
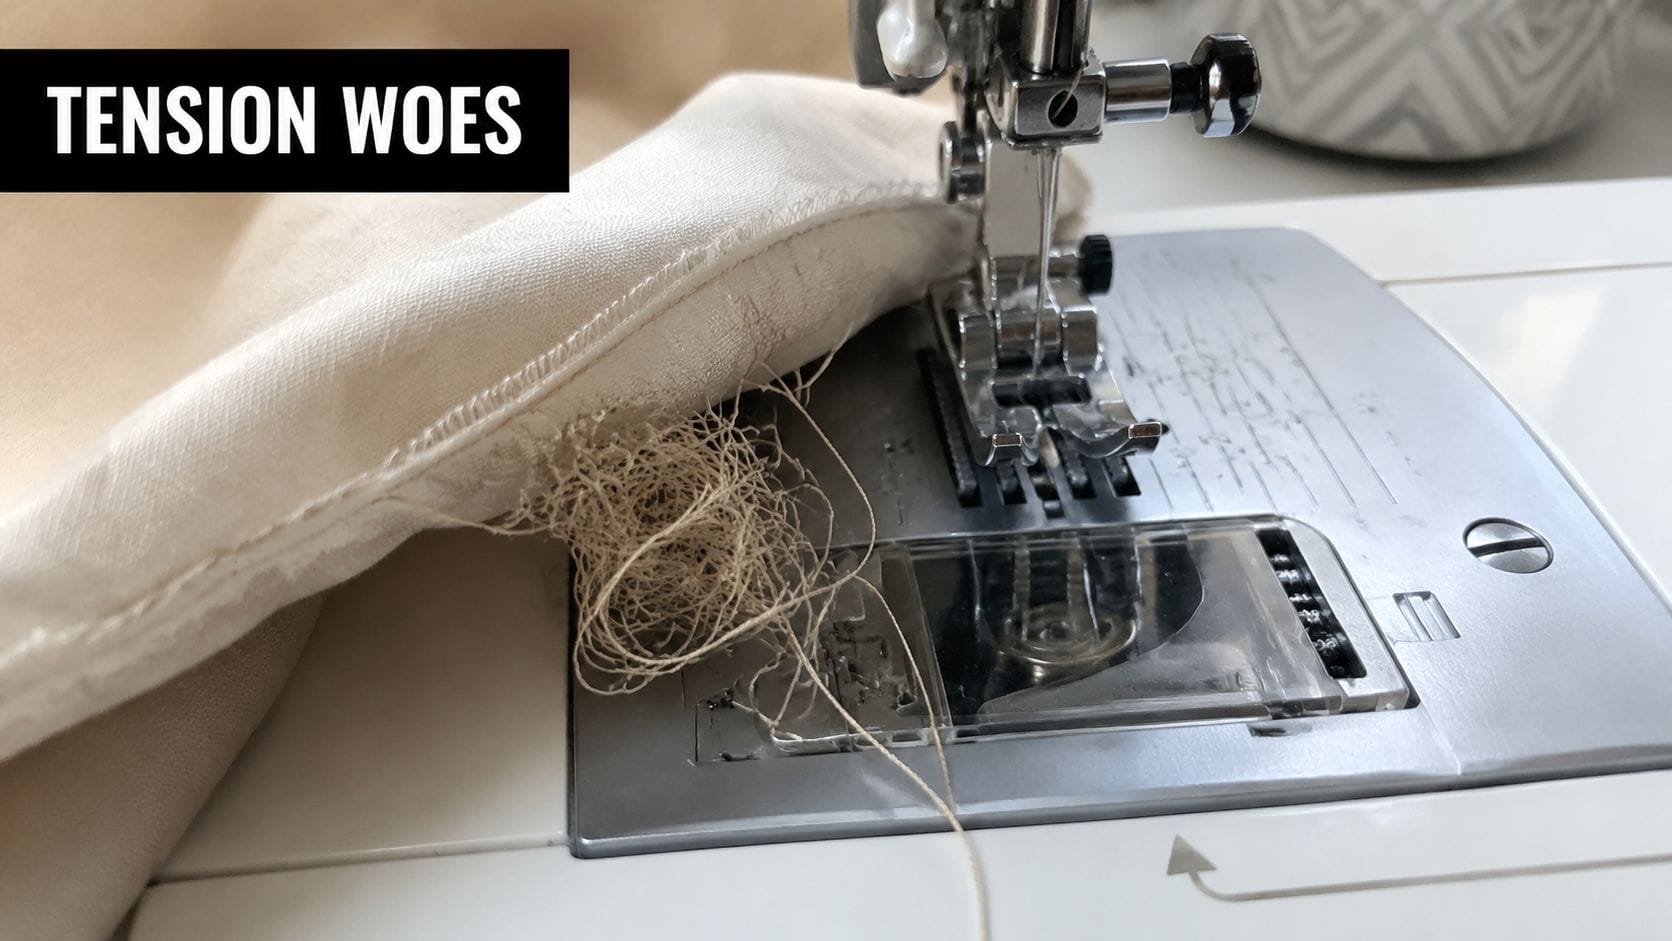
You sit down to sew a quick seam and the machine answers with loops, knots, or a wad of thread under the fabric. A common reaction is to reach straight for the tension dial. That's usually the wrong first move.
When someone brings a machine into a local shop with “tension trouble”, the fix is often simpler than they expected. The least invasive approach works best. Check the threading, the presser foot position, the bobbin, the needle, and the lint before you start turning dials or touching the bobbin screw. That order saves time, and it also stops a small mistake becoming three separate problems.
If you want to know how to fix sewing machine tension problems, think like a technician. Start with diagnosis. Change one thing at a time. Test on scrap. Read the stitch, not your frustration.
Diagnosing Your Sewing Machine Tension Issues
The usual signs are easy to recognise once you know what you're looking at. You might see a bird's nest under the fabric, loose loops on one side, or tiny knots that seem to sit on the surface instead of disappearing into the seam. Sometimes the machine also sounds wrong, as if the thread is dragging.
A balanced stitch looks boring in the best possible way. The top thread and bobbin thread meet between the fabric layers, not on the top and not on the underside. On a plain cotton test swatch, both sides should look neat and even.
Read the side where the problem shows
A lot of sewists get tripped up here. They see loops underneath and assume the bobbin is at fault. Often it isn't.
| What you see | What it usually means |
|---|---|
| Loops on the underside | The upper thread isn't under proper control. The top tension may be too loose, or the machine may be threaded wrongly |
| Bobbin thread visible on top | The upper tension may be too tight, pulling the bobbin thread upward |
| Knots sitting between uneven stitches | The machine may be partially threaded, the thread may be snagging, or the needle may be wrong for the fabric |
If the underside looks like tangled spaghetti, treat that as a clue to check the top thread path first. The machine can only make a balanced stitch if the top thread has seated into the tension discs.
Practical rule: The side with the mess often points to the opposite thread path.
Use a proper test instead of guessing
Don't diagnose tension on your actual garment piece if you can help it. Use a swatch. A double layer gives the stitch somewhere realistic to lock, and contrasting thread colours make the fault easier to read with your own eyes.
For example, thread the needle with a dark thread and wind or fit a light bobbin. Sew a short straight seam on folded cotton. If you see the pale bobbin thread pulled onto the top surface, that suggests the upper tension is too tight. If the dark needle thread is making loose loops underneath, the upper tension is too loose or not engaged correctly.
That's why random dial turning is so unhelpful. If you haven't identified which thread is misbehaving, you're adjusting blind. Good troubleshooting starts with a stitch sample, a close look, and one conclusion at a time.
Simple Fixes Before You Touch Any Dials
You finish threading, start a seam, and the underside turns into a nest of loops. The tempting move is to reach for the tension dial. Hold off. In the shop, the quickest fixes are usually the simple ones that disturb the machine the least.
That matters because every dial change adds another variable. If the fault is a missed thread guide, a badly seated bobbin, or lint packed under the needle plate, changing tension only muddies the diagnosis.
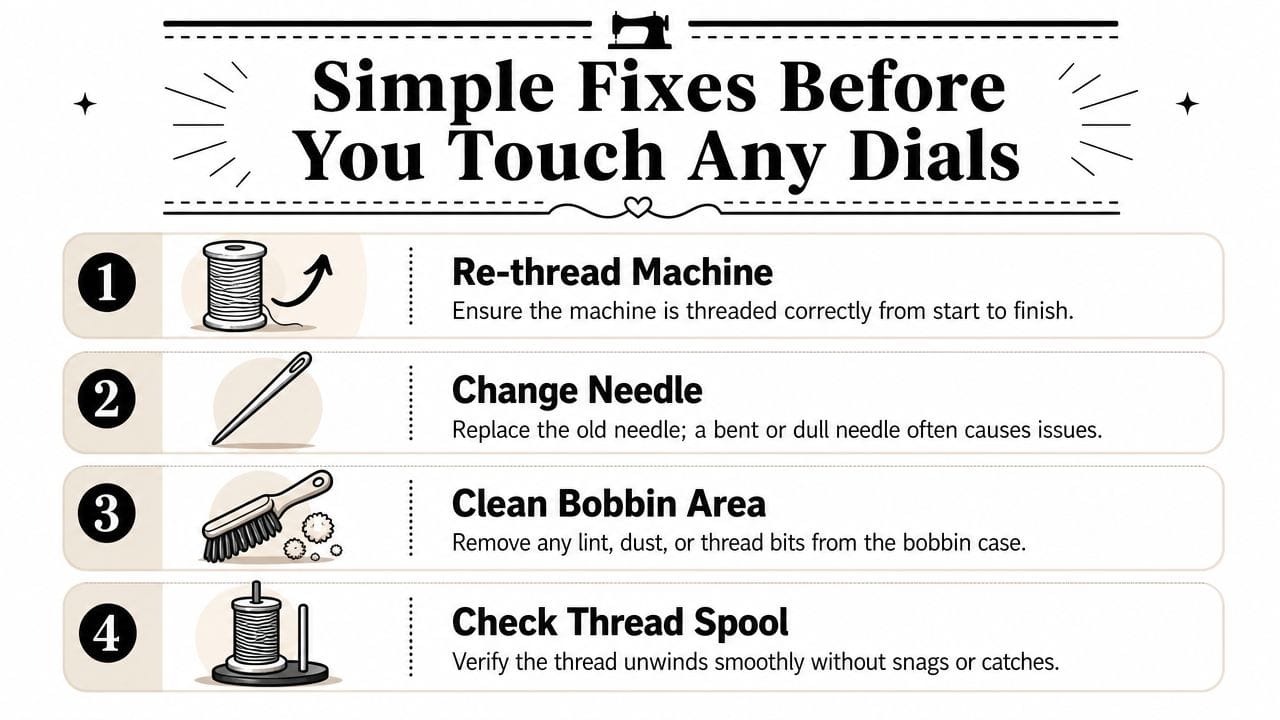
Rethread the machine from scratch
Pull the top thread out completely and thread it again from the spool. Partial fixes waste time. If the thread missed one guide or failed to seat between the tension discs, the whole path is suspect.
Raise the presser foot first. With the foot up, the tension discs open and let the thread drop into place. Thread with the foot down, and the thread can ride outside the discs. The stitch then behaves as if the upper tension is far too loose, even when the dial setting is normal.
I see this constantly. A sewer is convinced the bobbin area has failed because the underside is looping. I rethread with the presser foot raised, sew a test seam, and the stitch cleans up immediately.
Check the basics that mimic tension trouble
A surprising number of "tension" complaints are really feed problems. The machine cannot balance a stitch if the thread or needle is fighting it.
Check these points in order:
- Bobbin winding: Rewind any bobbin with loose spots, ridges, or spongy layers. Uneven winding changes how smoothly the lower thread feeds.
- Bobbin placement: Confirm the bobbin is fully seated and turning in the correct direction for your model.
- Needle condition: Replace the needle if it is bent, dull, nicked, or old. A damaged needle adds drag and can pull thread inconsistently through the fabric.
- Thread quality: Set aside thread that is fuzzy, brittle, or visibly uneven. Cheap or aging thread often snags in ways that look like tension faults.
This takes two minutes.
Clean the thread path and bobbin area
Lint creates resistance. Resistance looks like tension trouble.
Open the bobbin compartment and brush out fluff, clipped threads, and dust. Remove the needle plate too if your machine gives easy access. Use a small brush. Skip canned air and don't blow into the machine with your mouth, because that often pushes debris deeper inside.
Then watch the top thread feed. Turn the handwheel slowly and make sure the thread comes off the spool smoothly. If it catches on a spool notch, wraps around the pin, or jerks through one guide, that snag can pull the stitch off balance even though the tension setting is fine.
These checks are boring, but they solve a lot. The trade-off is simple. Spend a few minutes on the least invasive fixes now, or spend half an hour chasing a dial setting that was never the actual problem.
Adjusting Upper Thread Tension for Balanced Stitches
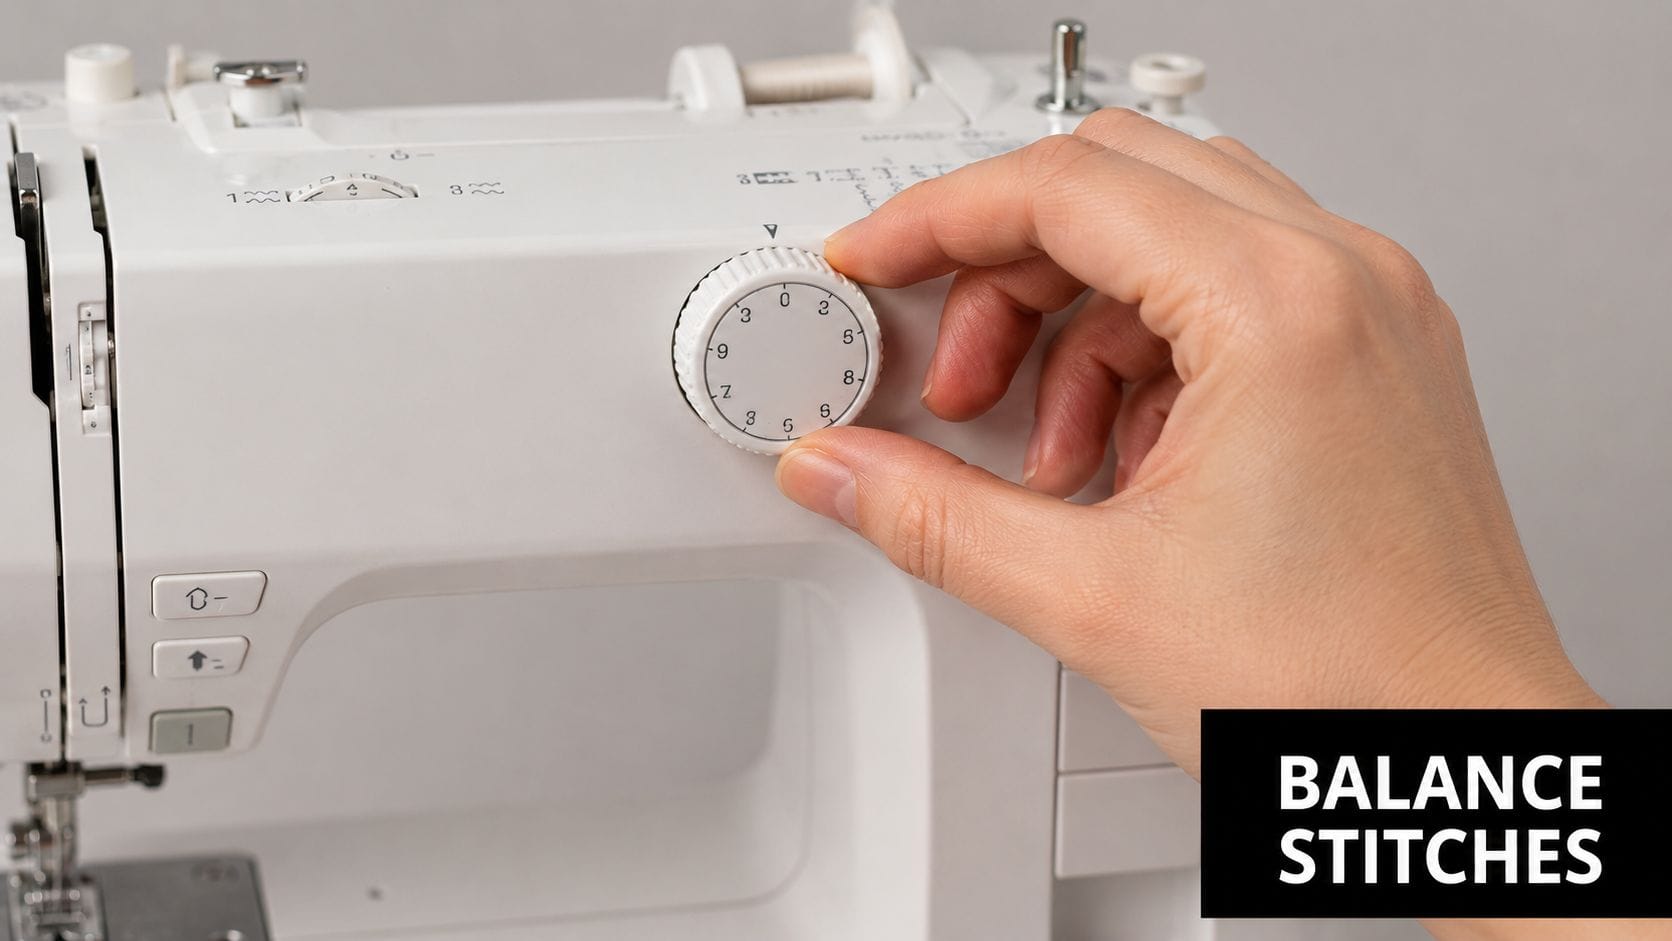
You finish the simple checks, sew a test line, and the stitch is still pulling to one side. This is the point where the upper tension dial earns your attention.
On most domestic machines, the upper tension scale runs from 0 to 9, and many machines sew balanced stitches near the middle of that range. Treat that middle setting as a starting point, not a rule. The correct number depends on the fabric, thread weight, needle size, and even how firmly the presser foot is holding the layers.
The dial is only adjusting how firmly the top thread is controlled as it passes through the tension discs. Higher numbers tighten the top thread more. Lower numbers let it pass with less resistance. Balanced tension means the lock of the stitch sits between the fabric layers instead of being dragged to the top or bottom.
Make one small change at a time
Use a folded scrap of the same fabric you plan to sew, and thread the needle and bobbin with contrasting colours. That makes the stitch easier to read. If bobbin thread is showing on the top side, the upper tension is usually too tight, so lower the dial a little. If the top thread is looping or lying loose underneath, the upper tension is usually too loose, so raise it a little.
MadamSew recommends adjusting in small steps and retesting, rather than making big jumps, in its thread tension troubleshooting guide.
A steady method keeps you out of trouble:
- Start near the machine's normal setting.
- Sew a short seam on a double-layer test swatch.
- Check both sides of the stitching.
- Turn the dial by 0.5 at a time.
- Sew another test seam before changing anything else.
I use that same order at the bench because it shows cause and effect clearly. If you jump from 4 to 7, you learn very little except that the stitch changed. If you move from 4 to 4.5, you can see whether you helped the problem or pushed it the wrong way.
A few common examples:
- Two layers of quilting cotton show loose top-thread loops underneath. Raise the upper tension slightly and test again.
- A plain-weave linen test seam pulls bobbin thread up to the surface. Lower the upper tension slightly.
- The stitch looks better after one change but still is not centered. Keep moving in the same direction, one small step at a time.
What throws people off
Overcorrection is the big one. So is reading only one side of the seam. A messy underside does not always mean the bobbin is at fault, and a neat top surface can hide a poor lock underneath.
Another trap is adjusting the dial while the presser foot is down during threading. On many machines, the tension discs stay closed with the foot down, so the thread may not seat properly between them. Then the dial setting becomes misleading. If a machine seems to ignore every dial change, I stop and rethread the top path with the presser foot raised before touching the dial again.
This short demonstration helps if you want to see the principle in action:
A balanced stitch comes from reading the seam and changing one variable at a time.
Patience saves time here. Small adjustment. Fresh test seam. Check both sides. Repeat until the stitch lock sits in the middle.
Advanced Fixes for Stubborn Bobbin Tension Problems
Bobbin tension is the advanced step. I treat it as the last home adjustment, not the first. In many machines it's close to factory set, and careless tweaking can leave you chasing your tail for the rest of the afternoon.
Still, there are times when the top tension has been checked properly, the machine is clean and correctly threaded, and the stitch is still off. That's when it makes sense to inspect the bobbin side.
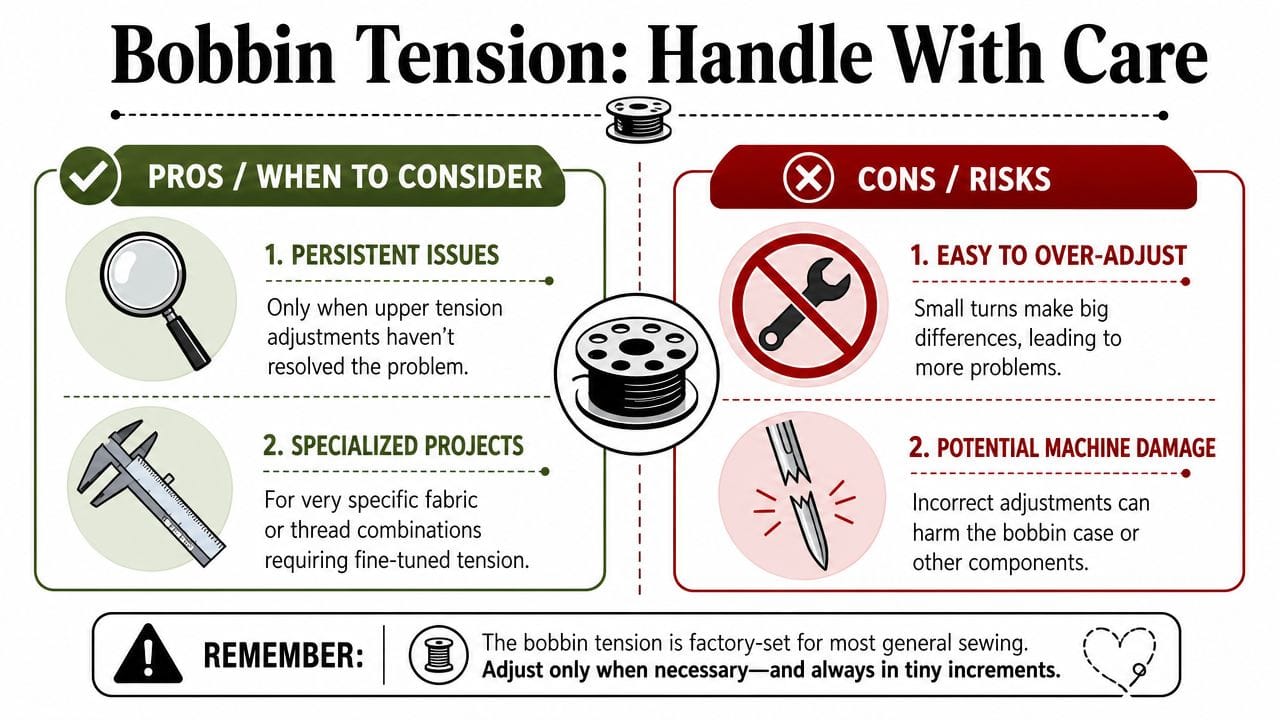
When bobbin adjustment is worth considering
Start by removing the bobbin case or opening the bobbin area, depending on your machine design. Look for lint packed under the spring, bits of broken thread, or a bobbin that isn't wound smoothly. Clean first. Many “stubborn bobbin problems” are dirt in a very sensitive place.
For persistent faults, the bobbin case screw may need adjustment. Turn it clockwise to tighten or anticlockwise to loosen in small, 90-degree increments, testing each change on a fabric swatch. An expert trick is the drop test: hold the bobbin case by its thread, and with a sharp jerk, it should only drop about 1 inch (2.5 cm), as explained in Tilly and the Buttons' tension troubleshooting advice.
How to make the adjustment safely
Use the tiny screwdriver that came with the machine, or one that fits the screw properly. A poor fit can chew up the screw head.
Then work like this:
- Photograph the original position: Before you touch the screw, take a clear phone photo. If things get worse, you've got a visual reference.
- Turn only a quarter turn: That's roughly 90 degrees. More than that is usually too much for one move.
- Right to tighten, left to loosen: If underside stitches are loose and loopy, a slight clockwise turn increases bobbin tension.
- Test after every change: Sew a fresh sample. Don't rely on memory.
Over-adjusting the bobbin screw is one of the fastest ways to create new tension problems. Tiny turns make a big difference.
Use the drop test as a reality check
The drop test gives you a physical way to judge the setting. Hold the bobbin case by the thread tail. Give a sharp wrist jerk. You want the case to drop only about 1 inch (2.5 cm). If it falls freely, it's too loose. If it doesn't move at all, it's too tight.
That test is especially helpful when someone has already been “having a go” at the screw and no one knows where the original setting was.
There's also a practical trade-off here. Fine-tuning bobbin tension can help with unusual fabric and thread combinations, but it takes restraint. If you move the screw too far, you can damage the spring or lose your baseline. In a workshop, I'd much rather see a machine that hasn't had the bobbin screw touched than one that's been turned back and forth in frustration.
Preventive Care to Avoid Future Tension Headaches
The best tension fix is the one you never need because the machine stays clean, threaded correctly and matched to the job. A lot of repeat tension problems come from habits, not hardware.
Lint is a major culprit. It builds under the needle plate, around the feed dogs, and in the bobbin case area where thread needs to move smoothly. Thread fluff from dark cottons, fluffy overlocker cones, and bargain thread can collect faster than people realise. Once that fluff packs in, the machine starts behaving as if an extra brake has been fitted.
A maintenance routine that actually helps
Keep it simple and repeatable.
- After messy projects: Brush out the bobbin area and under the needle plate.
- When starting a new garment: Fit a fresh needle that suits the fabric.
- Before threading: Raise the presser foot so the upper thread seats properly.
- When a spool snags: Stop and check how the thread is unwinding instead of sewing through the resistance.
- If stitches change mid-project: Clean first, then rethread, then test on scrap.
Good sewing habits protect tension
Cheap thread often sheds more lint and can vary in thickness along its length. Mismatched needle and fabric can also produce false tension symptoms. A universal needle on tightly woven denim, for example, may struggle in ways that look like tension trouble when the problem lies with penetration and thread control.
Ten minutes with a brush, a new needle and a proper rethread can save far more time than another round of random adjustments.
If you sew often, keep a small kit by the machine. Needle pack, lint brush, screwdriver, good thread snips, and a few scrap swatches of plain cotton. Those basics solve a surprising number of interruptions before they turn into a full troubleshooting session.
When to Seek Professional Sewing Machine Servicing
Sometimes you've done everything right and the machine still won't sew a balanced line. That's the point to stop blaming yourself.
Professional servicing makes sense when tension remains unstable after proper threading, cleaning, a fresh needle, upper tension testing and careful bobbin checks. It also makes sense if the machine is making unusual noises, the stitch formation changes unpredictably, the thread keeps shredding for no obvious reason, or the machine may have a timing issue.
A technician can check parts you can't easily assess at home, including wear in the tension assembly, burrs in the thread path, damage around the hook area, and mechanical calibration. That isn't an admission of defeat. It's sensible maintenance for a tool you rely on.
If your machine needs a proper once-over, More Sewing offers sewing machine servicing and repairs alongside fabrics, haberdashery and practical support for sewists. If you're in Worthing or ordering online in the UK, it's a useful place to get both your materials and expert help keeping your machine sewing properly.