
Dressmaking, Guides
How to Get a Perfect Sleeve Length Measurement
You've sewn the cuff, pressed the sleeve head, tried the garment on, and then felt that sinking disappointment. The sleeve finishes halfway up the wrist, or it drops so low you can't use your hand comfortably. It's one of the most common fit problems in home dressmaking, and it can make a beautifully sewn garment look homemade for the wrong reasons.
The good news is that sleeve length measurement is fixable. Once you know where to start, where to stop, and how to adapt the method for different sleeve styles, you stop guessing and start getting consistent results. That matters whether you're making a crisp shirt, a soft jersey top, a simple school blouse, or a more advanced jacket toile.
Why a Perfect Sleeve Length Is a Game Changer
A sleeve can be off by a little and still feel wrong all day. Too short, and the whole garment seems to ride up whenever you move. Too long, and the cuff bunches, catches, and makes the arm look untidy even when the rest of the fit is right.
That's why sleeve length deserves more attention than it usually gets. Sewists often focus first on bust, waist, and hip because those are the measurements printed most clearly on pattern envelopes. In practice, sleeve length is one of the details that tells the eye whether a garment fits the body or merely hangs on it.
Fit changes the way the whole garment behaves
Think about a shirt sleeve with a button cuff. If the length is right, the cuff breaks neatly at the wrist and the arm bends comfortably. If it's wrong, the elbow starts taking the strain. The fabric then pulls in the wrong place, and people often assume the bicep or sleeve cap is the problem when length is the underlying issue.
The same thing happens in softer garments too. A viscose blouse with overlong sleeves can look droopy. A knit top with sleeves cut short can feel as if the whole shoulder is sitting too high. The measurement influences comfort, balance, and proportion all at once.
Practical rule: If a garment feels restrictive when you reach forward, don't blame the armhole first. Check the sleeve length measurement and the posture used when it was taken.
It saves fabric, time, and frustration
Most home dressmakers can alter a hem. Sleeve corrections are less forgiving, especially after cuffs, plackets, facings, or lining have gone in. On narrow sleeves, there may be little or no hem allowance left to rescue a mistake.
A careful measurement at the start saves unpicking later. It also helps when you're choosing between sizes, comparing patterns, or deciding whether a ready-to-wear shirt is worth copying. Once you have a reliable method, you can use it again and again instead of reinventing the process for every project.
Gathering the Right Tools for Precision
Before you measure, set up properly. You don't need a huge workroom or expensive equipment, but you do need tools that behave predictably.
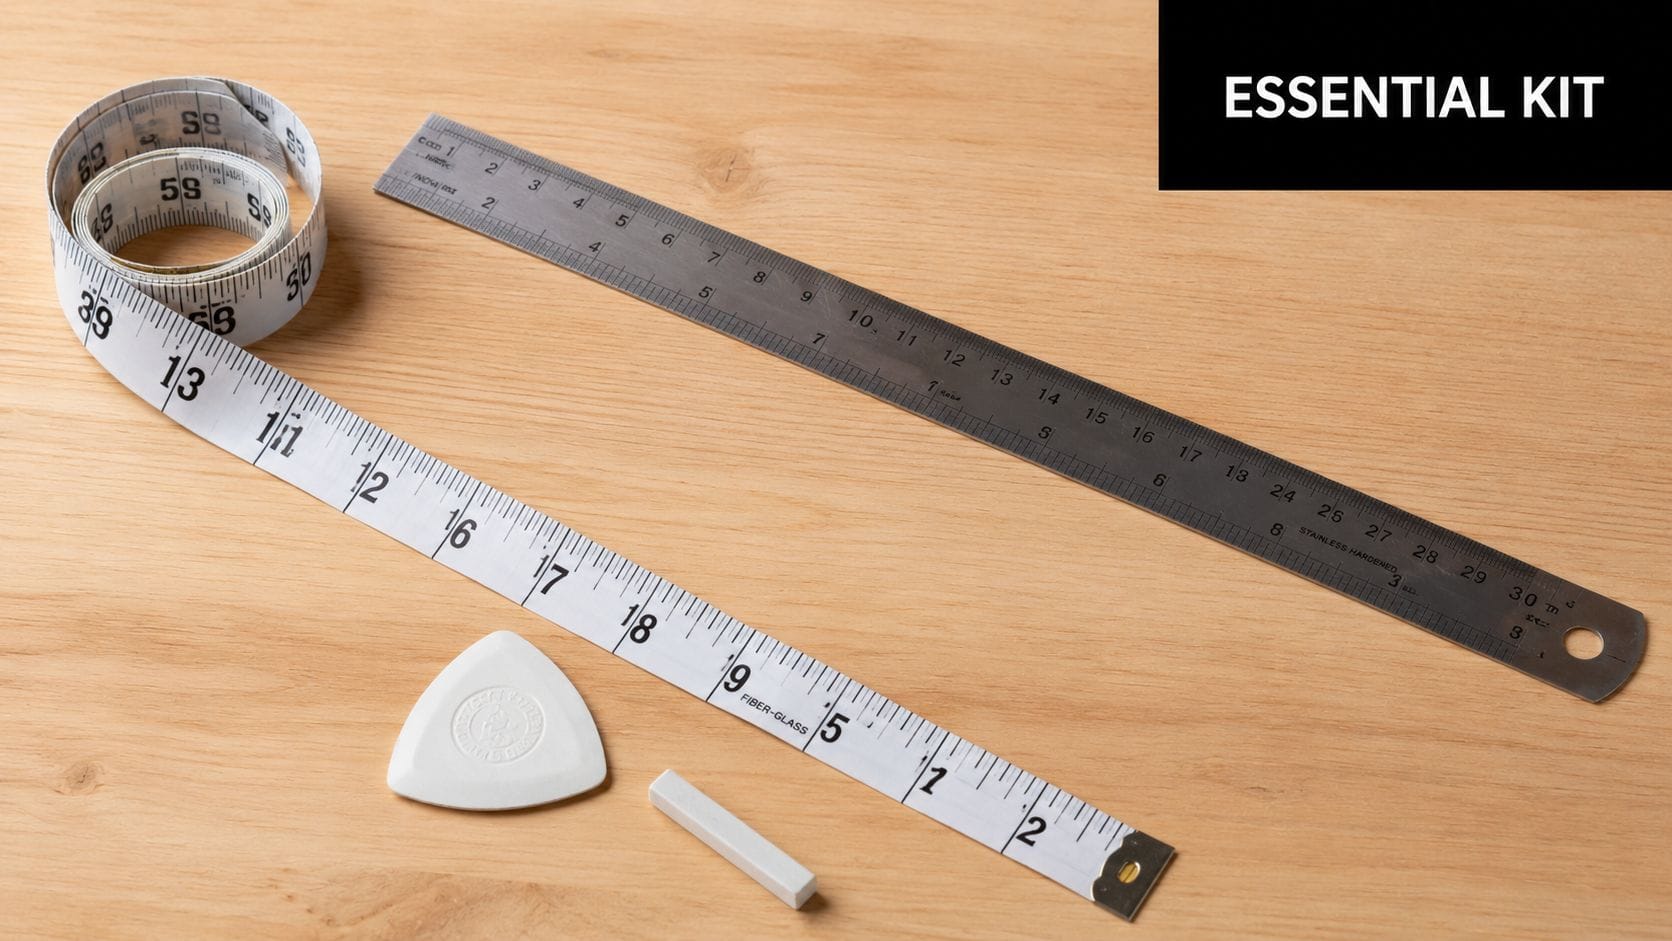
What to use
Keep these on hand:
- Flexible tape measure. This is the main tool. A soft tailor's tape follows the curve from neck to shoulder to wrist. A rigid builder's tape won't sit cleanly over the body and will usually distort the reading.
- Notebook or phone notes. Write the number down immediately. People often remember the first segment and forget the second, or swap left and right arm notes after measuring.
- Tailor's chalk or washable marker. Helpful if you want to mark the shoulder point, wrist point, or the intended hem on a toile.
- Steel ruler or seam gauge. Not for taking the body measurement itself, but useful when checking pattern pieces and hems on the table.
- Pins or small stickers. These can mark the wrist break or desired finished point on an existing garment.
Who should help
If you can get someone to help, do. The centre-back starting point is awkward to find on yourself, and a second pair of hands usually gives a cleaner reading.
If you're measuring solo, stand in front of a mirror and work slowly. It helps to wear a close-fitting top so the tape isn't sliding over bulky fabric. For men's shirt measurements, the starting point matters a great deal, so don't rush it.
A rushed measurement nearly always becomes a sewing correction later.
How to prepare the body
Posture matters. Stand naturally with the arm relaxed and slightly bent. Don't stretch the arm straight down as if you're standing to attention, and don't lift it away from the body.
Also decide before measuring what you're making. A classic shirt sleeve, a bracelet sleeve, and a short sleeve all end in different places. The measuring method may stay similar, but the endpoint changes according to style.
The Gold Standard Method for Measuring Your Sleeve Length
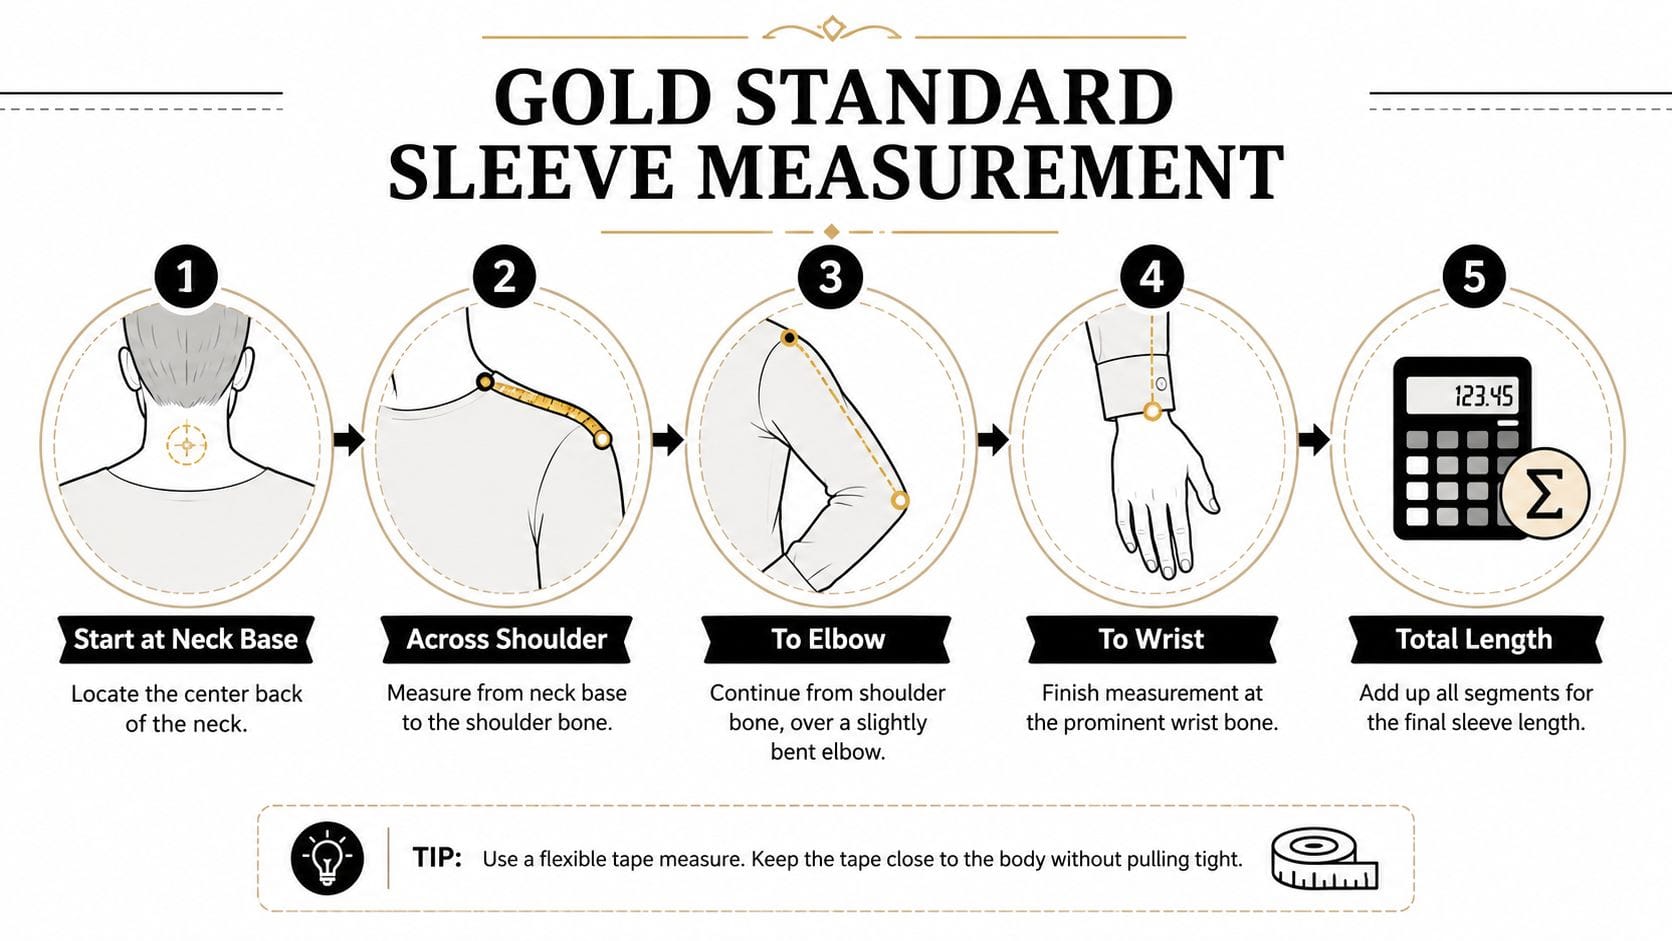
A sleeve can look right on the hanger and still feel wrong the moment you bend your arm. That usually comes down to where the measurement started, how the tape travelled over the body, or whether the number was taken for the body, the pattern, or a finished garment. For a standard set-in sleeve, the method I trust most in the workroom is the centre-back neck to wrist measurement because it reflects how the sleeve needs to behave in wear, not just how it looks laid flat.
Find the correct starting point
Start at the nape, the centre back of the neck where the spine meets the neckline. On shirts and structured tops, this gives a more dependable reading than guessing from somewhere near the shoulder.
Oliver Wicks on shirt sleeve length explains the trade method clearly. Measure in two parts: from centre back neck to shoulder point, then from shoulder point to wrist. Add those two numbers together. That approach also lines up with how many shirtmakers check fit, including cuff position at the wrist.
If the nape is hard to locate on yourself, use a mirror and touch the prominent bone at the base of the neck. From there, keep the tape centred before you angle it across to the shoulder.
Take the measurement in two clean segments
Use the tape in the same path the finished sleeve needs to cover.
- Place the tape at the centre back neck. Keep the tape flat against the body.
- Measure across to the shoulder point. Stop where the shoulder naturally turns down into the arm.
- Continue from shoulder to wrist. Follow the outside of the arm, not the front.
- Leave a slight bend at the elbow. That extra shape matters for long sleeves you plan to move in.
- Finish at the wrist bone or wrist break. Use the exact endpoint that suits the style you are making.
I tell customers this all the time. A sleeve measured on a locked straight arm often comes back feeling skimpy by the end of the day.
This video from a tailoring channel shows the tape path clearly and helps if you want to see the hand position and wrist endpoint before measuring.
What accurate placement looks like
The tape should rest on the body without drooping and without being pulled tight. A sagging tape adds length. A tight tape steals it.
For a dress shirt, the finished sleeve usually lands at the wrist break so the cuff sits neatly when the arm bends. If you are sewing something more formal, check how the sleeve will behave with the jacket worn over it. If you are sewing a casual blouse or overshirt, you may want a touch more ease instead of that sharper, more precise finish. That is the trade-off. Cleaner lines often mean less forgiveness.
Adjusting the endpoint for style
Once the measuring path is correct, the only thing that changes is the finish point.
- Short sleeves end at the chosen point on the upper arm.
- Elbow sleeves stop at or just above the elbow, depending on design and ease.
- Three-quarter sleeves usually finish between elbow and wrist where the arm narrows.
- Full-length sleeves with cuffs should be measured to the wrist break first, then checked against the pattern's cuff and placket construction.
Body measurement and sewing measurement are not always identical; a deep cuff, a turned hem, or a gathered sleeve head can all change the finished result if you do not account for construction.
UK size references that help with checking
Size charts can help as a rough sense check, especially for ready-to-wear shirts. Cipriani Leather's global clothing size conversion guide for men lists common UK menswear size relationships that can help you spot a measurement that is obviously off.
Use that kind of chart carefully. It helps confirm whether your number falls in a normal range, but it does not replace a proper sleeve measurement taken for the actual project. That is especially true if you are comparing a body measurement with a commercial pattern or a favourite shirt that already has wearing ease built in.
How to Measure for Raglan and Kimono Sleeves
Raglan and kimono sleeves confuse people because the usual shoulder seam either changes position or disappears altogether. The mistake I see most often is trying to force a set-in sleeve method onto a pattern that isn't built that way.
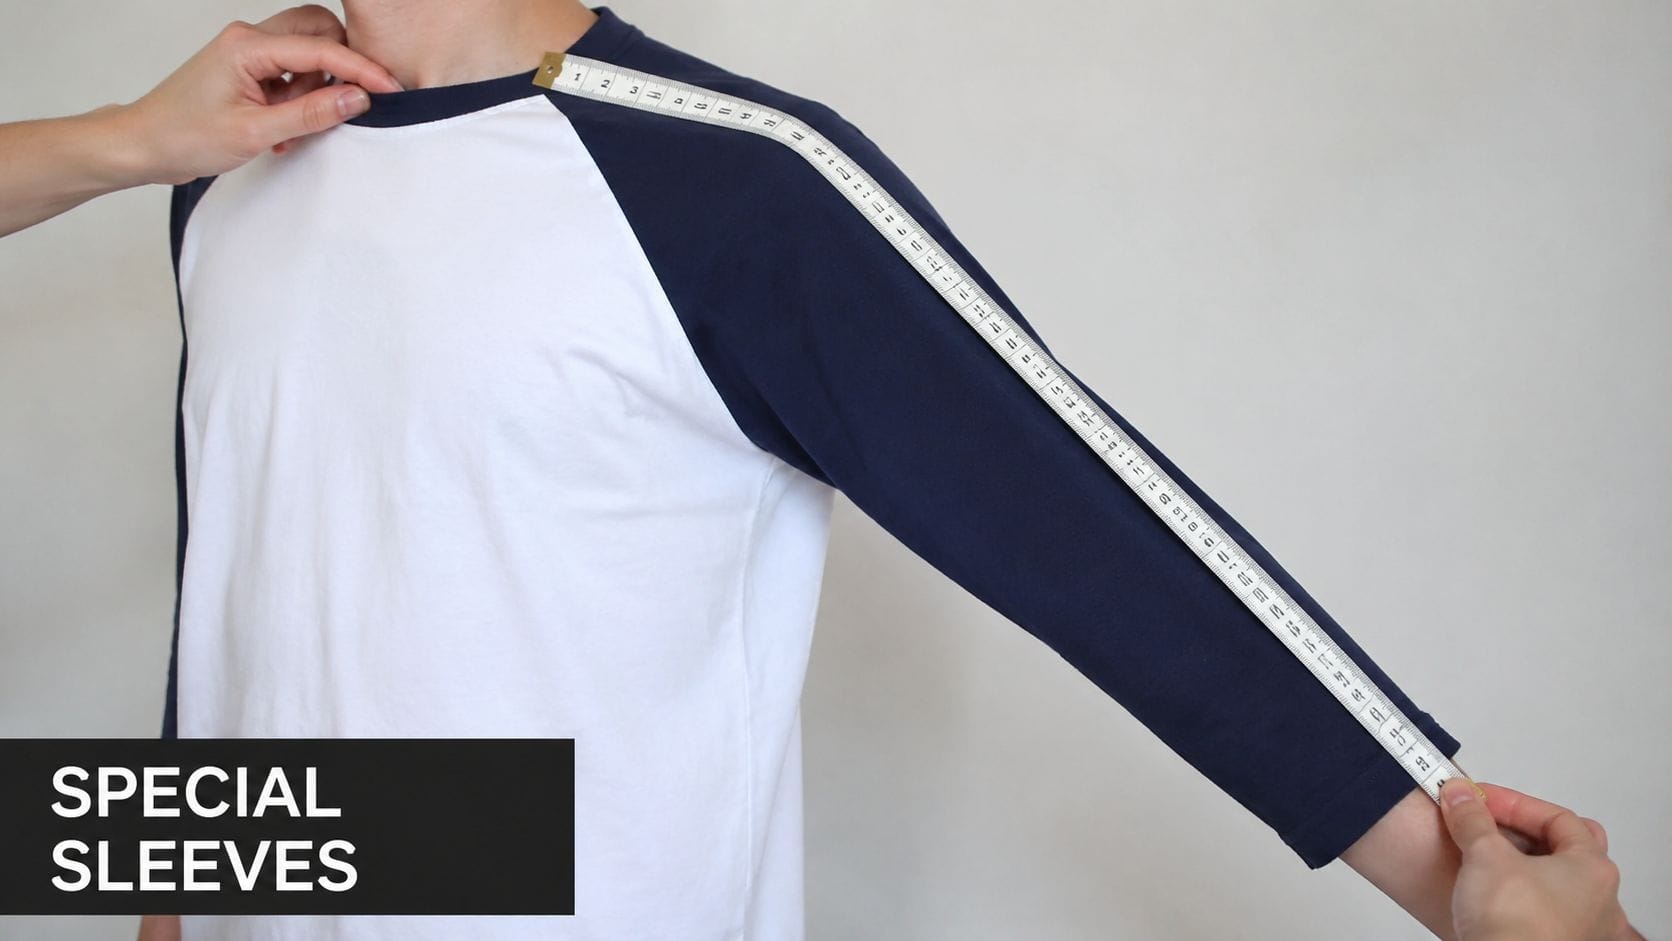
Raglan sleeves need a new starting point
A set-in sleeve joins the bodice at a shoulder seam and armhole. A raglan sleeve runs up to the neckline. Because of that, the measurement starts closer to the side neck base rather than at a shoulder seam line that doesn't exist in the same way.
For raglan styles, use this practical approach:
- Start at the side neck base where the raglan seam begins.
- Run the tape over the shoulder area along the line the sleeve will follow.
- Continue down the outer arm to the desired finished point.
- Bend the elbow slightly if it's a long sleeve.
This gives you a measurement that reflects the actual path of the sewn seam and sleeve, not the path of a standard shirt block.
Kimono and dolman sleeves are measured as a total reach
Kimono and dolman sleeves are cut in one with the bodice, so the focus shifts. You're no longer thinking only about a separate sleeve piece. You're thinking about the distance from the body's centre line out to the arm endpoint.
A sensible way to handle these is to measure from the centre-back neck, across the shoulder line area, and down the arm to the desired end point. That total gives you a working measurement to compare with the pattern's combined bodice-and-sleeve shape.
For cut-on sleeves, don't chase a shoulder seam that isn't there. Follow the line the garment will actually take on the body.
Comparing the three methods
| Sleeve type | Best starting point | Tape path | Main watch-out |
|---|---|---|---|
| Set-in sleeve | Centre-back neck | Over shoulder point and down arm | Starting too far out |
| Raglan sleeve | Side neck base | Along raglan line and down arm | Measuring as if it had a standard shoulder seam |
| Kimono or dolman | Centre-back neck | Across upper body and out along sleeve area | Forgetting that bodice width affects apparent sleeve length |
Pattern clues to look for
If the sleeve is a separate pattern piece with a sleeve cap, use the standard body method from the previous section. If the sleeve seam angles into the neckline, think raglan. If the upper sleeve is part of the bodice itself, think kimono or dolman.
In practice, I always advise making a quick toile for unusual sleeve styles. These designs can look generous on paper and feel short once the arm lifts, especially in woven fabrics with little give.
Working with Patterns and Favourite Garments
Your body measurement is the reference point. After that, the question becomes how to compare it with what's on the cutting table or already hanging in your wardrobe.
Measuring a paper pattern properly
Many sewists measure the cut edge of a sleeve pattern and stop there. That can mislead you because the sewing line, hem treatment, cuff construction, and sleeve head shape all affect the finished length.
Use this method instead:
- Check the seam line, not only the cutting line. If the pattern includes seam allowance, measure the stitching line.
- Measure along the sleeve's grain direction area, following the length of the piece rather than cutting straight across curved edges.
- Subtract or include hem allowance appropriately. Ask whether the pattern piece includes a turn-up hem, cuff, facing, or band.
- Walk the pattern if needed. For shaped cuffs or unusual sleeve endings, blend the seam information with the finishing method.
For custom-fit shirts and blouses, I like to mark the wrist line directly on the pattern before cutting. That makes it easier to compare the intended finished point with the body measurement, especially if I'm blending between sizes.
Measuring an existing garment you love
A well-fitting shirt or top can be one of your best references, but only if you measure it according to its construction.
- Lay the garment flat on a hard table. Don't measure on a bed or sofa where the fabric sinks.
- Smooth creases gently. Don't stretch the sleeve.
- For a standard shirt with a shoulder seam, measure the sleeve from shoulder seam to cuff, then combine that with half the shoulder width if you need a centre-back equivalent.
- For raglan styles, measure from the neckline seam along the sleeve route to the cuff.
- For cut-on sleeves, measure from centre back across to the sleeve end in the path the garment follows.
This is especially helpful when you've got one shirt that always feels right in the arm and another that looks good but never quite wears comfortably. Comparing the two often shows the difference quickly.
A favourite garment is a fitting map. Use it, but measure the construction line that matches the garment type.
Translating from garment to pattern
Once you have a body measurement and a favourite-garment measurement, compare both with the pattern. If all three are close, you're in a strong position. If the pattern is noticeably shorter or longer than both, adjust before cutting.
I also recommend checking the sleeve cap and cuff style before changing length. Sometimes the issue isn't only length. A deep cuff or a gathered sleeve can alter where the sleeve appears to end, even if the raw measurement seems similar.
Common Measurement Mistakes and Pro Tips
A sleeve can look fine when your arms are at your sides, then ride up the moment you reach for a bag, sit at a desk, or bend your elbow. That usually points back to measuring, not sewing.
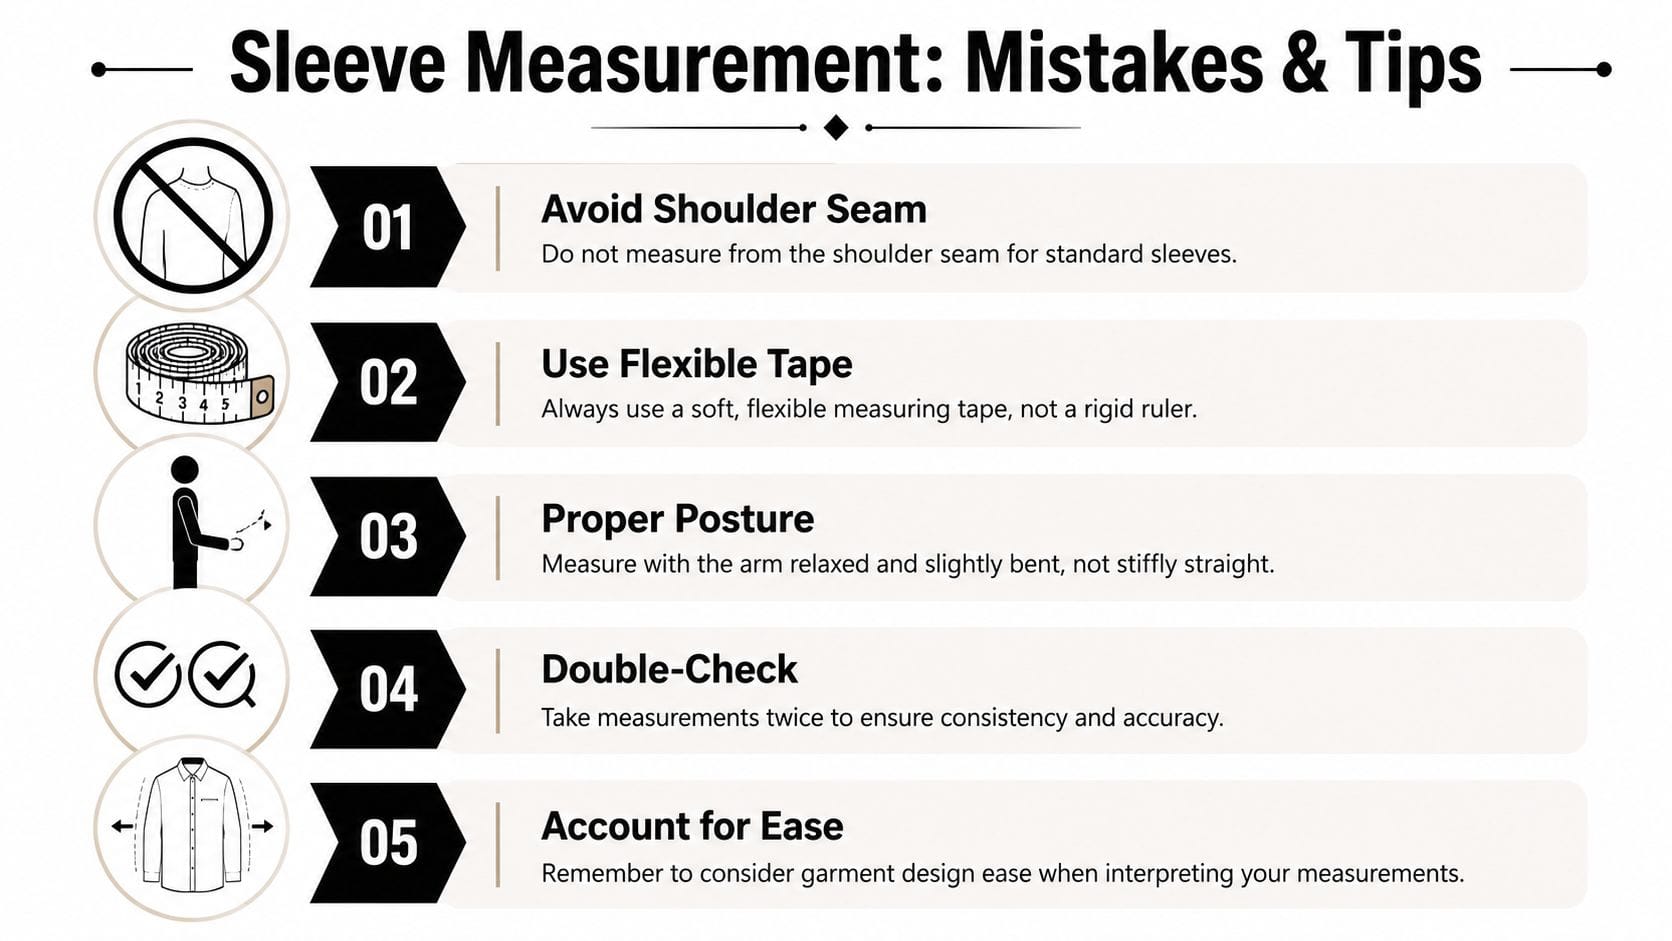
The shoulder seam mistake
A common mistake is starting every sleeve measurement at the shoulder seam. That only works if you are measuring a garment built that way for a flat comparison. It does not give the full wearing length needed for many body-based checks, especially on set-in sleeves where the route from the neck and shoulder affects the finished feel.
In the workroom, this is one of the first things I check when a customer says, “I copied my favourite top, but the sleeves still came out short.” The number may be tidy on paper, but it is the wrong number for the job.
Other problems that spoil the result
Small handling errors can change the result more than people expect:
- Arm held too stiffly. A slight bend gives a more wearable length, especially for shirts, blouses, jackets, and children's clothes.
- Tape pulled tight around the curve. The tape should follow the line cleanly, not compress it.
- Tape drifting off the true path. This happens often on raglan and kimono styles, where the measuring route is less obvious.
- Ignoring finish details. A turn-up cuff, deep hem, elasticated edge, or shaped cuff changes where the sleeve reads on the body.
- Mixing measurement types. A body measurement, a pattern measurement, and a garment measurement are not interchangeable unless you account for ease and construction.
The fix is simple. Label each number by context. Write down whether it came from the body, the pattern, or an existing garment, and note whether the sleeve is set-in, raglan, or kimono.
Pro tips that work in the sewing room
| Mistake | What happens | Better approach |
|---|---|---|
| Measuring from the wrong starting point | Sleeve ends up short or unbalanced | Match the starting point to the job. Body, pattern, and garment checks use different routes |
| Measuring over a jumper or bulky shirt | Tape catches and shifts | Measure over a close-fitting top |
| Forgetting hem or cuff depth | Finished sleeve lands higher or lower than planned | Include the full finished design, not only the cut piece |
| Taking one reading and cutting straight away | Small errors get built into the project | Take two or three readings and use the consistent one |
| Copying one method for every sleeve style | Raglan and kimono sleeves end up off | Follow the seam or construction line for that sleeve type |
One habit saves a lot of unpicking. Compare three things before cutting if the project matters: the body, the pattern, and a garment that already wears well. If one number is out of line with the other two, stop and check why.
A quick conversion chart
A simple reference chart helps when patterns, rulers, and garment guides switch between imperial and metric.
| Inches | Centimetres (cm) |
|---|---|
| 32 | 81.28 |
| 33 | 83.82 |
| 34 | 86.36 |
| 35 | 88.90 |
| 36 | 91.44 |
| 37 | 93.98 |
| 38 | 96.52 |
| 39 | 99.06 |
| 44 | 111.76 |
| 48 | 121.92 |
| 49 | 124.46 |
Keep one more note beside the measurement. Record the sleeve type. “Set-in,” “raglan,” or “kimono” prevents mix-ups later, especially if you are sewing more than one project at once or returning to a pattern after a few days.
If you're planning your next make and want dependable fabrics, sewing kits, and practical haberdashery in one place, take a look at More Sewing. It's a useful shop for beginners starting out and experienced dressmakers who want quality cloth and tools without the guesswork.
