Guides
Block Print on Fabric: Guide for Dressmakers
You've got the fabric. It's washed, pressed, and ready for a blouse, skirt, or easy summer dress. The only problem is that it still looks like fabric from the bolt, not fabric with your hand in it.
That's where block print on fabric becomes addictive. A plain cotton lawn can turn into a neat repeat print for a shirt dress. A smooth viscose can take on a scattered motif that looks far more considered than anything you found in a shop. A length of linen blend can carry a border design along a hem or cuff and suddenly feel like a one-off textile.
For dressmakers, a key question isn't whether block printing is enjoyable. It is. More importantly, the question is whether you can make prints that stay good-looking after cutting, sewing, wearing, and washing. You can, but the answer sits in the unglamorous parts of the process: fabric choice, ink control, pressure, curing, and aftercare.
From Plain Fabric to Personal Masterpiece
A lot of home sewists arrive at block printing the same way. You find the right base cloth, but not the right print. Maybe you want a soft black motif on off-white linen for a simple top. Maybe you want a border print that lands exactly where you want it on a skirt panel. Ready-made fabric rarely gives you that level of control.
Why dressmakers love printing their own cloth
What makes block print on fabric so satisfying is that it solves a design problem and a sewing problem at the same time. You aren't just decorating fabric. You're creating cloth for a specific garment.
That changes the decisions you make. A quilter might be happy with a charming irregular repeat across a flat piece. A dressmaker usually needs to think about drape, seam placement, where the eye lands on the body, and whether the print still works once darts, facings, and hems are involved.
A few strong uses that work particularly well are:
- Engineered borders for sleeves, hems, plackets, and patch pockets.
- Small all-over repeats for shirts, pyjamas, and simple dresses.
- Single-placement motifs at the back yoke, chest, cuff, or skirt front.
- Panel printing before cutting, when you want a motif centred exactly where it will show.
Practical rule: Print with the finished garment in mind, not just the fabric on the table.
A craft with real textile history
There's also a deeper pleasure in the method itself. Block printing isn't a novelty hobby. It sits inside a long textile history. Indian block-printed cottons became highly visible in Britain after the East India Company's trade monopoly in the 17th century, shaping later demand for printed fabrics in the UK, as outlined in this history of woodblock printing in British textile culture.
That matters more than it might seem. It places your printed blouse or dress inside a much older conversation about patterned cotton, trade, dress, and surface design. The process is still straightforward. Carve or buy a block, ink it, and stamp it onto cloth. But the result doesn't feel simple. It feels considered.
What makes a garment print successful
For wearable sewing, success usually comes down to three things:
| Focus | What works | What fails |
|---|---|---|
| Surface | Smooth, stable woven cloth | Heavily textured, bulky, or stretchy fabric |
| Design | Bold motifs with enough open space | Very fine detail that fills or disappears |
| Use | Prints placed away from stress points | Printing right over awkward seams or unstable areas |
If you keep those three in view from the start, your fabric stands a much better chance of becoming a garment you'll wear.
The Best Fabrics and Inks for Wearable Prints
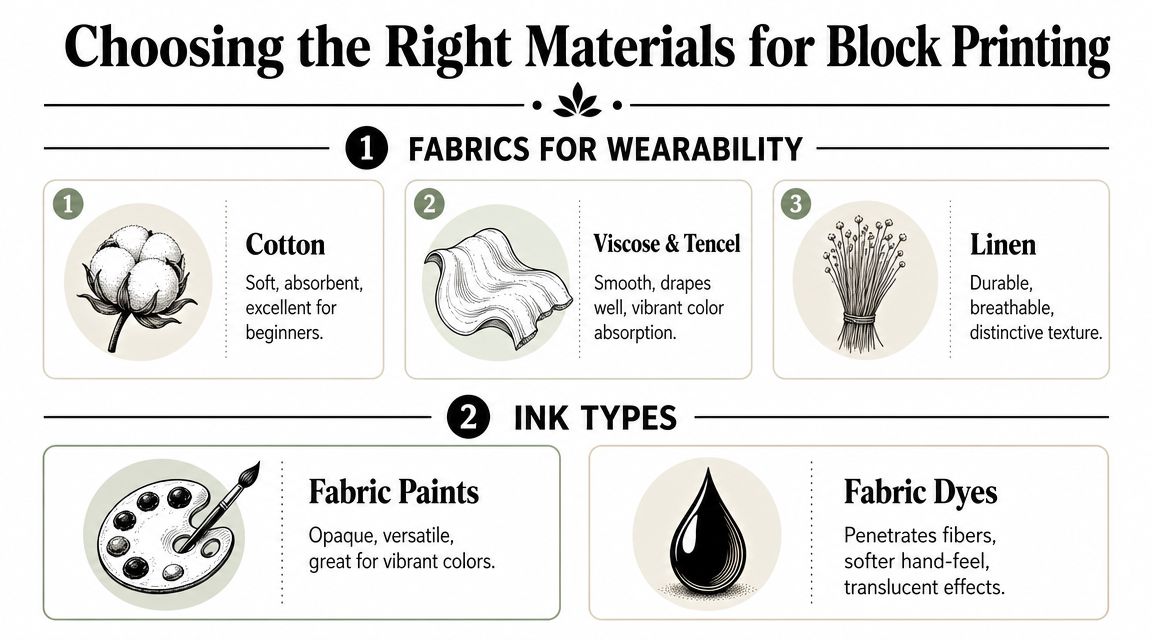
Most beginner advice stops at “use cotton”. That's safe advice, but it isn't enough if you sew clothes. Dressmakers use viscose challis, Tencel blends, linen, cotton poplin, cotton lawn, deadstock shirtings, and all sorts of slightly unpredictable fashion fabrics. Existing tutorials rarely answer how modern dressmaking fabrics such as viscose or Tencel blends perform, because much of the advice comes from craft demos on simple cottons, creating a real gap for home sewists, as noted in this discussion of fabric suitability for hand printing.
Fabrics that usually give the cleanest result
The safest place to start is a smooth, tightly woven fabric. That surface lets the block make even contact and helps the motif stay crisp.
Here's how common dressmaking fabrics tend to behave in practice:
| Fabric | Printing behaviour | Best use |
|---|---|---|
| Cotton lawn | Crisp surface, takes detail well | Blouses, dresses, linings, pyjamas |
| Cotton poplin | Stable and forgiving | Shirts, shirt dresses, skirts |
| Linen | Beautiful character, slightly more broken print edge | Tops, trousers, relaxed dresses |
| Viscose challis | Lovely drape, can shift and feather if over-inked | Soft dresses, blouses, skirts |
| Tencel blend | Often smooth and elegant, but needs testing because finishes vary | Contemporary dressmaking projects |
| Canvas or denim | Can print, but full opacity is harder | Bags, jackets, utility details |
The key isn't fibre name alone. It's surface smoothness and stability. I'd choose a plain-woven viscose with a flat finish over a slubby cotton any day if I wanted a neater print.
What to expect from viscose and Tencel
These fabrics are where many dressmakers hesitate, and rightly so. They sew beautifully when handled well, but they don't forgive heavy-handed printing.
Useful trade-offs to keep in mind:
- Viscose drapes beautifully, so motifs can look more refined on the body than they do on a rigid cotton.
- It can also move under the block, especially if the fabric isn't well secured on the table.
- Tencel blends often have a smooth face, which can produce attractive, even colour.
- Factory finishes vary, so one deadstock length may print well and another may resist ink or show uneven absorption.
Smooth modern dressmaking fabrics can print beautifully, but they usually reward restraint, not force.
A good approach is to cut a decent test swatch and treat it as a real experiment. Print, dry, cure, wash, and handle it before committing to the full length.
Choosing between paint-like and dye-like products
You'll often see products described broadly as fabric paints or fabric dyes. For home block printing, that distinction matters because the hand-feel and look can differ.
- Fabric paints tend to sit more on the surface. They're often useful when you want stronger opacity or sharper contrast.
- Fabric dyes tend to sink more into the fibres. They usually give a softer hand, but the effect is often more translucent.
If you're printing a dark motif on pale cotton for a shirt, a more opaque product may suit you. If you want a softer, washed-in look on a flowing summer fabric, a dye-like result may be more appealing.
What doesn't usually work well
Some fabrics fight the process from the start:
- Knits and stretch wovens shift too easily.
- Pile and textured fabrics don't let the block contact the surface evenly.
- Very bulky seams or pleated areas break the print.
- Shiny or coated finishes can resist absorption or cause patchiness.
For garments, I'd rather print the right plain woven and enjoy sewing it than force a print onto a fabric that doesn't want it.
Preparing Your Printing Toolkit and Workspace
You don't need a dedicated studio for block print on fabric. A cleared dining table or kitchen table works perfectly well if the surface is flat and you can leave things undisturbed long enough to print calmly.
The workflow that gives the most reliable results is simple: prepare a flat padded surface, prime the block with a thin roll-out of ink using a brayer, and do test pulls before touching the final fabric, as recommended in this fabric block printing workflow guide.
The toolkit that earns its place
A compact, useful setup looks like this:
- Block. Wooden hand-carved block, soft-carve block, or lino-style relief block.
- Brayer. This matters more than beginners realise. It helps spread a thin, even layer instead of blobs.
- Inking plate or tray. Glass, acrylic, or another smooth non-porous surface.
- Padded base. A folded towel under a smooth cotton layer works well.
- Fabric shears and test scraps. Keep them close so you test before printing.
- Ruler and chalk or fabric pencil. Helpful for repeats, borders, and placement motifs.
- Cleaning cloths. Ink on fingers travels fast.
If you're choosing between carving your own block and buying one, the decision is mostly about design control. Ready-made wooden blocks are excellent if you want immediate results and repeating motifs. Carving your own block makes more sense if you want placement prints that match a garment design exactly.
Setting up the table properly
A lot of disappointing prints come from a poor surface, not a poor block.
Use this order:
- Protect the table with paper or another barrier if needed.
- Add padding with a folded towel or blanket layer.
- Top it with smooth cloth so the printing surface stays even.
- Tape or smooth the fabric flat so it won't creep as you lower the block.
A hard bare table can leave parts of the motif under-printed. Too much softness can blur the edges. You want a little give, not bounce.
If your block lands before you mean it to, accept the print and work with it. Trying to drop it back into exactly the same place nearly always makes the mark worse.
Preparing the fabric before ink ever touches it
For garments, I always treat preparation as mandatory.
- Pre-wash the fabric so shrinkage happens before printing.
- Press it properly because wrinkles create weak contact points.
- Check for sizing or finish. If the cloth feels stiff from the bolt, it often needs washing before it will print evenly.
- Plan around seams and cut lines. Mark the usable area before you begin.
This stage feels slow, but it saves fabric. A slightly impatient start often becomes a very expensive practice piece.
Layout Design and Printing Techniques
Layout is where dressmakers can do something that ready-printed fabric often can't. You can put the motif where the garment needs it. A repeated print can run evenly across a shirt front, or a single block can frame a cuff, collar, pocket, or skirt hem.
Block printing itself reaches far back. It's widely traced to China around 220 AD and is also described as being at least 2,000 years old in India, with Indian use documented from at least the 12th century, as explained in this history of traditional hand block fabric printing. That long history is useful in the workroom because the core principles haven't changed. Clear design, even inking, accurate placement, steady pressure.
Planning the print around the garment
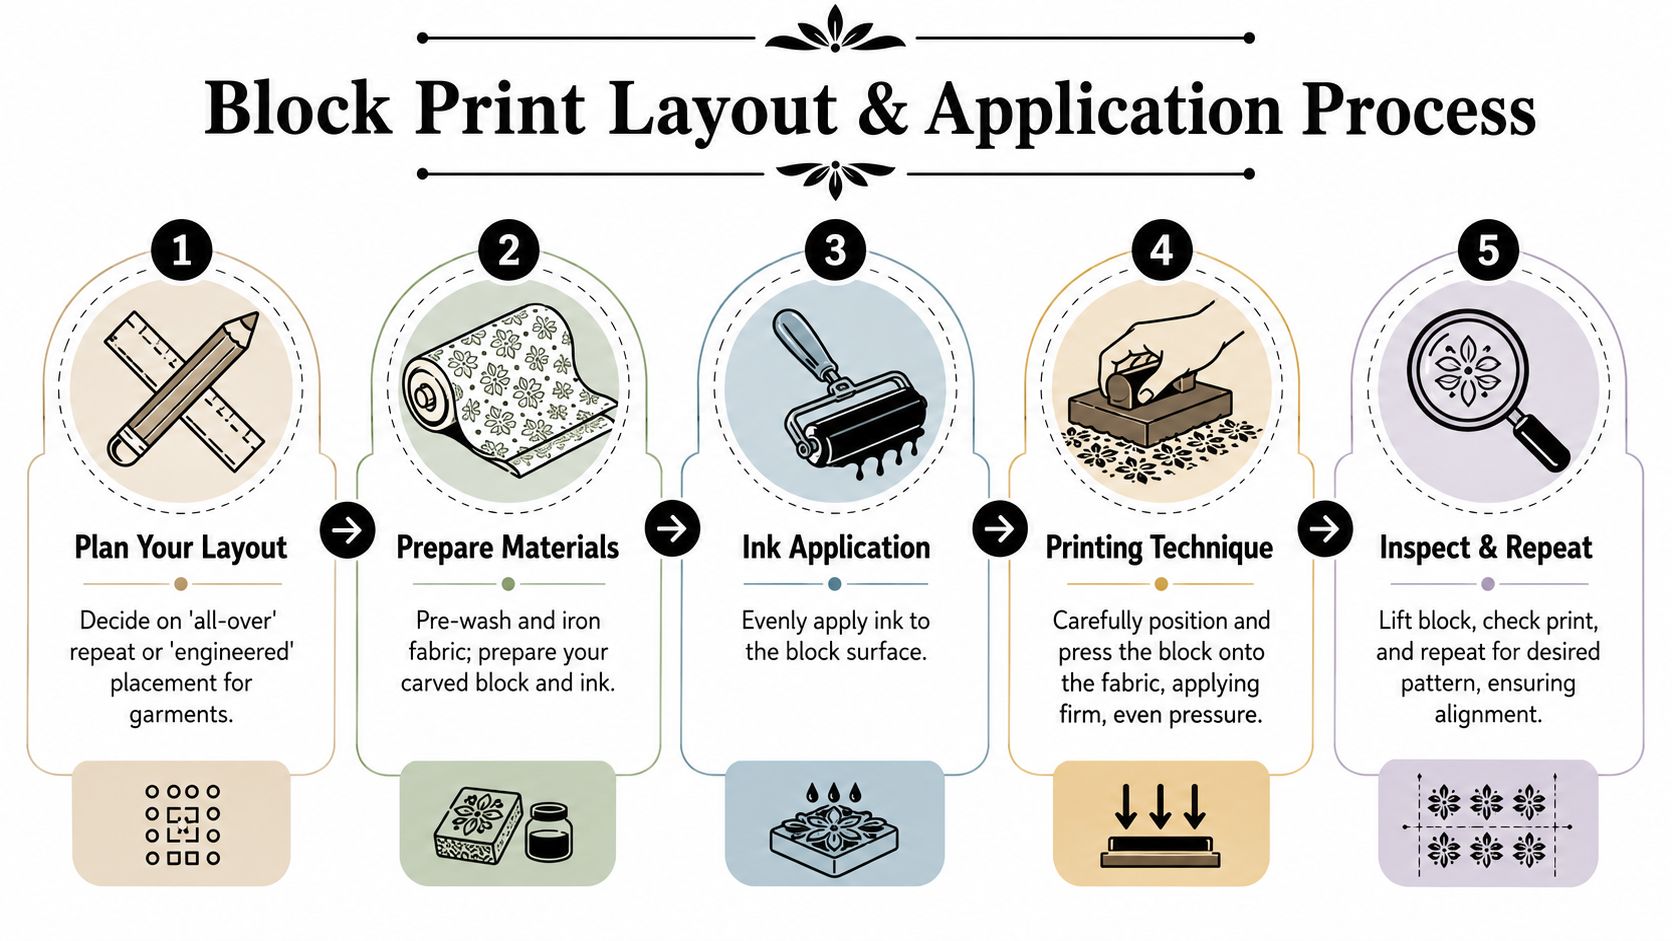
Start by deciding what kind of print you're making.
- All-over repeat suits shirt dresses, simple tops, pyjama sets, and easy skirts.
- Engineered placement works for borders, yokes, plackets, facings, and hem panels.
- Single motifs are ideal if you want a restrained, modern finish.
For clothing, I often prefer to print before cutting but after planning pattern placement. That gives you room to centre a motif exactly, while still respecting seam allowances and grain.
A few layout methods that help:
| Layout style | Best for | Helpful technique |
|---|---|---|
| Scattered repeat | Soft blouses, dresses | Mark a loose grid with fabric pencil |
| Tight regular repeat | Shirts, pyjamas | Use ruler marks at consistent intervals |
| Border print | Hems, cuffs, plackets | Draw one long guide line parallel to selvedge |
| Panel motif | Bodice fronts, pockets | Cut paper pattern first and mark placement area |
Printing for sharp edges
Most crisp prints come from using less ink than beginners expect, then applying better pressure than beginners expect.
Try this sequence:
- Roll out a thin, even layer of ink with the brayer.
- Ink the block until the surface is covered but not clogged.
- Lower the block straight down.
- Press evenly across the whole surface.
- Pay extra attention to the outer edges.
- Lift vertically or in a controlled peel.
If the print has a light patch, don't try to stamp the block into exactly the same spot again. Small missed areas are usually better corrected with careful stippling.
A simple two-colour approach
Multi-colour printing is manageable if you keep the design uncomplicated. Start with blocks or shapes that tolerate tiny variations, such as petals, leaves, dots, or geometric overlays.
Good habits for layered colour:
- Print the lighter colour first if your materials call for layered transparency.
- Let each layer dry properly before adding the next.
- Choose designs with forgiving registration. A halo or slight offset can look intentional in a floral design.
- Keep one colour dominant and use the second as an accent.
For sewists who also want to compare block printing with other garment surface options, this custom shirt printing guide gives useful context on how different printing methods suit different apparel goals.
A practical demonstration helps if you want to watch hand placement and pressure in motion:
How to Cure and Care for Your Printed Fabric
A print that looks beautiful on the table can still fail in the wardrobe. This is the stage many sewists rush, then regret. If the print isn't properly cured and sensibly washed, the first laundry day may do more damage than the sewing machine ever could.
The main pitfalls are over-wetting and direct sunlight drying. Recommended aftercare is a cold machine wash with mild detergent and line drying to preserve colourfastness, according to this guide to block-printed textile care and aftercare.
Curing before you sew
Always follow the instructions for the specific product you're using, because curing methods vary. Some printed textiles are washed and cured after printing, and some processes may include steaming before final washing so the design fully develops and residual binder is removed. For the home dressmaker, the key point is simple: don't sew first and ask questions later.
A safe routine is:
- Let the print dry fully before handling it much.
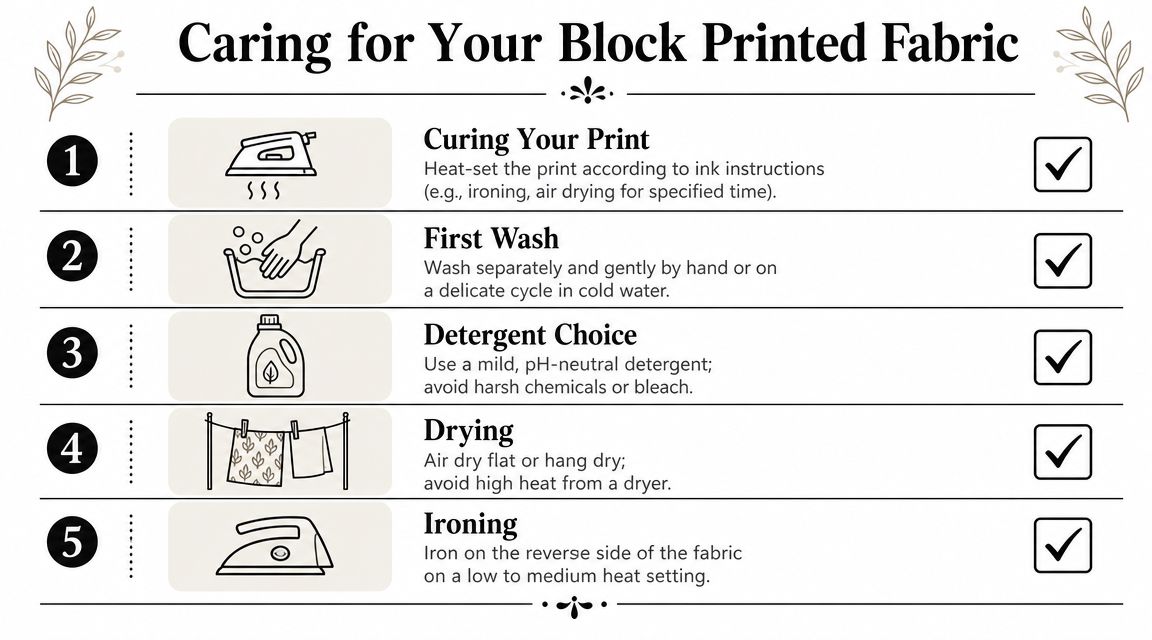
- Cure it as directed by the ink or paint manufacturer.
- Heat-set if appropriate for your product and fabric.
- Test wash a swatch if washability matters, which it should for clothing.
The print isn't finished when it looks dry. It's finished when it has survived the care routine you plan to use.
Washing without undoing your work
Once the fabric is cured and sewn, treat it like a handmade textile, not an ordinary shop-bought print.
Good care habits include:
- Cold washing rather than hot.
- Mild detergent instead of harsh products.
- Line drying rather than blasting it in strong heat.
- No soaking, especially for newly printed garments.
- Separate colours if you're concerned about transfer.
If you ever need help decoding garment care symbols before you decide how to wash a finished piece, this SouthShore Fine Linens wash tag guide is a useful reference.
What changes over time
Even well-made hand prints can soften with wear. That isn't always a flaw. On many garments, a slight mellowing makes the print look more integrated with the fabric.
The point is to expect graceful wear, not absolute permanence. If your goal is a hand-printed garment that still looks good after repeated real-life use, careful curing and gentle routine care matter more than any single trick product.
Project Ideas and Troubleshooting Common Issues
Once you've printed a few test pieces, the most useful projects are the ones that take advantage of garment placement. A block print doesn't need to cover every inch of cloth to look deliberate. In fact, some of the strongest dressmaking results come from restraint.
A few ideas that suit home sewing particularly well:
- A cuff and collar print on a plain cotton or linen shirt.
- A hem border on a gathered skirt.
- Pocket and yoke motifs on workwear-style garments.
- An all-over small repeat on lightweight summer pyjamas.
- A single chest or back motif on a simple top.
- Printed facing details that only show when the garment moves.
A key concern for garment makers is long-term durability and wash fastness, because many beginner guides focus on the printing moment rather than what happens after repeated laundering in real home-sewing conditions, as discussed in this sewing-focused look at creating block-printed textiles.
When the print comes out blurry
Blurry prints usually come from one of three problems: too much ink, too much movement, or uneven pressure.
Check these first:
- Too much ink often floods the carved detail.
- Sliding the block smears edges immediately.
- Loose fabric lets the surface shift under your hands.
- Over-soft padding can make the motif spread.
The fix is usually simple. Roll out less ink, smooth the fabric more carefully, and lower the block in one controlled motion.
When the print looks patchy or pale
This is the opposite problem. The block hasn't transferred enough ink, or parts of it didn't make contact.
Common causes include:
| Problem | Likely cause | Better approach |
|---|---|---|
| Light overall print | Not enough ink on block | Build a thin but complete layer with the brayer |
| Missing corners | Pressure dropped at edges | Press edges deliberately, more than once |
| One repeated weak spot | Block not inked evenly | Roll in more than one direction |
| Interrupted print near seams | Uneven surface | Move the motif away from seam bulk |
Small gaps are often best fixed with a stiff brush and stippling. Reprinting in the same spot usually creates a double image.
When fine fabrics bleed or feather
This tends to show up on drapey viscose or any cloth with a surface that takes ink quickly.
Try these adjustments:
- Use less ink than you think you need.
- Choose bolder motifs instead of very delicate linework.
- Do extra swatch tests on the actual fabric, not a substitute.
- Print before cutting, when the cloth is easier to stabilise flat.
- Avoid heavily handled areas until the print is dry and cured.
If a fabric wants a softer, slightly broken mark, let it have that character. Fighting every fibre usually makes the print look worse, not better.
Projects that build skill fast
If you want practice that translates directly into wearable sewing, start in this order:
- Border print on linen or cotton for a skirt hem
- Small repeat on cotton lawn for a pyjama top
- Single-placement motif on a shirt pocket or back yoke
- Scattered print on viscose once your pressure is consistent
- Two-colour layered print on a stable woven
That sequence teaches control before complexity. By the time you move onto slippery dress fabrics, you'll already know how your hands handle ink, alignment, and pressure.
If you're ready to turn these ideas into an actual garment, More Sewing is a useful place to browse dressmaking fabrics, haberdashery, and sewing supplies for testing prints on cottons, viscose and Tencel blends, linen, and other wearable fabrics.