Guides
How to Sew Zips: A Beginner’s Guide to Perfect Finishes
You've cut the fabric, matched the thread, and you're feeling quite pleased with yourself. Then the pattern says “insert zip”, and suddenly the project goes quiet on the table for a day or two.
That's normal. A lot of sewists are happy with seams, hems and facings, then freeze at the zip. The good news is that zips aren't magic, and they're not a test of talent. They're a sequence. Once you learn that sequence, how to sew zips stops feeling like guesswork and starts feeling like one of the most useful skills in dressmaking.
The trick is choosing the right method for the job. A centred zip suits a cushion cover or a simple skirt. An invisible zip gives a dress a clean, uninterrupted line. A lapped zip is ideal when you want coverage and strength, especially in skirts, trousers and structured projects. Each has its place, and each behaves better when you stop fighting the fabric and prepare properly.
Conquering Your Fear of Zippers
Most zip disasters happen before the first proper stitch goes in. The fabric hasn't been stabilised, the opening hasn't been marked clearly, or the zip type doesn't suit the project. What looks like “I'm bad at zips” is usually just a preparation problem.
That's why I like to treat zip insertion as a workshop skill rather than a mysterious sewing milestone. Reputable sewing guidance teaches centred, lapped and invisible zips as distinct methods, which tells you something useful straight away. These aren't improvised tricks. They're established techniques with a repeatable order of work. Threads Magazine also notes that an invisible zip should be pressed flat with a cool iron before insertion, and that seams are sewn with a zipper foot so the needle can get very close to the coils, which is part of what makes the finish controlled and consistent in practice (Threads zipper methods).
Start with the result you want
If you think in terms of the finished project, the method becomes easier to choose.
- For a neat, visible closure use a centred zip. Good for cushion backs, simple skirts, pouches and children's clothes.
- For a hidden fastening use an invisible zip. Best for dresses, occasionwear, blouses and fitted skirts.
- For a stronger covered finish use a lapped zip. Ideal for structured skirts, trousers and vintage-style garments.
Practical rule: Don't ask “Which zip technique should I learn first?” Ask “What do I want this project to look like when it's finished?”
Confidence comes from repetition, not bravery
Your first zip may not be your prettiest. That's fine. I'd much rather see a slightly wonky zip in the right place than a perfect-looking one that strains, ripples or jams because it was forced into the wrong fabric or opening.
A zip is there to do a job. Once you understand what each style is meant to do, the sewing becomes much less intimidating.
Your Zipper Toolkit and Essential Prep Work
A good zip starts before the machine is switched on. If your tools are wrong, your markings are vague, or your seam allowances haven't been pressed, the job gets harder than it needs to be.
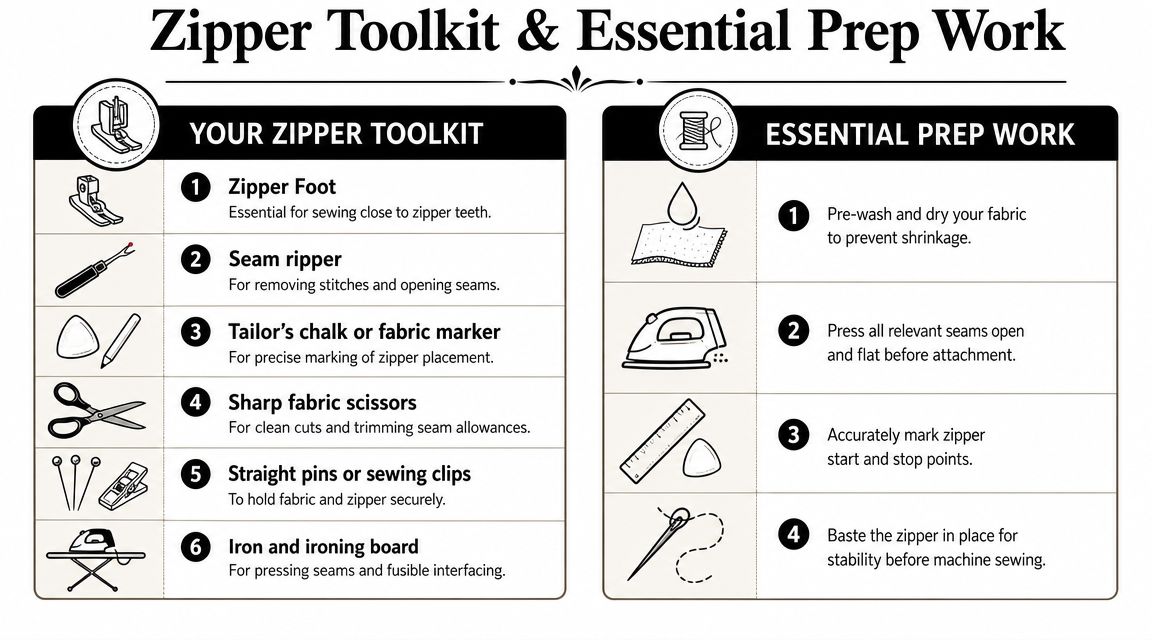
The tools that genuinely help
You don't need a huge collection of gadgets, but a few things make a real difference.
- Zipper foot. This is the one I wouldn't skip. It lets the needle sew close to the teeth or coils without the foot bumping into them.
- Seam ripper. Not because you're bound to fail, but because zips often improve when you're willing to unpick a short section neatly.
- Tailor's chalk or fabric marker. Mark top and bottom points clearly so both sides finish level.
- Pins or clips. Useful for holding tape and seam allowances in place before basting.
- Iron and board. Pressing isn't optional with zips. It helps the seam allowances sit flat and keeps the whole area under control.
- A hand needle and thread for basting. Machine basting is excellent, but hand basting is still handy when fabrics shift.
Precision matters more than speed
A foundational benchmark in dressmaking is the 5/8-inch seam allowance, and it matters because zip insertion works best when the seam line and opening are measured, not guessed. Guidance also gives a practical example: a 7-inch zipper is typically installed into an 8-inch opening, leaving room for top and bottom finishes (zip opening and seam allowance guidance).
That sounds simple, but it saves a lot of frustration. If the opening is too short, the zip strains. If it's too long, the finish looks loose and untidy.
Measure the opening on the seam line, not at the raw edge. That one habit clears up a surprising number of fitting and alignment problems.
Choosing the right zipper for your project
Beginners often make life difficult for themselves by choosing based on colour alone. The better question is how the project will be used.
| Zipper Type | Best For | Appearance | Recommended Fabrics |
|---|---|---|---|
| Centred zip | Cushion covers, simple skirts, pouches, tote pockets | Visible and symmetrical | Cotton, canvas, linen, stable wovens |
| Invisible zip | Dresses, formal skirts, blouses | Hidden in the seam | Viscose, Tencel, fine cotton, lightweight dress fabrics |
| Lapped zip | Tailored skirts, trousers, vintage garments | One side overlaps and hides the zip | Denim, twill, suiting, medium-weight woven fabrics |
| Standard coil zip for shaped projects | Bags, accessories, some curved applications | Functional, flexible | Bag fabrics, mixed weights, projects with corners or curves |
Prep work that prevents most problems
Before I sew any zip, I run through the same small checklist.
- Press the seam allowances so the area lies flat.
- Mark the start and stop points instead of eyeballing them.
- Check the zip length against the planned opening.
- Stabilise if needed, especially on drapey or stretchy fabric.
- Baste before final stitching when accuracy matters.
There's also one area that many basic tutorials don't cover enough, and that's non-standard shapes. Straight seams are one thing. Corners, curves and cut-to-length applications are another. That gap matters because lots of home sewing projects are bags, pouches and shaped accessories rather than simple dress back seams, and makers often need separate demonstrations just to tackle 90-degree turns and curved zipper work (zipper corners and curves as an underserved topic).
If you're making a boxed pouch, for example, a flexible coil zip is usually easier to manage than a stiff zip that wants to stay straight.
How to Sew a Classic Centred Zipper
The centred zip is the one I reach for when I want something sturdy, tidy and forgiving. It works beautifully on a cushion back, a simple A-line skirt, a craft pouch, or the back seam of a straightforward dress in stable woven fabric.
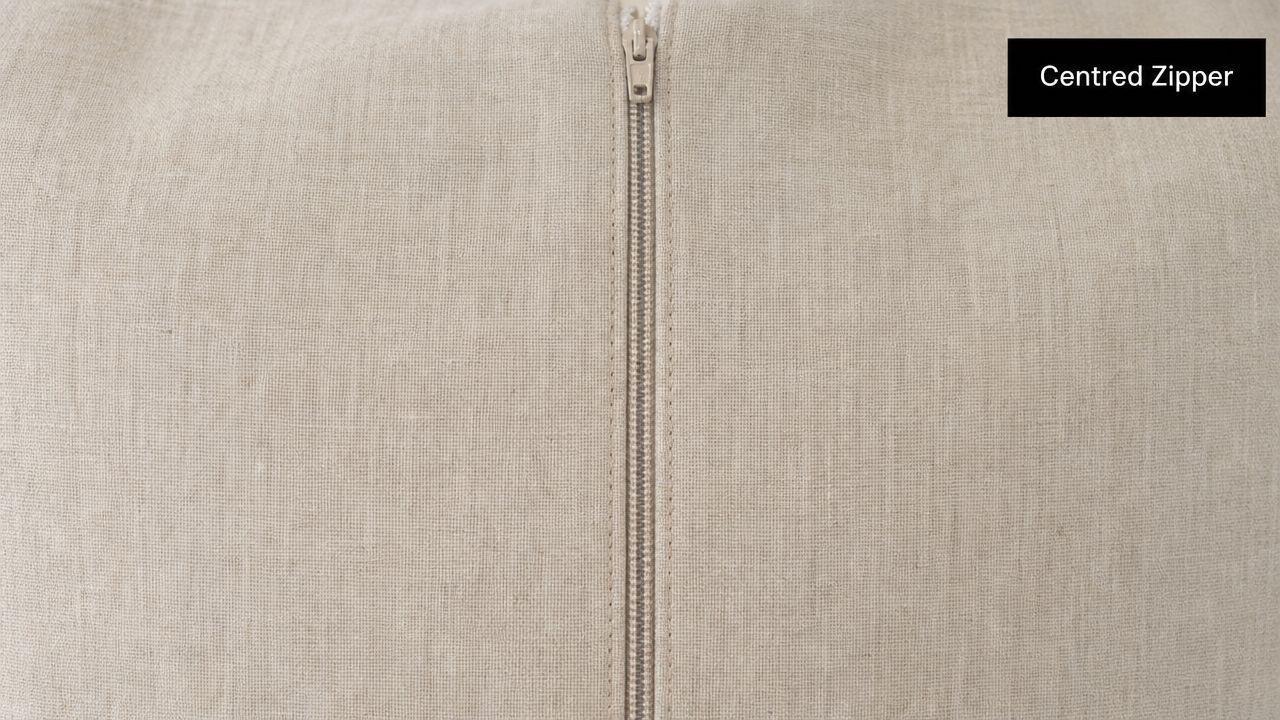
Why this method works
A centred zip sits evenly on both sides of the seam. The reason beginners often get better results with it is that the basted seam gives you a guide first, and the topstitching goes in after the zip is positioned.
For a cushion cover, that means a closure that can cope with regular use. For a cotton skirt, it gives a clean back opening without demanding the precision of an invisible zip.
A reliable order of work
A practical method for a centred zip is to baste first with a long stitch of about 4–5 mm, then use a zipper foot to sew each tape from top to bottom with the zip face down on the seam allowance. Keeping the needle the same distance from the teeth on both sides is what gives the finished zip a symmetrical look (centred zipper method and stitch length).
I'd sew it like this:
- Stitch the seam below the zip opening as normal.
- Baste the zip opening closed with that long stitch.
- Press the seam open well.
- Place the zip face down over the seam allowances.
- Check the top sits level and the zip isn't twisted.
- Stitch one side from top to bottom.
- Stitch the second side from top to bottom.
- Remove the basting so the zip opens cleanly.
Small details that improve the finish
Three little habits help a lot here.
- Leave the slider partway down before you begin so the top area is easier to align.
- Hand baste first if the fabric shifts. Linen, brushed cotton and some loose weaves behave much better when anchored by hand.
- Test the zip before the final topstitching is complete. If it's pulling or twisting, fix it then.
If one side looks better than the other, check your needle position before blaming your sewing. Uneven spacing from the teeth is usually the culprit.
Best project uses
A centred zip is often the sensible choice when the zip doesn't need to disappear.
For example, on a removable cushion cover, I'd rather have a centred zip that opens smoothly and survives repeated washing than an invisible zip under strain. On a beginner skirt in cotton poplin or light denim, the same logic applies. It's easier to fit, easier to press, and easier to repair if needed.
Sewing a Flawless Invisible Zip
An invisible zip gives that lovely clean dressmaker's finish where the fastening almost disappears into the seam. It's ideal when you want the fabric to be the star, not the closure.
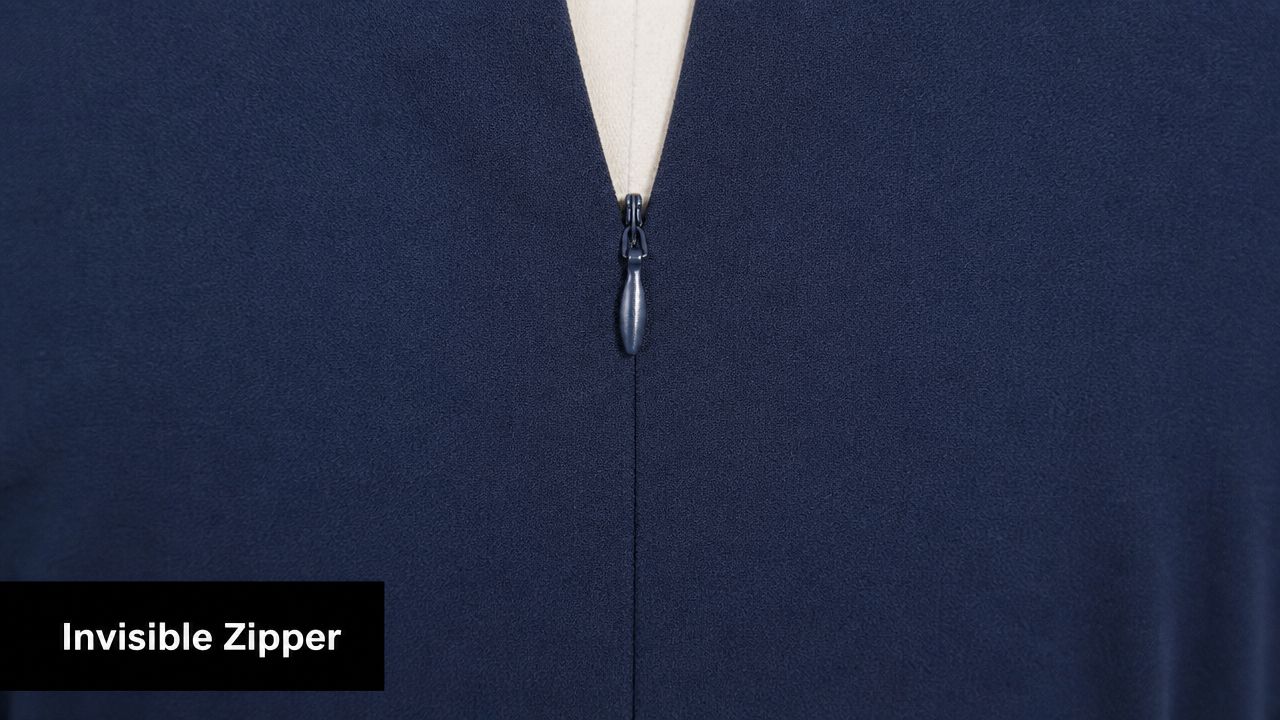
This is the zip I'd choose for a viscose dress, a Tencel skirt, a bridesmaid dress, or a blouse where a visible topstitched zip would interrupt the line of the garment. It looks refined, but it's less forgiving than a centred zip, so the setup matters more.
What makes invisible zips different
You don't sew an invisible zip the same way as a centred one. The zip goes in while open, and you need to get very close to the coils. That's why an invisible zip foot is so useful. It helps roll the coils open so the stitching sits close enough for the zip to vanish into the seam.
Before sewing, press the coils gently with a cool iron so they open out slightly. Don't scorch them, and don't flatten them aggressively. You're only easing them enough to reach the stitch line more accurately.
The fabric matters here
Invisible zips are lovely in lightweight woven fabrics, but they can misbehave in soft, drapey cloth if you rush. Viscose challis, cupro, fine lawn and lightweight crepe all need calm handling. Let the fabric rest on the table, support the weight, and avoid dragging the garment while stitching.
If you want another practical walkthrough on achieving a professional zipper finish, that guide is a helpful companion, especially if you're trying to improve the look of the seam where the zip ends and the regular seam begins.
A dressmaker's sequence
I use this sequence when I want the seam to look uninterrupted:
- Mark the seam allowance clearly so both sides start at the same level.
- Open the zip fully before positioning it.
- Sew one side first, keeping the fabric smooth but not stretched.
- Close the zip briefly to check alignment at the waistband or seam joins if your project has them.
- Sew the second side only once you're happy the top edges match.
- Sew the seam below the zip as close as you can to the last zipper stitches.
That last part is where a lot of invisible zips go wrong. If there's a gap between the zipper stitching and the lower seam, you get a bubble or a little bump right under the fastening.
Here's a useful visual refresher if you prefer to see the handling in motion:
When not to use one
Invisible zips aren't always the best answer. I wouldn't choose one for a hard-wearing cushion, a chunky denim skirt, or any project where the seam carries lots of stress and abrasion. They can look beautiful, but they're not the most durable option in every context.
That's the bigger lesson with how to sew zips. The smartest method is the one that suits the project, not the one that looks most advanced.
Creating a Professional Lapped Zipper
The lapped zip is classic tailoring territory. One side of the fabric overlaps the other and hides the zip underneath, which gives a clean finish with a bit more protection than a centred zip.
If I'm making a skirt in suiting, a pair of trousers, or working from a vintage pattern, this is often the method I trust most. It looks deliberate and copes well with garments that need a stronger closure.
Why a lapped zip earns its place
A lapped zip is especially useful when the zip area gets more wear. The overlap shields the teeth, and the topstitching helps hold the shape of the opening. On skirts and trousers, that gives a more refined appearance than a visible centred zip.
It's also the foundation for the zipper fly. Once you understand the lap and underlap, the fly front stops looking complicated and starts looking like a variation of the same logic.
The key is the fold, not speed
With a lapped zip, one side becomes the underlap and the other becomes the visible lap. If that fold isn't crisp, the whole thing can look soft and homemade in the wrong way.
A practical way to approach it is:
- Sew and prepare the opening according to the pattern.
- Press one side so it forms the underlap.
- Position and stitch the zip to that side first.
- Fold the overlap into place and baste it carefully.
- Topstitch from the right side in a straight, even line.
This is one of those methods where pressing between stages matters as much as the stitching itself.
A lapped zip should look calm. If the overlap is fighting to spring open, the fold hasn't been established properly or the fabric needs more control.
Applying the same idea to a fly front
For a zipper fly, sequence matters. Tailoring guidance recommends attaching the fly guard and facing with edgestitching, then stitching the zipper to the fly facing and reinforcing the stress point at the base of the J-shaped topstitch with a bartack or several backstitches to prevent failure (zipper fly construction and reinforcement).
That reinforcement is important because the base of the fly takes strain every time the garment is worn. Skip it, and the neatest topstitching in the world won't save the zip from working loose.
Good uses for this method
Think of the lapped zip as the practical, polished choice.
- Fitted skirt. Excellent when you want a clean side or back fastening.
- Trousers or shorts. The natural home of the zip fly.
- Vintage dressmaking. Many older patterns were drafted with this method in mind.
- Medium-weight fabrics. Twill, denim, suiting and firm linen all respond well.
For a delicate viscose dress, I'd still lean invisible. For jeans, trousers or a sturdy skirt, I'd choose lapped every time.
Solving Common Zipper Problems
Even experienced sewists get the occasional awkward zip. The difference is that you stop panicking and start diagnosing. Most problems have a cause you can spot once you know what to look for.
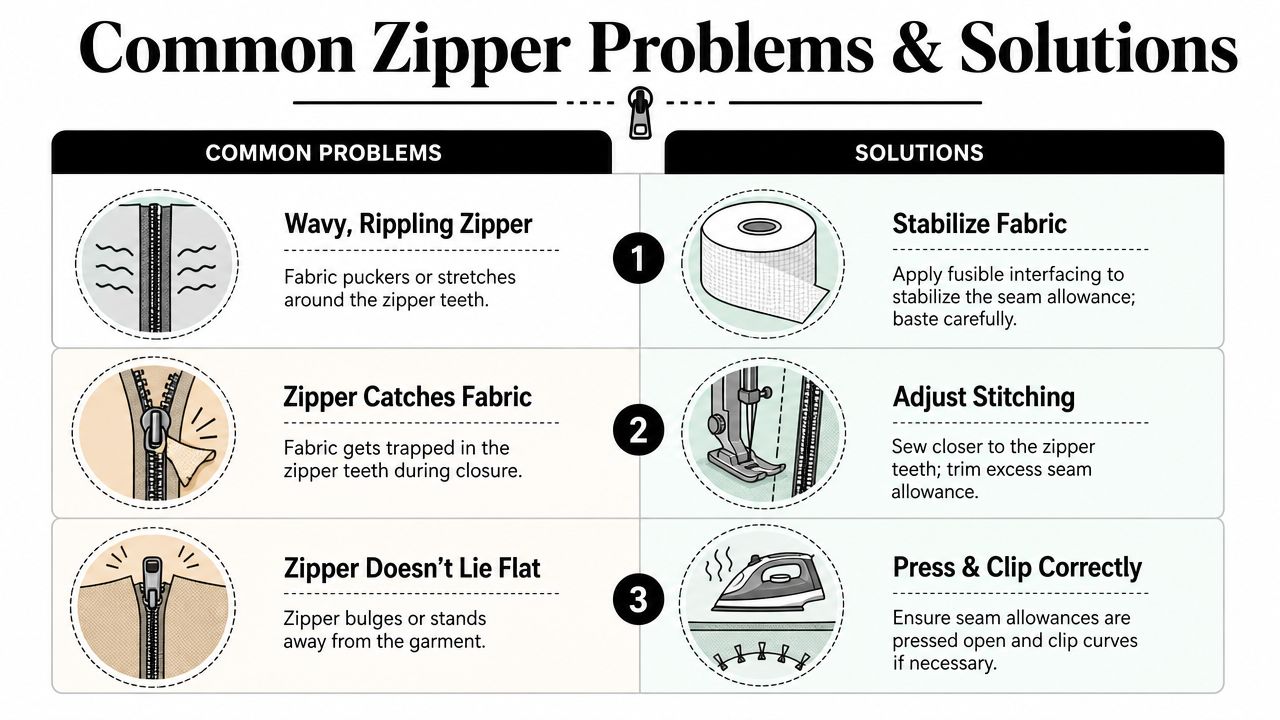
The wavy zipper problem
This is the complaint I hear most often with jersey, viscose blends and other unstable fabrics. The zip tape stays stable while the fabric stretches under the needle, and the result is that dreaded ripple.
A better fix is stabilisation before sewing. Guidance for invisible zips on stretch fabrics points to lightweight fusible stay tape along the seam allowance as a much better solution than trying to control the stretch by hand alone (stabilising stretch fabric for zip insertion).
If you're sewing a zip into jersey, I'd also add these habits:
- Press, don't drag the seam allowance before insertion.
- Baste first so the tape and fabric act as one layer.
- Sew slowly and let the feed dogs do the work.
The zip won't lie flat
This often shows up on curved seams, bulky fabrics, or projects where the seam allowances weren't pressed open properly.
Try this:
- Check the pressing first. A half-pressed seam almost always looks worse after topstitching.
- Trim bulk if the fabric allows it. Thick seam allowances can push the zip outward.
- Clip where needed on curves. Not into the stitching, just enough to release tension.
A pouch with a corner or a shaped opening often needs a different approach from a straight skirt seam. Sometimes the issue isn't your sewing at all. It's that the zip type is too stiff for the shape.
The bottom of the zip bulges
That little bubble under the zip is common on dresses and skirts. Usually, the seam below the fastening didn't start close enough to the zipper stitching, or the two sides weren't aligned before sewing.
When this happens, I don't always unpick the whole thing. I check whether the problem sits only in the bottom inch or so. If it does, a careful partial redo is often enough.
If the zip closes but the seam below it bumps outward, look at the join between zipper stitching and regular seam stitching first.
The slider catches fabric
This is especially common with lining, loose seam allowances or fluffy fabrics.
A few practical fixes help:
- Trim away excess seam allowance near the teeth if it's crowding the slider.
- Sew close enough to the teeth that the fabric can't roll into the opening.
- Keep the area tidy inside the garment. Loose threads and fraying edges love to get caught.
Tricky fabrics need a calmer approach
Velvet, chiffon, sequins, unstable viscose and stretch jersey all need extra patience. In those fabrics, I'm much more likely to hand baste, test the zip before final stitching, and press in short stages rather than all at once.
There's also a genuine gap in many tutorials for stretch and delicate fabrics. Sewists often get told to “go slowly”, but what they really need is advice on when to stabilise, when to change the zip type, and when a classic woven-fabric method just isn't the right one for the job.
If you're ready to practise how to sew zips with the right tools, suitable fabrics and reliable haberdashery, More Sewing is a solid place to start. You'll find dressmaking fabrics, zips, sewing notions and practical supplies for everything from a first skirt to a well-finished cushion cover, plus support from a real UK sewing shop that understands how these projects come together in everyday sewing.