Guides
Buttons with Shank: Choose & Sew Perfectly
You’ve chosen a beautiful fabric, cut the garment carefully, sewn a neat buttonhole, and then the button ruins the finish. It pulls the front edge out of shape, sits too tight against the cloth, or makes a heavy coat look homemade. That’s usually not a sewing problem. It’s a button choice problem.
Buttons with shank solve that issue better than many home sewists realise. They’re one of those small details that change how a garment hangs, closes, and wears over time. If you sew coats, jackets, dresses, blouses, bags, or upcycled denim, knowing when to use a shank button makes your work look more polished and last longer.
We help customers with this choice all the time. The same question comes up in different forms. Why does this coat button gape? Why does this denim repair keep failing? Why does this drapey fabric look dragged down by the fastening? The answer often comes back to the anatomy of the button, the height of the shank, and the way it’s attached.
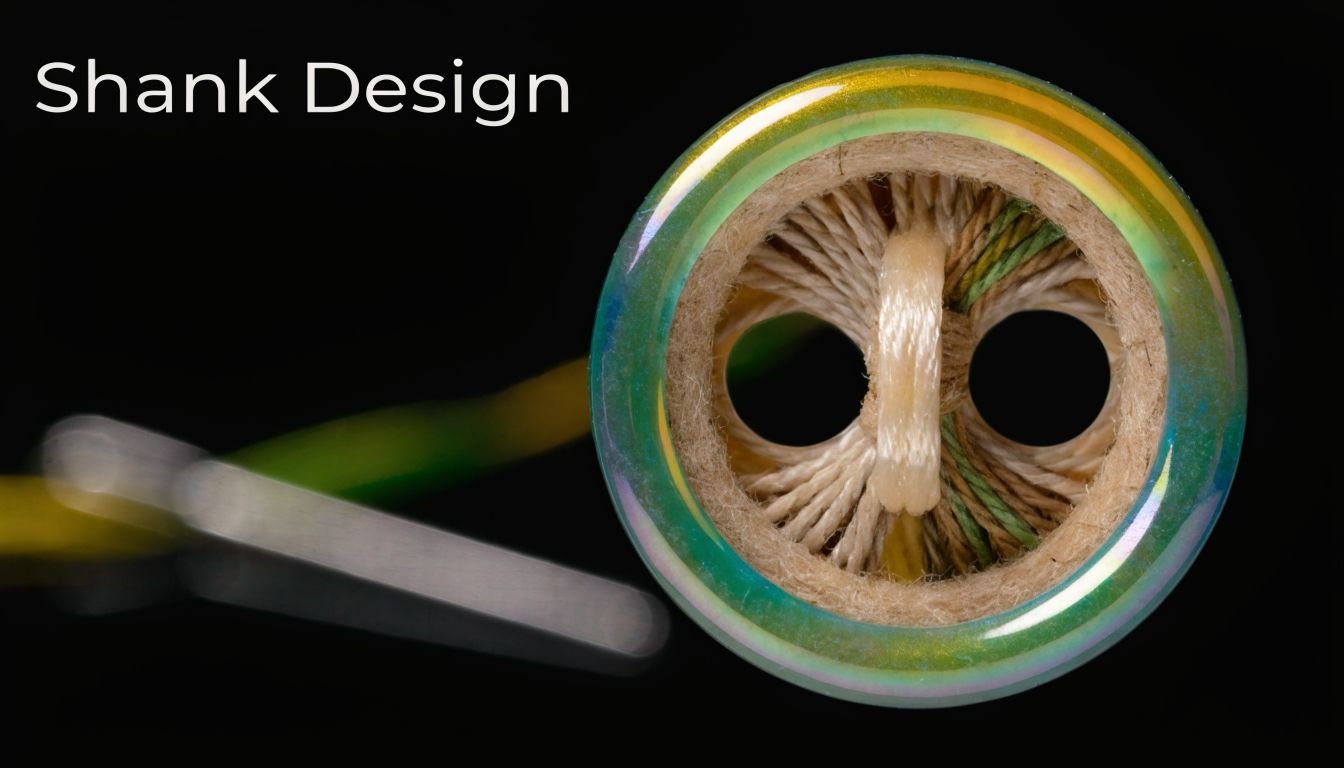
Understanding the Shank Button Anatomy
A shank button is built differently from a standard sew-through button, and that difference shows up the moment you fasten a garment. The front is the visible face. The back has a raised loop or moulded attachment point where the thread secures the button.
That small raised section changes how the closure behaves.
Instead of sitting hard against the cloth, the button stands slightly away from it. On a heavy wool coating, a quilted layer, or a doubled waistband from an upcycled jeans project, that extra room lets the fabric settle where it should. The buttonhole can wrap around the button without forcing the garment edge to strain.
Why the gap matters
The useful part of a shank is the clearance it creates between the button face and the fabric. That gap gives the overlap somewhere to sit.
We see this constantly in the shop. A customer chooses a beautiful statement button for a coat in thick wool, then finds the front edge buckles because the button sits too tight. The same problem shows up in softer fabrics too, just in a different way. On Tencel, viscose blends, or lighter deadstock dress fabrics, a button that pulls too closely can leave the placket looking pinched instead of fluid.
A shank helps in both cases. It gives bulky fabric breathing room, and it stops drapey fabric from being dragged into a tight, awkward fold.
Practical rule: If the garment has thickness, loft, or layered construction, the button needs built-in space above the cloth.
How shank buttons differ from flat buttons
With a flat two-hole or four-hole button, the sewist usually creates space by wrapping a thread shank under the button while attaching it. That works well if the sewing is neat and the shank height matches the fabric thickness. A true shank button has that spacing built into the button itself, so the result is more consistent.
That built-in structure is useful for a few reasons:
- The front looks cleaner. There are no visible sewing holes on the face.
- Bulky fabrics fasten more comfortably. The buttonhole has room to sit around the button.
- Curved or shaped areas behave better. Coat fronts, collars, cuffs, and waistbands often lie flatter.
- Decorative buttons are easier to use well. Domed metal, covered buttons, jewel styles, and vintage deadstock pieces usually look better with the attachment hidden underneath.
For UK home sewists, that matters most on real projects rather than in theory. A heavy melton coat, a denim waistband repair, a pinafore in sturdy deadstock twill, and a blouse in drapey Tencel do not need the same button depth. Shank buttons give you a head start because the button is already designed to sit off the fabric.
A short historical note that still matters
Older tailoring traditions used raised button constructions for the same reason sewists still choose them now. Thick cloth needs room at the fastening point, and hard-wearing garments put more stress on the attachment. British tailoring solved that problem long before modern home sewing patterns did.
The principle has not changed. If the fabric is weighty, layered, or likely to see regular strain, a button with built-in stand-off usually gives a better finish and longer wear.
A Guide to Different Shank Button Types
Shank buttons do different jobs, and choosing by looks alone is where many home sewists go wrong. In the shop, we often see a lovely button picked first and the fabric considered second. That works sometimes. It fails quickly on a heavy wool coat, a pair of upcycled jeans, or a slippery Tencel blouse.
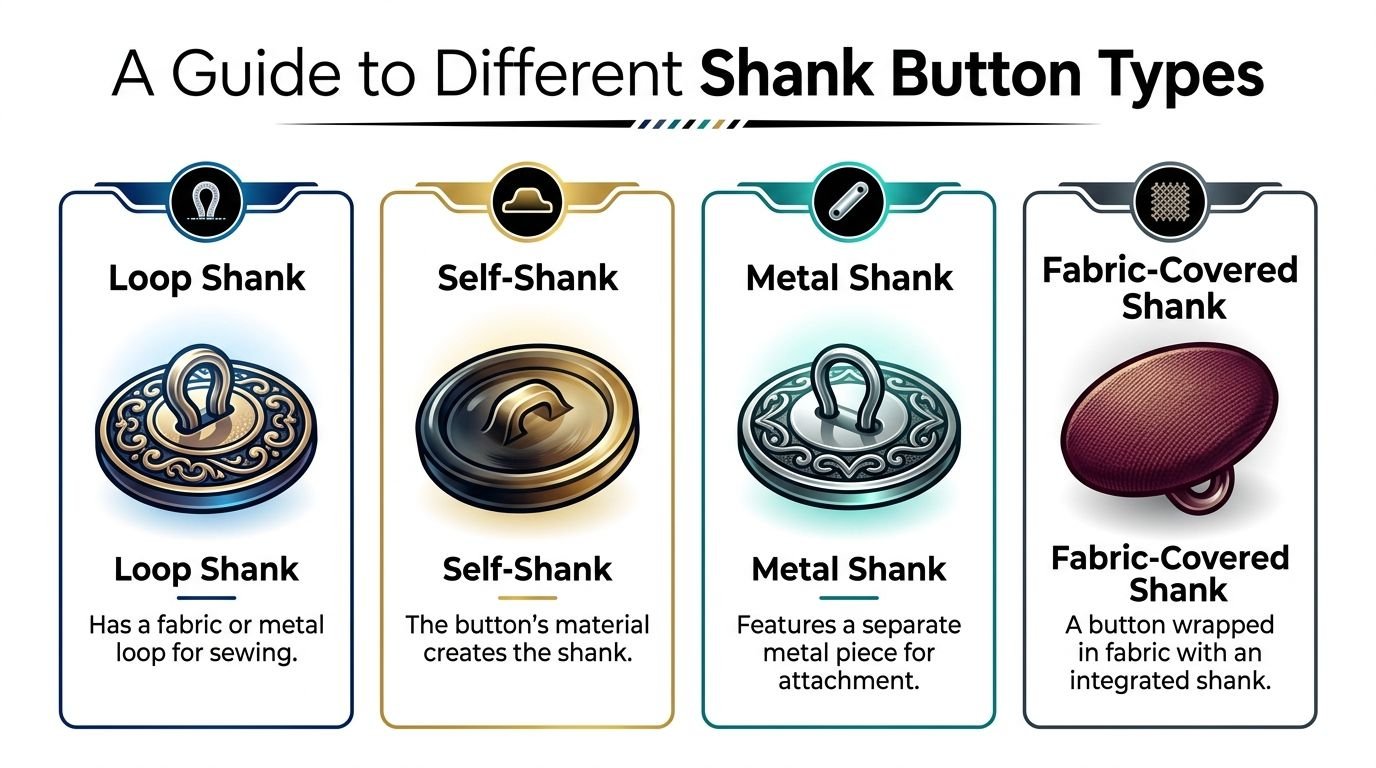
The most common types at a glance
| Type | What it looks like | Best use | Watch out for |
|---|---|---|---|
| Metal shank | Metal face or metal-backed button with loop | Coats, jackets, denim details, bags | Can feel too heavy for fine fabrics |
| Moulded plastic shank | Lightweight, often coloured or patterned | Dresses, cardigans, children’s wear, casual sewing | Cheap versions can look dull or scratch easily |
| Fabric-covered shank | Button wrapped in matching or contrast fabric | Occasionwear, bridal, structured garments | Marks and wear show quickly on high-rub garments |
| Self-shank | The button body itself forms a raised back | Fashion garments, lighter closures, decorative use | Shape can make attachment fiddly |
| Sew-through shank style | Hybrid construction, often practical rather than decorative | Utility garments, some structured sewing applications | Less common in general home sewing stock |
Metal shanks for outerwear, denim, and hard wear
Metal shanks earn their keep on garments that get handled a lot. Coats, jacket fronts, cuffs, dungaree bibs, bag flaps, and jean repairs all put strain on the fastening. A good metal shank keeps its shape and usually looks right with thicker cloth.
We recommend them often for melton, coating wools, and heavier deadstock fabrics because the button has enough visual weight to hold its own. On an heirloom coat, that matters. On an upcycled denim project, it matters just as much, because a flimsy button can make the whole finish look temporary.
The trade-off is weight. On soft fabrics, a metal shank can drag the edge down or make a placket twist.
Moulded plastic shanks for lighter dressmaking
Moulded plastic shanks cover a wide range, from basic shirt-and-dress buttons to very polished vintage-style designs. The better ones are light, smooth, and consistent in size, which makes them useful for everyday sewing.
They are often the safer choice for Tencel, viscose, rayon blends, cotton voile, lawn, and lighter jerseys. Those fabrics move, drape, and show every pull at the fastening edge. A light button gives you the stand-off of a shank without adding too much strain.
In practice, this is one of the best all-round options for UK home dressmaking. If someone is sewing a soft blouse, tea dress, or child’s cardigan and wants colour choice without extra weight, plastic usually does the job well.
Choose plastic for low weight, good colour range, and easy wear. Choose a better finish, not the cheapest finish.
Fabric-covered shanks for dress coats and special pieces
Fabric-covered buttons are useful when you want the button to support the garment rather than compete with it. They suit bridal work, occasionwear, formal blouses, fitted bodices, and dressier coats.
We also like them for customers sewing with special deadstock, where the fabric is the reason for the project. A covered button in the same cloth can look considered and expensive, especially on jacquards, brocades, or a beautiful wool blend. On the other hand, covered buttons are rarely the best choice for garments that rub hard against bags, desks, or car seatbelts every day.
Use them where finish matters more than abrasion resistance.
Self-shank buttons for decorative depth
A self-shank button has the rise formed as part of the button body rather than added as a separate loop. These often show up in fashion buttons, domed styles, and decorative vintage pieces.
They can be excellent on lighter jackets, statement cuffs, and special closures where the face of the button is part of the design. The drawback is attachment. Some self-shank shapes are awkward to stitch securely, especially if the back opening is narrow. If you are using precious deadstock buttons, test one first on a scrap sandwich with interfacing.
That small check can save a lot of frustration.
Sew-through shank styles and older constructions
Some buttons sit between a classic sew-through and a true shank. You still find versions with raised backs or built-up centres that create a bit of lift without a full loop shank. They are practical rather than showy and can work well on utility makes.
Older canvas-based constructions are also worth knowing about, even if most home sewists will not buy them by that name. As noted earlier in the article, older British garment making used raised and flexible button setups for good reason. Thicker cloth and repeated wear demanded a button that could sit properly and still move a little in use.
That same trade-off still applies now. Rigid shanks suit some jobs better. Slightly more flexible constructions are often easier on bulkier or less uniform layers.
Matching Shank Buttons to Your Fabric
You feel the difference straight away when you test buttons against real cloth. A shank button that looks lovely in a packet can sit perfectly on a wool coat front, then look awkward and heavy on a Tencel dress. We see this in the shop all the time, especially with customers buying for one special make and trying to choose only by colour.
Match the button to the fabric first. Then check whether it still suits the style of the garment.
The four things that matter most are fabric weight, drape, surface texture, and the thickness at the fastening edge once facings, interfacing, and seam allowances are included. That last point catches people out. A fabric can feel fairly light in the hand and still become bulky once the front edge is built.
Heavy wool and coatings
Heavy wool, melton, coating, and structured outerwear need a button with enough body to sit comfortably on top of the cloth. If the button is too small or too flat to the garment, the front edge pulls and the overlap never quite settles.
For coats and jackets, these usually work well:
- Metal shank buttons for weight, strength, and a look that suits outerwear
- Large moulded shank buttons when you want the size without quite so much heft
- Covered buttons with a firm base for smarter coats and dressier finishes
We often suggest checking the button against the actual coat layers, not just the outer fabric. Heavy wool with canvas, interfacing, and a lining behaves very differently from a single layer of cloth. If you are sewing an heirloom coat from a beautiful coating or a special deadstock wool, this is the stage to slow down and test properly.
Tencel, viscose, and other soft drapey fabrics
Soft fabrics need lighter buttons. Tencel twill, viscose challis, cupro blends, and fluid deadstock dress fabrics can all distort at the front edge if the button is too heavy for the cloth.
Good options include:
- Small moulded shank buttons
- Fine self-shank buttons
- Light covered buttons for blouses, shirt dresses, and soft occasion wear
Heavy metal can still work if you want a feature button on a cuff or neckline, but for a full button front it often drags the edge out of shape. On a drapey fabric, the nicest result usually comes from a button that supports the line of the garment without announcing itself too loudly.
Denim and upcycled jeans
Denim asks for something different. The cloth itself is strong, but the fastening area is thick, stiff, and put under repeated strain. That matters on jacket fronts, overshirts, pocket tabs, bag projects, and jean upcycling.
For these makes, look for:
- Metal shank buttons with a solid feel for areas that get regular handling
- A size that suits the existing buttonhole or slit, especially in repairs and upcycling
- A smooth back and clean edges so the buttonhole fabric does not wear faster than it should
We regularly see old jeans turned into skirts, aprons, and utility bags. The common problem is not the face of the button. It is choosing a shank and size that fight the opening that is already there. If you are reusing a buttonhole, measure first and test before committing.
Jersey, lighter wovens, and awkward in-between fabrics
Stretch and unstable fabrics need a bit more caution. A heavy shank button on jersey can make the edge dip, twist, or grow with wear unless the area is stabilised well. On lighter cottons and linen blends, the issue is usually less dramatic, but the wrong button can still cause rippling.
Use a lighter shank button and make sure the button area is supported. On knit cardigans, ponte jackets, and soft overshirts, the best choice is often the one that feels slightly lighter than your first instinct.
How to judge shank height in practice
The easiest check is hands-on. Build a small stack that matches the fastening edge as it will really be worn. Include the outer fabric, facing, interfacing, and lining if the garment has one.
Then test the button against that stack:
- Place the button at the edge of the layers
- Check whether the shank gives the top layer enough room to sit under the button without strain
- Pass the button through the finished buttonhole or a sample slit
- Watch the fabric, not just the button. If the edge tents, twists, or puckers, the shank is too short, the button is too heavy, or both
As noted earlier, larger shank buttons usually have a bit more clearance built in. That extra space is what helps thicker fabrics sit properly under the button instead of fighting it.
A simple pairing guide
| Fabric | Usually works well | Usually works poorly |
|---|---|---|
| Heavy wool | Metal shank, substantial covered button | Small light plastic shank |
| Tencel and viscose | Lightweight moulded or self-shank | Heavy ornate metal |
| Denim | Firm metal shank | Delicate covered button |
| Jersey | Light shank with a stabilised support area | Heavy button on a stretchy edge |
| Deadstock fashion fabrics | Chosen after testing drape and thickness | Buttons picked on appearance alone |
If you are unsure, test the button on a scrap using the exact layers from your project. We do this constantly in the shop, and it prevents most of the problems people blame on the button itself. Often the issue is that the fabric, the button weight, and the shank height were never matched as a set.
Perfecting Your Shank Button Attachment
A good button can still fail if it’s attached badly. Most loose buttons aren’t caused by poor thread alone. They happen because the stitches are too tight, the shank isn’t stabilised, or the knotting is rushed.
Hand sewing gives the neatest control for most home dressmakers, especially on coats and special garments.
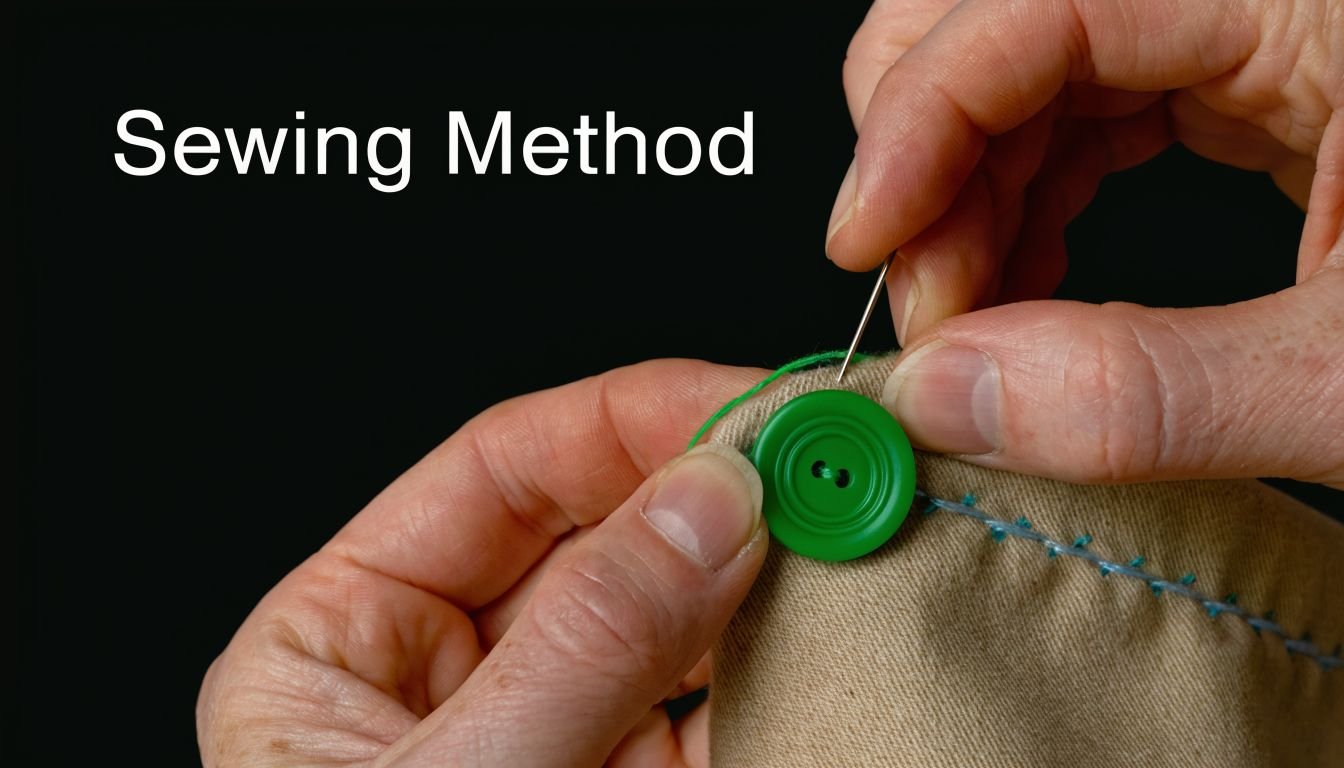
The hand-sewn method that holds best
For a true shank button, you aren’t creating the shank itself. You’re securing the loop on the back and often building a neat thread neck under it so the button sits firmly without wobbling.
Use a strong polyester thread, and for heavier garments double it. A sharp hand needle helps on dense fabrics, while a shorter needle can feel easier to control if you’re making many small stitches.
Step by step
Mark the exact position
Use chalk, a removable pen, or a pin. Check alignment with the buttonhole before you sew.Anchor your thread well
Start on the wrong side. Make a few tiny stitches in place if the fabric is loosely woven.Bring the needle through the shank loop
Pass through the fabric and the loop repeatedly, keeping the stitches snug but not strangled.Leave a little lift
Don’t haul the button flat against the garment. It needs a touch of movement.Build a thread neck if needed
Slide the needle under the stitched area beneath the button and wrap the thread around those stitches several times. This creates a tidy support and reduces wobble.Finish on the wrong side
Knot securely, then run the thread a short distance through the fabric before trimming.
What works and what doesn’t
A spacer can help. A cocktail stick, matchstick, or tapestry needle laid under the button while you make the first stitches keeps the tension even. Remove it before wrapping the thread neck.
What doesn’t work is rushing the first passes. If those stitches are uneven, the button will lean. If they’re too tight, the buttonhole will strain. If they’re too loose, the button will swing around and wear the fabric.
If a shank button feels wobbly, don’t just add more stitches through the loop. Stabilise the base with a compact thread neck and firmer anchoring on the wrong side.
Troubleshooting common attachment problems
The button twists sideways
The base stitches aren’t balanced. Remove it and resew rather than trying to correct halfway.The fabric puckers underneath
You’ve sewn too tightly, or the shank height is wrong for the fabric thickness.The button feels loose after a few wears
The thread may be too fine, the knotting weak, or the garment area under strain and in need of interfacing.The thread tangles constantly
Shorter lengths are easier to manage. Long thread may seem faster but usually slows the job.
Machine and adaptive options
A sewing machine with a button-sewing function can help on repeated production work, though not every shank style suits machine attachment equally well. On unusual button shapes or delicate fabrics, hand sewing still gives better control.
For sewists with hand pain or reduced grip, adaptive tools can make a real difference. According to guidance on accessibility and shank buttons, shank buttons can reduce finger strain by up to 40% compared to sew-through buttons, and spring-loaded shank pliers are designed to cut sewing time by as much as 60% for users with mobility challenges.
A visual demo can help if you want to compare hand position and tension while sewing:
Creative Uses and Care for Shank Buttons
Shank buttons aren’t only for fastening a coat front. Some of the best uses are decorative or structural details that give a handmade project more character.
On bags, a shank button can become a focal point on a flap or tab. On a cuff, it can look far richer than a standard shirt button. On a fabric belt, it can turn a simple fastening into a design feature. I also like them on the back neck of dresses where you want the closure to feel intentional rather than purely practical.
Upcycling and jean repairs
Upcycling is where buttons with shank really earn their keep. A lot of home sewists repair denim skirts, overshirts, and casual jackets, but the replacement button often fails because the choice is too flimsy or the shank diameter doesn’t suit the opening.
A 2024 UK Craft Council report referenced in this denim repair guidance noted growing interest in upcycling and also highlighted a common problem. Shank buttons can last twice as long as flat buttons under UK laundry stress, yet many sewists are unsure how to source the correct denim shank diameter, which is typically 4 to 6mm for these repairs.
That’s a very practical point. If the button is too narrow for the slit, the fastening feels insecure. If it’s too bulky, the area gets stressed every time you open it.
A bit of fashion history
Shank buttons also have real style history behind them. They weren’t just invented for utility. They’ve long been associated with dressier and more refined clothing.
One lovely example is the rise of shanked pearl buttons in Britain. Their early documented use on an undershirt belonging to King George IV helped push them into wider fashion, and they later became a familiar feature on shirts and fine garments.
Caring for garments with shank buttons
Care depends on the material, but a few habits help almost every garment:
- Turn garments inside out before washing to reduce rubbing.
- Fasten buttons before laundering when practical, so they aren’t battering the drum.
- Use a mesh bag for delicate blouses or dresses with decorative buttons.
- Check the stitches after cleaning because moisture and agitation often reveal weak attachment before daily wear does.
- Store coats hanging properly so heavy buttons don’t drag oddly against folded fronts.
Metal, shell, and covered buttons all reward a little caution. The button may be small, but once it chips, dents, or loosens, the whole garment looks tired.
Common Questions About Shank Buttons
Why is my shank button wobbling?
A little movement is normal, especially on coats and heavier jackets. A loose, sloppy wobble usually means the stitches underneath are spreading or the button is too heavy for the way it was sewn on. Resew it with firmer anchoring, and build a neat wrapped thread neck if you are working with thick wool, denim, or layered fronts.
What thread is best for a coat button?
Use a strong polyester thread or a proper button thread. For heavy wool coatings and winter jackets, we often suggest doubling the thread and waxing it if you want extra abrasion resistance. Fine all-purpose thread can work on lighter garments, but on a weighty coat it tends to wear out long before the fabric does.
Can I use buttons with shank on lightweight fabric?
Yes, if the button suits the cloth. On Tencel, lightweight deadstock shirtings, or soft blouse fabrics, choose a smaller, lighter shank button so the front hangs properly. If the fabric is loosely woven or especially soft, stabilise the button area first with a small backing piece or interfacing.
Can I turn a flat button into a shank button?
Yes. Sew it on with a spacer, then wrap the threads underneath to create a thread shank. It is a useful fix for thicker plackets, upcycled denim projects, or fabrics where a flat button sits too tightly.
Use it as a workaround, not a habit. Some garments simply perform better with a true shank button from the start.
Are shell shank buttons practical or just decorative?
They can be both. Shell shank buttons are a good choice on occasionwear blouses, fine cardigans, christening pieces, and lighter coats where you want a natural sheen without using plastic. They are less forgiving than resin or metal if the garment gets hard daily wear, so they are best on projects that will be treated with a bit of care.
How do I know if the shank is too short?
Look at how the button sits once fastened. If the fabric has to cram tightly under the button, the shank is not giving the layers enough room. This comes up a lot on thick boiled wool, melton, quilted fronts, and any coat with interfacing plus lining.
Should I hand sew or machine sew them?
Hand sewing gives the best control on most home sewing projects. You can place the button exactly where you want it, adjust the height, and secure it properly for unusual fabrics or one-off makes. Machine attachment is useful if you are sewing several identical garments, but for heirloom coats, deadstock finds, or careful repairs, hand sewing usually gives the cleaner result.
If you’re choosing buttons with shank for a coat, blouse, denim repair, or a special project, More Sewing has fabrics, haberdashery, and practical sewing support to help you get the details right. We stock dressmaking essentials for beginners and experienced makers alike, and we’re always happy to help you match the right button to the right fabric so your finished garment looks good and wears well.