Dressmaking, Guides
Plus Size Sewing Patterns: A Practical Fitting Guide
You buy a pattern that looks promising, cut into lovely fabric, spend a weekend sewing it, try it on and feel deflated. The shoulders slip back, the bust pulls, the tummy strains, or the sleeves bind the moment you lift your arms. Most plus-size sewists know that feeling far too well.
The problem usually isn't your body. It's that many patterns aren't built with your proportions in mind, and even good patterns still need personalised fitting. That's normal dressmaking, not failure. Once you stop expecting the packet to do all the work, sewing gets much more satisfying.
Why Finding Great Plus Size Sewing Patterns Matters
A lot of sewists start by hunting for a magical pattern brand that will fit straight out of the envelope. I understand the impulse. If you've had enough of unpicking side seams and redrawing darts, you want a shortcut.
But the better goal is to find well-drafted plus size sewing patterns and then build the skills to fit them properly. That shift changes everything. Instead of asking, “Why doesn't this fit me?” you start asking, “What is this garment asking for in the bust, sleeve, waist or length?”
In the UK, this isn't a niche issue. The Health Survey for England 2021, discussed in this sewing history overview reported that 64% of adults were overweight or living with obesity. That matters because it means extended sizing reflects a large part of the population, not a small corner of the sewing market.
The body isn't the problem
Commercial sewing has a long habit of treating the standard size range as “normal” and everything else as an adaptation. That mindset is unhelpful in the sewing room. Bodies vary in bust position, shoulder width, tummy shape, upper arm size, back curve, hip depth and torso length. Two people can wear the same shop size and need very different pattern changes.
Plus-size sewing works best when you treat fitting as a craft skill, not a verdict on your shape.
A fitted shirt is a good example. One sewist may need more room through the bicep. Another may need extra front length and a full bust adjustment. A third may need a smaller shoulder and a larger hip. None of that means the pattern is awful or the body is awkward. It means flat paper has to be translated into a three-dimensional garment.
What good pattern shopping really looks like
When I help customers choose a project, I don't start with the size number. I start with these questions:
- What kind of garment do you want to wear? A work dress behaves differently from a jersey tee.
- Where do clothes usually fail on you? Bust, tummy, sleeve, seat, shoulders and length all tell a story.
- How much fitting are you willing to do? A loose top needs a different level of precision from fitted trousers.
- What fabric are you planning to use? Fabric can help a pattern succeed or expose every drafting weakness.
That's the practical route to better results. The pattern matters. Your fitting process matters more.
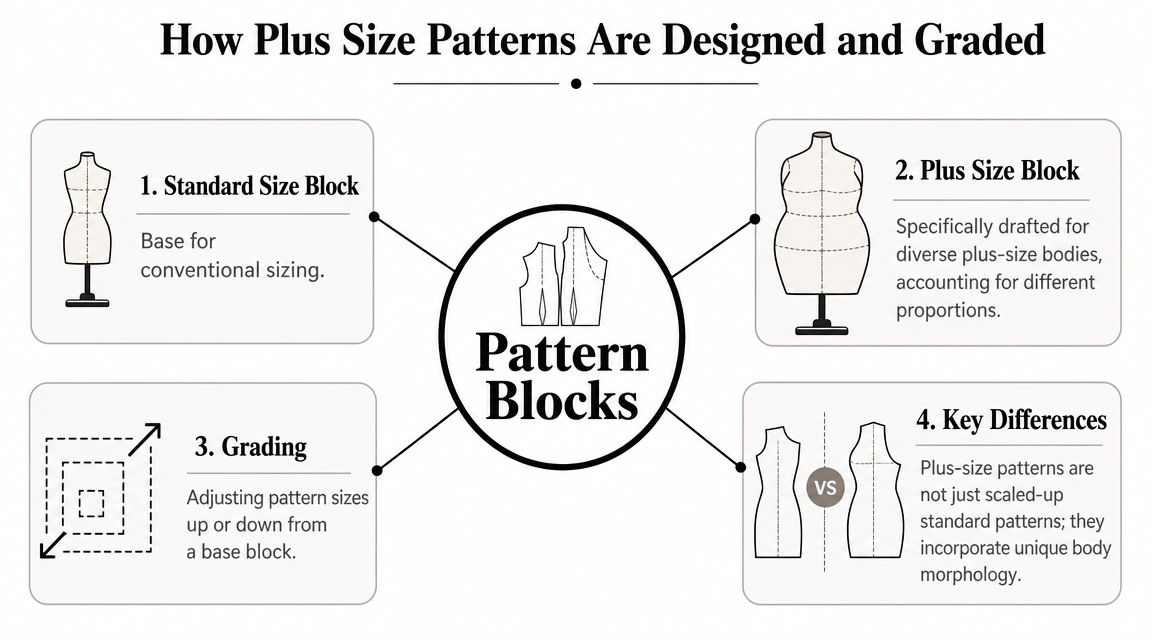
How Plus Size Patterns Are Designed and Graded
A pattern doesn't begin as a whole size range. It begins with a block, sometimes called a sloper. That's the base shape a pattern cutter uses to create styles. Everything that happens later depends on that starting point.
If the starting block reflects one set of proportions, and the company scales outward, the result can look bigger without fitting better. That's where many plus size sewing patterns disappoint people.
Why simple grading falls short
When enlarging a photograph, you can make the image bigger, but you haven't changed the composition. A similar problem occurs when a pattern is merely scaled up from a smaller block. The shoulders may become too wide, the neckline too open, the bust point too high or too close, and the armhole shape may stop working.
A proper plus-size draft takes body proportion into account. It doesn't just add circumference. It considers where fullness sits, how length is distributed, how the bust is positioned, and how the body changes through the torso and upper arm.
What to look for in the drafting
You don't need to see a pattern company's whole development process to spot clues. Read the finished measurements, the cup information if it's provided, and the line drawings. Then ask practical questions.
- Bust shaping matters. A pattern for a woven bodice needs enough shaping and length over the front.
- Shoulder and neck fit should stay controlled. Oversizing to accommodate the bust often throws these areas off.
- Hip and tummy room should be balanced with the rest of the garment, not dumped into side seams.
- Sleeve drafting needs attention. Plus-size garments often fail first at the bicep and armhole.
One technically useful detail comes from Craftsy's guidance on plus-size fitting and design. It notes that plus-size drafting should account for proportional changes such as apex-to-apex distance, and that a dart point should end about 1.5 to 2 inches from the bust apex. That tiny detail makes a real difference. Put the dart too close and the bust looks pointy. Leave it too far away and the shaping goes soft and collapses.
Why this knowledge helps you shop better
Once you understand blocks and grading, you stop blaming yourself for poor results. You also become much better at spotting patterns that are likely to need heavy adjustment.
Practical rule: If a pattern only seems to get wider as sizes increase, expect to do more fitting work in the shoulders, bust, sleeves and front length.
That doesn't mean you should avoid a pattern. It means you should choose with open eyes. Some styles are worth the alteration time. Some aren't. A boxy overshirt in stable cotton is forgiving. A fitted princess-seamed dress in crisp woven fabric demands better drafting from the start.
Measuring Your Body and Choosing a Pattern Size
Taking measurements sounds basic, but many fitting problems begin with this step. If you choose the wrong starting size, every later adjustment gets harder.
The biggest mistake I see is choosing by full bust alone. That often pushes plus-size sewists into a size that fits the bust but drowns the shoulders, neckline and upper chest.
Start with the right measurements
Use a flexible tape measure and wear the undergarments you'd realistically wear with the finished garment. Stand naturally. Don't pull the tape tight enough to indent the skin, and don't hold your breath.
For woven tops, dresses and jackets, these are the measurements I'd prioritise first:
- High bust. Around the upper chest, above the full bust.
- Full bust. Around the fullest part of the bust.
- Waist. Your natural waist or the point where the pattern is meant to sit.
- Full hip. Around the fullest area of the hip and seat.
- Bicep. Around the fullest part of the upper arm.
- Back waist length and front length if you often struggle with bodice balance.
According to the Curvy Sewing Collective guide to sewing pattern sizes for curvy figures, sewing educators recommend using the high-bust measurement to choose the base size when the upper body is smaller than the full bust, then doing a Full Bust Adjustment to add volume only where it's needed. That approach usually protects shoulder and neck fit.
Ignore the packet number
Pattern sizes aren't a moral judgement, and they aren't consistent across brands. Treat them as a rough filing system, nothing more.
What matters much more is the finished garment measurement. That tells you how large the actual garment will be after sewing, including ease. Ease is the difference between your body measurement and the garment measurement. Some ease is needed for movement in wovens. Additional ease may be added for style.
Here's how I use those numbers in practice:
- For a closer woven top, I want enough room to breathe and move, but not so much that the bust and armhole collapse.
- For a relaxed shirt, I'll accept more ease through the body, but I still check shoulders and bicep.
- For a skirt or trouser, I focus hard on the hip and tummy area, because extra ease there changes the whole silhouette.
Measure the pattern if needed
Some commercial patterns include generous ease. That can tip a garment from comfortable to baggy very quickly, especially in plus sizes where extra width multiplies across the whole body. If the envelope and instruction sheet aren't clear enough, measure the pattern pieces themselves after accounting for seam allowances.
When the finished measurements and the style line disagree, trust the measurements.
That one habit saves fabric, time and disappointment. It also makes you less vulnerable to misleading size labels, which is one of the biggest upgrades you can make as a home dressmaker.
Essential Fitting Adjustments for Plus Size Sewists
The most useful fitting changes are the ones you can diagnose with your eyes. You put on the toile, you look for drag lines and strain, and you adjust the pattern to match what the fabric is telling you.
Full bust adjustment
You'll usually know you need an FBA when the front rides up, the side seams swing forward, the bust pulls horizontally, or the waist seam sits higher at the front than at the back.
The fix is simple in principle. You add both width and length to the front pattern piece so the garment can travel over the bust rather than trying to cut straight across it. That extra length is just as important as the extra width. Without it, the hem can tilt and the garment can feel as though it's being yanked forward all day.
A useful fitting note from the earlier Craftsy guidance is to check bust position and bodice balance carefully. If you add front length at the bust, you may also need to redistribute length through the bodice so the front hangs smoothly.
Full tummy adjustment
A full tummy adjustment solves a different problem from a full hip adjustment. You need it when the front strains over the abdomen, hems kick up at the centre front, or side seams pull toward the front body.
This alteration adds room where you need it rather than everywhere. On skirts and trousers, that often means adding targeted space to the front. On dresses and tops, it may mean extra width and length through the lower front bodice.
What doesn't work is cutting a larger size and hoping the extra fabric sorts itself out. That usually creates too much room in the shoulder, back or upper chest while still leaving the front short.
Full bicep adjustment
If sleeves feel tight when you bend your arm, or if horizontal drag lines form around the upper arm, you likely need a full bicep adjustment. This is one of the most common reasons a garment feels uncomfortable even when the body fit looks fine from the front.
The goal isn't to make the whole sleeve bigger and floppy. It's to add space through the upper sleeve while keeping the cap shape workable for the armhole. Sometimes that means increasing width only. Sometimes you also need a little extra sleeve cap height or a small armhole rethink, depending on the pattern.
For jackets, shirts and workwear styles, I'd rather address the sleeve properly than size up the entire garment.
Here's a visual walkthrough if you like seeing fitting changes demonstrated in motion.
Sway back adjustment
A sway back adjustment removes excess length at the lower back. You'll often spot the need for it when fabric pools horizontally above the seat, especially in dresses, skirts with waistbands, and fitted shirts.
This change looks small on paper but has a big effect on polish. By removing length where the back curves inward, you help the hem sit level and stop extra fabric bunching at the waistline.
A quick fitting table
| Fit Problem (What you see) | Likely Cause | The Solution (Pattern Adjustment) |
|---|---|---|
| Horizontal drag lines across the bust, front riding up | Not enough front width and length over the bust | Full Bust Adjustment |
| Front hem lifting over the tummy, side seams pulled forward | Not enough room and length through the front abdomen | Full Tummy Adjustment |
| Sleeve feels tight, drag lines around upper arm | Sleeve too narrow through the bicep | Full Bicep Adjustment |
| Fabric pooling at lower back | Too much length through back waist | Sway Back Adjustment |
Diagnose before you alter
Don't make every common adjustment automatically. Fit the toile first. Some bodies need one major change and one tiny tweak. Others need several small corrections that work together.
- Look at balance first. Is the garment hanging evenly from shoulder to hem?
- Then check strain. Where is the fabric pulling?
- Then check excess. Where is fabric collapsing or pooling?
- Mark the toile. Draw seam lines, waistlines and bust level on the test garment so you can see what has shifted.
A good fitting adjustment makes the fabric hang more quietly.
That's the result you're after. Less pulling, less distortion, less fighting.
Matching Sewing Styles and Fabrics to Your Shape
A pattern can be excellent and still disappoint if the fabric is wrong for the garment. Fabric choice decides whether the design skims, clings, stands away from the body, or collapses.
For plus-size dressmaking, that matters a great deal. The same wrap dress in a soft viscose challis and in a stiff cotton poplin can feel like two entirely different patterns.
Structured fabrics and cleaner outlines
Structured fabrics hold shape. Think denim, cotton twill, firmer linen, needlecord, and stable suiting. These fabrics are useful when you want definition through seams, waistbands, collars and A-line skirts.
They work well for garments such as:
- Shirt dresses where you want the collar and placket to sit neatly
- A-line skirts that should hold away from the body rather than cling
- Workwear trousers that need crease, shape and durability
- Jackets and overshirts where structure is part of the style
The trade-off is accuracy. Stable fabrics don't hide fitting problems. If the bust is too tight or the sleeve is too narrow, a structured cloth will show it immediately.
Drapey fabrics and softer movement
Drapey fabrics move around the body instead of sitting away from it. Viscose challis, Tencel blends, soft crepe and fluid lawn can be wonderful for wrap dresses, blouses, skirts with movement and relaxed shirts.
They're often flattering because they skim rather than stand stiffly. But there is a catch. Too much volume in a very drapey fabric can create visual bulk, especially if the design has heavy gathers in the wrong place.
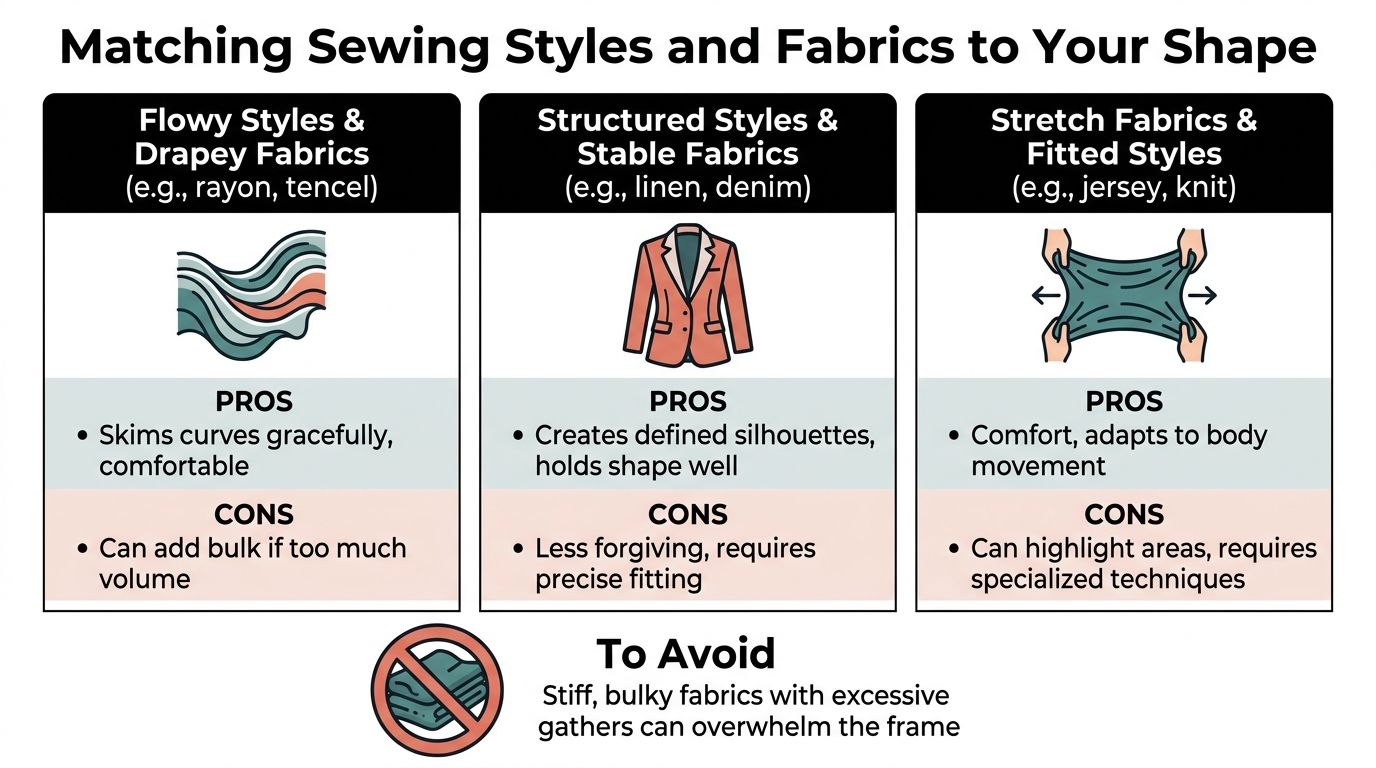
Stretch fabrics and close fit
Stretch fabrics solve some problems and create others. Jersey and ponte can be comfortable, easy to wear and forgiving in movement. They're especially useful for fitted tops, knit dresses and layering pieces.
But stretch won't fix poor proportion. If the shoulder is too wide, the neckline too open or the bust point misplaced, the knit garment may still look off. Stretch also highlights lumps, seam impressions and uneven hems more readily than some people expect.
Here's a practical way to compare them:
- Choose structured fabrics when you want shape, support and a defined line.
- Choose drapey fabrics when you want movement and a softer outline.
- Choose stretch fabrics when comfort and mobility matter most, but be precise with construction.
Silhouettes that often sew well
Some style lines are easier to fit and wear.
Empire seams, wrap fronts, fit-and-flare dresses, gently shaped shirts and trousers with a clean front often give you more fitting options than a very boxy or very clingy pattern.
For workwear, I like styles that leave enough room to sit, reach and layer without turning shapeless. A softly structured shift in ponte, a fit-and-flare dress in denim-look twill, or a blouse in Tencel under a jacket can look polished and feel comfortable all day.
What usually disappoints is a mismatch. A highly gathered pattern in bulky cloth. A fitted sheath in fabric with no recovery. A body-skimming knit in jersey that grows and bags. Match the style to the fabric and the garment becomes much easier to live in.
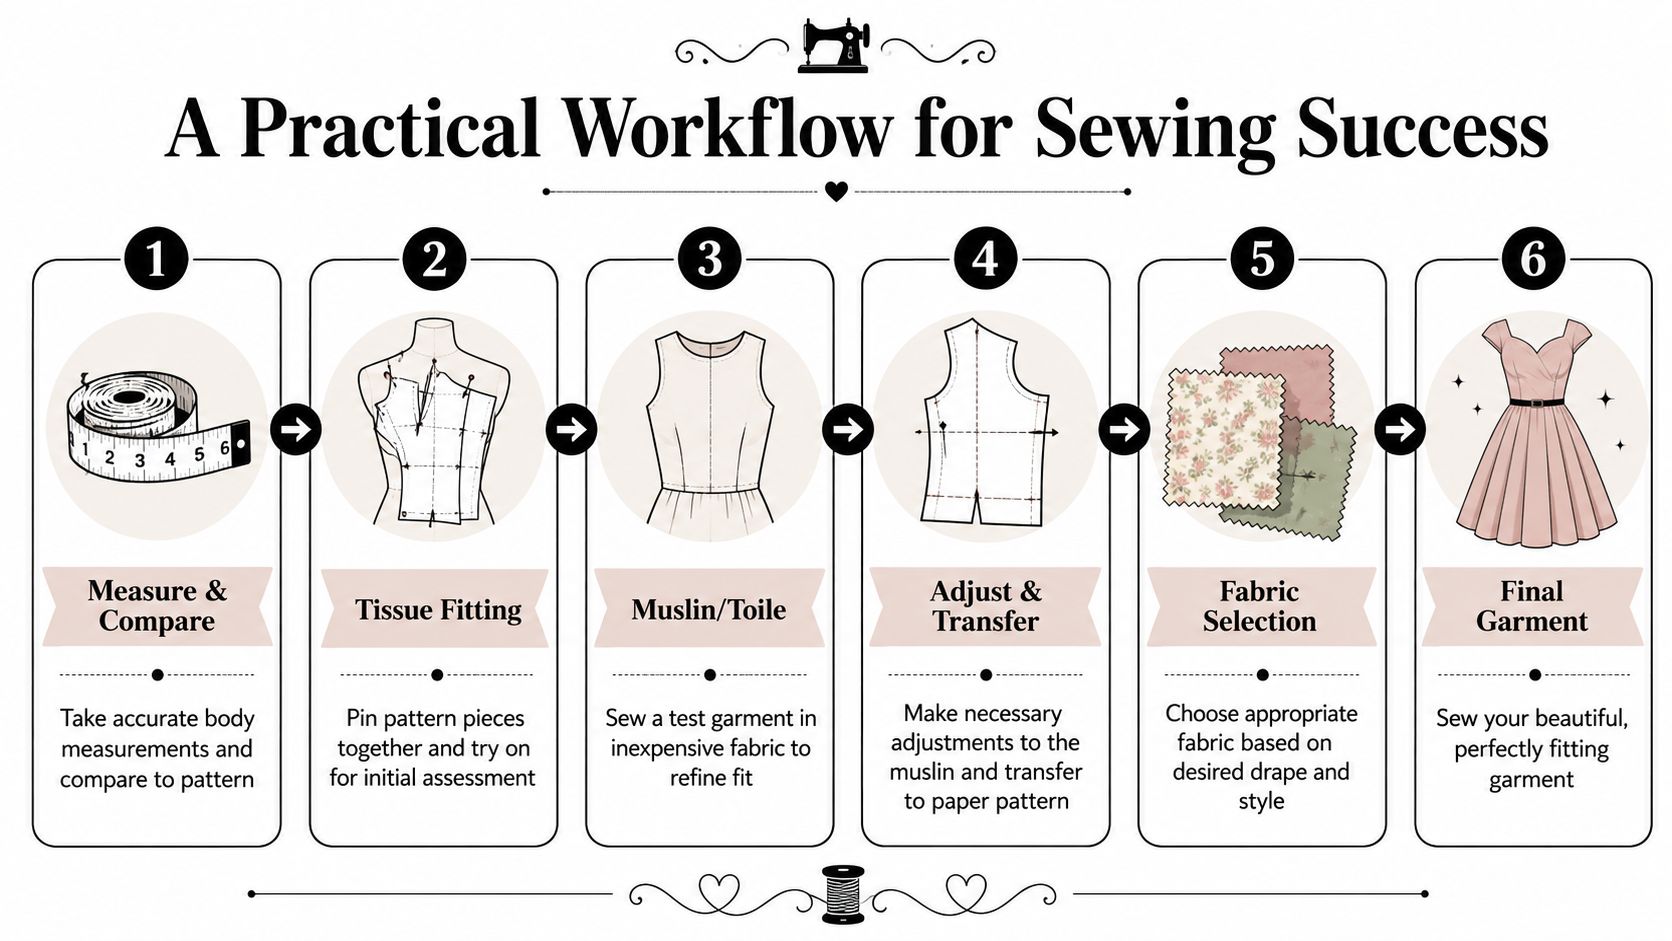
A Practical Workflow for Sewing Success
Good fit is rarely one lucky guess. It comes from a repeatable process. When sewists struggle over and over, it's often because they skip one or two key stages and then ask the final garment to do the work of fitting.
The most important habit is making a toile. Not optional. Not only for advanced sewists. Not something to skip because the pattern “looks easy”.
A workflow that saves fabric and frustration
Follow this order and you'll make better clothes more consistently.
Measure and compare
Take fresh body measurements and compare them with the pattern chart and finished garment measurements.Tissue-fit the main pieces
Pin or tape the bodice, skirt or trouser pieces together enough to assess length, width and general balance.Make a toile
Use inexpensive fabric with similar behaviour to your final cloth. Mark grainline, bust level, waistline and hip line.Assess the toile on your body
Check balance first, then strain, then excess fabric. Pin out or slash where needed.Transfer changes to the paper pattern
Don't trust yourself to “remember what you did”. Walk the seams and true the lines after altering.Cut the final fabric only when the pattern is ready
Confidence stems from this. You're not guessing anymore.
What a useful toile should tell you
A toile isn't meant to be pretty. It's meant to answer questions.
- Does the shoulder sit in the right place?
- Is the bust point where it should be?
- Does the side seam hang straight?
- Can you sit, bend and lift your arms comfortably?
- Does the hem stay level?
If the answer is no, that's good information. You've learned it in calico or spare cotton instead of in your final fabric.
The fastest way to waste expensive fabric is to skip the cheap test version.
That workflow also makes sewing feel calmer. You stop expecting perfection from the first cut and start building it step by step.
Your Next Steps to Confident Plus Size Sewing
The best thing you can do next is keep it simple. Don't try to master every fitting adjustment at once. Pick one pattern with a clear silhouette, take accurate measurements, check the finished garment measurements, and make a proper toile.
If you already know where ready-to-wear and sewn clothes usually fail on you, start there. Bust pulling? Learn the FBA. Sleeves always too snug? Tackle the full bicep adjustment first. Front hems always rise? Work on tummy and length changes before anything else.
Plus size sewing patterns become far less frustrating once you stop treating fit as luck. It's a skill. You can learn it. And every toile, every redrawn seam and every improved garment builds that skill a little further.
You don't need a perfect body for sewing. You need a pattern, some fabric, and the confidence to alter what doesn't serve you.
If you're ready to put these fitting ideas into practice, have a look at More Sewing for quality dressmaking fabrics, useful notions, and ready-to-sew kits that make getting started easier. If you're unsure which fabric will suit your next project, their team can help you choose something that works with the garment you want to make, not against it.