Guides
Sewing Patterns T Shirts: The Ultimate UK Guide
You know the feeling. You pull on a shop-bought tee that’s almost right, but not quite. The neck sits too high, the sleeve cuts into the arm, the hem lands at the wrong point, or the fabric twists after one wash. That’s usually the moment people start looking at sewing patterns t shirts and then promptly get overwhelmed by size charts, fabric notes, and pattern jargon.
The good news is that a handmade T-shirt is one of the most useful things you can sew. It teaches fitting, knit handling, neckbands, hems, and fabric choice without the complexity of zips, waistbands, or heavy tailoring. Once you crack one good tee, you’ve usually cracked a whole section of your wardrobe.
Your Journey to the Perfect Handmade T-Shirt
A well-made handmade T-shirt doesn’t need to be fancy. It just needs to work. The shoulder seam should sit where your shoulder ends, the neckband should lie flat, and the body should skim or relax exactly as you intended. That’s why so many dressmakers come back to tees again and again.
In practice, most frustrations come from three places. The wrong pattern shape, the wrong fabric for that pattern, or the wrong size choice based on high-street habits instead of body measurements. Fix those three, and sewing patterns t shirts become much easier to trust.
There’s also something very rooted in British home sewing about making your own basics. The practice of using patterns at home has deep roots in the UK. As early as 1808, The Lady's Economical Assistant provided the first full-sized, traceable patterns, which helped ordinary women make fashionable clothing at home, as noted in the history of sewing patterns.
Home dressmaking in the UK didn’t begin with boutique indie patterns. It began with practical women using whatever tools they had to make clothes fit real lives.
That legacy matters because T-shirt sewing is still practical sewing. It isn’t about chasing perfection on the first attempt. It’s about learning what suits your body and building a pattern-and-fabric combination you can repeat with confidence.
Some readers start with a classic crew neck in stable cotton jersey. Others go straight for a drapey relaxed tee in a viscose or Tencel blend. Both approaches can work. The difference is knowing what the pattern is asking from the fabric, and what the fabric will do once it’s on your body.
Decoding T-Shirt Sewing Patterns
When you open a T-shirt pattern for the first time, the envelope or PDF cover often looks simpler than it is. A tee may only have a front, back, sleeve, and neckband, but each piece carries important information. Once you know what you’re looking at, the pattern stops feeling cryptic.
The terms that matter most
A few words show up constantly in sewing patterns t shirts.
- Ease means the difference between your body measurement and the finished garment measurement. A fitted tee has less ease. A relaxed tee has more.
- Armscye is the armhole opening. If this shape is wrong for your body, you’ll feel pulling, pinching, or drag lines.
- Grainline tells you how to place the pattern piece on fabric so the garment hangs properly.
- Notches are matching marks. They help you place sleeves correctly and align side seams or neckbands.
- Stretch direction matters more in knits than many beginners expect. Most T-shirt patterns want the greatest stretch going around the body, not up and down.
If a pattern includes a finished garment measurement chart, use it. It often tells you more than the size name on the front.
What the pattern pieces are telling you
A T-shirt pattern usually contains fewer pieces than a dress or jacket, so every line matters.
Look closely at these details:
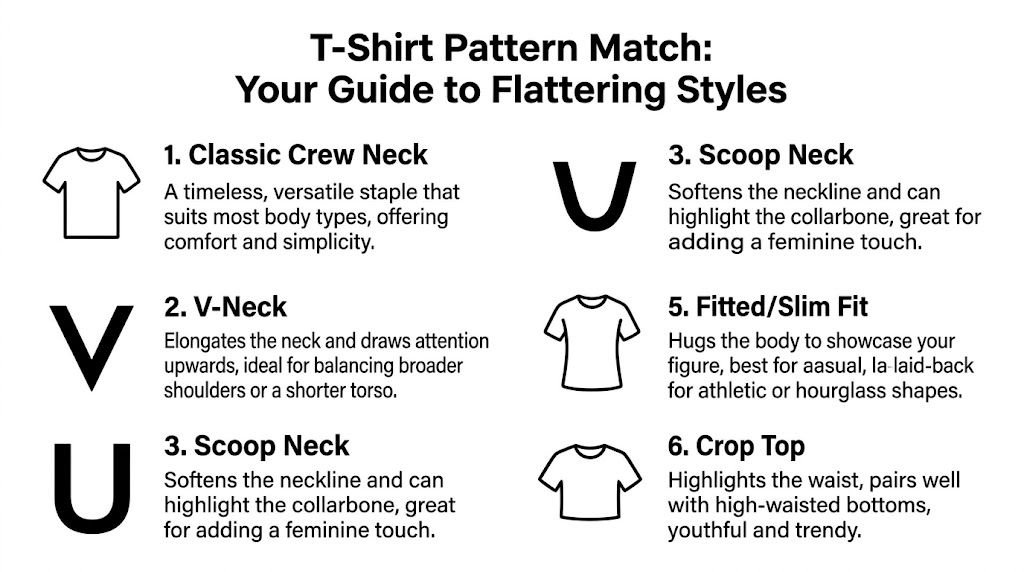
Neckline shape
A high crew neck, scoop neck, and V-neck don’t just change appearance. They change how the neckband behaves and how the top frames the face.Sleeve type
Set-in sleeves usually look more structured. Drop shoulders feel looser and are easier to sew, but they also add width through the upper body.Body silhouette
Side seams that curve inward suggest shape through the waist. Straighter side seams usually mean a boxier fit.Hemline
Straight hems are easiest to alter. Curved hems need more care when hemming and can change how long the tee looks from front to back.
Practical rule: Don’t buy a tee pattern based only on the styled model photo. Check the line drawing. It shows the actual design lines without styling tricks.
How to read the instructions sensibly
Beginners often treat pattern instructions as law. They’re better treated as a tested route through the project. Follow them, but read ahead first.
A sensible order is:
- Check the fabric notes before cutting
- Read the finished measurements if provided
- Identify seam allowance on the pattern
- Trace or mark your size before making changes
- Highlight neckband steps, because that’s where many tees are won or lost
If the instructions tell you to use an overlocker and you only have a sewing machine, that’s not a problem. Most tees sew perfectly well on a regular machine with the right needle and stitch choice.
The views inside one pattern
Many tee patterns include several views. That doesn’t mean they’re all equally suitable for your first make.
A single pattern may offer:
| Feature | What it changes | Good for |
|---|---|---|
| Crew neck | Closer neckline | Everyday basics |
| Scoop neck | Lower, wider neckline | Softer, more open look |
| Short sleeve | Standard tee | Layering and warmer weather |
| Long sleeve | More coverage | Base layers and winter wear |
| Straight hem | Clean basic finish | Beginners |
| Curved hem | More shaped look | Slightly dressier casual tee |
If you’re making your first version, choose the simplest view with the most stable knit. Save the more drapey fabric and deeper neckline until you know how the base pattern fits you.
Choosing the Right Pattern for Your Shape and Style
Fit starts long before you cut fabric. It starts with choosing a pattern silhouette that already wants to behave the way you want your top to behave. That sounds obvious, but lots of disappointing tees begin with trying to force a boxy pattern into a fitted role, or a close-fitting pattern into a slouchy one.
A useful starting point is to buy from UK designers when possible. A 2024 UK Sewing Association survey found that 68% of home sewists struggle with fit when using US-designed indie patterns, often because of differences in body proportions such as torso length and shoulder width, according to the UK-focused fit discussion. That doesn’t mean US patterns never work. It means you should expect more checking and adjusting.
Four common tee silhouettes
Each silhouette creates a different relationship with the body.
Fitted tee
A fitted tee follows the bust, waist and upper hip more closely. It works well if you like a neat layer under jackets or cardigans, and it’s often the best choice if you want to show waist definition.
What works:
- Clean shoulder line
- Stable knit with good recovery
- Careful bust sizing
What doesn’t:
- Very drapey fabric if you want structure
- Choosing by ready-to-wear size rather than measurements
Relaxed fit
A relaxed tee skims the body without clinging. This is often the most forgiving and wearable option for everyday dressing.
It works particularly well in fluid jerseys because the extra ease lets the fabric move rather than stick. If you want a tee that looks polished but not tight, this is often the safest bet.
Boxy cut
A boxy tee has straighter side seams and usually a wider body. It can look modern and sharp, especially cropped or paired with high-waisted trousers and skirts.
The trade-off is that boxy tees can add visual width. If the shoulder is also extended, the whole top can drift from intentional to shapeless quite quickly unless the length is balanced.
Drop shoulder
Drop shoulder tees are casual and often easier to sew because the sleeve insertion is less exacting. The downside is that they change proportion a lot. On some bodies they feel relaxed and flattering. On others they can swamp the frame.
If you’re petite through the shoulders, be cautious with very dropped shoulders in heavy jersey. The seam can slip too far down the arm and make the tee feel borrowed rather than designed.
Matching the pattern to your priorities
Try this decision route instead of focusing on body type labels.
You want a layering basic
Choose a fitted or gently semi-fitted tee with a set-in sleeve.You want comfort first
A relaxed tee in soft jersey usually earns the most wear.You want a contemporary look
A boxy shape with a neat neckline and balanced hem does that well.You dislike tight upper arms
Look for a relaxed sleeve or a pattern with more upper-arm room rather than automatically sizing up the whole garment.
Necklines that change the whole feel
Necklines do a surprising amount of work.
A crew neck is classic and easy to wear. A V-neck can feel more open and lengthening. A scoop neck softens the line across the chest and collarbone. If you often feel top-heavy in a high neckline, the fix may not be a larger size. It may be a different neckline shape.
Style matters, but so does sewing confidence. If neckbands still make you nervous, start with the neckline shape recommended by the pattern rather than hacking it on day one.
Getting the Perfect Fit Sizing and Grading Explained
The best thing about sewing your own T-shirts is that you can stop letting shop sizing make decisions for you. Pattern sizing and ready-to-wear sizing are not the same system, and treating them as if they are is one of the fastest ways to cut the wrong size.
UK pattern sizing has had a much more stable relationship with body measurements than high-street clothing. Since 1972, measurements in UK sewing patterns have remained consistent rather than drifting with vanity sizing, as outlined in this history of sewing pattern sizing. That consistency is a gift, but only if you use the measurement chart and ignore the emotional pull of the size number.
Take the three measurements that matter
For most sewing patterns t shirts, start with:
- Full bust at the fullest part, with the tape level
- Waist at your natural waist
- Full hip if the tee reaches that area
Wear close-fitting clothes or measure over underwear. Keep the tape snug but not tight. If you pull the tape too firmly, you’ll build disappointment straight into the pattern choice.
A helpful habit is to write down both your body measurements and the pattern’s finished garment measurements if available. That tells you how much room the garment will have.
Why your size may change from one area to another
Very few people match one size top to bottom. You might be one size at the bust and another at the waist or hip. That’s normal. It doesn’t mean the pattern is wrong. It means you’ll grade between sizes.
Grading sounds technical, but for a tee it’s often simple. On the front and back pattern pieces, blend smoothly from one size line to another between the underarm and waist, or from waist to hip. Use a curved ruler if you have one, but a steady hand works fine if you draw lightly first.
Here’s a practical example:
| Area | What to do |
|---|---|
| Bust smaller than hip | Start on the smaller line at the bust and blend to the larger line by the hip |
| Bust larger than waist | Use the larger bust size, then taper in gently at the waist |
| Broad shoulders, smaller bust | Check shoulder width separately before deciding to size up the whole top |
Cup blocks can save you work
Some UK pattern companies draft for different bust shapes rather than expecting everyone to do a full bust adjustment from the same base. Sew Over It’s Ultimate T-Shirt PDF includes a B-cup block in sizes 6-20 and a D-cup block in sizes 18-30, which helps account for bust shaping and armhole depth and can reduce alteration rates by an estimated 25% for sewists who would otherwise need a more complex bust change, as described on the Ultimate T-Shirt pattern page.
That matters because bust fit isn’t just about extra width at the front. It often changes how the armhole sits and how the side seam hangs.
If a tee fits your bust only when you size up, but then drops at the shoulder or bags at the upper chest, you probably need a bust adjustment or a different cup block, not a bigger size everywhere.
A simple way to approach grading
If your measurements cross sizes, use this order:
- Choose the shoulder and upper chest first for tops
- Match or adjust at the bust
- Blend through waist and hip
- Check finished ease against the style you want
This is also a good point to compare the paper pattern to a favourite tee from your wardrobe. Lay your existing top flat and compare key widths, especially chest, waist, sleeve opening and body length. It isn’t a substitute for measuring, but it’s a very practical sense check.
A visual fitting walkthrough can help if you prefer to see the process in action.
Basic bust adjustments without panic
For T-shirts, you don’t always need a full formal patternmaking exercise. Sometimes a small change is enough.
A Full Bust Adjustment adds room over the bust without changing the shoulder or neckline too much. A Small Bust Adjustment removes excess where the pattern has more shaping than you need. The slash-and-spread method sounds dramatic, but on a knit tee it’s often a matter of drawing lines, cutting, opening or overlapping slightly, then truing the seam.
Watch for these signs:
- Horizontal drag lines across the bust often mean you need more room there
- Fabric pooling above the bust can suggest too much fullness
- Side seams swinging forward may indicate the front needs more shaping or length
- Armholes pulling after a bust change may need smoothing and rebalancing
Start small. A moderate adjustment can transform the fit. Over-correcting can create more problems than it solves.
The Essential Guide to T-Shirt Fabrics
A good T-shirt pattern can fail in the wrong knit. A plain pattern in the right knit can look excellent. Fabric choice controls drape, cling, recovery, opacity, and how forgiving the finished tee feels on the body.
That’s why I always suggest choosing the pattern and fabric together, not as separate decisions. A close-fitting tee in a liquid viscose jersey behaves very differently from the same tee in a stable cotton interlock.
The main knit options compared
Here’s the practical version.
| Fabric | Handle | Best use | Watch out for |
|---|---|---|---|
| Cotton jersey | Soft, familiar, everyday knit | Classic tees | Some versions curl at the edges |
| Interlock | More stable, smoother, less curl | Beginners, neat fitted tees | Can feel slightly heavier |
| Rib knit | Very stretchy with strong recovery | Neckbands, close fits | Too much stretch can distort a loose pattern |
| French terry | Knit face with looped back | Sweatshirt-style tees, relaxed tops | Usually heavier than a standard tee knit |
| Viscose or Tencel jersey | Soft, fluid drape | Relaxed or dressier tees | Can grow, shift, or feel slippery while sewing |
Cotton jersey versus drapey blends
Cotton jersey is usually where beginners start, and for good reason. It’s familiar under the needle and tends to behave better during cutting and sewing than very fluid knits. If your goal is a traditional everyday tee, it’s often the right answer.
Viscose and Tencel blends create a different result. They fall closer to the body, feel cooler and softer, and suit relaxed silhouettes beautifully. They can also show every fitting issue more clearly. A neckband that’s slightly too loose, or a shoulder seam that wasn’t stabilised, is often more obvious in a fluid blend.
A stable knit forgives a lot. A drapey knit tells the truth about your cutting, sewing, and fit.
Deadstock jersey and why it needs respect
Deadstock can be brilliant for T-shirts because it often has better handle and a more interesting finish than standard basics. It’s also increasingly popular. The use of sustainable deadstock jersey has seen a 45% increase in sourcing among UK hobby sewists, and a Worthing sewing guild study found these fabrics can offer superior drape, while UK-sourced Tencel may shrink by up to 8% and may need a wider neckband formula to cope with variable stretch, according to this discussion of deadstock sewing challenges.
That translates into very practical habits:
- Pre-wash before cutting if the fabric is washable
- Test stretch and recovery on a scrap before choosing your neckband length
- Cut a single layer if the fabric shifts easily
- Mark the right side clearly on subtle fabrics where face and back look similar
Deadstock is worth sewing, but it doesn’t reward assumptions.
Matching fabric to pattern style
Use the pattern silhouette to guide the knit.
Fitted tee
Best in cotton jersey, cotton-elastane jersey, or stable interlock. You want recovery and enough body to hold shape.Relaxed tee
Lovely in viscose jersey, Tencel blends, or softer cotton jersey. Drape helps the shape look intentional.Boxy tee
Usually better in a knit with some body. Too much drape can collapse the shape.Drop shoulder tee
Works in many knits, but the heavier the knit, the more volume you’ll create at the upper body.
Read the fabric before you sew it
Before cutting, stretch a scrap across the width and let it go. Does it spring back or stay stretched? Rub it between your fingers. Is it dry and crisp, silky and fluid, dense and smooth, or spongy and thick? Those clues matter more than marketing names.
If the knit rolls badly at the edges, use more pins or clips and don’t leave pieces hanging off the cutting table. If it feels slippery, slow down and press often. If it has lovely drape but poor recovery, use it in a looser tee rather than a close-fitting one that relies on resilience.
Essential Tools and Notions for Sewing Knits
Knits don’t ask for a huge toolkit, but they do ask for the right one. Most sewing problems people blame on the fabric are really tool problems. Skipped stitches, tunnelling hems, popped seams, and wavy shoulders usually start there.
The core kit
These are the items I’d consider basic for sewing patterns t shirts well.
Ballpoint or stretch needles
A standard sharp needle can damage knit fibres or miss stitches. Ballpoint and stretch needles part the fibres more cleanly.Polyester thread
It has enough give for knit seams. Cotton thread is less forgiving under stretch.Pins or clips that suit slippery knits
Fine pins work, but clips are often easier on drapey or rolling fabrics.A clear ruler or tape measure
Useful for checking hems, neckband width, and any pattern changes.An iron that you use
Pressing during knit sewing isn’t optional. It settles seams, shapes neckbands, and improves hems.
Machine stitches that work
You don’t need an overlocker to sew a tee. A regular machine does the job perfectly well if you choose the stitch with care.
Try these options on scraps first:
- Narrow zigzag for seams that need flexibility
- Lightning stitch if your machine has one
- Twin needle for hems when you want a ready-to-wear look
- Stretch zigzag or overcast stitch if that’s what your machine offers reliably
Don’t assume the machine’s default settings will suit your knit. Test first. A simple stitch-length tweak can stop waviness.
Notions that prevent common failures
In many UK-designed T-shirt patterns, such as Merchant & Mills’ The Tee Shirt, seam allowances are a standard 1.5cm, and guidance linked to that pattern notes that trimming underarm and sleeve seams to 1cm after stitching can improve movement, while shoulder stabilisation with stay tape can improve neckline stability by up to 15% during wear, as described on the Merchant & Mills Tee Shirt pattern page.
That tells you where to focus your effort.
- Stay tape or clear elastic belongs in shoulder seams when the knit is soft or drapey
- A twin needle gives a convincing hem on a standard machine
- A walking foot can help if your machine stretches the top layer as it sews
- Wash-away tape or a glue pen can make neckbands and hems easier to control
Sew one shoulder seam with stabiliser and one without on a scrap if you’re unsure. The difference often shows up quickly once the fabric hangs under its own weight.
Small habits that improve the result
Good knit sewing is often quiet, repetitive discipline.
- Test every stitch on a fabric offcut
- Press after each major seam
- Let the machine feed the fabric
- Avoid pulling the knit from front or back
- Trim bulk where seams cross
If you’re getting skipped stitches, change the needle before changing everything else. If the hem tunnels, test the twin needle with a scrap and adjust tension. If the neckline ripples, revisit the neckband length and pressing before blaming the pattern.
Simple Hacks to Customise Your T-Shirt Pattern
Once you’ve got one tee pattern fitting reasonably well, the fun starts. A basic T-shirt is one of the easiest garments to customise because small changes create a noticeably different result without requiring full pattern drafting.
The trick is to keep the original fit stable while changing one design feature at a time. That way you know what improved the top and what caused trouble.
Add a patch pocket
A chest pocket is simple, useful, and a good way to use contrast fabric.
Cut the pocket from the same knit if you want it subtle, or use a contrast knit for a sportier look. Interface very softly only if the fabric is extremely limp. In most jersey, a clean turned hem and careful topstitching are enough.
A few practical notes help:
- Keep the pocket modest in scale on smaller frames
- Place it after checking the tee on your body, not just on the flat pattern
- Avoid placing it too close to the centre front, where it can look awkward
Try colour blocking
Colour blocking works especially well on tees because the seam lines can become the design. You can split the front, back, or sleeves into panels, as long as you add seam allowance to the new cut lines and keep grainlines marked.
The neatest versions usually share a few habits:
- Keep knit weights similar so one panel doesn’t drag another
- Match stretch direction across all sections
- Avoid awkward seam endings right at stress points like the lower armscye
- Press each new seam before joining the full garment
This is a great use for leftover jersey pieces that are too small for a full top.
Change the neckline shape
Changing a crew neck to a scoop neck is one of the fastest pattern hacks, but it needs restraint. Scoop too low or too wide, and the neckband becomes harder to draft neatly.
Use the original front pattern piece as your base. Redraw only the front neckline at first and leave the back alone. Measure the new neckline seam line and cut a fresh neckband based on the new opening, testing with scraps if your knit has unusual stretch.
The more fluid the fabric, the less forgiving a hacked neckline becomes. If you’re experimenting, use a stable knit first.
Lengthen it into a tee dress
A T-shirt dress is often just a tee with added length and, sometimes, a little more width through the hip. That’s why this hack works best after you’ve already checked where the original tee sits at bust, waist and upper hip.
A practical route is:
- Extend the side seams straight down for a column shape, or gently flare for more movement
- Check hip room before cutting
- Walk, sit, and bend in a toile if the dress is close-fitting
- Consider adding side splits if you want ease without excess width
This kind of hack is ideal for knit fabrics that feel too special for a plain tee but too casual for a more formal dress pattern.
Start Sewing Your Dream T-Shirt Today
A good handmade tee earns its place quickly. You wear it, notice what worked, adjust one thing, then sew another. Before long, you’ve got a pattern that feels like your pattern rather than a generic template.
Start with a simple silhouette, a knit that won’t fight you, and a size chosen from measurements rather than habit. Stabilise the shoulders, take care over the neckband, and press as you go. That’s where a homemade T-shirt starts looking polished instead of homemade in the unhelpful sense.
You don’t need a huge fabric stash or advanced patternmaking skills. You need one sensible pattern, one suitable knit, and the willingness to learn from the first version.
If you’re ready to start, More Sewing is a dependable place to find quality jersey, Tencel and viscose blends, ex-designer deadstock, haberdashery, and ready-to-sew kits, with support for beginners and experienced dressmakers alike.