Guides
Your Guide to Childrens Dressmaking Patterns
You've found a fabric you love. It might be a soft cotton with a tiny floral print, a cheerful jersey for everyday wear, or a sturdy cord that's begging to become a pinafore. Then you pick up a pattern envelope and suddenly the excitement dips. There are size charts, fabric layouts, notions lists, and lines everywhere. For a lot of home sewists, that's the point where a lovely idea gets folded back into the cupboard.
That's a shame, because sewing for children can be one of the most satisfying parts of dressmaking. The pieces are smaller, the sewing often moves along quickly, and the result gets worn, washed, climbed in, and loved. The challenge isn't usually style. It's fit, comfort, growth, and whether the garment will still be useful once the child has another growth spurt.
Good childrens dressmaking patterns exist because home sewing changed in a big way when commercially standardised patterns became widely available in the mid-19th century. Butterick, founded in 1863, helped popularise graded patterns, which meant home sewists could make properly sized garments without drafting everything from scratch. That matters even now. Children don't stay one size for long, so patterns that give you a practical starting point are worth their weight in gold.
Starting Your Childrens Sewing Journey
A beginner often starts with the wrong question. The question isn't, “What's the prettiest pattern?” It's, “What will get made, worn, washed, and worn again?”
That shift changes everything. A dress for a child has to survive sitting on the floor, lifting arms, sprinting through the garden, and repeated trips through the washing machine. A smart-looking envelope photo won't tell you that. The pattern shape, fastening, seam allowance, and fabric choice will.
Children's clothing has long had its own logic. Historical dress research notes that children's wear developed as a distinct category because it needed different proportions, shorter hems, looser cuts, and more freedom of movement than adult clothing, rather than being a simple smaller copy of adult fashion from around 1750 or 1760 onward. That's still the heart of good sewing for children now. You're not miniaturising an adult garment. You're making something for a body that moves differently and changes quickly.
What makes a good first project
The best first make usually has a few practical strengths:
- Simple shape. An A-line dress, pinafore, or loose tunic gives you room to focus on accuracy.
- Forgiving fit. Elastic casings, gathered skirts, and roomy styles stay wearable longer.
- Straightforward fabric. Cotton poplin, stable lawn, or soft needlecord behave better under the machine than slippery fabrics.
- Easy care. If it can't cope with frequent washing, it probably won't earn a regular place in a child's wardrobe.
If you're sewing for a baby or very young child, it also helps to look at adjacent projects that build confidence before you tackle a dress. A guide to useful handmade baby gifts can spark ideas for simple sewn items that teach the same skills on a smaller scale, such as accurate cutting, pressing, and neat topstitching.
Practical rule: Choose your first children's pattern by wearability, not by ambition.
Once you start reading patterns as working documents rather than glossy promises, sewing for children gets much less intimidating.
Decoding Your First Pattern Envelope
The pattern envelope is your project map. If you can read it calmly, you'll make better choices before you cut anything.
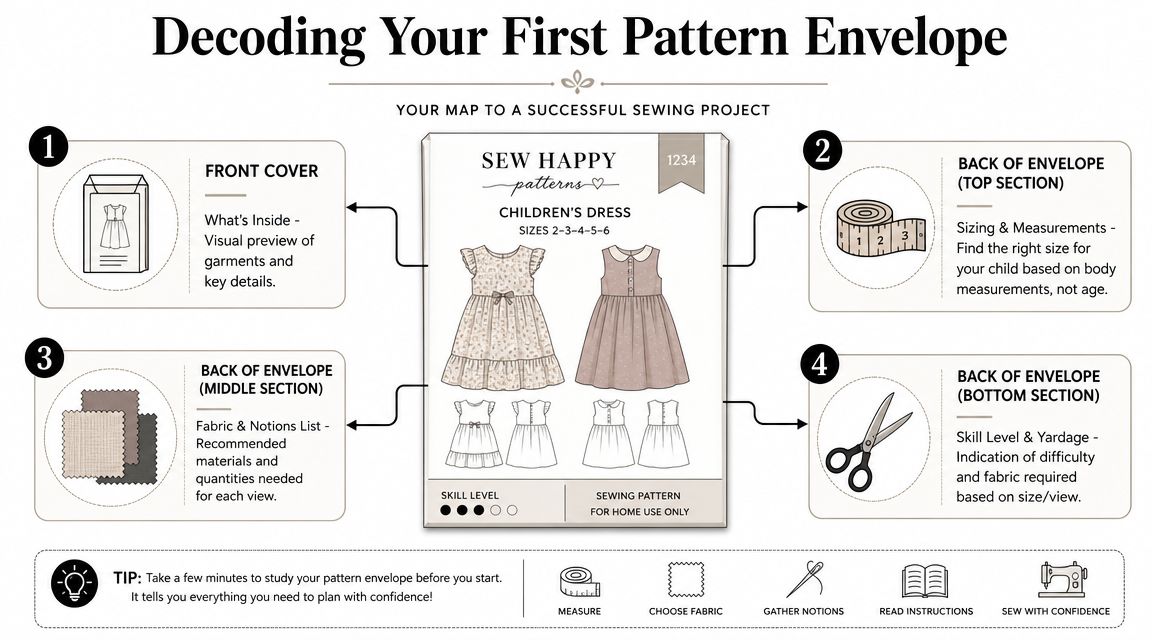
Start with the drawings, not the photo
The front illustration or styled photograph sells the dream. The line drawing details the garment you're sewing.
Look for the details that affect construction:
- Sleeve type. Set-in sleeves take more control than raglan sleeves.
- Fastening. A back zip is different from a button placket or elastic neckline.
- Skirt shape. Gathered skirts add fullness and sewing steps. A-line skirts are plainer but easier.
- Lining. A lined bodice gives a nice finish but adds another layer of handling.
If a pattern includes several views, check whether one version is much simpler than the others. Often the basic sleeveless or short-sleeved view is the best place to begin, even if the envelope highlights the fanciest option.
Read the size chart properly
A common pitfall for many beginners lies in pattern sizing. Ignore the age printed in big type if the pattern also gives body measurements. Pattern sizing is drafted to a standard block. Real children rarely match one neat line all over.
Check the measurement chart before anything else. For childrens dressmaking patterns, the chest and height are usually the most useful starting points for choosing size. If those don't match the same size, that's normal. You trace between sizes later. You do not buy fabric for a bigger size and hope for the best.
Fabric recommendations matter more than people think
When an envelope suggests cotton lawn, poplin, chambray, stable knit, or lightweight corduroy, it isn't being fussy. It's telling you what the pattern was designed to hang, stretch, or support.
A few useful translations:
- Drape means how softly a fabric falls. A gathered party dress in a crisp cotton looks very different from one in viscose.
- Stable knit means a knit that stretches, but not wildly. Easier to sew, less likely to ripple.
- Crisp woven holds shape. Good for collars, pleats, and structured bodices.
- Soft woven feels comfortable and often washes well, but may collapse if the style relies on stiffness.
If the envelope says “for woven fabrics”, don't substitute a stretchy jersey on your first attempt. The shape, ease, and neckline finish may all behave differently.
Don't skip the notions list
Notions are the parts that make the garment function. If the envelope calls for a zip, bias binding, interfacing, elastic, or buttons, buy them before you start.
A quick pre-cutting checklist helps:
- Match zip type to pattern. Concealed zips, standard dress zips, and open-ended zips are not interchangeable.
- Choose interfacing by weight. Lightweight fabric needs lightweight interfacing.
- Check elastic width. A casing drafted for narrow elastic won't behave the same with a wider one.
- Buy thread to suit the fabric. All-purpose polyester thread works for many children's clothes, but colour matching still matters.
Yardage is a cutting plan, not a guess
The yardage chart tells you how much fabric you need for the size, view, and fabric width. It also assumes you'll follow the layout. If your fabric has a one-way print, nap, or directional motif, you may need more than the most economical layout would suggest.
A careful sewist also checks whether the pattern pieces are large relative to the fabric width. Full skirts, puff sleeves, and facings can turn a modest project into one that needs more room than expected.
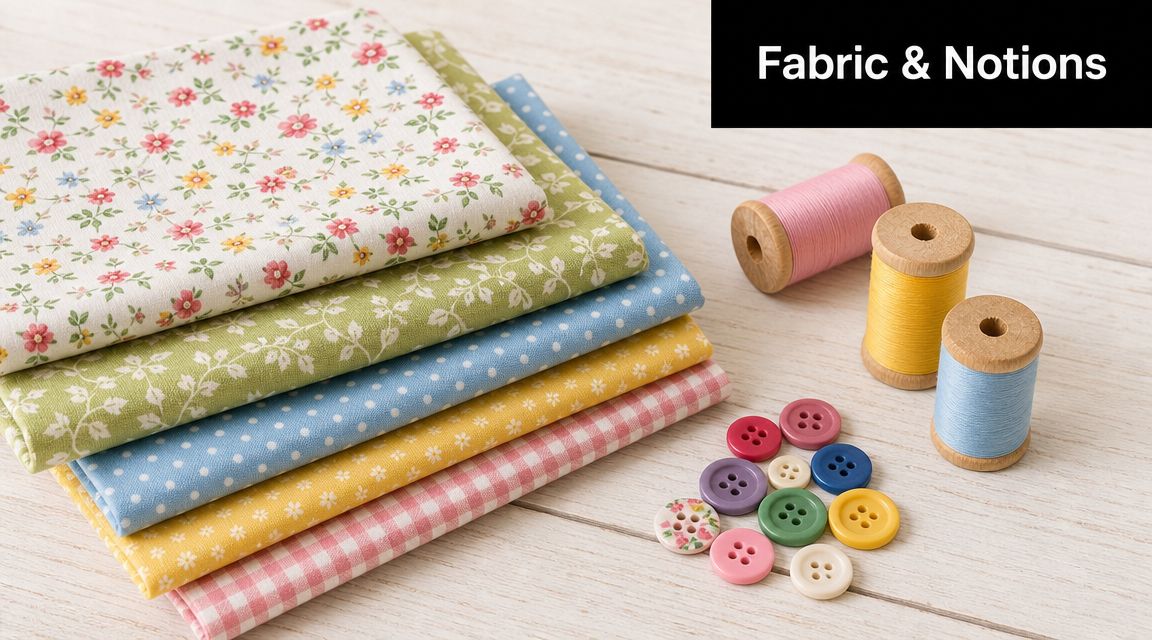
Choosing the Right Fabrics and Notions
Fabric choice decides whether a child reaches for the dress or resists it. A beautiful pattern sewn in the wrong cloth can feel scratchy, twist out of shape, or refuse to wash well. For children, practicality usually wins.
UK guidance discussed in sewing resources often points parents and makers back to the same concerns: fibre content, flammability, and avoiding hazards such as long or exposed cords, especially for younger children and everyday wear in this practical overview. That's worth keeping in mind before you even compare prints.
Match the fabric to the job
Think about where the garment will be worn.
A summer party dress needs different qualities from a nursery pinafore. A special-occasion style might benefit from cotton lawn, seersucker, or a crisp poplin that holds shape. A play dress needs softness, washability, and room to move. Jersey works well when you want stretch and easy dressing, while needlecord or corduroy can be excellent for layered pinafores that stand up to regular wear.
This is also where comfort comes in. Some children notice every seam, every scratchy trim, and every stiff neckline. If you're sewing for a child with sensitive skin, smoother fibres and softer finishes usually make life easier. If you want a broader look at why many parents prefer gentler everyday fabrics, this piece on supporting kids with organic cotton is a useful starting point.
Notions that help instead of hinder
Fastenings change how a garment gets used.
A back zip can look tidy on a more structured woven dress, but if you're sewing for a child who wants independence, large buttons, snaps, or an elastic neckline may be more practical. Tiny covered buttons look charming and can be maddening at school-run speed. The right notion isn't the prettiest one. It's the one that suits the child and the purpose of the garment.
Here's a quick comparison you can keep in mind.
| Garment Type | Recommended Fabric | Key Properties |
|---|---|---|
| Everyday A-line dress | Cotton poplin or chambray | Stable, easy to cut, washable |
| Party dress | Cotton lawn or seersucker | Lighter handle, neat gathers, good for detail |
| Play dress | Jersey or interlock | Stretch for movement, comfortable, easy to pull on |
| Pinafore | Needlecord or corduroy | Durable, structured, good for layering |
| School-friendly simple dress | Stable woven cotton | Hard-wearing, not slippery, easier to press |
Small choices that improve wearability
A few material decisions make a big difference in finished childrens dressmaking patterns:
- Prewash the fabric so shrinkage happens before sewing, not after the first laundry cycle.
- Skip harsh trims if they'll sit near the neck or underarms.
- Use soft seam finishes on garments worn close to the skin.
- Avoid bulky embellishments on everyday clothes that need to be sat on, climbed in, and washed often.
A practical fabric demonstration can help if you're still learning what different cloths feel like in use.
A child will forgive a plain fabric before they'll forgive an itchy neckline.
Taking Measurements and Understanding Sizing
Age sizing is convenient. It's also one of the least reliable ways to choose a children's pattern.
For the best fit, UK children's dress patterns should be chosen from the child's body measurements rather than age, and the most useful place to begin is by comparing chest circumference and height to the pattern chart before making length adjustments, as explained in this fitting guide from Pink Hollybush Designs.
The measurements that matter most
You don't need a full tailoring session for every simple dress. For most childrens dressmaking patterns, these are the core measurements:
- Chest. Measure around the fullest part, keeping the tape level.
- Waist. Measure at the natural waist without pulling tight.
- Height. Stand the child straight against a wall if possible.
If the pattern includes a finished garment measurement chart, use it. That tells you how much room is built in beyond the body size.
How to take them without a wrestling match
Children wriggle. That's normal. The trick is to be quick and calm.
Try these habits:
- Measure over close-fitting clothes or underwear, not over jumpers.
- Keep the tape snug, not tight. If the tape digs in, your result is wrong.
- Write each number down immediately. Don't trust memory when you're juggling a tape and a moving child.
- Measure twice if something looks odd.
If a child falls between sizes, choose based on the part of the garment that matters most to movement and comfort. For dresses, that's often the chest first, then the overall length.
Blending sizes is normal
A child might match one size at the chest and another in height. That doesn't mean the pattern is bad. It means the child is real.
Trace the size that matches the chest through the bodice width, then blend to the taller size for skirt or bodice length where needed. This usually gives a much cleaner result than jumping up a full size everywhere. Going larger all over can create a neckline that gapes, shoulders that slide off, and armholes that feel clumsy.
Ease is what lets children move
Ease is the extra room built into a garment beyond the body measurement. In children's clothing, that room matters because sitting, reaching, bending, and climbing all ask more from the garment than standing still does.
Woven dresses usually need positive ease so the child can move comfortably. Knit dresses may need much less because the fabric itself stretches. If a woven bodice fits neatly while standing but tightens when the child lifts their arms, the issue often isn't size alone. It may be a lack of ease or a proportion problem in the upper body.
Measure the child you have, not the age on the packet.
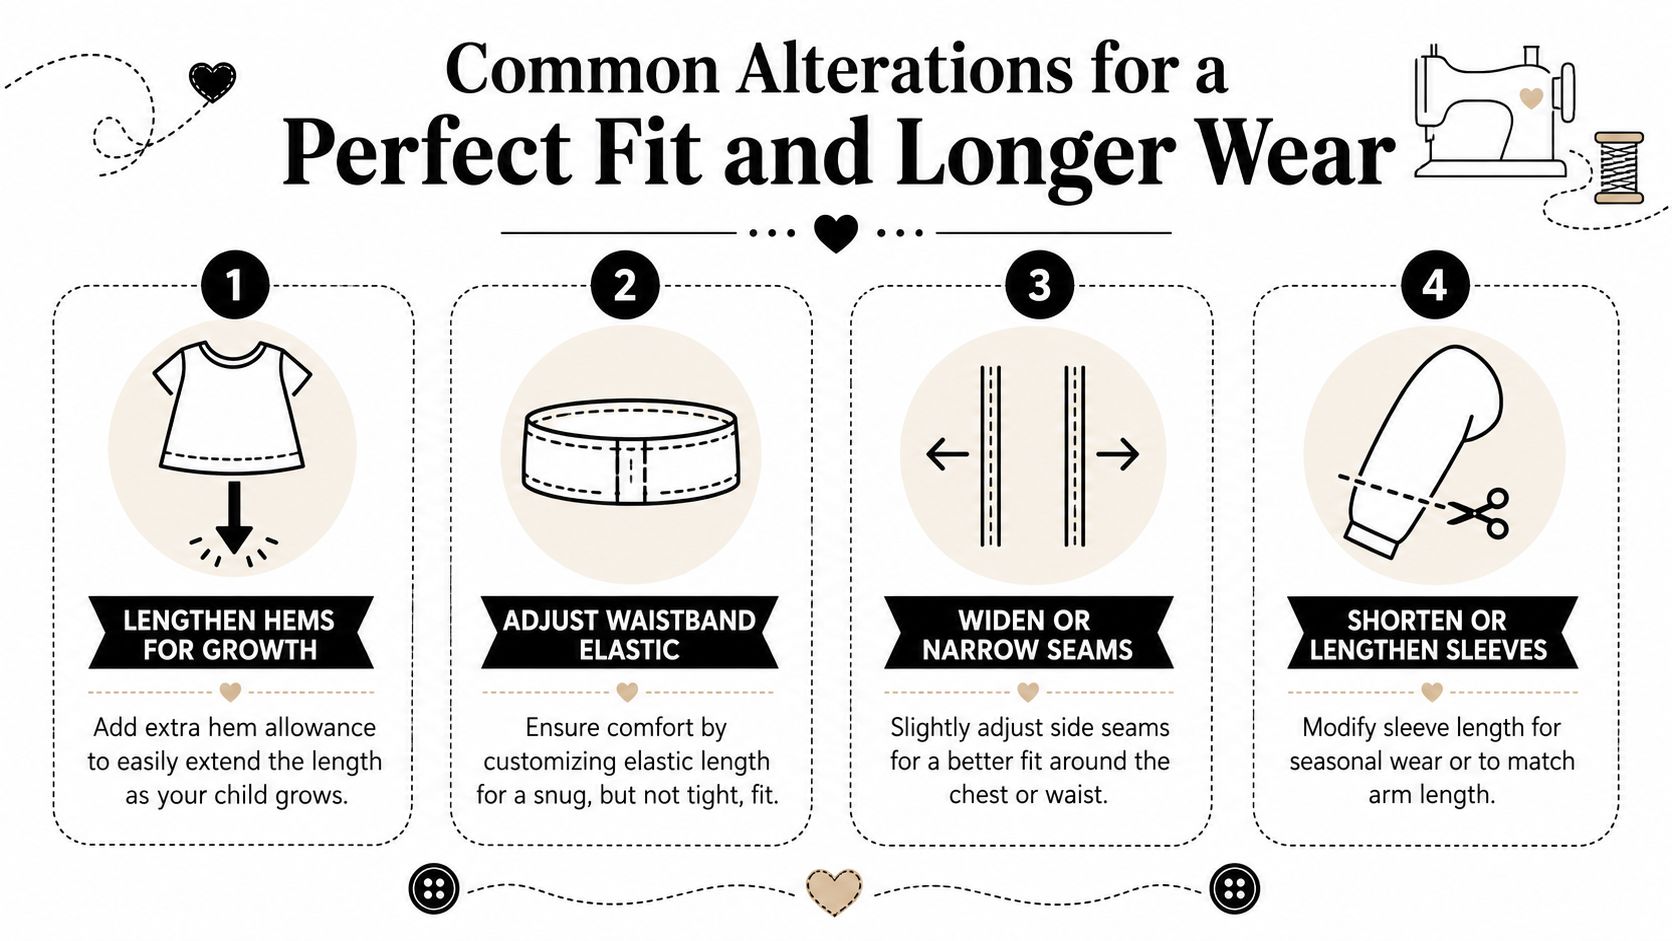
Common Alterations for a Perfect Fit and Longer Wear
The best children's clothes aren't only well sewn. They're planned to keep working for longer than one brief season.
A very common mistake is to grade everything up evenly when a child needs more room or more length. That often throws off the upper body. In children's patterns, proportion is usually the trickier issue. Incremental shoulder adjustments and a redrawn armhole curve tend to work better than scaling every point equally, because otherwise the sleeve and armhole stop matching cleanly and movement suffers, as shown in this children's pattern grading demonstration.
Length changes that preserve the shape
If the dress fits in the chest but feels too short in the body, don't cut a larger size. Add length where the pattern intends it.
The classic method is slash and spread:
- Draw the lengthen line if the pattern doesn't already provide one.
- Cut across that line.
- Spread the pieces by the amount needed.
- Tape extra paper behind the gap.
- True the seam lines so they flow smoothly.
This keeps the width, neckline, and shoulder size steady while giving extra body length. The same method works for sleeves.
Grow-with-me details that are worth adding
Some alterations help now. Others buy you extra wearing time.
These are the ones I'd prioritise:
- Deep hems. A generous double-fold hem can be let down later. This works especially well on plainer skirts and pinafores.
- Adjustable waist elastic. Buttonhole elastic lets you tighten or loosen the waist without remaking the garment.
- Wide seam allowances in side seams. Handy if the child needs a little more room later, though you should still keep the balance of the garment in mind.
- Turn-up cuffs. On sleeves, they look intentional from day one and can unfold as arms lengthen.
Styles that survive a growth spurt
Some pattern shapes naturally last longer than others.
A pinafore layered over tops and tights often keeps working after a fitted waist dress would be retired. A loose A-line dress can become a tunic as the child grows. Elasticated peasant styles are forgiving, but they can become bulky if the fabric is too stiff. Structured bodices look lovely, though they're less forgiving if the child changes shape quickly.
Here's a useful way to consider it:
| Alteration or Feature | Best Use | Watch out for |
|---|---|---|
| Deep hem | Skirts and simple dresses | Added bulk on heavy fabrics |
| Adjustable elastic | Waistbands and some pinafores | Need access point to adjust later |
| Extra side seam allowance | Woven garments with simple seams | Can distort fit if used excessively |
| Sleeve length adjustment | Dresses, tops, pyjamas | Recheck cuff or hem depth |
| Roll-up cuffs | Casual styles | Less suited to formal sleeves |
Where fit often goes wrong
If a bodice pulls across the front, many sewists assume they need a bigger size. Sometimes they do. Sometimes the actual problem sits higher up.
Check these points before changing everything:
- Shoulder line. If it extends too far, the sleeve can droop and the armhole loses support.
- Armhole shape. Distorted armholes restrict movement fast.
- Neckline width. Sizing up can create a neckline that's too wide even if the chest fit improves.
A quick toile in a similar fabric saves disappointment. It doesn't need to be pretty. It needs to tell you whether the child can sit, lift arms, and move comfortably.
Leave yourself permission to alter the pattern. That's often what turns a nice make into a favourite dress.
Top Pattern Styles for Your First Project
Beginners usually do better with a sensible first win than a dramatic first challenge. That matters more in childrens dressmaking patterns, because there's already enough to think about with fit, comfort, and fabric.
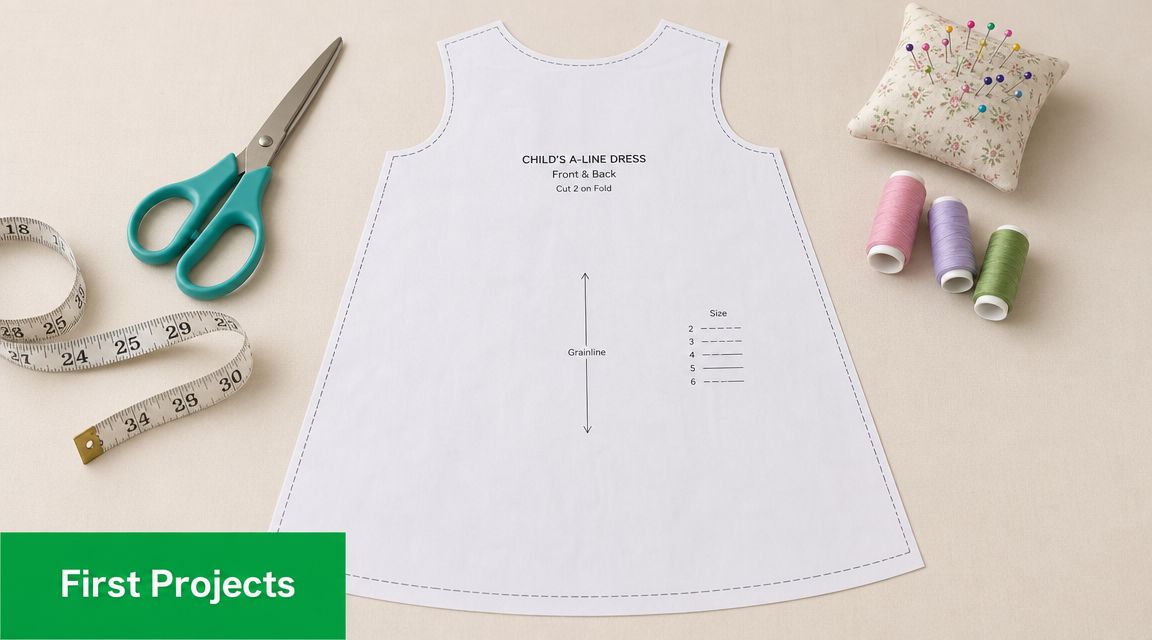
The styles most likely to go well
If you want a smooth first experience, start with pattern features rather than brand names.
The easiest winners tend to include:
- A-line dresses with few pattern pieces and no fussy fitting
- Pinafores that layer over tops, so exact fit matters less
- Peasant dresses or tops with elastic necklines
- Simple knit dresses only if you're already comfortable sewing jersey
- Raglan sleeve styles because they're easier to assemble than traditional set-in sleeves
A plain silhouette gives you room to focus on straight seams, neat pressing, and accurate hems. Those skills matter far more than decorative extras on a first project.
What to avoid at the start
Some pattern features look charming and create unnecessary frustration when you're still learning.
I'd leave these until later:
- very full skirts in slippery fabric
- fitted bodices with multiple darts or panels
- tiny bound buttonholes
- collars paired with set-in sleeves
- delicate fabrics that shift while cutting
None of these are impossible. They just ask for more control. If you're still building confidence, choose a pattern that forgives small inconsistencies.
A practical way to judge any pattern
When you're browsing, ask four blunt questions:
- Can I identify the order of construction from the drawings and instructions?
- Will the chosen fabric behave well under my machine?
- Can the child get it on and off without drama?
- Will it still be wearable if the fit isn't perfect on the first try?
That last point matters. An A-line woven dress with a neat but not exact fit often still gets worn. A closely fitted lined bodice usually doesn't.
A strong first project gives you something better than a finished dress. It gives you momentum.
The Joy of All-in-One Sewing Kits
One reason beginners stall isn't lack of enthusiasm. It's decision fatigue. Pattern, size, fabric type, matching thread, zip length, interfacing weight, elastic width. Each choice is manageable on its own, but together they can stop a project before it starts.
That's why all-in-one sewing kits make so much sense for new dressmakers and busy hobbyists. A good kit removes the mismatched choices that trip people up. The fabric suits the pattern. The notions are compatible. You're not standing in front of a shelf trying to decide whether this poplin is too crisp or that zip is the wrong sort.
Why kits work so well for children's sewing
Children's clothes are often small enough to feel achievable, but the practical decisions still matter. A kit cuts down on avoidable mistakes and lets you concentrate on the useful skills: marking, cutting, pressing, stitching accurately, and checking fit as you go.
They're also a nice answer if you're looking for hands-on, meaningful making time rather than another throwaway activity. Families who enjoy creative time together often look for screen-free activities for children, and sewing fits beautifully into that rhythm when the setup feels manageable rather than chaotic.
A calmer way to build skill
The nicest thing about sewing for children is the reaction when the garment works. The dress goes on easily. The neckline sits comfortably. The child can run, sit, and play without tugging at it. That's the point where sewing stops feeling like a technical puzzle and starts feeling like a useful craft.
If you're choosing your next step, keep it simple. Pick a practical pattern. Choose fabric that suits real life. Build in a little room for growth. The pretty details can always come later.
If you're ready to turn all of this into a first finished project, More Sewing is a helpful place to start. Their range of fabrics, haberdashery, and ready-to-sew kits makes it easier to choose materials that work well together, so you can spend less time second-guessing and more time sewing.