Guides
Rivets In Jeans: History, Purpose, & Installation Guide
You’ve sewn the seams neatly, topstitched the pockets, wrestled the fly into place, and pressed every edge with care. Then you hold up your jeans and something still feels unfinished. They look handmade in the good sense, but not quite in the polished, hard-wearing, ready-to-wear sense.
That final shift often comes down to the hardware.
Rivets in jeans are tiny, but they do a lot of heavy lifting. They reinforce stress points, sharpen the overall look, and give homemade denim that familiar structure people recognise straight away. They’re not just decorative dots at the pocket edge. They’re part engineering, part style detail, and part tradition.
For home sewists, rivets can seem fiddly at first. The pieces are small, the tools look a bit intimidating, and one bad strike with a hammer can leave you with a dented cap or a crooked set. The good news is that rivets are much simpler once you understand what they’re doing and where they belong.
Introduction The Finishing Touch That Makes a Jean
A good pair of handmade jeans asks a lot from the maker. You need accurate cutting, steady topstitching, sensible pressing, and patience at every stage. Rivets are one of the last jobs, but they have an outsized effect on the result.
When they’re chosen well and set properly, they make jeans feel intentional. The pocket corners look cleaner. The construction feels stronger. The whole garment reads as proper denim rather than just trousers made in denim fabric.
Why rivets matter in practice
Rivets solve two problems at once.
They reinforce strain points where fabric and stitching take repeated pulling
They add visual structure that makes jeans look balanced and finished
They support longevity in areas that get handled constantly, especially pocket openings
They help define style through finish, colour, and scale
If you’ve ever had a pocket edge start to pull away, you already know why reinforcement matters. Thread alone does a lot, but some areas benefit from a mechanical fastener.
Practical rule: If a spot gets tugged every time a hand goes in or out of a pocket, that spot deserves extra thought.
What works and what doesn’t
A few habits make rivets in jeans much easier to get right.
What works
Testing on scraps first with the exact same denim layers and interfacing
Matching post length to fabric thickness so the rivet sets tight rather than loose
Marking placement carefully before committing to a hole
Choosing a finish that suits the thread and denim wash
What doesn’t
Hammering straight onto a decorative cap without protection
Using a very long post on light layers and hoping it will compress neatly
Forcing rivets through bulky seams where the layers are uneven
Treating all metal hardware as interchangeable
Once you understand the history, the parts, and the placement, rivets stop feeling like specialist hardware and start feeling like one more useful sewing skill.
The Story Behind the Stud A History of Rivets in Jeans
A miner reaches into his front pocket for the tenth time that day, and the cloth gives way at the corner again. That repeated failure is the starting point for jean rivets. They came from repair logic, not decoration.
On May 20, 1873, Jacob Davis, a tailor of Latvian descent working in Reno, Nevada, patented the use of copper rivets at stress points, especially pocket corners and the base of the button fly, to prevent tears in workwear. Levi Strauss & Co. received the exclusive U.S. patent, and the company held that monopoly for 17 years until 1892, according to Levi Strauss & Co.'s history of denim.
Why the idea caught on
The method was straightforward. Instead of making the whole garment heavier, Davis reinforced the exact spots that tore first. Anyone who has mended work trousers or hard-worn jeans will recognise the logic. Fix the point of strain, and the rest of the garment has a better chance of lasting.
That principle still holds at the sewing table. Good hardware is often a more sensible answer than extra bulk, especially on pocket openings that get pulled hundreds of times over a garment’s life.
Rivets also solved a business problem. Durable trousers built trust. If a customer came back because the jeans wore well rather than because the pocket failed, the maker kept the sale and the reputation.
From workwear detail to denim signature
For many years, rivets belonged to workwear first. Later, as jeans moved into everyday dress and youth culture, rivets stayed put. By then they were doing two jobs at once. They still reinforced stress points, and they had become part of the look people associated with a proper pair of jeans.
That shift matters to small brands and home sewists. A rivet is one of those details that reads instantly, even when the viewer could not explain why. Remove it from a design that needs it, and the jeans can look underbuilt. Add it where there is no strain, and it starts to feel costume-like rather than considered.
Why this history still matters at the sewing bench
History is useful here because it keeps the decision practical. Rivets belong on jeans when they solve a real wear problem, support the shape of the garment, or both. They are not a shortcut to quality. They are a small piece of engineering.
I also encourage makers to think about hardware choices in terms of repair and lifespan. A well-placed rivet can keep a pocket from tearing out for years. A poor-quality one can corrode, loosen, or make later repairs harder than they need to be. If sustainability matters, and for many customers it now does, the best choice is rarely the cheapest packet of shiny hardware. It is the rivet that lasts, suits the fabric weight, and does not force an early replacement of the whole garment.
That is why rivets still feel right on handmade jeans. They come from a clear purpose, and good jean-making still depends on purpose.
Anatomy of a Jean Rivet Types Materials and Finishes
A jean rivet is a small component, but there’s more going on than many makers realise. If you’ve ever bought a packet of hardware and thought, “These all look roughly the same,” that’s usually the point where problems start.
At its simplest, a rivet is a two-part fastening. The visible top is the cap or rivet head. The lower piece is the tack or post, which pierces the fabric and locks into the cap. The original 1873 copper rivet used a 9.6mm diameter design, and modern premium jeans rivets remain close to that at around 9.5mm, with finishes such as nickel-free copper, antique brass, and gunmetal, as described by Denimhunters' guide to jean rivets.
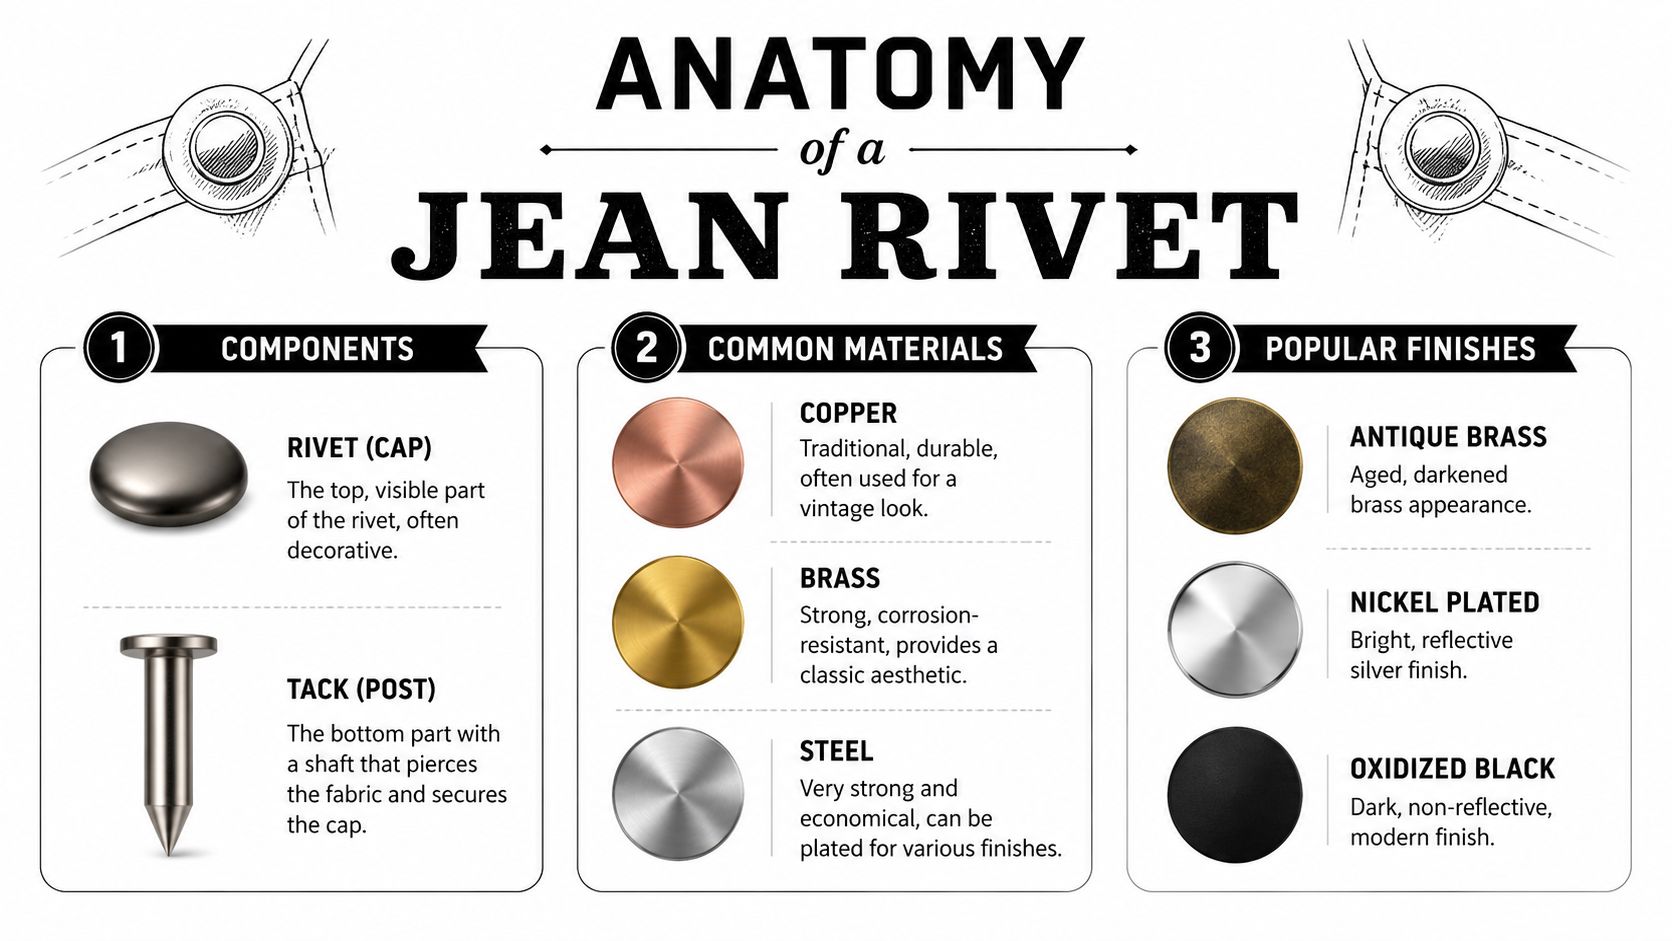
The two parts that need to fit each other
The cap is what everyone sees. It affects the look of the jeans more than people think. A bright silver cap feels sharper and cooler. Antique brass softens into a more heritage look. Gunmetal can make dark denim look cleaner and more modern.
The tack does the unseen work. If the post is too short for your denim layers, it won’t grip properly. If it’s too long, the rivet may wobble, crush awkwardly, or set crooked. This is why cheap mixed hardware packs can be frustrating. The finish may look fine, but the dimensions aren’t always suited to proper jeans construction.
Common material choices
The metal changes both appearance and behaviour. Some finishes also disguise marks better than others, which is useful if you’re installing by hand.
| Material/Finish | Appearance | Durability | Best For | Example Use Case |
|---|---|---|---|---|
| Copper | Warm, traditional, heritage look | Durable | Classic blue denim | Indigo jeans with gold topstitching |
| Brass | Rich gold-toned finish | Strong and corrosion-resistant in use | Vintage-inspired makes | Mid-blue or ecru denim with tan thread |
| Nickel plated | Bright silver, crisp finish | Good for everyday wear if plating is sound | Cleaner modern styling | Black denim with grey or white topstitching |
| Antique brass | Darkened, aged brass effect | Practical and forgiving of minor marks | Workwear-style jeans | Heavy denim with tobacco thread |
| Gunmetal | Dark, muted, modern | Useful where you want low visual contrast | Dark fashion denim | Charcoal or black jeans |
| Nickel-free copper | Warm metal with sensitivity-conscious appeal | Durable | Makers avoiding certain plated finishes | Premium denim projects |
Finish is like seasoning
Choosing rivet finish is a bit like seasoning food. Use too little thought and the result is flat. Pick a finish that suits the rest of the garment and everything feels more balanced.
A few pairings that usually work well:
Dark indigo denim often suits antique brass or copper because the warmth echoes traditional topstitch thread
Black denim can take gunmetal beautifully if you want hardware to recede
Grey denim often looks best with silver-toned or blackened hardware
Ecru or natural denim can handle brass or copper without looking heavy
What doesn’t work so well is mixing signals. Very heritage topstitching with icy modern hardware can feel accidental unless you’re doing it deliberately. Likewise, heavily distressed denim with overly polished hardware can look mismatched.
Rivets and alternatives
Not every metal stud sold near denim hardware is a true jean rivet. Snaps and decorative studs may look similar from the top, but they don’t behave the same way under strain. For pocket reinforcement, use hardware intended for jeans or workwear.
Some makers also choose alternatives in specific areas. Denimhunters notes that later adaptations included bar tacks and systems such as Lee’s X-Tacks for reinforcement in certain pocket locations. That’s useful to remember if you want the look of rivets in some places and stitched reinforcement in others.
A pretty cap doesn’t make a good rivet. The hardware has to match the thickness and purpose of the garment.
Strategic Reinforcement Where and Why to Place Rivets
Placement is where rivets stop being decorative and start doing their real job. Good placement comes from stress-point thinking. Where does the garment get pulled, strained, or flexed over and over again?
Traditionally, rivets in jeans sit in five key locations: the top corners of the front pockets, the coin pocket, and the outer corners of the back pockets. That pattern comes from stress-point analysis, and rivets work differently from stitching because they create metal-to-metal compression joints that spread force across a broader area, as explained in Closet Core's denim rivet installation guide.

The classic five-point map
Think about how you use jeans during the day. Hands go in and out of front pockets constantly. Coins, keys, and phones tug at openings. Pocket bags pull against the front leg.
That’s why these points matter:
Front pocket corners take repeated outward strain
Coin pocket corner is a small area, but it’s thick and often catches stress at the top edge
Back pocket outer corners were historically reinforced because pockets pulled against the seat and side movement
If you’re making classic five-pocket jeans, these placements make structural sense, not just visual sense.
Modern adjustments
Not every traditional placement is still ideal in every project. Denimhunters notes that Levi’s replaced hidden back pocket rivets with bar tacks in 1966 to stop furniture scratching complaints. For home sewists, that’s a practical reminder that durability always sits alongside comfort and everyday use.
If I’m advising someone making jeans for daily wear around the house, I usually suggest thinking carefully about the back pockets. Rivets there can look authentic, but bar tacks are often the better choice if you want less bulk and less chance of snagging or scratching.
Where not to put them
Many homemade jeans tend to go slightly off course. More rivets don’t automatically mean better jeans.
Avoid placing rivets:
Too close to seam allowances where the fabric can distort
Directly on very bulky intersections unless the hardware is sized for that thickness
On decorative pocket points with no real support underneath
Anywhere the wearer sits directly on hard metal unless comfort has been considered
A rivet should support the cloth around it. If the surrounding area is weak, loosely sewn, or too bulky, the hardware won’t rescue it.
If a rivet placement looks good but makes the garment less comfortable, choose the stitched solution instead.
A useful habit before setting
Before punching holes, lay the jeans flat and mark both sides. Step back and compare. Rivets need symmetry. Even a small mismatch can show up sharply on finished denim.
That pause saves a lot of regret.
Your Guide to Installing and Removing Rivets Like a Pro
Installing rivets is one of those jobs that becomes straightforward once your setup is sensible. Most problems come from rushing, poor support underneath, or using hardware that doesn’t suit the thickness of the garment.
The basic idea is simple. You make a controlled hole, insert the tack from the wrong side, place the cap on the right side, and apply force evenly so the two pieces lock together.
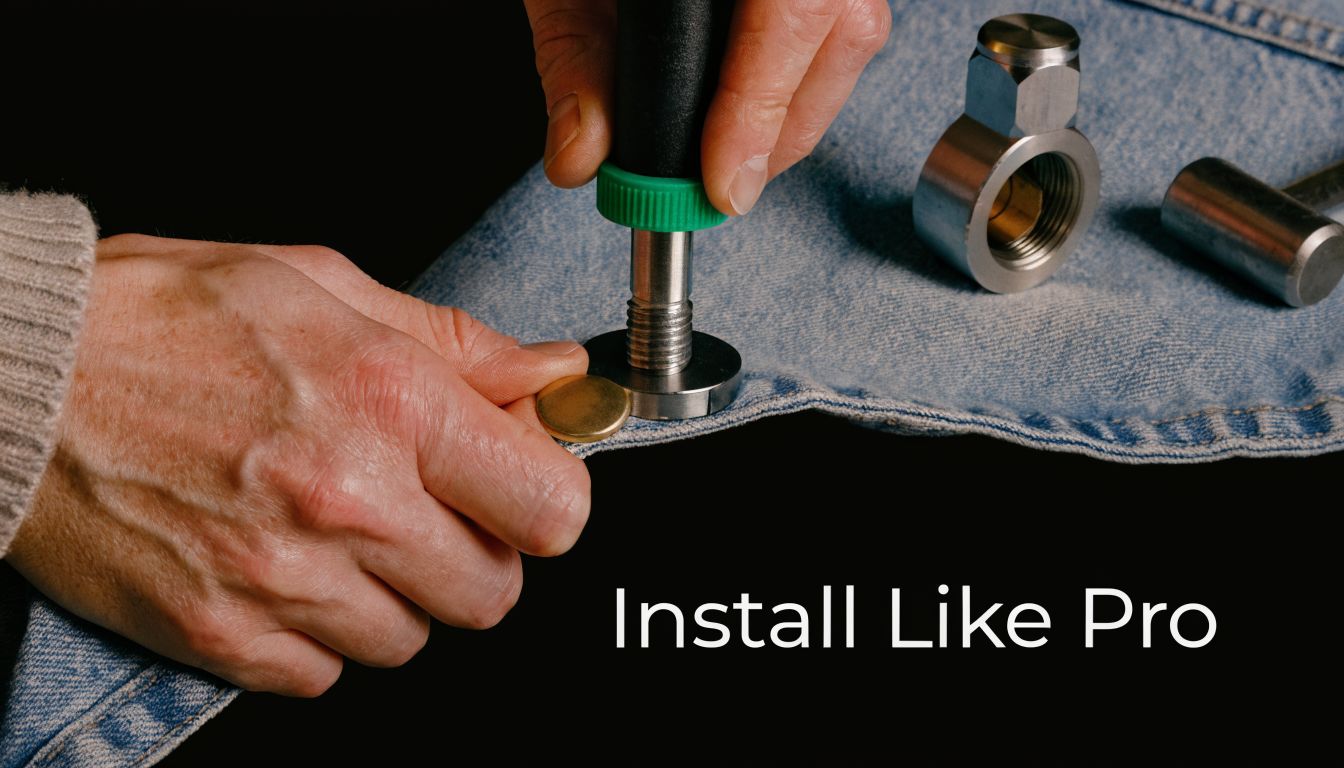
Tools that make the job easier
You don’t need a workshop full of equipment, but you do need stability.
A practical home setup can include:
An awl or hole punch for making the opening
A small hammer if you’re setting manually
A hard surface such as a metal block or very firm anvil-style base
A rivet setter or matching die if your hardware brand supplies one
A pressing cloth, scrap denim, or scrap leather to protect the cap finish
Pliers or side cutters for removal if something goes wrong
If you sew jeans often, a hand press is worth considering because it gives more control and more repeatable results. If you only make the occasional pair, a hammer-and-setter method works perfectly well with care.
Installing rivets step by step
Mark the placement carefully
Use chalk, a removable marker, or a pin to identify the exact spot. Check both sides of the garment before making the hole. This is especially important on front pockets, where left and right need to mirror each other.
Make a neat hole, not a torn one
Use an awl or punch just large enough for the post. Don’t cut a big ragged opening. A too-large hole can leave the rivet loose because the fabric isn’t supporting the post firmly.
On tightly woven denim, opening the weave neatly is often better than shredding fibres.
Insert the tack from the back
Push the tack through from the inside or wrong side so the decorative cap will sit on the outside. Make sure the tack comes through squarely. If it leans, the final set often leans too.
Seat the cap and check the fit
Place the cap on top and hold the layers firmly. Before hammering or pressing, check that the post length makes sense for the fabric stack. If there’s far too much exposed post, the result may be loose or crushed-looking.
Set with controlled force
A few light, controlled taps are better than one wild swing. Keep the garment supported on a hard surface and keep the hardware upright.
Use enough force to lock the rivet. Don’t use so much that you flatten the cap or bruise the surrounding denim.
This is a useful demonstration if you want to see the motion and setup in action:
Small techniques that improve the result
Some habits make a visible difference.
Test on scraps with the same layers as the pocket edge
Protect the cap finish with scrap fabric or leather when hammering
Keep the garment flat and fully supported so the force lands evenly
Work one rivet at a time rather than marking and punching everything in a hurry
If your denim is especially thick, reduce bulk where you can before setting. Rivets don’t like unstable stacks of fabric.
How to remove a rivet without wrecking the jeans
Sometimes one sets crooked. Sometimes a cap gets marked. Sometimes you change your mind. Removal is possible, but it needs patience.
Try this method:
Protect the fabric first by keeping your tool away from the visible denim as much as possible.
Work from the back if you can because marks are less likely to show.
Use pliers or cutters carefully to grip or break the tack connection.
Wiggle the pieces apart gradually rather than yanking.
Reinforce the area if needed before installing a replacement, especially if the hole has enlarged.
If the fabric has become weakened, don’t put a new rivet straight into a damaged spot and hope for the best. Add support behind it or shift placement slightly if the design allows.
Sourcing and Selecting the Best Rivets for Your Project
Buying rivets well saves more frustration than any clever installation trick. Good hardware fits the project. Poor hardware asks the fabric to adapt to it, and that almost never ends well.
The first thing to look at is the garment itself. Heavy rigid denim, stretch denim, canvas, and lighter fashion denim all behave differently. A rivet that feels sturdy in the packet may still be wrong if the post is too long, the cap too oversized, or the finish too flimsy for repeated wear.
What to check before you buy
When choosing rivets in jeans projects, I’d look at these points first:
Fabric thickness. Heavier denim needs a post that can pass through the layers cleanly and still set securely.
Pocket construction. If your pocket corner includes extra layers, interfacing, or thick topstitching, test thickness before buying in bulk.
Finish quality. A smooth, even finish usually behaves better than hardware with rough edges or patchy plating.
Style of the jeans. Heritage workwear jeans suit warm metals beautifully. Clean fashion denim may look better with silver or gunmetal.
Comfort and use. If the jeans will be worn hard, prioritise solid function over novelty finishes.
Signs of quality
A decent rivet usually feels tidy before it’s even installed. The cap should be evenly formed, the tack should be straight, and the finish shouldn’t flake when handled. If the pieces already feel rough, lightweight, or inconsistent, installation won’t improve them.
Cheaper rivets often fail in one of two ways. They either set poorly because the fit between cap and post is imprecise, or they look worn too quickly because the outer finish lacks durability.
The sustainability question most guides skip
Hardware rarely gets the same scrutiny as fabric, but it should. There’s a clear information gap around the environmental impact of rivet production, especially in relation to mining, processing, and disposal. For more conscious sewing, it’s worth considering the impact of copper mining and looking for suppliers that offer recycled metals or clearer supply-chain information, as noted by Long John’s discussion of rivet history and overlooked sustainability questions.
That doesn’t mean you need perfection before you sew. It means asking better questions.
A few practical ways to shop more thoughtfully:
Choose fewer, better rivets rather than buying mixed packs you may never use
Ask about metal content if the supplier provides material details
Look for recycled metal options where available
Buy hardware that suits the project the first time so fewer pieces are wasted
Consider bar tacks instead of rivets in places where metal reinforcement isn’t essential
Good sourcing isn’t only about appearance. It’s about buying hardware you’ll actually use, trust, and keep in circulation through long-wearing garments.
Troubleshooting Common Rivet Installation Issues
Even experienced sewists occasionally mangle a rivet. The key is knowing what caused it so you can correct the problem instead of repeating it on the next pocket.
My rivet cap bent during setting
The usual cause is uneven force or poor support underneath. If the garment was resting on a soft surface, or the setter slipped, the cap can distort.
Try again on a hard, stable base. Check that the cap and tack are lined up straight before striking. If you’re using a hammer, lighter controlled taps are safer than one heavy hit.
The post won’t go through all the layers
This usually means one of two things. The hole is too small, or the placement sits over more bulk than the rivet can handle comfortably.
Use an awl to open the hole more neatly, and reassess the exact spot. If the corner includes seam allowances, topstitching, and pocket bag all stacked awkwardly, shift placement slightly while keeping the look balanced.
The rivet feels loose after installation
A loose rivet often points to a post that’s too long for the fabric thickness, or a hole that was made too large. Once the connection isn’t snug, the hardware can wobble.
If it’s noticeably loose, remove it and replace it. Don’t leave a spinning rivet in place. It will only wear the fabric more.
The fabric looks strained around the rivet
That’s often a placement issue. The rivet may be too close to the edge, too close to a seam line, or installed in an area that doesn’t have enough support.
To prevent this, reinforce soft or stretchy areas before setting, and avoid placing rivets where the cloth has little substance around the hole.
I marked the cap finish while hammering
That’s one of the most common beginner mistakes, and it’s easy to avoid next time. Put a scrap of denim, calico, or leather between the tool and the visible cap. Darker finishes such as gunmetal and antique brass also tend to hide minor marks better than very bright polished ones.
How to store spare rivets
Keep them dry, grouped by finish, and away from loose tools that can scratch them. Small labelled tins, envelopes, or divided boxes work well. If you mix all your hardware in one tin, the prettier finishes usually come out first looking tired.
Frequently Asked Questions About Jean Rivets
Can I install rivets without special tools?
Yes. A hammer, a solid surface, and the correct setter will do the job for many home sewists. What makes the difference is control. If the rivet is well supported and the post length suits the fabric thickness, hand-setting can give a tidy, durable result.
A press is faster and more consistent, especially if you make jeans often or produce small runs to sell. For one pair at a time, a hand tool setup is usually enough.
Are rivets only for denim?
No. Rivets also suit canvas, drill, heavy twill, and other firm fabrics that take strain at pocket corners or openings. I use them on workwear aprons and utility skirts too, but only where the cloth has enough body to hold the hardware without tearing.
Soft linen, loose weaves, and lightweight fashion fabrics usually do better with bar tacks or reinforcement stitching. Metal hardware should match the job, not just the look.
Do all jeans need rivets?
Some of the best jeans do. Some do not.
Rivets make sense when you want extra reinforcement, a classic workwear finish, or that satisfying bit of structure at high-stress points. They are not automatically the right answer for every pair. Bar tacks are often a better choice for very lightweight denim, children’s clothes, or areas that may scratch furniture.
There is also a sustainability angle that gets missed. Rivets can extend the life of a hard-worn garment by protecting weak points, which is a real benefit. But extra hardware can make later repairs, alterations, and fibre recycling more awkward. For small designers and home sewists, that trade-off is worth considering at the pattern stage.
Why do rivets still matter if jeans are mostly fashion now?
Rivets stayed because they still do two jobs well. They reinforce strain points, and they signal that a pair of jeans is built with workwear details in mind.
That visual language still matters. Even on fashion jeans, rivets tell the eye that the garment is grounded in utility. As noted earlier in the article’s history section, jeans kept many of their practical details as they moved from workwear into everyday dress. Rivets survived that shift because they were useful to begin with, and because the look became part of what people expect from a proper pair of jeans.
If you're ready to make your next pair look and wear better, More Sewing is a reliable place to find quality fabrics, haberdashery, and sewing essentials for denim projects. Whether you’re choosing hardware, planning a first jeans make, or looking for materials that feel a cut above the average, it’s well worth a browse.