
Guides
Expert Guide to Fusible Interfacing UK 2026
You've bought a lovely fabric for a blouse, jacket or dress, cut your pattern, and then hit the moment every sewist knows. The fabric is beautiful, but it won't quite behave. A collar flops. A waistband buckles. A facing looks limp instead of crisp.
That's usually the point where fusible interfacing saves the day. It's the quiet helper that sits on the wrong side of the fabric and gives shape where you need it, without shouting for attention. Once you understand how to choose it and apply it properly, your work starts looking far more polished.
Giving Your Sewing Projects Professional Finish
A sewist walks into the shop with a nearly finished shirt dress and a slightly fed-up look. The fabric is lovely, the stitching is neat, but the collar points have gone soft, the button stand shifts about, and the facing will not stay flat for long. It is a familiar problem in UK dressmaking, especially with fluid fabrics such as viscose, lightweight denim, cotton lawn, and the deadstock blends that turn up in fabric shops every week.
The fix is often simple. Add the right fusible interfacing in the right weight, and those small problem areas start behaving properly. It is a bit like giving selected parts of the garment a firm lining inside the wall. The blouse can still drape, but the collar, cuffs, placket, or waistband get enough structure to hold their shape.
That practical support is why Fusible Interfacing UK matters so much to home sewists. It helps soft collars stay crisp, keeps pocket openings from stretching, steadies zip areas, and gives facings a cleaner edge. It is also especially useful with British deadstock fabrics, because those often come with less information on finish, fibre mix, or intended use. A quick test on a scrap can turn a mystery fabric into a much easier project.
Fusible interfacing has become a normal part of modern sewing, as noted in a 2024 market summary. The useful question is not whether to use it, but how to match it well.
Where beginners usually get stuck
Beginners often run into three practical questions.
- What weight do I need? Light, medium, and heavy sound straightforward until you are choosing between viscose twill, soft needlecord, washed linen, or ex-designer suiting.
- What type should I buy? Woven, non-woven, knit, fusible web, and tailoring interfacings all behave differently.
- How do I avoid bubbles? Usually by testing first, using the right heat, and keeping the iron still while the glue bonds.
A handy rule from the cutting table is this.
Practical rule: If an area needs to hold a shape instead of simply draping, add interfacing.
That covers more projects than many beginners expect. Shirt collars, cuffs, and button bands need support. So do dress waistbands, pocket mouths, bag panels, coat facings, and the zip section of a soft skirt. Once you start matching interfacing weight to fabric weight, the choice gets much less mysterious. Light cotton lawn usually pairs best with a light fusible. Mid-weight cotton poplin or chambray often suits a medium one. Heavy coating or bag-making fabrics need something stronger, but only in the areas that must stay firm.
That matching habit is what gives handmade clothes a more polished finish. Same fabric, same pattern, same maker. Better support in the right place.
What Is Fusible Interfacing and How Does It Work
You cut a neat collar, press your seams carefully, and the finished piece still looks a bit limp. Very often, the missing ingredient is fusible interfacing.
Fusible interfacing is an extra layer added to the wrong side of a fabric to give it more shape, firmness, or control. It sits behind the scenes, but it changes how the fabric behaves. A soft cotton collar can stand properly. A button band can stay tidy. A bag panel can stop collapsing in on itself.
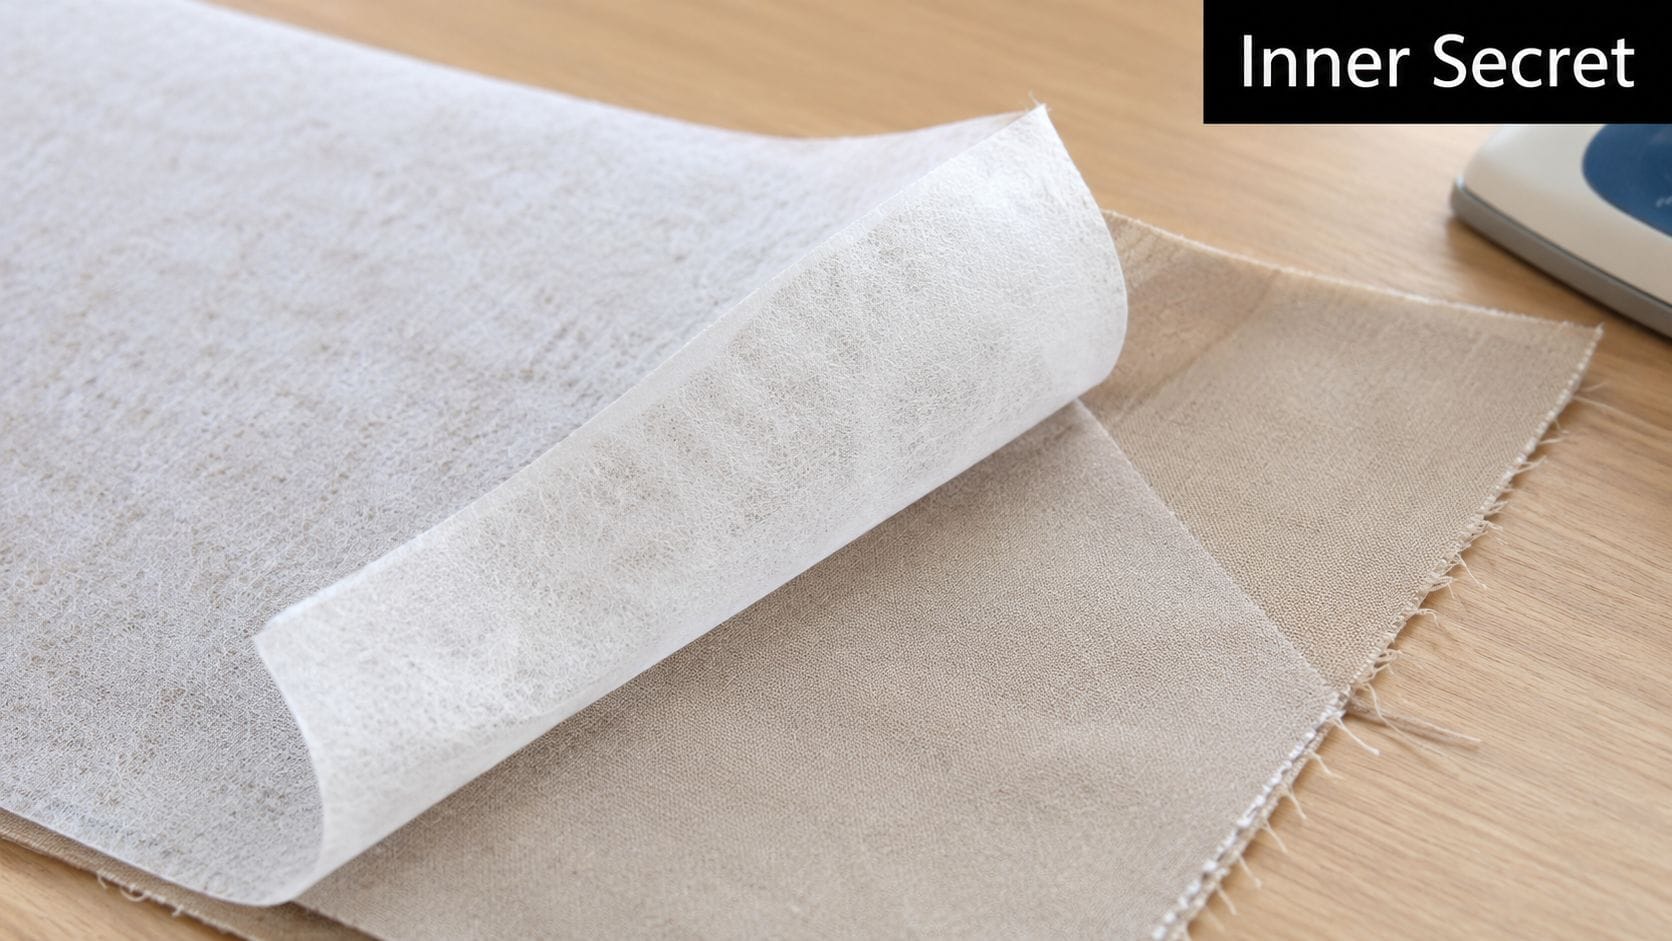
One side of fusible interfacing is coated with tiny adhesive dots. Heat and pressure melt those dots so they bond to the fabric. Once the piece cools, the two layers act more like one cloth instead of two separate sheets. That is why a neckline can keep its shape better after wear, and why a waistband feels more secure instead of crumpling.
A good way to picture it is wallpaper paste. Before heat is applied, the glue is sitting there waiting. Press it properly, and it grabs hold.
The difference between fusible and sew-in
Fusible interfacing bonds to fabric with heat.
Sew-in interfacing is attached with stitching.
The end goal is similar. Both add support. The difference is in how they behave and where they suit best.
Sew-in interfacing is still useful, especially for fabrics that dislike heat or show every mark from an iron. It can also give a softer result in garments that require precise construction. In UK dressmaking, it is often chosen for delicate silks, textured fabrics, and some special occasion fabrics where fusible glue might show through or make the cloth feel too stiff, as explained in Dalston Mill Fabrics' interfacing guide.
For many everyday projects, though, fusible is the quicker and more predictable option. That matters when you are making school shirts in polycotton, a poplin blouse, a needlecord overshirt, or a tote from deadstock denim and want clean results without extra handling.
Why fusible is so widely used
Fusible interfacing became popular for a practical reason. It saves time and keeps layers from shifting while you sew.
That makes a real difference on common home sewing jobs. A shirt cuff is easier to topstitch when the support layer is already bonded in place. A curved facing behaves better when it is not sliding away from the main fabric. For many UK sewists working with cotton poplin, chambray, viscose blends, or ex-designer deadstock with an unknown finish, fusible gives a reliable starting point, as long as you test a scrap first.
What the glue dots are doing
Those little dots are not there to make the fabric hard. Their job is to anchor the interfacing evenly across the surface.
If the adhesive melts well, the support becomes part of the fabric rather than a separate insert. If it does not melt enough, the corners may lift. If the iron moves around too much, you can trap wrinkles between the layers. If the heat is too high, some fabrics can shine, flatten, or scorch.
That is why pressing matters as much as product choice.
The coated side goes against the wrong side of the fabric. Usually, it feels slightly rough or bumpy compared with the plain side. After pressing and cooling, the best result is one you barely notice. The fabric should feel better behaved, not bulky or cardboard-like.
In practice, that means matching support to the job. A lightweight lawn facing needs a very different fusible from a wool coating collar stand or a deadstock jacquard bag panel. In the UK, where fabric shops often stock everything from Liberty tana lawn to sturdy schoolwear twill and mystery end-of-roll fashion fabrics, that matching step is what turns interfacing from a guessing game into a useful system.
Decoding the Different Types of Fusible Interfacing
Walk into a haberdashery and the shelf can look baffling. White rolls, black rolls, soft ones, papery ones, woven ones, fleecey ones. The trick is to sort them into a few sensible families.
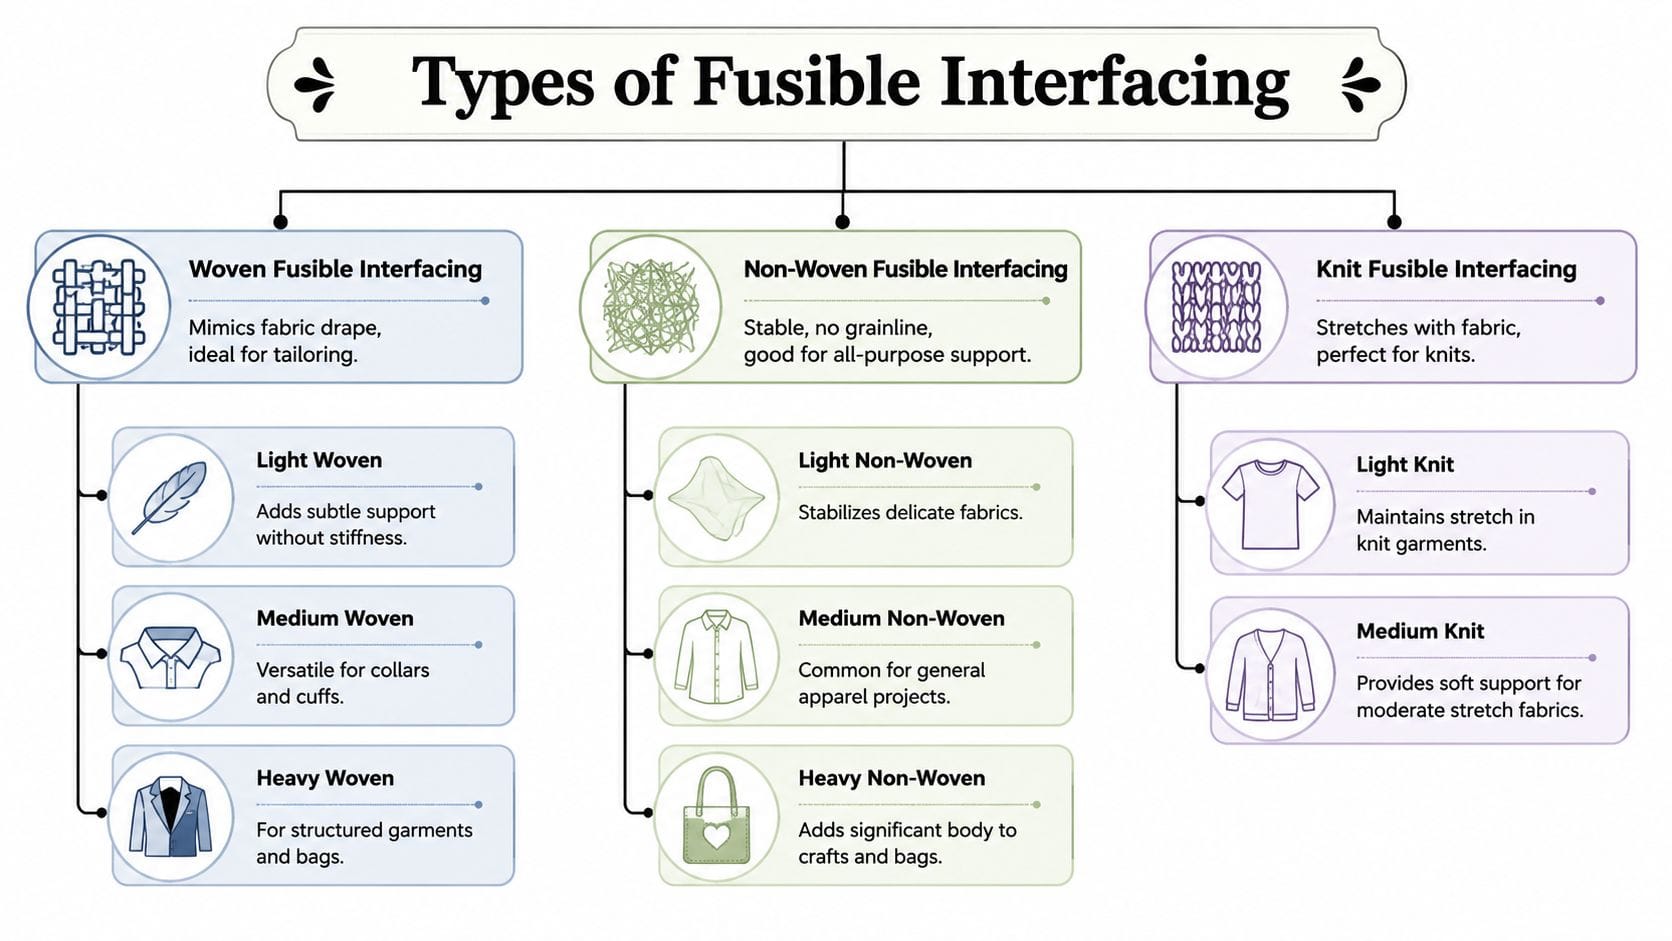
Woven, non-woven, and knit
Woven fusible interfacing has a grain, just like fabric. It usually behaves in a more fabric-like way, so it's a strong choice for tailoring and garments where drape matters.
Non-woven fusible interfacing has no grain. It's stable in every direction and often easier for beginners because you don't need to line up warp and weft. It's commonly used for general dressmaking, facings, pocket areas, and crafts.
Knit fusible interfacing has stretch. It's useful when your main fabric stretches and you want support without completely killing that movement. Think jersey necklines, cardigan fronts, or a knit dress facing that still needs flexibility.
Weight matters just as much as type
A light interfacing on a heavy coating won't do much. A heavy interfacing on cotton lawn can turn a soft blouse into cardboard. This is the bit people often miss.
Here's a practical perspective:
| Interfacing weight | Best for | Typical UK project examples |
|---|---|---|
| Lightweight | Gentle support | Shirt collars on fine cotton, blouse facings, pocket openings, lightweight skirts |
| Medium weight | General dressmaking structure | Cuffs, shirt stands, dress waistbands, jacket facings, simple bags |
| Heavyweight | Firm structure | Structured jackets, coats, bags, waistcoats, blazer fronts |
Common examples in the sewing room
- Light woven fusible suits cotton lawn, voile, fine poplin, and some lighter deadstock shirtings.
- Medium woven fusible is a dependable all-rounder for chambray, standard cotton, linen blends, and many dress-weight denims.
- Heavy woven tailoring interfacing is where you move for coats, waistcoats, and structured blazers.
- Light non-woven helps stabilise delicate or shifty fabrics where you need control more than shape.
- Medium non-woven is often the first thing beginners buy because it works for many ordinary garment tasks.
- Heavy non-woven shows up more in bags, crafts, and areas needing body rather than elegant drape.
- Knit fusible belongs with jersey, ponte, sweatshirting, and stretch fabrics that still need reinforcement in certain zones.
Fusible web is not the same as tailoring interfacing
This causes a lot of muddle. Fusible web is designed more like a bonding product. It's used for appliqué, hems, mending, and decorative work where you want to glue one layer to another. In garment sewing, it's a different tool from a proper tailoring interfacing.
Some fusible web products even come as thicker foam or padding types for projects needing a springy, cushioned finish, rather than the firm support you'd want in a collar or lapel. That distinction is explained clearly in this sewing demonstration on fusible web uses.
If your goal is structure, ask for interfacing. If your goal is bonding two layers together for appliqué or decorative work, ask for fusible web.
That one distinction prevents a lot of expensive mistakes.
How to Choose the Right Interfacing for Your Fabric
You are in a UK haberdashery with a length of brushed cotton in one hand and a packet of interfacing in the other. The label says lightweight, medium, or heavy, but that still does not tell you what will happen once it meets your fabric under the iron. That is the moment a simple matching system helps.
Heavy garments catch people out most often. A 2025 report showed that 74% of UK home dressmakers incorrectly purchase lightweight fusible web for heavy tailoring projects, leading to fabric distortion, largely because they were not given clear guidance matching UK fabric weights to suitable interfacing according to a 2025 report on dressmaking habits.
The golden rule
Match the support to the cloth.
In most cases, your interfacing should be the same weight as your fabric, or slightly lighter. That keeps the fabric behaving like itself, only with a bit more control. If the interfacing is much heavier, it can make a collar feel cardboard-like, pull a facing out of shape, or leave a ridge you can see from the right side.
A good way to judge it is to treat interfacing like the lining inside a good coat. It should support the outer fabric, not argue with it.
A practical UK matching system
Shops often sort interfacing by weight, but sewists usually shop by fabric. So it helps to flip the question round and start with the cloth you have in front of you. The guide below is designed for common UK dressmaking fabrics, including the sort of deadstock pieces that turn up at markets and online remnants sales.
UK Fabric and Fusible Interfacing Matching Guide
| Fabric Type & Weight | Project Example | Recommended Interfacing Weight | Recommended Interfacing Type |
|---|---|---|---|
| Cotton lawn, voile, fine shirting | Blouse collar, cuff, button band | Lightweight | Light woven fusible |
| Poplin, chambray, standard quilting cotton | Shirt collar, placket, dress facing | Lightweight to medium | Woven or medium non-woven |
| Viscose challis, soft Tencel, fluid deadstock blouse fabrics | Facings, waistline support, pocket areas | Lightweight | Light woven fusible |
| Linen and linen blends | Shirt collar, dress facing, waistband | Medium | Medium woven fusible |
| Stable jersey, ponte, sweatshirt knit | Neckline, zip area, button stand | Light to medium | Knit fusible |
| Denim for garments, cotton twill, drill | Skirt waistband, overshirt collar, jacket facing | Medium | Medium woven fusible |
| Suiting wool blends, heavier deadstock tailoring cloth | Lapels, fronts, structured facings | Medium to heavy | Woven tailoring fusible |
| Coating, heavy wool, firm canvas | Coat fronts, structured collars, bags | Heavy | Heavy woven or specialist tailoring fusible |
| Delicate or heat-sensitive fabrics | Soft support areas | Depends on fabric | Consider sew-in instead of fusible |
How to judge the final effect
Fabric type is only half the decision. You also need to ask what that part of the garment is meant to do.
A shirt collar needs to sit neatly and hold its edge after washing, so a woven fusible often gives a cleaner result than a general craft interfacing. A viscose neckline facing needs enough stability to stop stretching out, but still has to drape softly against the body. A waistcoat front or blazer lapel needs body and shape, so a tailoring interfacing is usually a better match than a basic lightweight option.
That is why two pieces cut from the same cloth can need different support. A soft dress bodice facing and a waistband may sit on the same garment, but they do different jobs.
Deadstock needs extra care
Deadstock can be brilliant value and full of character, but it often comes without reliable fibre labels or proper weight notes. One piece may look like a standard suiting and then react like a much softer cloth once steam hits it. Another may feel stable on the bolt but drop heavily when held up.
Use your hands before you use the iron. Scrunch a corner. Let it hang. Fold it over your arm. If it falls in soft ripples, choose a gentler interfacing. If it holds a crease and stands away from the body, it can usually carry a firmer one.
A mystery deadstock fabric should always be tested with at least two interfacing weights before you commit to the full project.
A quick shop checklist
- Match behaviour first. Soft fabric needs soft support.
- Choose by project area, not only by fabric name. A cuff, waistband, and facing may all need different levels of firmness.
- Use woven interfacing for tailoring and crisp detail where drape and grain matter.
- Use knit fusible for stretch fabrics so the fabric keeps its give.
- Treat deadstock like an unknown recipe. Test a small sample before making your final choice.
- Buy enough to sample properly. A 10cm test can save a whole metre of fabric.
Choosing gets much easier once you stop hunting for a single "best" interfacing and start matching weight, drape, and job. That is the habit that gives garments a more professional finish, especially with the mix of cottons, suiting, jersey, linen, and deadstock fabrics UK sewists use every day.
A Step-by-Step Guide to Perfect Application
You have cut a lovely Liberty lawn collar or a bit of deadstock suiting for a waistband, and the interfacing choice was right. Then the pressing goes wrong, and the finish looks bumpy or patchy. That usually comes down to method, not luck.
Before the iron touches anything
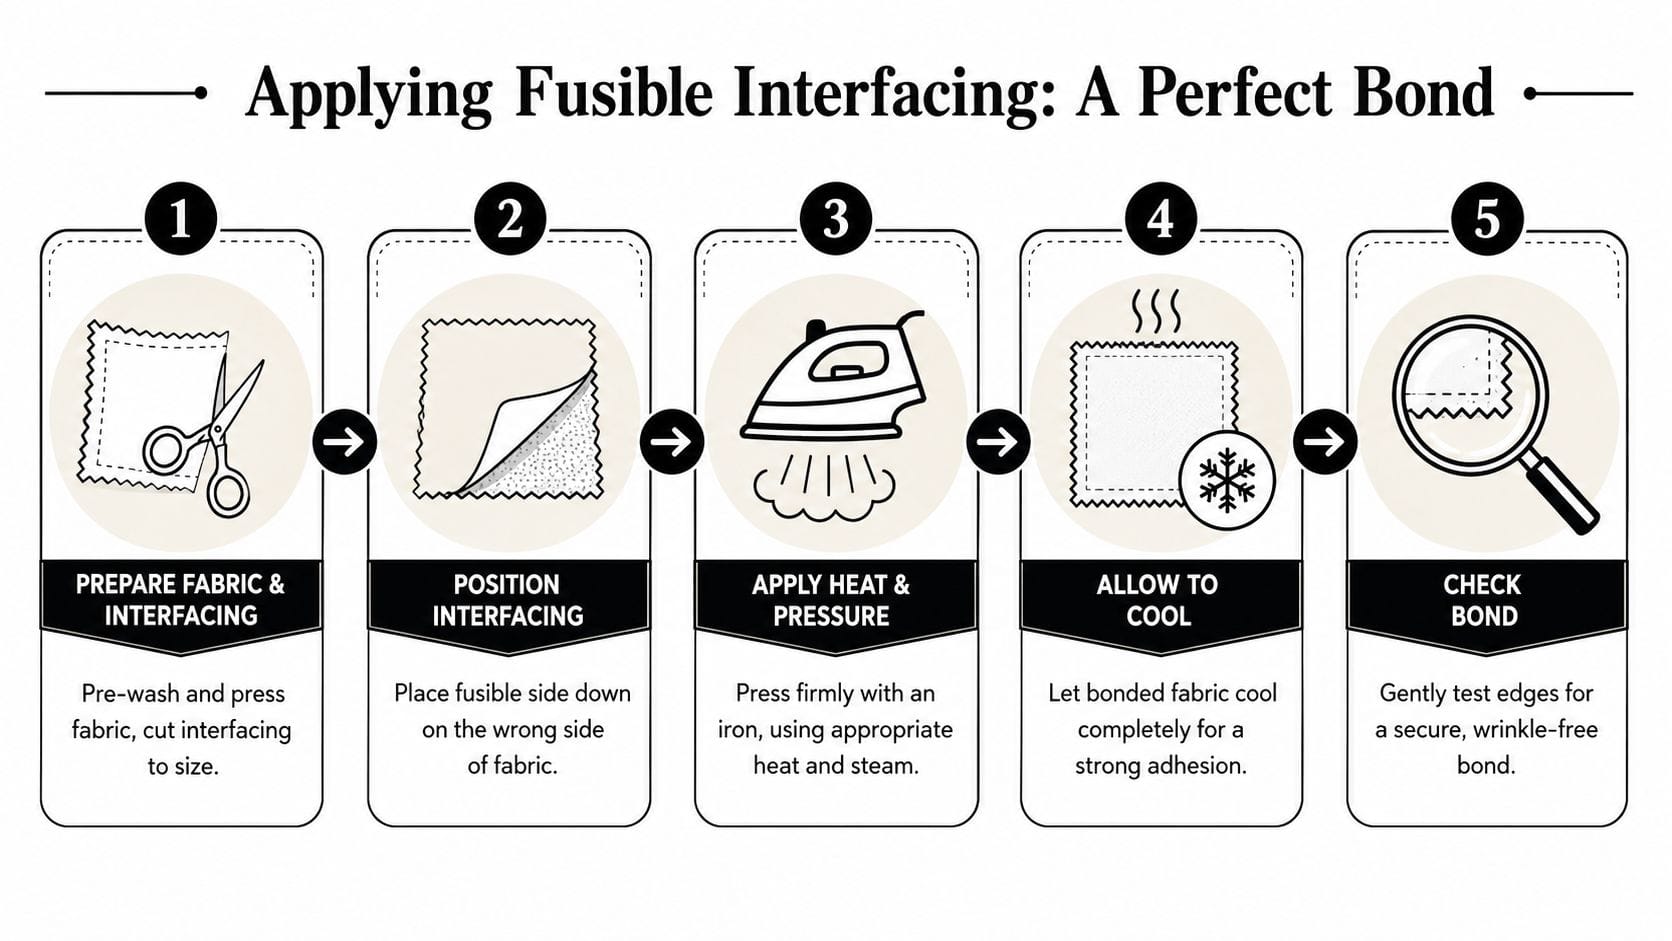
Start with flat fabric. A quick pre-press removes creases so you do not fuse wrinkles in place. Then cut the interfacing to match the pattern piece, or trim it just inside the seam allowance if you want to reduce bulk on areas like collars, cuffs, or facings.
Next, find the glue side. It is usually the rougher side with tiny adhesive dots. That side sits against the wrong side of your fabric.
Test on a scrap first. One small sample can save a whole placket, pocket flap, or coat front.
If you are using a standard medium-weight fusible, controlled heat, firm pressure, and a still iron matter more than speed. A commonly cited guide is 145 to 155°C, 2 to 3kg pressure, 15 to 18 seconds, using a static pressing motion rather than a sweeping one, as summarised in technical guidance for fusible interfacing.
The pressing method that gives an even bond
Pressing fusible interfacing works a bit like setting a sticker properly. If you rub it about before it has fixed, it shifts and creases. The iron needs to go straight down, stay still, then lift.
Use this order:
Lay the pieces in the right direction
Put the fabric wrong side up, then place the interfacing glue side down.Add a press cloth if needed
This is especially helpful for delicate cottons, wool blends, viscose, and mystery deadstock that may mark easily.Lower the iron straight down
Hold it in place without sliding.Lift and overlap the next area
Slight overlap helps you avoid little unfused gaps between presses.Leave it flat to cool
The adhesive settles as it cools, rather like glue setting after you clamp it.
Here's a helpful demonstration to watch alongside your first attempt.
Press cloth, steam, and heat control
A damp press cloth is a very practical habit in UK sewing rooms. It helps spread heat more evenly and protects both your fabric and your iron. A clean piece of cotton lawn or linen works well, as shown in this interfacing application demonstration.
Match the heat to the fabric you are working with. Medium and heavier fabrics often cope well with a wool setting. Lighter fabrics still need enough heat to melt the adhesive, but they benefit from more care, a press cloth, and a proper test first. You can often see when the bond is working. The glue dots stop looking raised and begin to sink into the fabric surface, as explained in Modeliste Creative's guide to getting the best results.
This matters especially with British fabric mixes. A crisp cotton poplin, a brushed deadstock twill, and a soft viscose blend may all need slightly different handling even if they take the same interfacing weight.
Small habits that improve the result
- Use a firm surface. Even pressure is much easier on a solid ironing board or pressing table.
- Work in sections. Large facings and front pieces fuse more evenly if you move methodically across them.
- Keep your hands light. Let the heat and pressure do the job instead of pushing the iron around.
- Check the edges after cooling. If a corner has missed, re-press it flat instead of pulling at it.
- Label your successful tests. If you sew with UK deadstock often, this builds your own reference system for future makes.
A calm rhythm gives the best finish. Press, hold, lift, cool. That is the habit that makes homemade pieces feel much more like ready-to-wear, whether you are fusing a school shirt collar, a linen dress facing, or a structured jacket lapel.
Troubleshooting Common Fusible Interfacing Problems
You press a collar, let it cool, and then spot a bubble right near the point. Or the waistband looked perfect on the ironing board, but one edge starts lifting after the first wear. That is frustrating, but it is also very normal. Fusible interfacing is a bit like matching the right lining to the right coat. If the fabric, weight, heat, and pressure are not working together, the result tells you quite quickly.
The useful part is this. Most problems leave clues. Once you know how to read them, you can usually tell whether the issue came from bonding, weight choice, or handling.
Bubbling after pressing
Symptom
You see little bubbles or blisters between the fabric and interfacing.
Likely cause
The adhesive did not bond evenly. On UK fabrics, this often happens with textured cottons, brushed deadstock twills, or anything with a slightly uneven surface. The iron may have moved, the heat may have been a touch low, or the fabric may not have been lying perfectly flat.
What to do
Re-press the area using a lift-and-press motion rather than sliding the iron. Smooth the piece first, then hold the iron in place long enough for the glue to settle into the cloth. If the bubbling is slight, that second careful press is often enough.
Interfacing won't stick at the edges
Symptom
Corners or edges start lifting.
Likely cause
Edges cool faster and are easy to miss, especially on collars, facings, plackets, and pocket flaps. Sometimes the heat reached the middle well enough, but not the very edge.
What to do
Press the loose area again, overlapping slightly into the bonded section so the join stays even. Keep the edge flat and avoid dragging the iron towards it. For fabrics that fray or curl easily, such as viscose blends or soft linen, a press cloth can help you apply firmer pressure without marking the surface.
The fabric feels too stiff
Symptom
Your blouse collar feels board-like, or a facing no longer hangs with the rest of the garment.
Likely cause
The interfacing is too heavy for the fabric, or the structure type is wrong. A simple matching system offers a solution. Lightweight British lawn, voile, and soft viscose usually suit a very light interfacing. Poplin, chambray, and many deadstock shirtings often take a light to medium one. Suiting, coating, and bag fabrics usually need something firmer.
What to do
For the next version, go down a weight or swap from non-woven to woven if the fabric needs to keep its drape. Test two scraps side by side if you can. One should support the fabric, not overpower it.
If the interfacing changes the personality of the fabric too much, it is the wrong match, even if the glue bond is fine.
A wrinkle got fused in
This catches out plenty of beginners because it looks permanent. Quite often, it is fixable.
If a fuse bond fails, the area can often be reheated so the glue softens again, allowing the interfacing to be peeled back carefully, smoothed, and pressed again, according to a technical summary from Vlieseline.
Use your fingertips to smooth the fabric gently before reapplying. Keep the cloth on grain and do not tug at it, especially with looser weaves or slippery deadstock blends. Then press again with steady heat and full contact.
Peeling after wear or washing
Symptom
The piece looked fine at first but starts separating later.
Likely cause
The initial bond was weak, or the interfacing was not a good partner for the fabric and the job it had to do. A lightweight fusible on a waistband, for example, may stick at first but struggle with repeated strain.
What to do
Match the interfacing to the stress of the project, not just the fabric weight. A shirt cuff, dress facing, tote bag top edge, and structured lapel all ask for different levels of support. If you sew often with British deadstock, keep a few labelled test swatches. They become your own reference library, which is far more useful than relying on the packet alone.
A simple fault-finding list
- Bubbles usually mean uneven heat, movement, or a fabric surface the glue has not fully settled into.
- Peeling usually means weak bonding or the wrong interfacing for the job.
- Stiffness usually means the weight match is off.
- Shine or scorching usually means too much heat or no press cloth.
- Wrinkles trapped underneath usually mean the fabric was not fully smoothed before pressing.
Mistakes here do not mean you are bad at sewing. They mean you are learning a material that behaves a little like a quiet workshop assistant. Treat it well, pair it sensibly with your fabric, and it does its job beautifully in the background.
Where to Buy Fusible Interfacing in the UK and Final Tips
Buying fusible interfacing in the UK is easier when you shop somewhere that also understands fabric. That matters because interfacing isn't a stand-alone purchase. It only makes sense in relation to the cloth you're using and the finish you want.
For many home dressmakers, fashion students, and small makers, it helps to buy from a UK supplier that stocks both fabrics and haberdashery in a curated way. That gives you a better chance of matching a cotton poplin to a sensible lightweight interfacing, or a deadstock suiting to a more suitable tailoring option, rather than grabbing something random from a giant mixed catalogue.
What to look for in a supplier
A thoughtful range
You want clear options, not endless confusion. Good stock selection makes choosing easier.Fabric samples or swatches
This is especially helpful for deadstock, viscose blends, suiting, and coatings, where handle matters just as much as appearance.Helpful customer service
If you can ask, “What would you pair with this for a waistband?” you're less likely to buy the wrong thing.Fast UK delivery
Sewing momentum matters. Waiting too long often means projects stall.Local support if you're nearby
A Worthing shop is useful for anyone who wants to see fabrics in person or combine fabric shopping with machine servicing and repairs.
Final tips worth keeping beside the ironing board
Keep these in mind every time
- Match weight sensibly. Same as the fabric, or slightly lighter, is the safest starting point.
- Choose by behaviour. Crisp, soft, stretchy, structured. Those words matter more than product packaging.
- Test on scraps. Especially with deadstock and unfamiliar fibres.
- Press, don't glide. Fusible interfacing responds far better to still pressure than sweeping movement.
- Let it cool. A bond needs time to settle before you judge it.
The best interfacing is the one nobody notices in the finished garment, because the collar sits well, the facing lies flat, and the fabric still feels like itself.
Once you've sewn a few projects with the right support in the right places, you'll start reaching for interfacing with much more confidence. It stops feeling mysterious and starts feeling as ordinary and useful as matching your needle to your fabric.
If you're ready to try the right Fusible Interfacing UK options with dressmaking fabrics, deadstock, and practical haberdashery in one place, have a look at More Sewing. They offer a carefully chosen range for home sewists, fashion students, and independent makers, plus fabric sample swatches, fast UK delivery, and a Worthing shop for local customers who like in-person help.
