Dressmaking
Master Hemming Stretchy Fabric: No More Wavy Hems
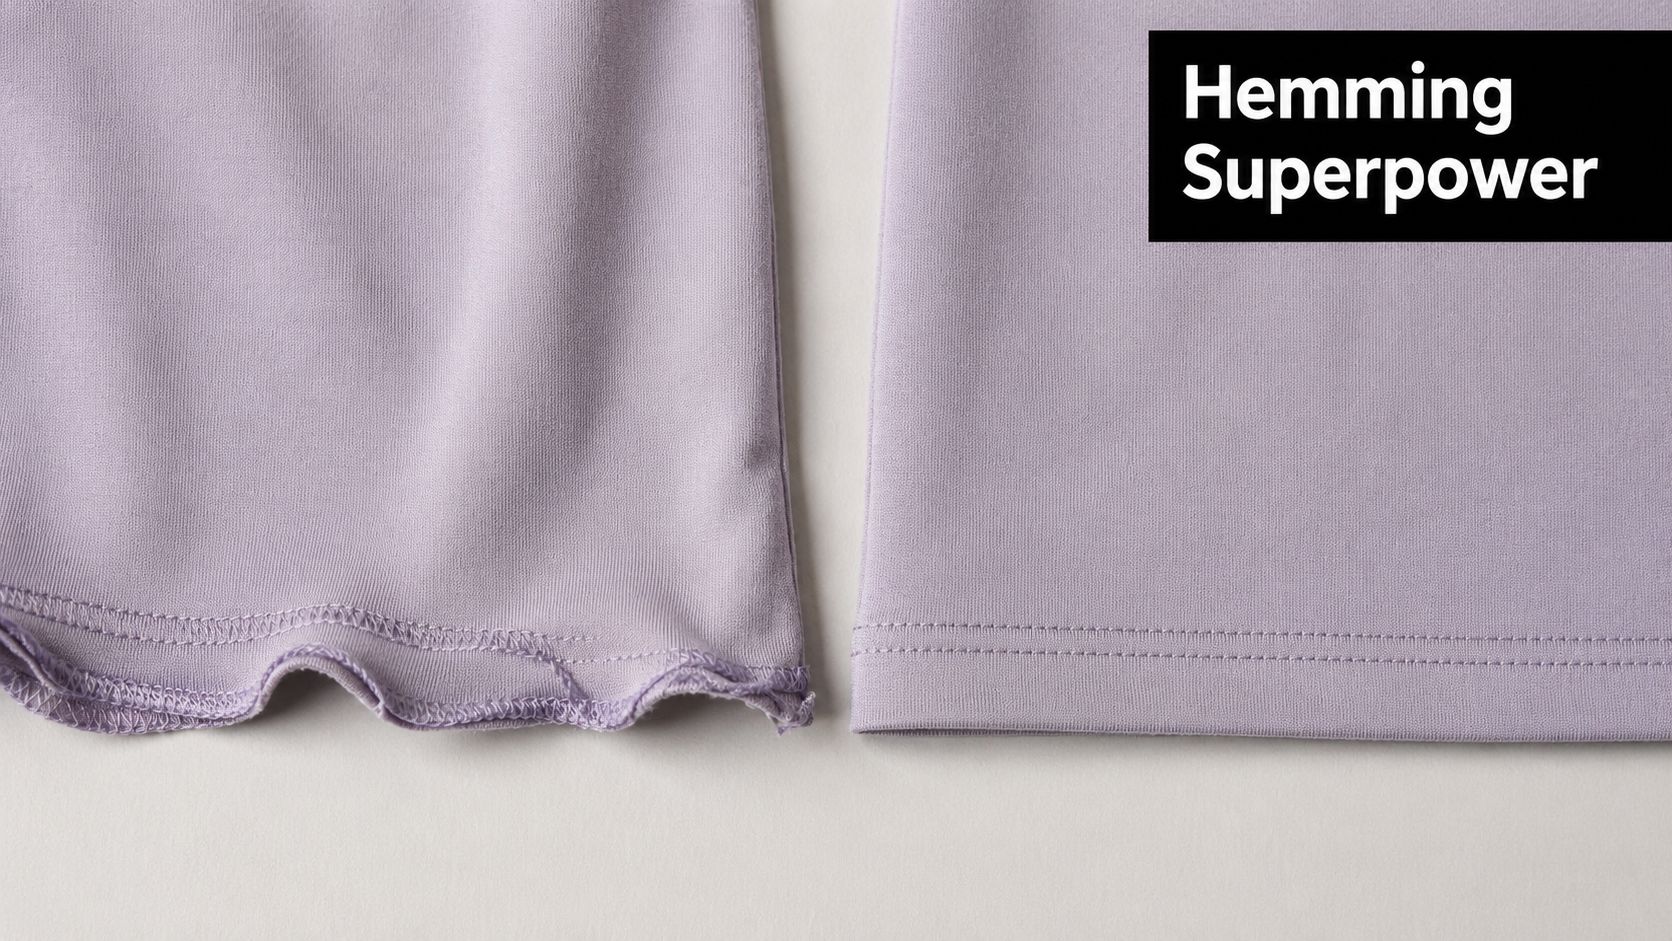
You've sewn the neckband neatly. The side seams sit flat. The fit is exactly what you hoped for. Then the last job, the hem, goes through the machine and comes out looking like lettuce when you didn't want lettuce at all. That moment puts plenty of sewists off knits for far too long.
The good news is that hemming stretchy fabric isn't a mysterious talent. It's a matching exercise. Match the fabric to the right needle, the right stabiliser, the right stitch, and the right amount of handling, and the result changes completely. A soft T-shirt jersey, a bouncy Ponte Roma, and a slippery activewear knit do not want to be hemmed in the same way.
That fabric-first mindset is what makes stretch hems much less frustrating. Instead of asking, “Which stitch should I use?” start with, “What kind of knit am I dealing with, and what usually goes wrong with it?” That one shift prevents a lot of wavy edges before they happen.
Why Mastering Stretch Hems Is Your Sewing Superpower
A stretch hem can ruin a lovely garment right at the finish line. Most dressmakers who sew knits have had that moment where a fresh jersey top goes from handmade and polished to homemade-looking in one pass under the presser foot. Usually the issue isn't the whole project. It's that the hem was asked to stretch, recover, and sit flat, and a standard woven-fabric approach could not do all three.
That's why this skill matters so much now. Between 2010 and 2020, around 45–50% of the garments bought by UK adults were knitted or stretch-rich items, and surveys indicate that 60–70% of UK hobby sewists now regularly work with jersey and other stretch knits. Stretch hemming isn't a niche trick anymore. It's one of the core finishing skills in modern dressmaking.
The hem is often the real learning curve
Knits can be surprisingly forgiving through most of the construction. Side seams can be sewn with a stretch stitch. Neckbands can be re-done. Even slightly uneven topstitching can disappear into a busy print. Hems are less forgiving because they sit right in view, often across the widest and drapiest part of the garment.
Practical rule: If a knit hem looks poor, the problem usually started before the stitching line. The wrong fold, no pressing, no stabilising, or too much handling often causes the wobble.
Many beginners assume they're “bad at jersey” when the actual issue is much narrower than that. They only need a better hemming method. Once that clicks, more projects open up. T-shirt dresses, lounge tops, children's leggings, knit skirts, fine viscose tees. They all become far less intimidating.
Confidence comes from repeatable methods
The aim isn't perfection on every first attempt. The aim is knowing what to change when a hem goes wrong. A stable cotton jersey will tolerate one method. A slinky viscose blend will need another. Activewear will ask for something else again.
That's sewing superpower territory. Not because it's flashy, but because it gives you control at the exact stage where many sewists lose confidence.
Your Essential Toolkit for Flawless Knit Hems
The cleanest knit hems usually start before the machine is even threaded. If the fabric is rolling, stretching, or bouncing around while you fold it, the stitching will only lock that distortion in place. Good tools don't just make the job easier. They prevent the most common failures.
Start with the non-negotiables
A ballpoint or stretch needle belongs at the top of the list. A universal needle can work on some stable knits, but it's often the first culprit when stitches skip or the fabric snags. Stretch fabrics need a needle that moves through the knit structure cleanly rather than fighting it.
Thread matters too. A good polyester thread is the reliable all-rounder for hems because it has more give than all-cotton thread and behaves better when the garment is pulled on and off. If a hem needs to flex, the thread has to cooperate.
Then there's the fold itself. For knits that don't fray, a single 1.5–2 cm fold-up is recommended over a double-fold. Press the raw edge up once and secure it with a stretch stitch. That avoids the extra bulk that can stretch and distort the hem, especially on softer fabrics, as noted in this guide to hemming stretch knits.
Your stabilisers are insurance
If you've resisted stabilisers because they sound fussy, this is the moment to change your mind. A stabiliser gives the machine something calmer to sew through.
Useful options include:
- Fusible knit tape or lightweight interfacing strips. Good when the hem edge wants to ripple or collapse.
- Wash-away tape. Helpful when you want temporary control without adding long-term bulk.
- Clear elastic. Useful when a hem needs help recovering its shape, especially on very stretchy knits.
Each has a different feel, but the job is the same. They stop the hem edge from stretching out while you stitch it.
A stabiliser isn't admitting defeat. It's using a support layer so the fabric behaves long enough for you to finish it well.
Pressing is part of the sewing
A lot of disappointing knit hems were never properly pressed before they were sewn. Pressing the fold in place gives you a visible, stable line to follow and reduces the amount of finger-tugging that stretches the edge. Use a press cloth if the fabric is delicate or shiny.
Clips can help more than pins on some knits, especially bulky ones, because pins can distort the fold as you place them. On fine jerseys, though, a few fine pins placed carefully can still be useful. Let the fabric decide.
A quick visual refresher helps if you want to see the setup in action before you test your own hem:
A simple prep routine that saves trouble
Before stitching, do these in order:
- Test the needle first. If the machine skips on scrap, change the needle before touching the garment.
- Press the hem allowance once. A clean single fold is usually better for knit hems than a bulky double turn.
- Add stabiliser if the fabric feels floppy. Lightweight jersey often benefits immediately.
- Check the machine feed. Don't pull from the front or back. Let the feed dogs do the work.
That short routine solves a surprising amount. Most won't say their hemming improved because of “discipline”, but that's often exactly what happened.
A Master Guide to Stretch-Friendly Stitches
You finish a knit hem, try the garment on, and hear stitches pop the first time it stretches over the hips or shoulders. That usually is not a sewing skill problem. It is a stitch-choice problem.
On knit hems, the stitch has to suit the fabric first, then the look you want. A soft viscose jersey often behaves better with a forgiving stitch that can flex and recover. A firmer T-shirt jersey can usually carry a more polished twin-needle finish. That fabric-first mindset saves a lot of disappointment.
The quickest comparison
| Stitch Type | Best For | Appearance | Pros | Cons |
|---|---|---|---|---|
| Narrow zigzag | Everyday jersey, soft tops, children's wear | Subtle visible zigzag | Stretchy, forgiving, works on most machines | Less like ready-to-wear topstitching |
| Twin needle | Mid- to light-weight jersey, T-shirts, knit dresses | Two parallel straight lines on right side | Professional-looking finish on a domestic machine | Can tunnel or skip if setup is off |
| Lightning or built-in stretch stitch | Areas needing flexibility, practical knit hems | Narrow utility stitch | Very stretchy and secure | Slower to sew, less decorative |
| Coverstitch | Frequent knit sewing, sporty or commercial-looking garments | Ready-to-wear hem finish | Excellent stretch and clean finish | Needs a separate machine or setup |
Narrow zigzag for the broadest range
If a reader asks me for the safest first knit hem on a standard machine, I point them to a narrow zigzag. It gives the thread enough movement to stretch with the fabric, and it is far more forgiving than a straight stitch on a lively knit.
For hemming stretchy knits on a domestic machine, a practical starting point is about 2 mm width and 2.5 mm length, as shown in this practical zigzag hem guide. That setting works well on medium jerseys, children's clothes, lounge pieces, and casual tops where comfort matters more than a shop-style finish.
If the hem looks heavy, reduce the width slightly. If it feels tight when you stretch it, increase the length a touch and test again on scrap. Small changes matter on knits.
Twin needle for a classic T-shirt finish
Twin needle hemming gives that familiar double row of topstitching on the right side, which is why many sewists reach for it on T-shirts and simple knit dresses. On the underside, the bobbin thread zigzags between the two needle lines and provides the stretch.
A good starting setup for many mid-weight jerseys is a straight stitch around 2.5 to 3 mm with a twin needle width that suits the fabric. Stable jersey often handles a wider spacing nicely. Fine or drapey knits usually look better with a lighter hand and careful testing first.
Twin needles are less forgiving than a zigzag, so the setup has to match the cloth. Tunnelling, skipped stitches, and ridging usually come from one of four causes:
- Needle spacing that does not suit the fabric weight
- Top tension that is too tight
- No stabilisation at the fold
- A needle type the knit does not like
If a twin needle hem rises into a ridge between the rows, check the setup before blaming your machine. On many domestic machines, easing the top tension slightly and supporting the hem fold with wash-away stabiliser, tissue, or a knit tape is enough to flatten the result.
I use twin needles most on hems where the visible finish is part of the garment, such as a classic crew-neck tee, a knit dress in stable jersey, or a cardigan in a fine but cooperative knit. On very soft viscose jersey, I test first and stay ready to switch to a zigzag if the fabric starts fighting back.
Lightning stitch for function first
The lightning stitch is a useful option on machines that have it, especially for garments that need plenty of give. It is narrow, flexible, and often sits flatter than a regular zigzag on some synthetic knits.
It does not give the same look as twin-needle topstitching.
It does give a durable hem on pyjama bottoms, base layers, casual tops, and any knit where comfort and stretch matter more than appearance from six inches away. For very springy fabrics, that trade-off is often the right one.
Coverstitch for frequent knit sewing
A coverstitch machine produces the finish many people associate with ready-to-wear knit hems. It handles recovery well, looks clean, and speeds up repeat sewing if knits are a regular part of your work.
You do not need one to sew knit hems well. A domestic machine with the right stitch, tested on the actual fabric, can turn out excellent results. I have seen more failed hems from rushing into the wrong stitch than from lacking expensive equipment.
How I'd choose by project
Use the project and the fabric together to decide:
- Soft everyday jersey top. Narrow zigzag first. Twin needle only if the fabric feels stable enough.
- T-shirt in medium cotton jersey. Twin needle for a clean ready-to-wear look.
- Lightweight drapey dress knit. Gentle zigzag is often the calmer choice.
- Children's knitwear. Zigzag usually wins for flexibility and speed.
- Sportswear or frequent knit sewing. Coverstitch if you own one.
- Very stretchy hem that keeps popping. Lightning stitch or a slightly longer, flexible zigzag.
The best stitch is the one that suits that exact knit and still looks good after the garment is worn, washed, and pulled on in real life.
Fabric-Specific Techniques for Professional Results
You finish a hem that looked tidy under the machine, then lift the garment and the edge ripples, flips, or stretches out. In my experience, that usually starts with treating all knits the same.
A fabric-first approach works better. Jersey, ponte, French terry, and activewear each ask for a different hem recipe, and choosing that recipe early prevents a lot of disappointment later.
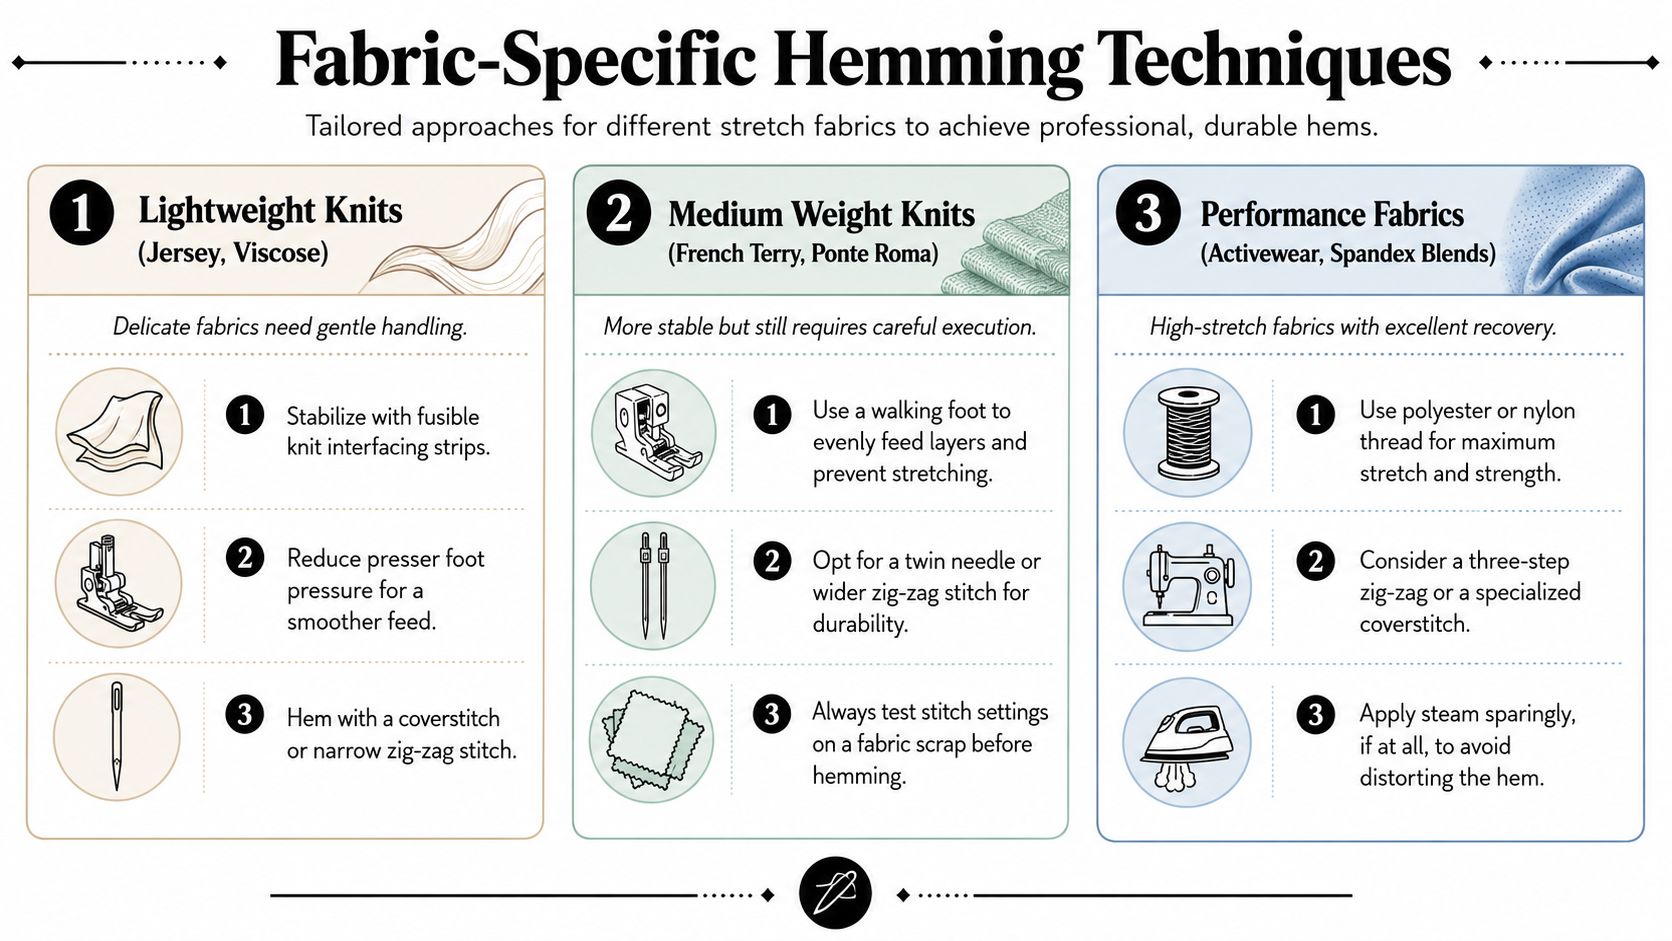
Lightweight jerseys and viscose blends
These are the knits that punish heavy handling. They curl at the cut edge, grow under the presser foot, and show every press mark if the iron is too hot. If a hem is going to wave, this fabric group is usually where it happens.
For fine jersey and viscose-rich blends, a slight zigzag often behaves better than a straight stitch because it gives the hem room to stretch and recover. A walking foot can help the layers feed more evenly, especially on soft, slippery knits. Textile specialist Claire Shaeffer notes that knit hems benefit from stitches that retain elasticity rather than rigid straight stitching in high-stress areas, a principle she discusses in Sew Any Fabric (https://books.google.com/books?id=QH2yDwAAQBAJ).
My usual setup for this fabric family looks like this:
- Needle. Stretch or fine ballpoint needle
- Stitch. Slight zigzag, or a twin needle only after testing on a pressed sample
- Stabiliser. Lightweight knit tape, washable hem tape, or a narrow strip of fusible tricot
- Handling tip. Keep the whole hem supported on the table and let the feed dogs do the work
If I am sewing a drapey viscose jersey top, I decide the hem method before cutting out. That sounds fussy, but it saves time. Some knits need the hem allowance narrowed, stabilised, or even left to drop before hemming, and it is easier to plan that at the start than rescue a stretched edge later.
Lightweight knits respond best to calm handling and a flexible stitch.
Medium-weight knits such as Ponte Roma and French terry
These fabrics are friendlier. They hold a fold, feed more evenly, and usually tolerate a twin needle well, which is why I often suggest them for a first knit project.
The trade-off is bulk. Ponte can become thick at side seams, and French terry can feel spongy if the hem is deep. Grade seam allowances where they cross the hem, and do not be afraid to trim one layer if the area feels lumpy.
Good options here include:
- Twin needle for a ready-to-wear look on stable ponte or sweatshirt knits
- Narrow zigzag for children's clothes, lounge pieces, or any project where reliability matters more than appearance
- Walking foot if the fabric has loft or the layers shift against each other
This is the group where you can often choose for looks as much as function. A neat twin-needle hem on ponte trousers looks polished. A zigzag on French terry shorts may be the smarter choice if the garment will be pulled on hard and washed often.
High-stretch activewear and performance knits
Activewear needs a hem that survives real strain. These fabrics spring back hard, can be slippery to sew, and may not forgive much heat.
I treat them as a performance fabric, not just another knit. That means testing stretch recovery on the sample, using polyester thread, and being cautious with twin needles unless the fabric proves it can handle one. A three-step zigzag or other flexible stretch stitch is often the safer answer for leggings, gym tops, and swim cover-ups.
A reliable activewear setup is simple:
- Use a stretch needle and polyester thread
- Stabilise lightly, only if the edge needs control
- Sew a sample and stretch it firmly by hand
- Press carefully, with low heat and a pressing cloth if needed
The prettiest hem is not always the one that lasts. On performance knits, I would rather see a slightly more visible stitch than have the hem pop the first time the garment is pulled on.
The lettuce hem when the ripple is intentional
Sometimes a wavy edge is the right finish. A lettuce hem suits very stretchy, lightweight knits and works well on sleeve edges, dancewear, children's clothes, and fitted tops that want a softer, playful finish.
The method depends on stretch and recovery. Sew near the edge with a suitable stitch while gently stretching the fabric, then let it relax so the ripple forms. Stable knits rarely give a clean lettuce edge, and thicker knits tend to look heavy, so this is one technique where fabric choice matters more than machine settings.
One habit that improves every fabric type
Make a hem sample from the actual garment fabric. Use the same layers. Include a seam crossing if the finished hem will have one.
Then press it, stitch it, and stretch it as the garment will be worn.
That little sample tells you more than guesswork ever will. It shows whether the hem tunnels, waves, feels bulky, or recovers properly, before you sew anything visible.
Troubleshooting the Most Common Hemming Headaches
A bad hem usually leaves clues. The trick is reading them correctly. If the edge waves, skips, tunnels, or pops, the machine isn't being “temperamental”. It's reacting to a mismatch between fabric, setup, and handling.
Wavy hem symptoms and the usual culprits
A wavy hem looks stretched out, fluted, or longer at the edge than it was before sewing. This happens most often when the fabric has been pulled during stitching, fed unevenly, or sewn without enough support.
Common culprits include:
- No stabiliser on a soft knit
- Too much presser foot pressure
- A straight stitch on a fabric that needs flexibility
- Sewing the hem while the garment hangs off the table
- Skipping the pressing stage
The cure is usually mechanical, not magical. Support the fabric, press the fold first, and use a stitch with some give. If the knit is especially soft, stabilise before trying again.
Skipped stitches nearly always point somewhere specific
When a hem skips, people often start adjusting random dials. Usually the better first move is much simpler. Change the needle.
Knits are far less tolerant of a slightly wrong, slightly worn, or slightly blunt needle than many woven fabrics are. If you're getting intermittent gaps in the stitching line, put in a fresh ballpoint or stretch needle before doing anything else. Then test on scrap with the exact layers from the garment.
A skipped stitch is often a needle problem wearing a tension-problem disguise.
Also look at the fabric itself. High-elastane knits can be fussier than ordinary jersey. A setup that behaved well on a lounge top may not behave the same way on activewear.
Tunnelling with twin needles has a direct fix
Tunnelling is the ridge that forms between the two rows of twin-needle stitching. It can make a hem look pinched and homemade even when the stitching itself is straight.
One practical fix is to stabilise the hem edge with wash-away tape at the foldline before stitching. Place the tape along the hemline, stitch over it, then wash the garment so the tape dissolves, leaving a smoother hem, as demonstrated in this wash-away tape hemming technique.
Other likely causes include tight top tension and a needle spacing that doesn't suit the fabric. If the hem tunnels, don't just sew more slowly. Change the setup.
Popped seams and hems that crack when worn
If the hem looks fine flat on the table but the stitches snap when the garment is worn, the hem didn't have enough stretch built into it. This often happens with straight stitching or with very short zigzag settings that behave almost like a straight line.
The solution is to prioritise elasticity over appearance on that fabric. Use a more flexible stitch and test by stretching the sample firmly by hand. If the sample can't survive that test, the garment hem won't either.
A simple troubleshooting order
When something goes wrong, work through it in this order instead of changing five things at once:
- Needle
- Stabiliser
- Stitch choice
- Tension
- Handling and support
That order saves time because it starts with the most common causes. Most stretch-hem problems can be fixed with one or two targeted changes rather than a full reset.
The Final Press and Caring for Your Finished Garment
A knit hem often looks better after the final press than it did straight off the machine. The stitches settle into the fabric, minor ripples relax, and the hem starts to look intentional rather than freshly handled. Use a press cloth where needed, and don't flatten the fabric with aggressive ironing. Lift and press instead.
Care matters too. Let the hem cool after pressing before moving the garment around. When washing, treat fine knits gently and avoid rough handling that can distort the edge while it's wet. Reshape the hem after laundering if the fabric is especially drapey.
The real secret is testing, not luck
A good stretch hem comes from small decisions made in the right order. Match the method to the fabric, sew a test scrap, and judge the sample by how it looks and how it stretches. That's the part many sewists skip, and it's often the part that would have saved the garment.
If your last knit hem went wavy, don't write off jersey. Try a different recipe on the next project. Use the softer zigzag on a drapey knit, the twin needle on a stable T-shirt jersey, or extra stabilising where the fabric needs support. Hemming stretchy fabric gets much easier once you stop expecting one method to suit every knit.
If you're planning your next knit project, More Sewing is a useful place to find jersey, viscose and Tencel blends, haberdashery, needles, and dressmaking supplies that make hemming stretchy fabric far less hit-and-miss. It's also a good option if you want fabric swatches before committing, or if your sewing machine could do with servicing before you tackle another run of knit hems.